In the digital age, where visual communication reigns supreme, the choice of typeface can dramatically influence how your message is perceived. From crafting compelling marketing materials and designing personal websites to preparing professional presentations and simply adding a touch of personality to your documents, custom fonts are an indispensable tool for creativity and productivity. Windows, being the world’s most widely used operating system, offers flexible and straightforward methods to install new fonts, empowering users to move beyond the standard collection and unlock a vast universe of typographic expression.
This comprehensive guide will walk you through everything you need to know about installing fonts on your Windows PC, from understanding different font types and finding reputable sources to step-by-step installation instructions using various methods, along with crucial advice on managing and troubleshooting your font collection. Whether you’re a graphic designer, a content creator, a business professional, or simply someone looking to personalize their computing experience, mastering font installation is a fundamental skill that will enhance your digital workflow.

Why Custom Fonts Matter: Unleashing Creativity and Productivity
Before diving into the “how-to,” it’s worth exploring the profound impact custom fonts can have on your digital life. Beyond mere aesthetics, typography plays a critical role in conveying mood, establishing brand identity, and improving readability.
Elevating Design and Personalization
The default fonts provided with Windows (like Arial, Calibri, or Times New Roman) are functional but often lack distinct character. Custom fonts allow you to:
- Forge a Unique Brand Identity: For businesses and personal brands, a distinctive font is as important as a logo. It communicates professionalism, creativity, or a specific niche, making your brand instantly recognizable and memorable across all your digital and print assets.
- Enhance Creative Projects: Whether you’re designing invitations, social media graphics, video titles, or digital artwork, custom fonts provide the visual flair needed to make your creations stand out. They allow you to match the typography to the theme and mood of your project, creating a more cohesive and impactful result.
- Personalize Your Digital Space: Beyond professional work, custom fonts can simply make your personal computing experience more enjoyable. Use them in word processors, presentation software, and even some operating system elements to reflect your personal style.
Enhancing Readability and Impact
While aesthetics are important, functionality is paramount. The right font can significantly improve the readability of your content and the impact of your message:
- Improved User Experience: For long-form content, choosing a font that is clear, well-spaced, and easy on the eyes can reduce reader fatigue and encourage engagement. This is particularly crucial for web designers and content strategists.
- Highlighting Key Information: Different font weights, styles, and families can be used strategically to emphasize headings, quotes, or important data, guiding the reader’s eye and improving comprehension.
- Professionalism and Credibility: In business documents, reports, and presentations, an appropriate and well-chosen font conveys professionalism and attention to detail. It helps establish credibility and ensures your message is taken seriously. A consistent typographic style across all your communications reinforces your professional image.
Staying Current with Design Trends
The world of typography is dynamic, with new fonts and design trends emerging constantly. By knowing how to install custom fonts, you can keep your design toolkit fresh and relevant. This is particularly valuable for designers and marketers who need to adapt quickly to changing aesthetic preferences and maintain a contemporary look for their projects. Staying updated allows you to experiment with modern sans-serifs, elegant serifs, whimsical display fonts, or unique handwritten styles that resonate with current design movements.
Preparing for Installation: Understanding Font Types and Sources
Before you click “install,” it’s helpful to understand the different types of font files you’ll encounter and where to find them reliably.
Common Font File Formats
Windows supports several font formats, but the most common ones you’ll encounter are:
- TrueType Font (TTF): Developed by Apple and Microsoft, TTF is one of the oldest and most widely supported font formats. It contains both screen and printer font data in a single file, making it very versatile. Most free fonts you download will be in TTF format.
- OpenType Font (OTF): A more advanced format co-developed by Microsoft and Adobe, OTF builds upon TTF. It offers more sophisticated typographic features, such as ligatures, stylistic alternates, small caps, and old-style figures, making it a favorite among professional designers. OTF files often provide better support for extended character sets and can handle larger font families.
- TrueType Collection (TTC): Less common, TTC files combine multiple TrueType fonts into a single file, typically used for fonts that share many glyphs to save space.
- Web Open Font Format (WOFF/WOFF2): These are specifically optimized for web use and are generally not installed on your operating system directly but are rather served by websites. You won’t typically install these system-wide.
- Zipped Files (.zip): Many font downloads come compressed in a
.ziparchive. You’ll need to extract the font files (.ttf or .otf) from the zip folder before you can install them. Right-click the.zipfile and select “Extract All” to unpack its contents.
Where to Find Quality Fonts
The internet is teeming with fonts, both free and paid. It’s crucial to download from reputable sources to avoid corrupted files or malware, and to respect licensing agreements.
- Free Font Resources:
- Google Fonts: An excellent library of open-source fonts, all free for personal and commercial use. It’s well-organized, easy to browse, and highly reliable. Many web designers start here.
- DaFont: A massive archive of free downloadable fonts, categorized by theme. While a great resource, always check the license for each font, as many are “free for personal use” but require a commercial license for business applications.
- Font Squirrel: Offers a curated collection of high-quality, 100% free commercial fonts. They often provide helpful tools like a font identifier.
- Creative Market / Behance / Dribbble (Freebies sections): Many designers offer free fonts as promotions or portfolio pieces. Always check the licensing carefully.
- Paid Font Resources:
- Adobe Fonts (Included with Creative Cloud subscription): A vast library of high-quality fonts from renowned foundries, all cleared for commercial use. It integrates seamlessly with Adobe applications.
- MyFonts / Fontspring / Typekit: These platforms offer professional-grade fonts from individual designers and major foundries. Prices vary, but you’re paying for quality, extensive character sets, and clear commercial licensing.
- Independent Type Foundries: Many smaller foundries and individual type designers sell their unique creations directly. This is a great way to find truly distinctive fonts and support independent artists.
A Note on Licensing: Always review the license agreement for any font you download. “Free” doesn’t always mean “free for commercial use.” Using a font without the proper license can lead to legal issues for businesses and professionals.
Step-by-Step: Multiple Methods to Install Fonts on Windows
Windows offers several intuitive ways to install new fonts. The method you choose might depend on how many fonts you’re installing and your personal preference.
Method 1: The Quick Right-Click Installation (Recommended for Single Fonts)
This is the fastest and most common method for installing one or a few fonts.
- Locate Your Font File(s): After downloading and extracting (if it was a
.zipfile), navigate to the folder where your.ttfor.otffont files are located using File Explorer. - Select the Font: Find the individual font file you wish to install. If it’s a family with multiple weights (e.g., “MyFont-Regular.ttf,” “MyFont-Bold.ttf”), you can select them all by holding
Ctrland clicking each one. - Right-Click and Install: Right-click on the selected font file(s). From the context menu, choose “Install”.
- Install for All Users (Optional): If you’re using a computer with multiple user accounts and want the font to be available to everyone, select “Install for all users” instead. This typically requires administrator privileges.
- Confirmation: Windows will quickly install the font. If the font is already installed, you’ll be prompted to replace it. Once complete, the font should be available in most applications (Word, Photoshop, etc.). You might need to restart the application or even your computer for the font to appear.
Method 2: Drag-and-Drop to the Fonts Folder (Ideal for Small Batches)
This method provides a visual way to manage your fonts directly within the system’s font directory.
- Open the Fonts Folder: Press
Win + Rto open the Run dialog, typefontsand pressEnter. Alternatively, navigate toC:WindowsFontsin File Explorer. This will open the special Fonts folder, which displays all currently installed fonts. - Locate Your New Font Files: In a separate File Explorer window, open the folder containing your downloaded and extracted
.ttfor.otffont files. - Drag and Drop: Select all the font files you wish to install from your download folder and drag them directly into the
C:WindowsFontswindow. - Installation: Windows will automatically begin installing the fonts. You might see a progress bar for each font. Similar to Method 1, you’ll be prompted if a font is already installed, and you might need to restart applications.
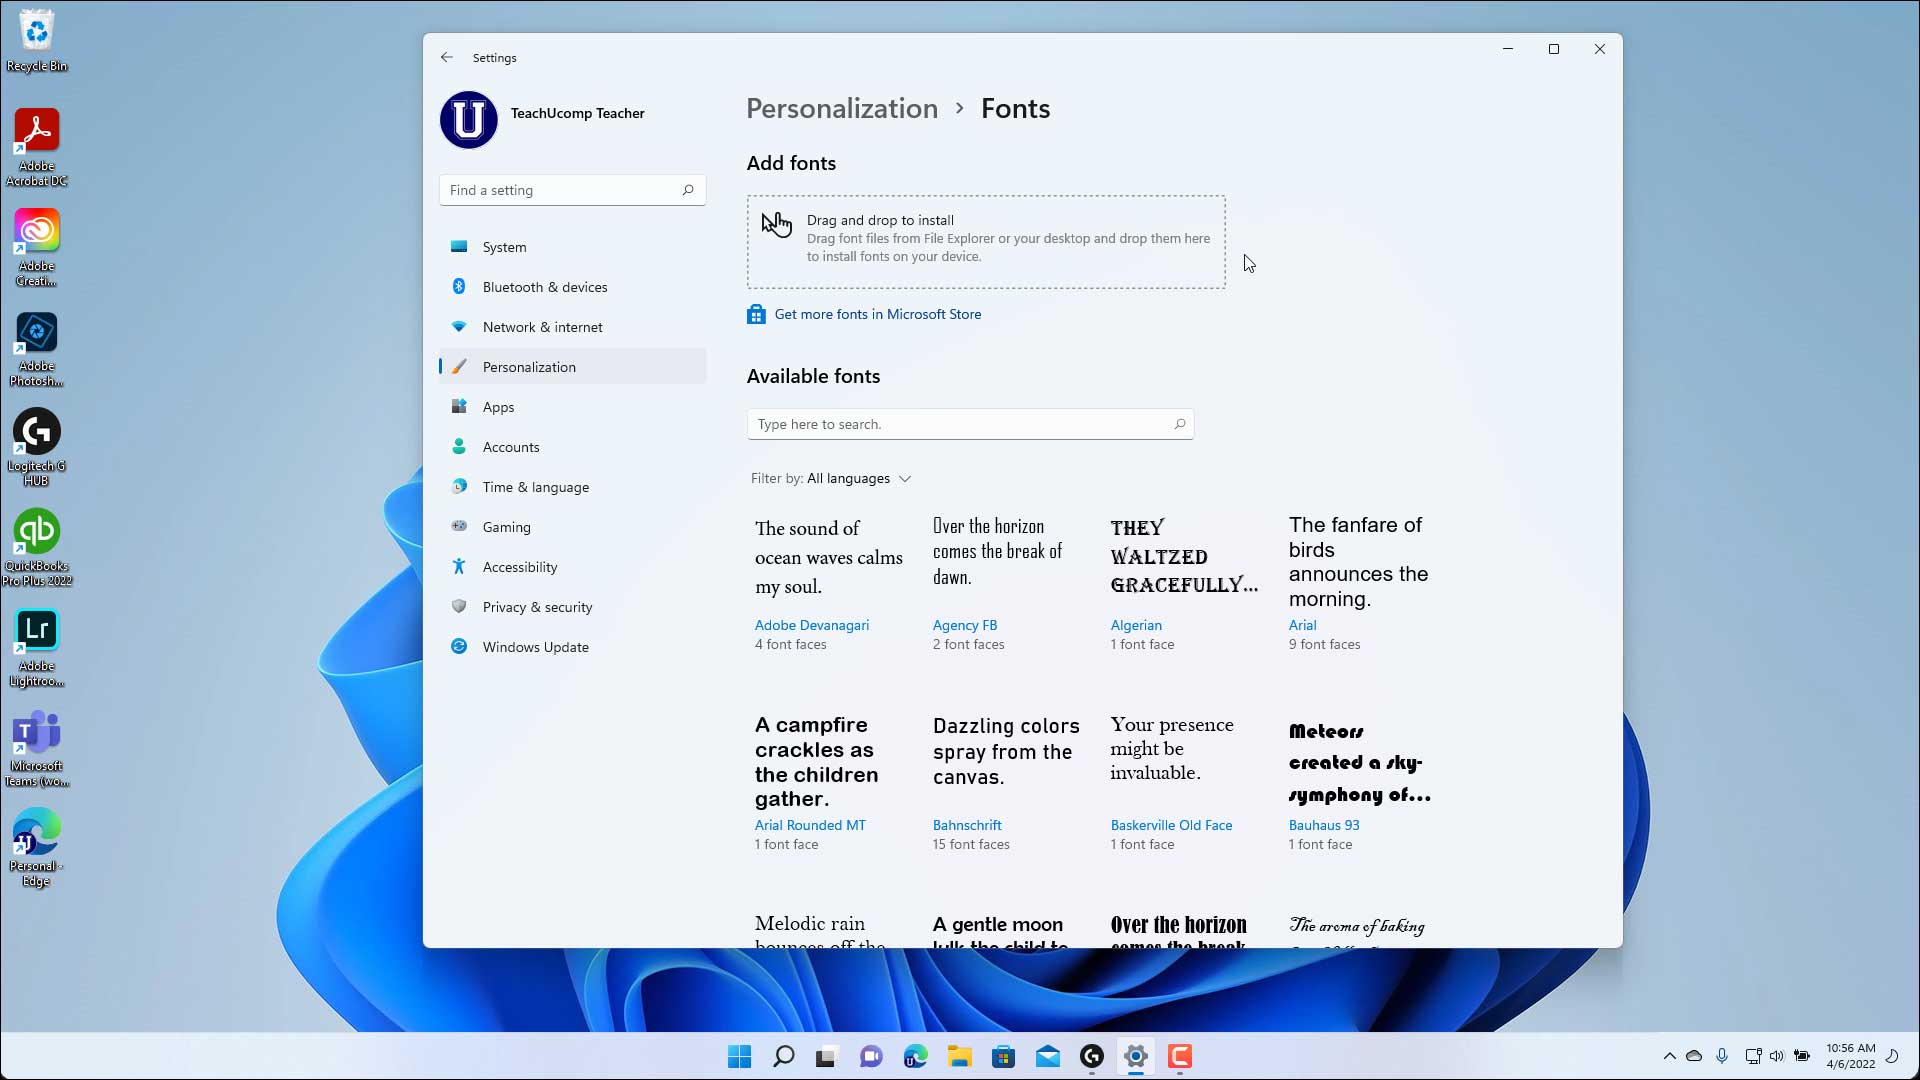
Method 3: Using Windows Settings (Modern Approach for Windows 10/11)
Windows 10 and 11 offer a more modern interface for managing fonts through the Settings app.
- Open Settings: Click the
Startbutton and selectSettings(the gear icon), or pressWin + I. - Navigate to Fonts: Go to
Personalizationand then click onFontsin the left-hand menu. - Install by Dragging or Browsing:
- Drag and Drop: You’ll see a section labeled “Drag and drop to install fonts.” Simply drag your
.ttfor.otffont files from File Explorer into this designated area. - Browse (Optional): Below the drag-and-drop area, there might be an option to “Add a font” or a link to the Microsoft Store. Clicking “Add a font” will usually open a file browser where you can locate and select your font files.
- Drag and Drop: You’ll see a section labeled “Drag and drop to install fonts.” Simply drag your
- Microsoft Store Fonts (Optional): The “Fonts” settings page also often includes a link to “Get more fonts in Microsoft Store.” This is another convenient way to discover and install fonts, including some free and premium options curated by Microsoft.
- Installation and Availability: Once dropped or selected, Windows will install the font. It will then appear in the list of installed fonts on this page.
Method 4: The Legacy Control Panel Method (Still Valid for All Windows Versions)
While the Settings app is newer, the Control Panel method remains functional, particularly useful for systems with older Windows versions or when performing bulk installations of many fonts from a very specific location.
- Open Control Panel: Search for “Control Panel” in the Start menu and open it.
- Navigate to Fonts: Go to
Appearance and Personalization, then click onFonts. This will open the sameC:WindowsFontsfolder view as in Method 2. - Install New Font (Legacy Menu): In the Fonts folder window, if you don’t see the drag-and-drop option immediately, look for a menu bar at the top (if enabled). Click
File(or sometimesOrganizethenLayoutto show menu bar) and selectInstall New Font.... - Browse for Font: A dialog box will appear. Use the “Drives” and “Folders” sections to navigate to the directory where your font files are stored.
- Select and Install: Once you’ve navigated to the correct folder, the font files will appear in the “List of fonts” box. Select the fonts you want to install (hold
Ctrlfor multiple selections) and clickInstall.
Method 5: Bulk Installation and Third-Party Font Managers (For Power Users)
If you manage a large collection of fonts or frequently install new ones, a dedicated font manager can significantly streamline your workflow. While Windows methods handle basic installation well, third-party tools offer advanced features.
- Bulk Installation: All methods above can handle multiple fonts, especially the drag-and-drop options. Just select all
.ttfor.otffiles and perform the chosen installation method. - Third-Party Font Managers: Tools like FontBase, NexusFont, or Typeface (macOS) allow you to preview, activate, deactivate, organize, and manage large font libraries without permanently installing every font onto your system. This is crucial for performance, as too many active fonts can slow down your PC and applications. These managers often include features like tagging, collections, and conflict resolution. While Windows doesn’t have a built-in “activate/deactivate” feature like these tools, they offer a professional solution for serious typographers and designers.
Managing Your Typography: Uninstalling, Troubleshooting, and Best Practices
Installing fonts is only half the battle; effective management ensures your system remains performant and your font collection stays organized.
Uninstalling Fonts from Windows
Just as you install fonts, you might need to remove them to free up resources, clean up your collection, or resolve conflicts.
- Via Windows Settings (Recommended for Windows 10/11):
- Go to
Settings > Personalization > Fonts. - Scroll down to the list of installed fonts.
- Click on the font you want to remove.
- Click the
Uninstallbutton that appears.
- Go to
- Via Control Panel / Fonts Folder:
- Open the
C:WindowsFontsfolder (Methods 2 or 4). - Locate the font you want to remove.
- Right-click on the font file and select
Delete. Confirm your action.
- Open the
Important Note: Windows will prevent you from deleting system fonts crucial for the operating system’s functionality. Some fonts might also be “in use” by an open application, preventing deletion until that application is closed.
Resolving Common Font Installation Issues
Sometimes, a font might not install correctly or may not appear in your applications. Here are common issues and solutions:
- Font Not Appearing in Applications:
- Restart Applications: Most applications (Word, Photoshop, etc.) need to be restarted after a new font is installed for it to appear in their font lists.
- Restart Computer: If restarting applications doesn’t work, a full system restart can sometimes resolve caching issues.
- Check Font Folder: Verify the font is listed in
C:WindowsFontsorSettings > Personalization > Fonts.
- Corrupted Font File: If the font looks distorted or fails to install, the file itself might be corrupted. Try downloading it again from a different source if possible.
- Incorrect File Type: Ensure you are trying to install a
.ttfor.otffile, not a.zip,.woff, or other unsupported format. - Administrator Privileges: If you’re using “Install for all users” or installing into a system-protected folder, ensure you have administrator rights.
- Too Many Fonts: While Windows can handle thousands of fonts, having an excessive number installed (especially active ones) can slow down system performance and application launch times. Consider uninstalling unused fonts or using a font manager to activate/deactivate them as needed.
- Font Conflicts: Rarely, two fonts might have internal names that conflict, causing issues. If you suspect this, try removing recently installed fonts one by one to identify the culprit.
Essential Tips for Font Management
Good font hygiene is crucial for a smooth and efficient workflow.
- Organize Your Downloaded Fonts: Before installing, create a well-structured folder system for your downloaded font files. Categorize them by style (serif, sans-serif, script), project, or foundry. This makes it easy to find and reinstall them if needed.
- Backup Your Fonts: Keep a backup copy of all your downloaded font files on an external drive or cloud storage. This protects your investments (for paid fonts) and ensures you can always recover your collection.
- Don’t Install Everything: Resist the urge to install every font you download. Only install fonts you genuinely need for current projects. Use font managers to preview and activate fonts only when they are required, keeping your system lean.
- Understand Font Licensing: Reiterate the importance of licensing. For professional use, always ensure you have the appropriate commercial license to avoid legal repercussions. Keep records of your purchased font licenses.
- Regularly Review Your Collection: Periodically go through your installed fonts and uninstall those you no longer use. This helps maintain system performance and keeps your font lists in applications manageable.

Conclusion
Installing fonts on Windows is a fundamental skill that significantly enhances your ability to personalize your operating system and elevate your creative and professional projects. Whether you opt for the quick right-click method, the visual drag-and-drop, or the modern Settings app, Windows provides straightforward pathways to expand your typographic horizons.
By understanding font types, sourcing from reputable platforms, and practicing diligent font management, you can build a powerful and efficient font library that supports all your design and communication needs. So go ahead, explore the vast world of typography, install those unique fonts, and transform your digital output from ordinary to extraordinary. Your creativity, productivity, and personal brand will thank you for it.
aViewFromTheCave is a participant in the Amazon Services LLC Associates Program, an affiliate advertising program designed to provide a means for sites to earn advertising fees by advertising and linking to Amazon.com. Amazon, the Amazon logo, AmazonSupply, and the AmazonSupply logo are trademarks of Amazon.com, Inc. or its affiliates. As an Amazon Associate we earn affiliate commissions from qualifying purchases.