In the digital age, where visual communication reigns supreme, the subtle yet profound impact of typography cannot be overstated. For Mac users, especially those engaged in creative pursuits, professional branding, or simply personalizing their computing experience, the ability to install and manage fonts is a fundamental skill. macOS, renowned for its design-centric approach, offers intuitive tools that make font installation a straightforward process, unlocking a world of creative possibilities.
Whether you’re a graphic designer meticulously crafting a brand identity, a content creator enhancing visual appeal, a student working on a presentation, or an entrepreneur aiming for distinct marketing materials, the right font can elevate your work from mundane to magnificent. This comprehensive guide will walk you through everything you need to know about installing fonts on your Mac, integrating best practices from the realms of technology, branding, and even practical financial considerations.
Understanding Fonts and Why They Matter for Your Mac
Before diving into the “how-to,” it’s crucial to understand what fonts are from a technical perspective and why their selection and management hold such significance, particularly for those focused on brand integrity and professional output.
Decoding Font File Types: TTF, OTF, and Beyond
When you download a font, you’ll typically encounter files with extensions like .ttf or .otf. Understanding these file types is the first step in effective font management.
-
TTF (TrueType Font): Developed by Apple in the late 1980s, TrueType fonts are one of the most common and widely supported font formats. They are characterized by their single-file structure, containing both screen and printer font data, making them highly portable and easy to use across different operating systems. TTF fonts are excellent for general use and web design, offering good rendering at various sizes. While a foundational technology, they may lack some of the advanced typographic features found in their successor.
-
OTF (OpenType Font): Co-developed by Adobe and Microsoft in the mid-1990s, OpenType is a more sophisticated and versatile font format. Building upon the TrueType structure, OTF fonts can contain a wider range of characters, including ligatures, alternative glyphs, small caps, old-style figures, and other advanced typographic features that are invaluable for professional design work. This richness in character sets allows for greater control over text appearance, enabling designers to create more nuanced and aesthetically pleasing layouts. OTF fonts are also cross-platform compatible, making them the preferred choice for many professionals due to their robustness and extensive feature set.
-
TTC (TrueType Collection): Less common but still encountered, a TrueType Collection file (
.ttc) is a single file that can contain multiple TrueType fonts. This format is useful for grouping related fonts, such as different weights or styles of a single typeface family, into one compact file. When you double-click a.ttcfile, Font Book will typically display all the fonts contained within it for installation.
While other formats like WOFF (Web Open Font Format) and WOFF2 exist, these are primarily optimized for web use and are generally not installed directly onto your operating system for desktop application use. Knowing the difference between TTF and OTF, however, will empower you to make informed choices about which fonts to use, especially when prioritizing advanced typographic control for specific design projects.
The Strategic Importance of Typography in Branding and Design
Beyond their technical specifications, fonts are powerful design elements that play a pivotal role in shaping perceptions and conveying messages. For businesses and individuals alike, the strategic selection and consistent application of typography are cornerstones of strong branding and effective communication.
-
Establishing Brand Identity: A brand’s chosen typeface often becomes synonymous with its identity. Think of the distinct fonts used by iconic companies like Coca-Cola, Google, or Apple. These fonts evoke specific feelings – trustworthiness, innovation, playfulness – and contribute significantly to brand recognition. For startups and personal brands, selecting a unique and fitting font can help differentiate them in a crowded marketplace. It’s an investment in visual equity.
-
Conveying Personality and Tone: Fonts possess personalities. A script font might suggest elegance or creativity, while a sans-serif font might communicate modernity and minimalism. A serif font can convey tradition or authority. The psychological impact of typography is profound, influencing how your audience perceives your message before they even read the words. This makes font choice a critical decision for everything from marketing campaigns to corporate reports.
-
Enhancing Readability and User Experience: Beyond aesthetics, the primary function of a font is to ensure readability. A well-chosen font, appropriately sized and spaced, enhances the user experience, making content more accessible and engaging. Conversely, a poor font choice can lead to reader fatigue, frustration, and ultimately, a missed message. For digital products, websites, and apps, consistent and clear typography is essential for usability.
-
Professionalism and Credibility: In professional contexts, typography reflects attention to detail and a commitment to quality. Using high-quality, legally licensed fonts that are consistently applied across all materials – from business cards to presentations – signals professionalism and builds credibility. This often means investing in premium fonts, which, while having a monetary cost, offer superior design, extensive character sets, and clear licensing terms that protect your brand from legal issues. This investment pays dividends in the perception of your brand’s legitimacy and trustworthiness.
Understanding these dimensions underscores that installing a font isn’t just a technical task; it’s a strategic decision with implications for your brand’s presence, professional image, and overall communication effectiveness.
Preparing for Installation: Sourcing and Securing Your Fonts
Before you can install a font, you need to acquire it. The digital world offers a vast ocean of typefaces, but knowing where to look and what to look for is key to building a robust and legally sound font library. This section touches on the technological pathways to acquire fonts and the financial/legal considerations associated with them.
Where to Find High-Quality Fonts
The internet is a treasure trove for fonts, offering both free and premium options. The choice often depends on your budget, project requirements, and the desired level of typographic sophistication.
-
Reputable Free Sources: For personal projects, testing, or budget-conscious endeavors, free font libraries are invaluable.
- Google Fonts: A massive and continually growing library of open-source fonts, all available for both personal and commercial use without charge. They are well-optimized for web use but also excellent for desktop applications.
- DaFont: An extensive archive of freeware, shareware, and demo fonts. Always check the individual font’s license, as many are free for personal use only and require a license for commercial projects.
- Font Squirrel: Specializes in hand-picked, high-quality, 100% free commercial fonts. It’s an excellent resource for designers needing free fonts for client work.
-
Premium Marketplaces and Subscriptions: For professional work, brand consistency, and access to the highest quality, most feature-rich typefaces, premium options are often necessary.
- Adobe Fonts (formerly Typekit): Included with Adobe Creative Cloud subscriptions, offering access to thousands of high-quality fonts for both desktop and web use. This is a powerful resource for designers already invested in the Adobe ecosystem.
- MyFonts, Fontspring, Linotype, Commercial Type: These are industry-leading marketplaces where you can purchase licenses for individual typefaces or entire font families from renowned foundries. While these come with a monetary cost, they guarantee quality, extensive character sets, and clear licensing terms critical for commercial projects.
- Independent Type Foundries: Many designers choose to support independent type foundries directly, often finding unique and cutting-edge typefaces not available elsewhere.
Essential Pre-Installation Checks
Once you’ve found your desired font, there are a few practical steps to take before installation.
- Downloading and Unzipping Font Files: Most fonts are downloaded as compressed ZIP files. Locate the downloaded file (usually in your
Downloadsfolder) and double-click it to decompress. Inside, you’ll find the actual font files (e.g.,.ttf,.otf). - Verifying File Integrity: Before installing, quickly check that the font files are present and seem intact. Corrupt font files can cause system instability or display issues. If a font fails to install or displays errors in Font Book, try re-downloading it from the source.
- Understanding Licensing Agreements: This is a crucial step, particularly for commercial projects, and ties directly into “Money” and “Brand” aspects. Most fonts, even free ones, come with a license agreement.
- Personal Use vs. Commercial Use: Many free fonts are “free for personal use” but require a paid license for commercial applications (e.g., use in a logo, marketing materials, products for sale). Misusing a font without the proper commercial license can lead to legal issues, damage your brand’s reputation, and incur financial penalties.
- Number of Users/Computers: Paid font licenses often specify the number of users or computers on which the font can be installed. Ensure your license covers your specific use case.
- Embedding Rights: For PDFs, e-books, or web fonts, check if the license permits font embedding.
Always read the license carefully. Investing a little time in understanding these terms can save significant hassle and potential costs down the line, ensuring your brand maintains its integrity and operates legally.
Step-by-Step Font Installation on macOS
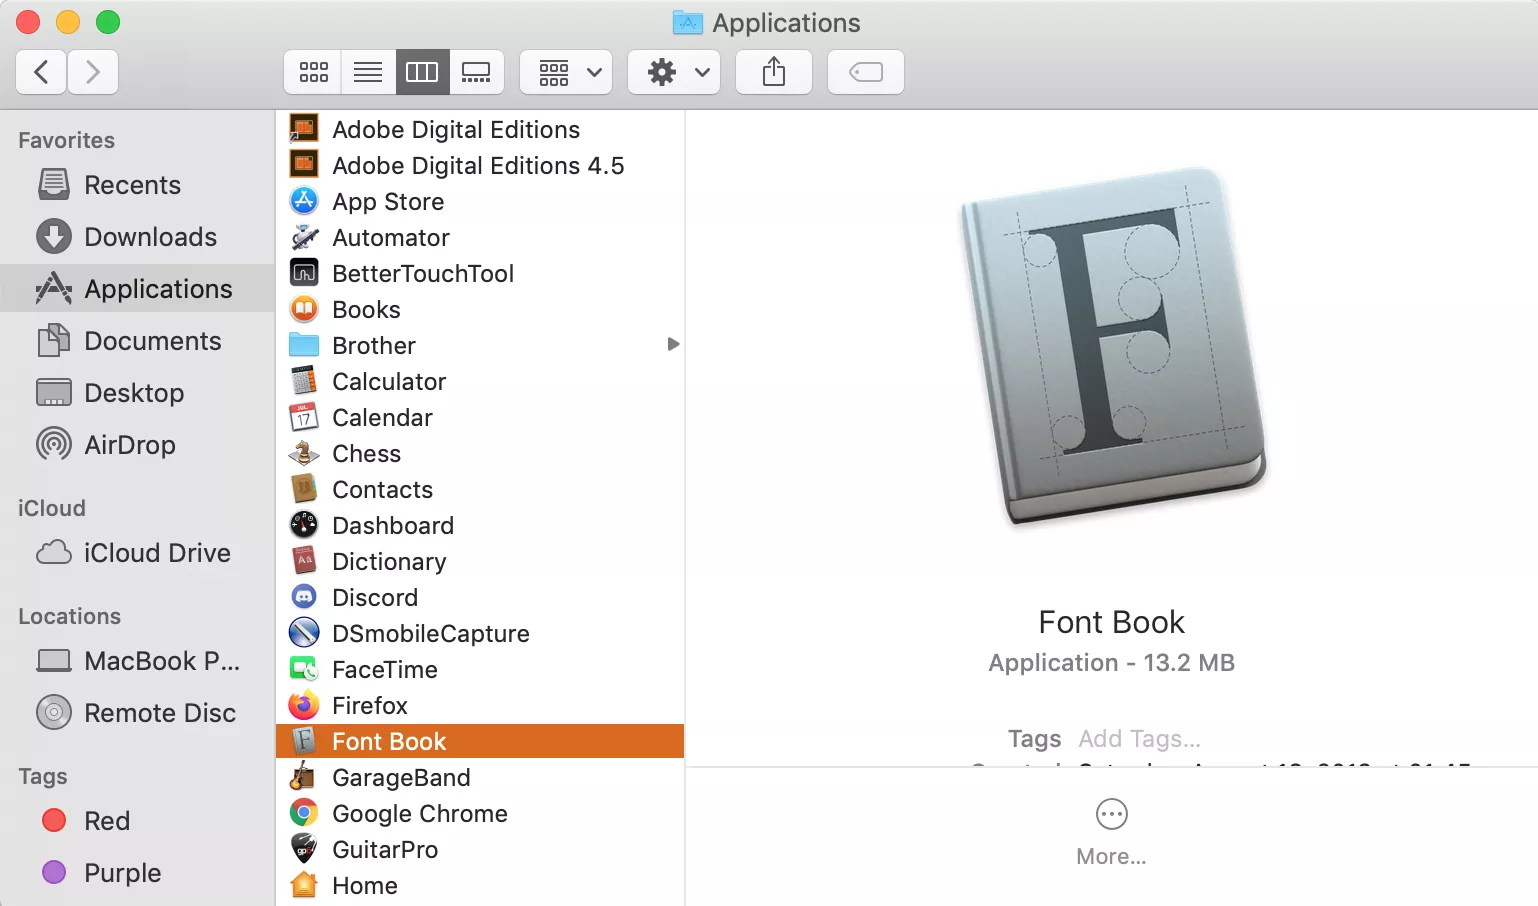
macOS provides a highly intuitive system for installing fonts, primarily through its built-in Font Book application. There are a few methods, each suitable for different scenarios. This section focuses heavily on the “Tech” aspect of installation.
Method 1: The Simplest Approach with Font Book
This is the recommended and most straightforward method for installing individual or a small number of fonts.
- Locate Your Font File(s): After downloading and unzipping, navigate to the folder containing your
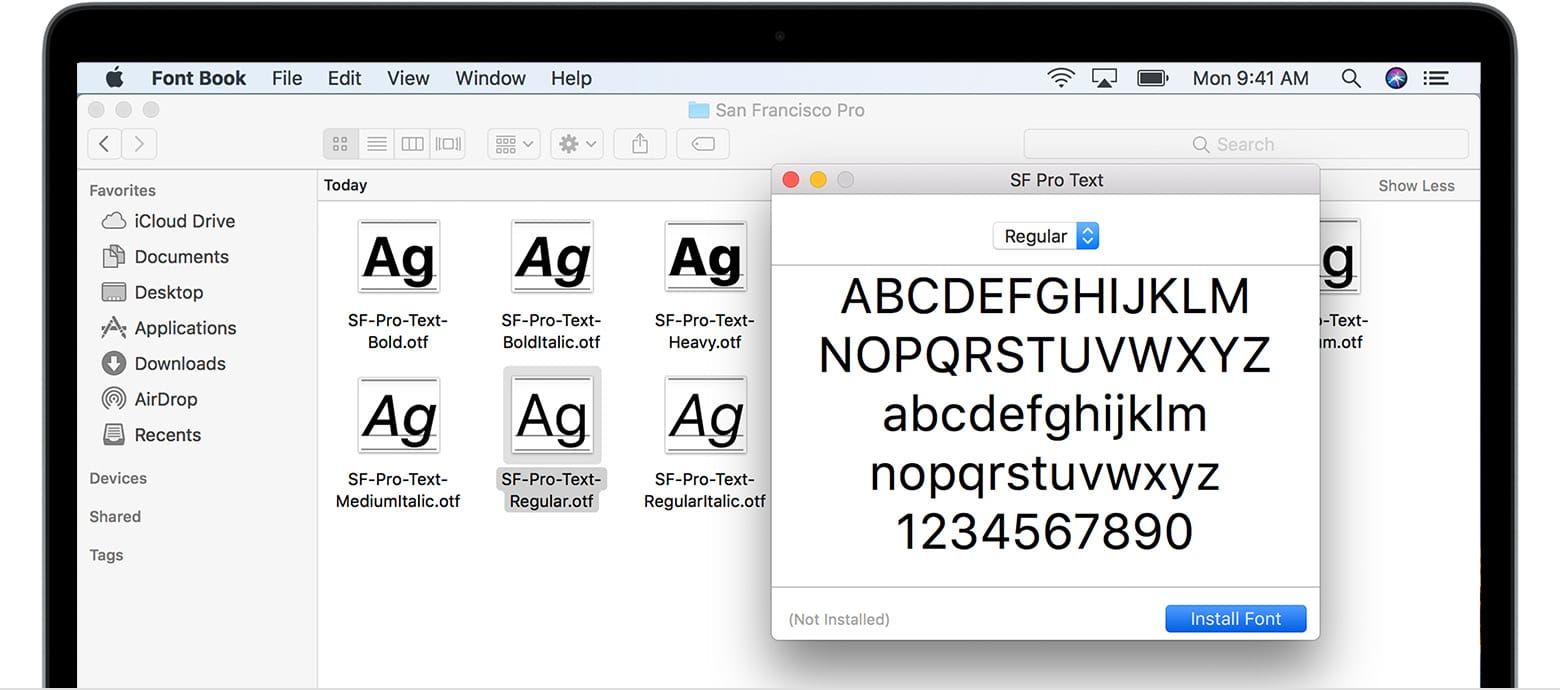
.ttf,.otf, or.ttcfont files in Finder. - Double-Click the Font File: Simply double-click on the font file you wish to install. This action will automatically open a preview window in the Font Book application.
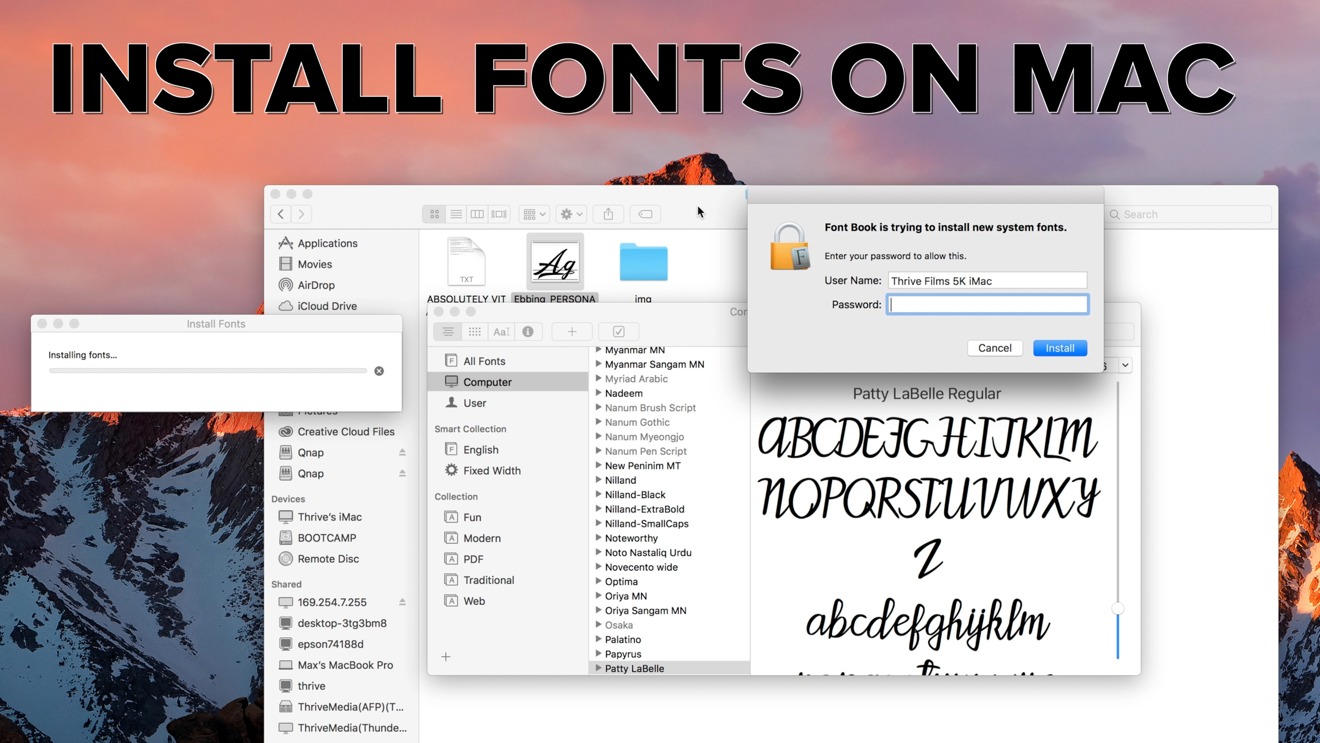
- Preview and Install: In the Font Book preview window, you’ll see how the font looks at various sizes. There will be an “Install Font” button, typically located in the bottom-right corner of the window. Click this button.
- Font Validation: Font Book will then perform a quick validation check on the font. This process checks for common issues such as corrupted data or duplicate fonts already installed on your system.
- If the font passes validation, it will be added to your font library and become available in all your applications (e.g., Pages, Microsoft Word, Adobe Photoshop, Keynote).
- If Font Book detects issues (e.g., “Minor errors found” or “Serious errors found”), it will present a dialog box. You can choose to proceed with the installation at your own risk, or, preferably, obtain a different copy of the font. For serious errors, it’s best not to install the font as it could lead to application crashes or display problems.
- Confirmation: Once installed, the font will appear in Font Book under “All Fonts” and any relevant collections (e.g., “English”).
This method leverages Font Book’s capabilities to manage fonts efficiently, automatically placing them in the correct location and running essential checks.
Method 2: Manual Installation into Library Folders
While Font Book is generally preferred, there might be situations where you want more control over where a font is stored, or you’re troubleshooting an issue. This method involves directly placing font files into specific system folders.
- Understanding Font Locations: On a Mac, fonts can be stored in a few key locations:
- User Fonts (
~/Library/Fonts): This is the most common location for user-installed fonts. Fonts placed here are only available to the specific user account that installed them. The~symbol represents your Home folder. This is ideal for personal use and keeps your fonts separate from system-critical fonts. - Local Fonts (
/Library/Fonts): Fonts installed here are available to all user accounts on that Mac. This is often used for fonts needed by multiple users or by specific applications that require system-wide access. Installing here typically requires administrator privileges. - System Fonts (
/System/Library/Fonts): This folder contains fonts essential for macOS to function correctly. Never modify or add fonts to this folder, as it can lead to system instability.
- User Fonts (
Steps for Manual Installation (to User Library):
- Open Finder: Click on the Finder icon in your Dock.
- Go to Folder: In the Finder menu bar, click “Go” then select “Go to Folder…” (or use the shortcut
Shift + Command + G). - Enter Path: Type
~/Library/Fontsinto the dialog box and press Enter. This will open your user’s Fonts folder. - Drag and Drop: Drag your unzipped font files (e.g.,
.ttf,.otf) directly into thisFontsfolder. - Restart Applications: For the fonts to appear, you may need to quit and restart any applications you intend to use them in.
Steps for Manual Installation (to Local Library – for all users):
- Open Finder: Click on the Finder icon in your Dock.
- Go to Folder: In the Finder menu bar, click “Go” then select “Go to Folder…” (
Shift + Command + G). - Enter Path: Type
/Library/Fontsinto the dialog box and press Enter. This will open the system-wide Fonts folder. - Drag and Drop: Drag your unzipped font files into this
Fontsfolder. You will be prompted to enter your administrator password to authorize this action. - Restart Applications: As with user fonts, restart any applications to ensure the new fonts are recognized.
Method 3: Installing Multiple Fonts Efficiently
If you have an entire font family or a collection of new fonts to install, doing them one by one can be tedious. macOS offers efficient ways to batch install.
- Select Multiple Files in Finder: In your unzipped font folder, select all the font files you wish to install. You can click and drag a selection box, or hold down the
Commandkey and click individual files. To select all files in a folder, useCommand + A. - Drag to Font Book Icon: Drag the selected font files directly onto the Font Book icon in your Dock. Font Book will open and prompt you to install all the selected fonts.
- Batch Installation via Font Book: Alternatively, with multiple files selected in Finder, right-click (or Control-click) any of the selected files and choose “Open With” > “Font Book.” This will open Font Book and initiate the installation process for all selected fonts, complete with validation checks.
These methods streamline the process, making it quick and easy to update your font library with numerous typefaces at once.
Managing and Troubleshooting Your Font Library
Installing fonts is only half the battle; effective management ensures your Mac runs smoothly and your creative workflow remains uninterrupted. This section explores Font Book’s management capabilities and common troubleshooting steps, reinforcing the “Tech” aspect of maintaining a healthy font ecosystem.
Leveraging Font Book for Robust Font Management
Font Book is more than just an installer; it’s a powerful font management utility built into macOS. Learning to use its features can significantly enhance your workflow and system performance.
- Enabling/Disabling Fonts: This is one of Font Book’s most useful features. If you have many fonts but only use a few regularly, you can disable the ones you don’t need. Disabled fonts remain on your system but are not active, meaning they won’t load into applications or consume system resources. This can improve application launch times and overall system performance.
- To disable a font: Open Font Book, select the font(s), and uncheck the checkbox next to the font name or click the “Disable” button in the toolbar.
- To enable: Check the box or click “Enable.”
- Removing Fonts: If you no longer need a font, you can easily remove it. This frees up disk space and keeps your font list clutter-free.
- To remove a font: Select the font(s) in Font Book, then go to
File > Remove Selected Fontsor right-click and choose “Remove.” You’ll be asked to confirm. - Caution: Do not remove fonts listed under “System” in Font Book, as these are critical for macOS.
- To remove a font: Select the font(s) in Font Book, then go to
- Organizing Fonts into Collections: For designers or users with extensive font libraries, collections are invaluable. You can create custom groups of fonts (e.g., “Project X Fonts,” “Serif Fonts,” “Web Fonts”) for quick access.
- To create a collection: Click the “+” button at the bottom of the “Collections” sidebar in Font Book, name your collection, then drag and drop desired fonts into it.
- Resolving Duplicate Fonts: It’s common to accidentally install the same font multiple times, especially if you download from various sources. Font Book automatically detects duplicate fonts during installation and offers to resolve them.
- To manually check for duplicates: In Font Book, go to
Edit > Resolve Duplicates. Font Book will scan your library and present options to either disable duplicates or move them to the Trash. Choosing to disable or move duplicates is generally recommended to prevent conflicts and ensure applications use the correct version of a font.
- To manually check for duplicates: In Font Book, go to
Common Issues and Solutions
Even with a robust system like macOS, font-related issues can arise. Here’s how to tackle some common problems:
- Font Not Appearing in Applications:
- Restart the Application: Most applications load their font lists upon launch. If you installed a font while an app was open, quit and restart that application.
- Restart Your Mac: For stubborn cases or system-wide issues, a full system restart can often resolve the problem by refreshing system caches.
- Clear Font Caches: Sometimes, macOS or individual applications maintain a font cache that needs to be cleared. While a restart often does this, you can also use third-party tools or terminal commands for a more thorough clear if necessary.
- Corrupt or Invalid Fonts:
- Font Book Validation: As mentioned, Font Book validates fonts upon installation. If it flags a font as having “Serious errors,” avoid installing it.
- Re-download: If you suspect a font file is corrupt, try downloading it again from the original source.
- Try a Different Version/Source: If the issue persists, the font file itself might be problematic. Look for an alternative version or download from a different reputable source.
- Performance Slowdown:
- Too Many Active Fonts: Having thousands of fonts active can slow down your Mac, especially during application launches or font menu loading. Use Font Book to disable fonts you don’t regularly use.
- Application-Specific Font Problems:
- Compatibility: Some older applications might have limited compatibility with newer OpenType features. Ensure your software is up to date.
- Font Conflicts: Occasionally, two fonts with similar internal names can cause conflicts. Resolving duplicates in Font Book can help.
Best Practices for a Healthy Font Ecosystem
Maintaining an organized and efficient font library is crucial for any Mac user, particularly those in creative or professional fields.
- Regularly Prune Unused Fonts: Just like digital files, fonts accumulate. Periodically review your Font Book library and disable or remove fonts you no longer need.
- Back Up Your Font Library: If you purchase premium fonts, ensure you back up the original font files. Your installed fonts are part of your system, but having the original files safe is vital for reinstallation or migrating to a new Mac.
- Stay Organized with Collections: Proactively use Font Book’s collection feature to group fonts by project, client, style, or type. This saves time and keeps your font menus manageable.
- Document Licenses: Keep a record of your font licenses, especially for paid fonts used in commercial projects. This demonstrates professionalism and protects your brand from potential legal pitfalls.
Conclusion: Empowering Your Creative and Professional Endeavors
Installing fonts on your Mac is a foundational skill that opens doors to unparalleled creative expression and professional polish. From understanding the nuanced differences between TTF and OTF files to strategically leveraging typography for brand building, the journey of font management is deeply intertwined with technological prowess, design acumen, and smart financial decisions.
By mastering the intuitive features of Font Book, diligently preparing your font files, and adhering to best practices for organization and troubleshooting, you empower yourself to craft compelling visuals, communicate effectively, and reinforce a strong, consistent brand identity. The right typeface can be the silent storyteller of your brand, lending credibility, conveying emotion, and distinguishing your work in a visually competitive world. So go forth, explore the vast world of typography, and let your Mac be the canvas for your creative vision.
aViewFromTheCave is a participant in the Amazon Services LLC Associates Program, an affiliate advertising program designed to provide a means for sites to earn advertising fees by advertising and linking to Amazon.com. Amazon, the Amazon logo, AmazonSupply, and the AmazonSupply logo are trademarks of Amazon.com, Inc. or its affiliates. As an Amazon Associate we earn affiliate commissions from qualifying purchases.