Ubuntu, a popular and user-friendly Linux distribution, has empowered millions of users globally, from everyday desktop users to developers and server administrators. Its robust ecosystem, backed by a vibrant open-source community, makes it a top choice for those seeking an alternative to proprietary operating systems. A core component of managing software on Ubuntu, like many Debian-based systems, is understanding how package files work. While the Ubuntu Software Center and command-line tools like apt typically handle software installation from official repositories seamlessly, there are instances where you’ll encounter a .deb file that needs to be installed manually.

A .deb file is the standard package format for Debian-based distributions, including Ubuntu. It’s essentially an archive containing all the necessary components for a piece of software: the executable program, libraries, configuration files, and metadata that describe the package and its dependencies. Knowing how to correctly install these files is a crucial skill for any Ubuntu user, especially when dealing with software not readily available in the official repositories, such as proprietary drivers, specific developer tools, or cutting-edge applications.
This comprehensive guide aims to demystify the process of installing .deb files on Ubuntu. We will explore what these files are, why you might need to install them manually, and walk through various installation methods, from graphical user interface (GUI) options to powerful command-line tools. Furthermore, we’ll cover essential troubleshooting tips to ensure a smooth and secure installation experience, enhancing your digital security and productivity.
Understanding .deb Files and Why They Matter
Before diving into the “how,” it’s essential to grasp the “what” and “why” behind .deb files. This foundational understanding will help you make informed decisions and troubleshoot potential issues more effectively.
What is a .deb File?
At its core, a .deb file is a Debian software package archive. Think of it as a .exe file on Windows or a .dmg on macOS, but for the Debian/Ubuntu ecosystem. It’s a compressed file that bundles all the necessary components for a piece of software to run on your system. This includes:
- Application Binaries: The actual executable programs.
- Libraries: Shared code components that the application relies on.
- Configuration Files: Settings and preferences for the software.
- Metadata: Information about the package, such as its name, version, description, maintainer, and crucially, its dependencies (other packages it needs to function correctly).
- Scripts: Pre-installation, post-installation, pre-removal, and post-removal scripts that automate tasks during the package lifecycle.
The .deb format originates from the Debian project, which emphasizes stability and robust package management. Ubuntu, being a derivative of Debian, inherits and utilizes this package format, making it central to its software distribution model. While Ubuntu has introduced newer packaging formats like Snap and Flatpak for sandboxed applications, .deb remains the bedrock for system-level software and many traditional applications.
When Do You Need to Install a .deb File Manually?
While most software can be installed directly from the official Ubuntu repositories using the Software Center or apt, there are several compelling reasons why you might need to download and install a .deb file manually:
- Proprietary or Third-Party Software: Many commercial applications, drivers (e.g., NVIDIA graphics drivers), or specialized tools are not open-source and thus aren’t included in Ubuntu’s official repositories. Software vendors often provide their applications as
.debpackages for easy installation on Debian/Ubuntu systems. Examples include Google Chrome, Microsoft Teams, Visual Studio Code, or specific printer drivers. - Newer Software Versions: Sometimes, the version of a package in the official Ubuntu repositories might be older than the latest stable release. If you need a cutting-edge feature, a critical bug fix, or enhanced performance only available in a newer version, the developer’s website might offer a
.debfile for manual installation. - Beta or Pre-Release Software: Developers often release beta versions of their software as
.debpackages to allow users to test new features before they are officially rolled out. This provides an opportunity to provide feedback and get early access. - Offline Installations: If you’re setting up a system without internet access, or in an environment with restricted network connectivity, you can download
.debfiles on another machine and transfer them for installation. - Specific Version Requirements: For compatibility reasons with other software or projects, you might need a very specific version of an application that is no longer available in the official repositories but can be found as an archived
.debfile. - Customized Builds: In some niche cases, you might download a
.debfile for a custom-compiled version of an application tailored for specific needs.
While manual .deb installation offers flexibility, it’s crucial to acknowledge the potential risks. Manually installed packages might not receive automatic updates through apt, and you must be extra vigilant about the source to avoid security vulnerabilities or system instability.
Preparing for Installation: Best Practices
Before you embark on installing any .deb file, a little preparation can save you a lot of headaches. Following these best practices ensures a smoother, more secure, and stable installation process.
Verify the Source and Integrity
This is perhaps the most critical step. Downloading and installing software from untrusted sources can expose your system to malware, security vulnerabilities, or simply poorly constructed packages that could break your system.
- Trusted Sources Only: Always download
.debfiles directly from the official website of the software vendor or a reputable open-source project page. Avoid third-party download sites that might bundle adware or modified versions of the software. - Check for Authenticity (GPG Signatures): Some developers provide GPG signatures or checksums (MD5, SHA256) alongside their
.debfiles. If available, verify these. A GPG signature confirms that the package was indeed created by the claimed developer and hasn’t been tampered with. Checksums ensure that the file you downloaded is identical to the one on the server and hasn’t been corrupted during transit. While verifying GPG signatures can be a bit more involved, checking a SHA256 checksum is straightforward using thesha256sum /path/to/your/file.debcommand in the terminal and comparing the output.
Check for Dependencies
Dependencies are other software packages that your .deb file requires to function correctly. If these dependencies are not present on your system, the installation will likely fail, or the application won’t run.
- Read Documentation: The software’s official documentation or download page often lists required dependencies.
- Automatic Resolution: While some GUI tools and
aptcan automatically resolve and install dependencies,dpkg(a lower-level tool) does not. Be prepared to manually install missing dependencies if usingdpkg. This is why usinggdebiorapt install ./package.debis often preferred, as they handle dependencies more intelligently.
Backup Important Data (Optional but Recommended)
Although installing a .deb file is generally safe, especially from trusted sources, there’s always a slight risk when modifying system components. In rare cases, a poorly constructed package or a conflict with existing software could lead to system instability.
- Home Directory Backup: Consider backing up your home directory or critical personal files before installing major software, especially if you’re experimenting with beta software or packages from less-known sources. Tools like
rsyncor graphical backup utilities can assist with this. - System Snapshots: For more advanced users, creating a system snapshot using tools like Timeshift can provide a quick recovery point if something goes wrong.
Multiple Methods to Install .deb Files on Ubuntu
Ubuntu offers several ways to install .deb files, catering to different user comfort levels and technical expertise. We’ll explore the most common and effective methods, starting with the most user-friendly.
Method 1: Using the Ubuntu Software Center (GUI)
The Ubuntu Software Center is the graphical interface for managing software on your system. It’s the simplest method for installing .deb files, especially for new users. It also often attempts to resolve dependencies automatically.
Steps:
- Locate the .deb File: Navigate to the directory where you downloaded the
.debfile using your file manager (e.g., “Downloads” folder). - Double-Click: Simply double-click on the
.debfile. - Software Center Opens: The Ubuntu Software Center will open, displaying details about the package. You’ll see information like the software name, version, a brief description, and usually, a prominent “Install” button.
- Initiate Installation: Click the “Install” button.
- Authenticate: You will be prompted to enter your user password to authorize the installation, as this modifies system files.
- Wait for Completion: The Software Center will download and install any required dependencies, then install the
.debpackage. A “Remove” button will appear once the installation is complete, indicating success.
Advantages:
- User-Friendly: Very intuitive for those familiar with graphical interfaces.
- Dependency Handling: Often attempts to automatically fetch and install missing dependencies.
- Integrated Experience: Provides a consistent look and feel with other system applications.
Disadvantages:
- Less Robust for Complex Dependencies: For
.debfiles with complicated or unusual dependency trees, the Software Center might occasionally fail without providing detailed error messages. - Can Be Slower: Sometimes, it can be slower than command-line alternatives.
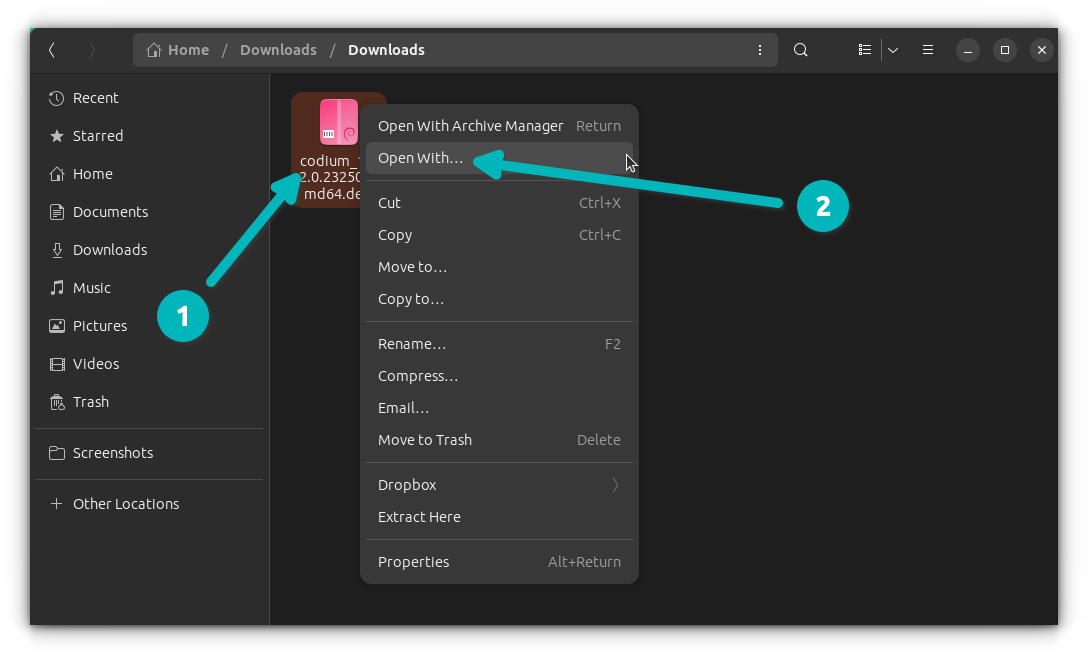
Method 2: Using GDebi Package Installer (GUI – Recommended for Dependencies)
GDebi is a lightweight graphical tool specifically designed to install .deb packages. Its primary advantage over the Ubuntu Software Center is its superior ability to handle and display dependencies, making it a highly recommended method, especially if the Software Center fails.
Steps:
- Install GDebi (if not already installed):
Open a terminal (Ctrl+Alt+T) and run the following command:
bash

sudo apt install gdebi-core gdebi
This command installs both the core GDebi functionalities and its graphical user interface. - Locate the .deb File: Open your file manager and navigate to the
.debfile. - Open with GDebi: Right-click on the
.debfile.- Select “Open With Other Application.”
- From the list, choose “GDebi Package Installer” and click “Select.”
- Review Dependencies: GDebi will open and immediately analyze the package. It will clearly show you if there are any unmet dependencies and, if so, whether they can be resolved. If all dependencies are met, it will simply state “All dependencies are satisfied.”
- Install Package: Click the “Install Package” button.
- Authenticate: Enter your user password when prompted.
- Wait for Completion: GDebi will install the package and its dependencies. Once finished, the button will change to “Reinstall Package” or “Remove Package.”
Advantages:
- Excellent Dependency Resolution: GDebi is highly effective at identifying and installing missing dependencies.
- Clear Dependency Information: It provides clear feedback on the status of dependencies, which is invaluable for troubleshooting.
- Lightweight: Faster and more focused than the full-fledged Software Center.
Disadvantages:
- Requires an initial installation of GDebi itself.
- Still a GUI tool, so it might not be preferred by command-line aficionados.
Method 3: Using the Terminal (Command Line – Advanced and Powerful)
For users who prefer the command line or need more control, the terminal offers powerful and flexible ways to install .deb files. This method is often faster and provides more detailed feedback in case of errors.
Using dpkg (Low-level package manager)
dpkg is the underlying package management system for Debian and Ubuntu. It’s a powerful low-level tool, but it doesn’t automatically handle dependencies.
Steps:
- Open Terminal: Press Ctrl+Alt+T.
- Navigate to Directory (Optional but Recommended): Change your current directory to where the
.debfile is located. For example, if it’s in your Downloads folder:
bash

cd ~/Downloads
- Install the .deb File: Use the
dpkg -icommand:
bash

sudo dpkg -i package_name.deb
Replacepackage_name.debwith the actual name of your file. - Handle Dependencies (Crucial Step): If the
dpkgcommand completes without error, you’re likely done. However, if it reports “unmet dependencies,” you’ll need to resolve them. The easiest way is to useaptto fix the broken installation:
bash

sudo apt install -f

# or

sudo apt --fix-broken install
This command tellsaptto find and install any missing dependencies for packages thatdpkgcouldn’t fully configure. After running this, the installation should be complete.
Advantages:
- Fundamental Control: Directly interacts with the core package management system.
- Works Anywhere: Can be used on headless servers or minimal installations.
Disadvantages:
- No Automatic Dependency Resolution: This is the biggest drawback. You must manually run
apt install -fif dependencies are missing. - Less user-friendly for beginners.
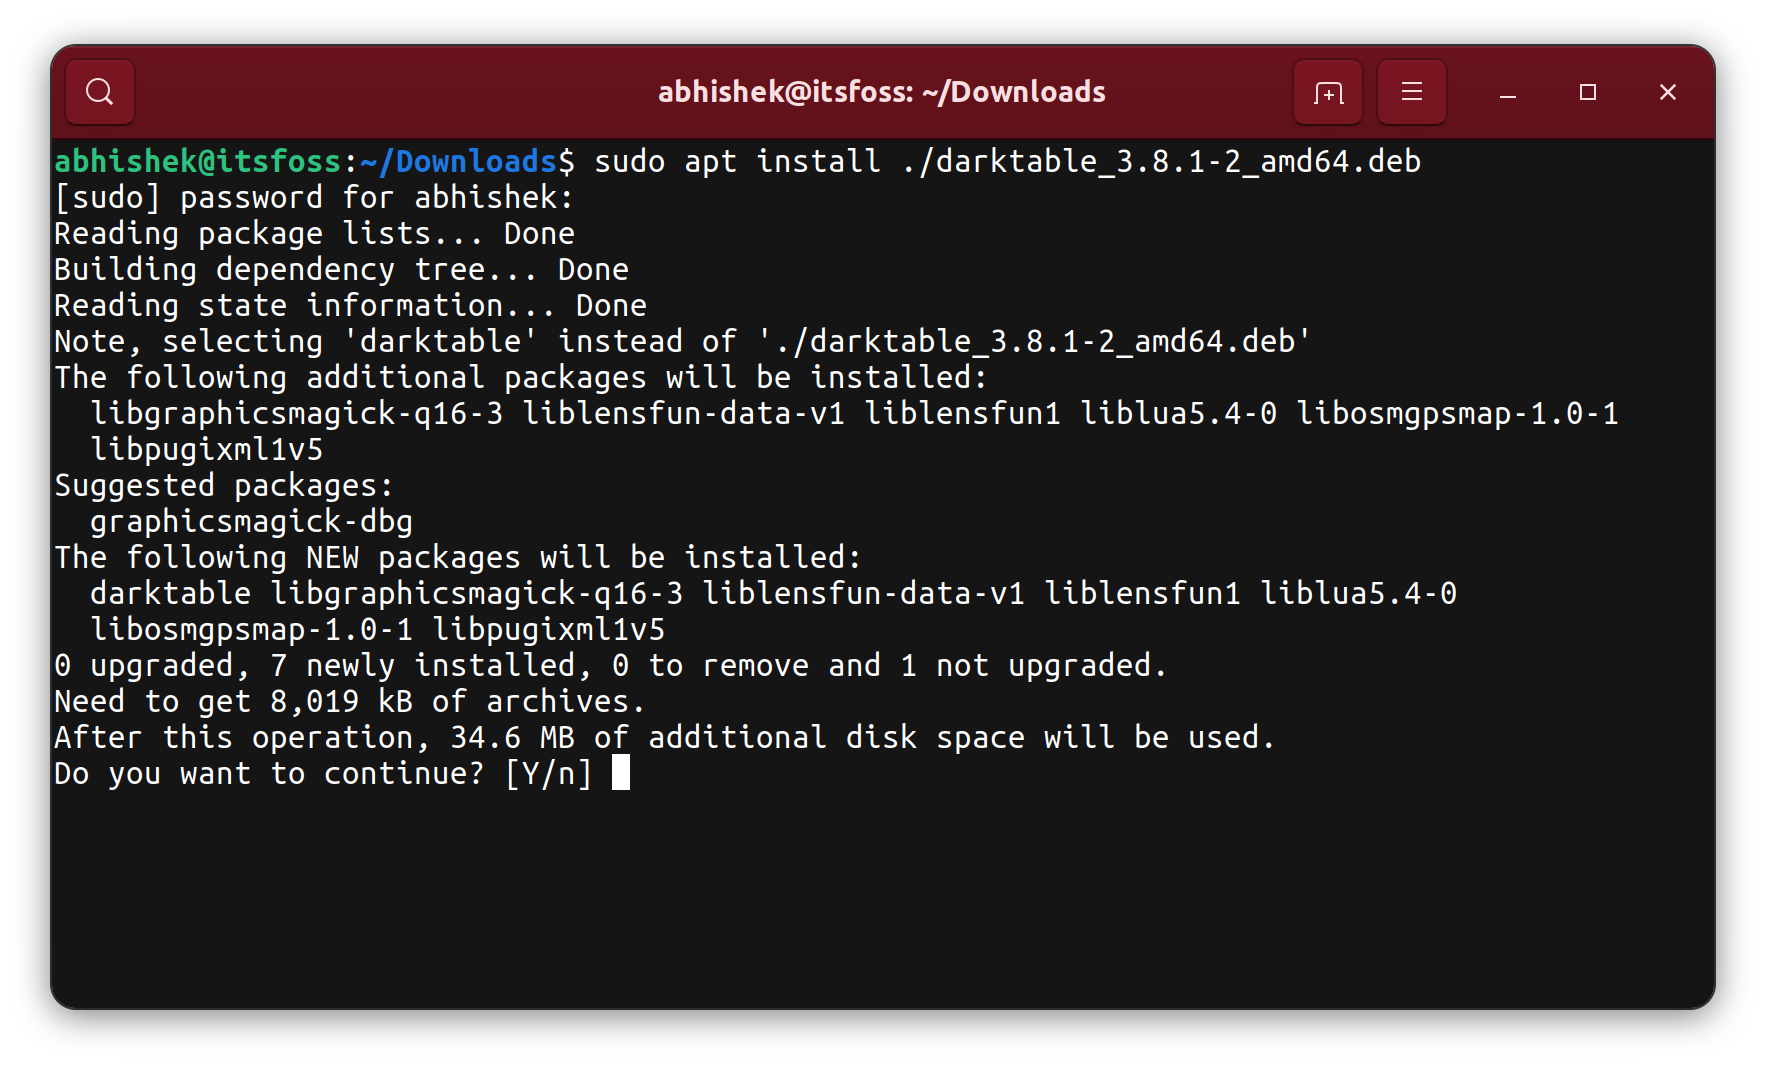
Using apt (High-level package manager)
apt is the modern command-line interface for package management on Ubuntu, combining the functionalities of dpkg with robust dependency resolution. It’s often the preferred terminal method for .deb files because it acts smarter than dpkg alone. This method requires apt version 1.1 or higher, which is standard on modern Ubuntu versions.
Steps:
- Open Terminal: Press Ctrl+Alt+T.
- Navigate to Directory (Recommended): Change your current directory to where the
.debfile is located:
bash

cd ~/Downloads
- Install the .deb File: Use the
apt installcommand, ensuring you prefix the filename with./to indicate a local file:
bash

sudo apt install ./package_name.deb
Replacepackage_name.debwith your actual file name. - Dependency Resolution:
aptwill analyze the package, tell you if there are any missing dependencies, and prompt you to confirm their installation. TypeYand press Enter to proceed.
Advantages:
- Automatic Dependency Resolution: This is its strongest feature;
apthandles dependencies gracefully. - Unified Command: Uses the same familiar command (
apt install) for both local.debfiles and packages from repositories. - Clear Feedback: Provides detailed output during the installation process.
Disadvantages:
- Requires
aptversion 1.1+, though this is rarely an issue on recent Ubuntu versions.
Using aptitude (Alternative high-level package manager)
aptitude is another powerful command-line package manager that offers a slightly different approach, including an interactive text-based user interface (TUI). It’s particularly renowned for its advanced dependency resolution capabilities, especially when dealing with complex or conflicting packages.
Steps:
- Install
aptitude(if not already installed):
bash

sudo apt install aptitude
- Open Terminal: Press Ctrl+Alt+T.
- Navigate to Directory: Change your current directory to where the
.debfile is located:
bash

cd ~/Downloads
- Install the .deb File:
bash

sudo aptitude install ./package_name.deb
- Follow Prompts:
aptitudeis known for offering multiple solutions for dependency conflicts. It might present you with options to resolve issues; simply choose the one that best suits your needs or accept the default recommendation.
Advantages:
- Superior Dependency Solver: Often finds solutions to dependency issues that
aptorgdebimight struggle with. - Interactive TUI: Can be helpful for exploring packages and resolving conflicts.
Disadvantages:
- Might be overkill for simple
.debinstallations. - Requires an extra tool installation.
Troubleshooting Common Issues and Post-Installation Steps
Even with the right methods, you might encounter issues. Knowing how to troubleshoot and what to do after installation is key to maintaining a healthy Ubuntu system.
Unmet Dependencies
This is the most frequent issue when installing .deb files.
- Symptoms: Installation fails with errors like “unmet dependencies” or “package depends on X but it is not installed.”
- Solution:
- If you used
dpkg, immediately run:
bash

sudo apt --fix-broken install
- If you’re using
gdebi, it’s designed to resolve these. If it fails, check the output for specific missing packages you might need to install manually. - For
apt install ./package.deb, it should automatically handle dependencies, but if it fails, the error messages will point to specific packages.
- If you used
Broken Packages
Sometimes, a package installation can get interrupted or corrupted, leaving your system in a “broken” state where apt or dpkg commands might not work correctly.
- Symptoms: Errors like “dpkg was interrupted, you must manually run ‘sudo dpkg –configure -a’ to fix the problem.”
- Solution:
- Run the suggested command:
bash

sudo dpkg --configure -a
- Clean up and update your package lists:
bash

sudo apt clean && sudo apt update && sudo apt upgrade
- If a specific package is causing problems, you might need to forcibly remove it (see “Removing an Installed .deb Package” below) and try reinstalling.
- Run the suggested command:
“Permission Denied” Errors
This usually means you’re trying to perform a system-level action without sufficient privileges.
- Symptoms: Errors like “Permission denied” or “Only root may install packages.”
- Solution: Always prefix your installation commands with
sudo(Super User Do) to execute them with administrative privileges. Ensure your user account is part of thesudogroup.
Removing an Installed .deb Package
Just as important as installing is knowing how to remove software cleanly.
- Identify Package Name: You need the exact package name. Often, it’s similar to the
.debfilename (e.g.,google-chrome-stableforgoogle-chrome-stable_current_amd64.deb). You can find this usingdpkg -l | grep <keyword>or by checking the software center. - Remove Package (Keep Configuration Files):
bash

sudo apt remove package_name
This removes the application binaries but keeps its configuration files, which is useful if you plan to reinstall it later. - Purge Package (Remove Configuration Files):
bash

sudo apt purge package_name
This removes the package along with all its configuration files, providing a cleaner uninstall. - Remove Unused Dependencies: After removing packages, some dependencies that were installed might no longer be needed by any other software.
bash

sudo apt autoremove
This command cleans up those orphaned dependencies, freeing up disk space.
Verifying Installation
After installation, you’ll want to confirm that the software is indeed present and functional.
- Check Application Menu: Most GUI applications will appear in your Ubuntu Applications menu (Activities overview). Search for the application by its name.
- Run from Terminal: For command-line tools or to verify the application’s version, open a terminal and type the application’s command (e.g.,
google-chrome --versionorcode). - Check Status: You can also check the package status with
dpkg -s package_name.
Conclusion
Installing .deb files on Ubuntu is a fundamental skill that unlocks a vast ecosystem of software beyond what’s available in the official repositories. Whether you’re integrating proprietary tools, experimenting with new software versions, or performing offline installations, mastering these methods empowers you with greater control over your system.
We’ve explored a range of options, from the user-friendly Ubuntu Software Center and the dependency-savvy GDebi installer to the powerful command-line utilities dpkg, apt, and aptitude. Each method has its strengths and ideal use cases, allowing you to choose the approach that best fits your technical comfort level and the specific installation scenario.
Crucially, remember that with great power comes great responsibility. Always prioritize downloading .deb files from trusted sources to safeguard your system against security threats and maintain stability. By following the best practices outlined in this guide – verifying sources, understanding dependencies, and leveraging the right installation tools – you can confidently manage software installations on your Ubuntu machine. This ability not only enhances your system’s functionality but also aligns perfectly with the spirit of digital productivity and technological empowerment that our website champions.