In an increasingly connected world, reliable home internet and television are no longer luxuries but essentials. Whether you’re setting up a new entertainment system, optimizing your smart home, or simply relocating your modem for better Wi-Fi coverage, knowing how to install a coaxial outlet yourself is an incredibly valuable skill. This isn’t just about saving money on technician calls; it’s about empowering yourself with practical tech knowledge and gaining full control over your home’s digital infrastructure.
This comprehensive guide will walk you through every step of installing a coax outlet, transforming what might seem like a daunting task into an achievable weekend project. We’ll delve into why this particular DIY endeavor aligns perfectly with smart financial planning and tech-savvy living, equip you with a detailed list of tools and materials, and provide clear, actionable instructions to ensure a successful, professional-grade installation. Get ready to enhance your home connectivity, one secure coax connection at a time.
Why Take on This Tech DIY? The Value of a Self-Installed Coax Outlet
At first glance, installing a coax outlet might seem like a job best left to the professionals. However, for the technically inclined and the financially astute, it presents a compelling opportunity to merge the worlds of technology and personal finance. This isn’t merely a household chore; it’s a strategic move that offers tangible benefits for your wallet and your home’s technological capabilities.
Firstly, let’s talk Money. Professional installations can be surprisingly expensive. Service calls from cable companies or independent electricians often come with hefty hourly rates, trip charges, and material markups. By taking the DIY route, you eliminate these costs entirely, paying only for the relatively inexpensive materials and tools – many of which you might already own or can use for future projects. Over time, these savings add up, contributing directly to your personal finance goals. Furthermore, the ability to modify your home’s wiring as needed means you’re less reliant on external services, saving you money on future reconfigurations or troubleshooting. It’s an investment in self-sufficiency that pays dividends.
Secondly, this project is a prime example of accessible Tech empowerment. In an era dominated by smart homes, IoT devices, and streaming services, a robust and flexible network foundation is paramount. A well-placed coax outlet ensures optimal signal strength for your cable modem, leading to faster, more reliable internet speeds – crucial for everything from online gaming and 4K streaming to remote work and video conferencing. It also provides the backbone for crisp, clear television signals. Learning to install a coax outlet gives you a deeper understanding of your home’s network infrastructure, demystifying the cables and connections that power your digital life. This practical knowledge can lead to greater confidence in tackling other home tech projects, from setting up a mesh Wi-Fi system to installing smart lighting. It’s about building a more resilient, high-performance home environment tailored to your exact needs, without waiting for a technician’s schedule or incurring extra charges.
In essence, installing a coax outlet yourself is a smart blend of financial prudence and technological proficiency. It saves money, enhances your home’s digital performance, and expands your personal skillset, making it a truly valuable endeavor in the modern landscape.
Gearing Up: Essential Tools and Materials for Your Coax Installation
Before you dive into the installation process, gathering all the necessary tools and materials is paramount. This ensures a smooth workflow, prevents frustrating interruptions, and ultimately leads to a professional-looking and functioning outlet. Think of this as preparing your tech arsenal for a successful mission.
Coaxial Cable and Connectors: The Core Components
- Coaxial Cable (RG6 or RG59): The lifeblood of your connection. For most modern applications, especially high-definition TV and broadband internet, RG6 cable is the preferred choice due to its thicker gauge and better shielding, which minimizes signal loss over longer distances and at higher frequencies. RG59 is older and generally suitable for shorter runs and analog signals. Ensure you purchase the appropriate length, adding extra slack for future adjustments.
- Coax Wall Plate/Outlet: This is the visible part of your installation. They come in various styles (single, double, quad) and colors to match your existing decor. Choose one with an F-connector terminal on the back.
- F-Connectors (Compression or Crimp Type): These are the metal connectors that attach to the ends of your coaxial cable. Compression F-connectors are generally recommended as they provide a more secure, weather-resistant, and signal-stable connection compared to traditional crimp-on types. Ensure they match your cable type (RG6).
Specialized Tools for Precision and Ease
- Coax Stripper: This indispensable tool is designed specifically to strip the various layers of a coaxial cable (outer jacket, braiding, foil, dielectric) to the precise lengths required for an F-connector. Using a proper coax stripper is crucial for a clean, reliable connection and avoids damaging the delicate inner conductor.
- Coax Crimper/Compression Tool: Depending on your chosen F-connectors, you’ll need either a crimping tool (for crimp-on connectors) or, preferably, a compression tool (for compression F-connectors). This tool securely fastens the connector to the cable, ensuring a strong, reliable connection that won’t pull apart or introduce signal interference.
- Fish Tape (Optional but Recommended for Wall Runs): A long, flexible tape used to pull cables through walls, conduits, or ceilings. It significantly simplifies running new cable through existing structures.
General Hardware and Safety Essentials
- Drill with Appropriate Bits: You’ll need a drill for various tasks. A large paddle bit (e.g., 3/4″ or 1″) may be needed to drill through studs if you’re routing cable through a wall. Smaller bits will be used for mounting screws.
- Screwdriver (Phillips and Flathead): For attaching the wall plate and any mounting brackets.
- Stud Finder: Essential for locating wooden studs behind drywall, preventing you from drilling into them unnecessarily and helping you find a clear path for your cable.
- Utility Knife/Drywall Saw: For cutting the opening in your drywall for the outlet box.
- Pencil: For marking your cut lines and drill points.
- Wire Cutters: Handy for trimming excess cable.
- Cable Ties/Staples: For securing the coax cable along its run, preventing kinks and ensuring a neat, professional installation. Ensure staples are designed for coax cable to avoid crimping the cable and damaging signal integrity.
- Low-Voltage Mounting Bracket (Old-Work Ring): This inexpensive plastic bracket mounts directly to the drywall and provides a secure frame for your coax wall plate.
- Flashlight: Invaluable for peering into dark wall cavities, attics, or crawl spaces.
- Safety Glasses: Always protect your eyes when drilling, cutting, or working in dusty environments.
Having these tools and materials on hand before you start will make the installation process efficient and straightforward, empowering you to complete the project with confidence and achieve a high-quality, lasting result.
Strategic Planning and Preparation: Laying the Groundwork for Success
A successful coax outlet installation isn’t just about the physical steps; it’s about smart planning and meticulous preparation. This phase is crucial for ensuring safety, optimizing performance, and achieving a clean, professional finish that integrates seamlessly with your home’s aesthetic and tech setup. Rushing through this stage can lead to frustrating setbacks or, worse, safety hazards.
Prioritizing Safety: Your First Step
Before you even think about cutting or drilling, safety must be your absolute priority. You’ll be working near electrical wires and potentially in dusty, confined spaces.
- Disconnect Power: If you are working near any existing electrical outlets or anticipate drilling into a wall that might contain electrical wiring, always turn off the power to that circuit at your main electrical panel. Use a non-contact voltage tester to confirm that the power is off before proceeding. While coaxial cables carry low voltage, you want to avoid any accidental contact with mains electricity.
- Wear Protective Gear: Safety glasses are non-negotiable, especially when cutting drywall, drilling, or working in an attic or crawl space where dust, insulation fibers, or debris might fall. Gloves can also be useful for handling cable and protecting your hands.
- Clear the Area: Ensure your workspace is free of clutter, allowing you to move freely and safely with tools.
Locating Your Outlet: Where Function Meets Form
Choosing the right location for your coax outlet involves a blend of practical functionality, aesthetic considerations, and structural awareness. This decision impacts both your home’s technological efficiency and its visual appeal.
- Proximity to Devices: The most important factor is placing the outlet where your devices (TV, cable modem, set-top box) will connect to it. Minimize the length of the patch cable required to connect the device to the wall outlet, as shorter cables generally mean less signal degradation.
- Avoiding Obstacles:
- Studs: Use a stud finder to locate wall studs. You cannot drill through a stud to install a wall box. Your outlet opening needs to be between studs. If you need to route cable through a stud, you’ll need to drill a hole through the center of the stud, taking care not to damage its structural integrity.
- Electrical Wiring and Plumbing: This is critical. Never install a low-voltage outlet directly adjacent to an electrical box in the same stud bay. Maintain at least 6-12 inches of separation from electrical outlets, switches, or wiring to prevent electromagnetic interference (EMI) from affecting your coax signal. Use your stud finder and common sense to avoid areas where plumbing pipes might be present.
- Access for Cable Runs: Consider the easiest and least invasive path for the coaxial cable to reach your desired outlet location from its source (e.g., an existing splitter, an attic, or a basement).
- Internal Walls: Running cable through internal walls is often easier than external walls.
- Attics and Crawl Spaces: If you have attic or crawl space access, this can greatly simplify running new cable across distances or between floors. Plan your route to avoid sharp bends, which can damage the cable and degrade signal quality.
- Aesthetic Integration: While functionality is key, also consider how the new outlet will look. Try to align it with existing outlets or architectural lines for a cleaner, more integrated appearance.
- Future-Proofing: While not always possible, think ahead. Could this location serve future tech needs? Is it in a high-traffic area where the cable might be easily damaged?
By carefully considering these planning and preparation steps, you’ll lay a solid foundation for a successful installation, ensuring your new coax outlet is safe, functional, and seamlessly integrated into your modern home environment. This diligent approach exemplifies the kind of thoughtful execution that defines efficient tech projects and smart home improvements.
The Step-by-Step Installation Process: From Cable to Connectivity
With your planning complete and tools at the ready, it’s time to bring your new coax outlet to life. This section details the practical steps for cutting, connecting, and securing your new outlet, transforming raw materials into a functional part of your home’s connectivity.
Preparing the Wall and Running the Cable
This stage is about creating the physical pathway for your coax signal.
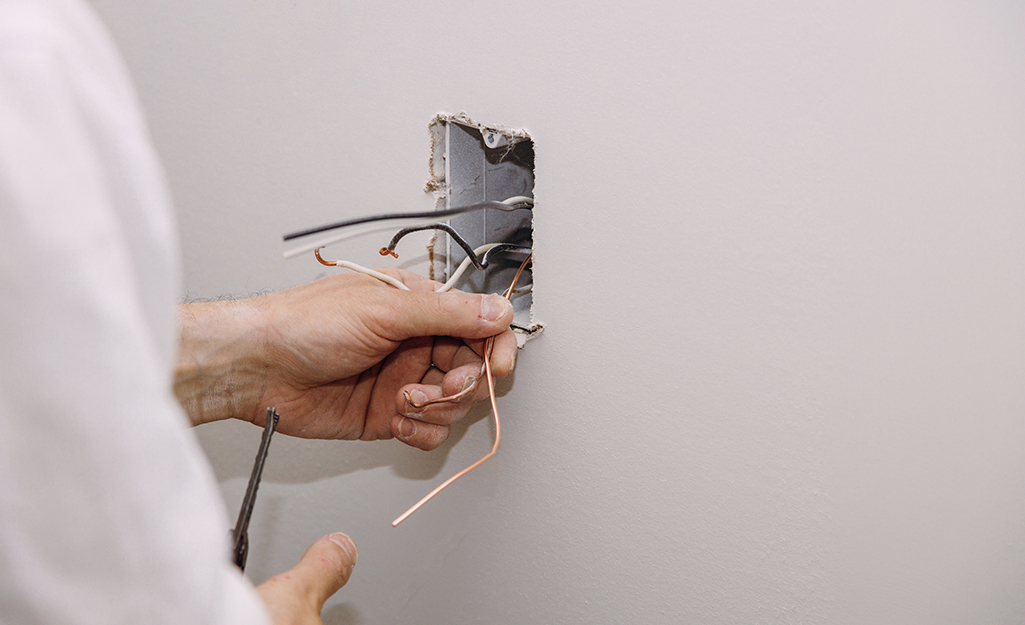
- Mark and Cut the Opening: Once you’ve chosen your location (between studs, away from electrical/plumbing), use a pencil to trace the outline of your low-voltage mounting bracket onto the drywall. Double-check your measurements. Using a utility knife or a drywall saw, carefully cut out the marked section. Take your time to ensure a clean, precise cut.
- Install the Low-Voltage Mounting Bracket: Insert the mounting bracket into the freshly cut hole. Tighten the screws on the bracket; these will pivot tabs that grip the inside of the drywall, securing the bracket firmly in place. This provides a stable frame for your wall plate.
- Run the Coaxial Cable: This is often the most challenging part.
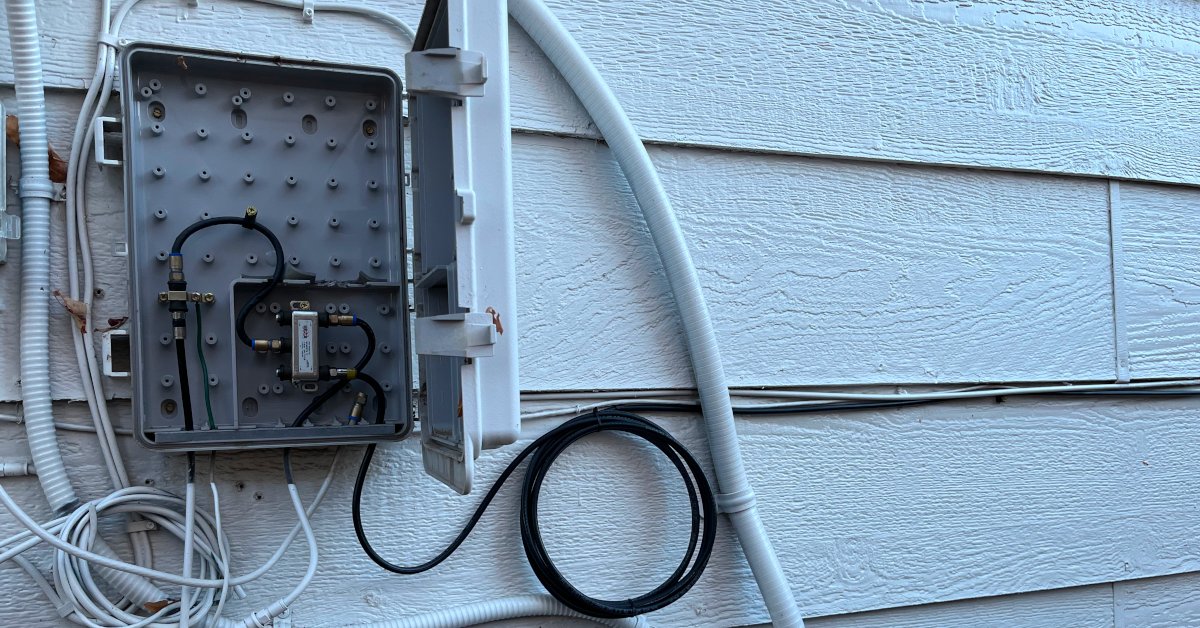
- From Source to Outlet: You need to guide the coax cable from its point of origin (e.g., an existing main splitter in the basement or attic, or an exterior entry point) to your new outlet location.
- Through Walls: If routing through an existing wall cavity, use fish tape. Feed the fish tape from the new outlet opening down towards the basement or up towards the attic (or horizontally to another opening), or vice-versa. Once the fish tape emerges, securely attach the end of your coaxial cable to it and pull the tape back, guiding the cable through the wall.
- Leave Slack: Ensure you pull enough cable through the wall opening – at least 1-2 feet of slack is advisable. This allows for easier manipulation, future adjustments, and prevents the cable from being pulled taut inside the wall.
- Secure the Cable: Along its run, secure the cable using coax staples or cable ties every few feet, especially in attics or crawl spaces, to prevent it from sagging or getting damaged. Avoid bending the cable at sharp angles, which can crimp it and degrade signal quality.
Mastering Cable Preparation: Stripping and Connecting
This is arguably the most critical step for signal integrity. A poorly prepared cable end will lead to poor signal quality or no signal at all.
- Trim and Square the Cable: Use wire cutters to trim the end of the coax cable square and clean.
- Strip the Cable with a Coax Stripper: Place the end of the cable into your coax stripper. Rotate the stripper tool around the cable a few times (usually 2-3 full rotations) until it cleanly cuts through the outer jacket and dielectric insulation.
- First Cut: This removes the outer PVC jacket and exposes the braided shield underneath.
- Second Cut: A separate blade (or a different setting on the same tool) then removes a smaller section of the dielectric insulation, exposing the copper center conductor.
- Inspect the Strip: You should end up with a clean, multi-layered strip: about 1/2 to 3/4 inch of outer jacket removed, exposing the braided shield; then a smaller section (about 1/4 inch) of the inner dielectric removed, revealing the copper center conductor. The braided shield should be folded back over the outer jacket.
- Attach the F-Connector:
- Push the F-connector onto the prepared end of the cable. The center copper conductor should slide smoothly into the center pin of the connector, and the folded-back braided shield should make contact with the inside of the connector body.
- Ensure the dielectric (white insulation) is flush with the base of the connector’s internal pin, and the copper conductor protrudes slightly (about 1/8 inch) beyond the end of the connector.
- Compress the Connector: If using a compression connector, insert the connector-cable assembly into your compression tool. Squeeze the handles firmly until the tool fully compresses the connector onto the cable. This forms a strong, sealed connection.
- Verify Connection: Give the connector a gentle tug to ensure it’s securely attached. Inspect for any stray strands of the braided shield touching the center conductor, which would cause a short circuit. Trim any stray strands with a utility knife.
Securing the Outlet and Making Final Connections
You’re almost there! Now it’s about making everything tidy and functional.
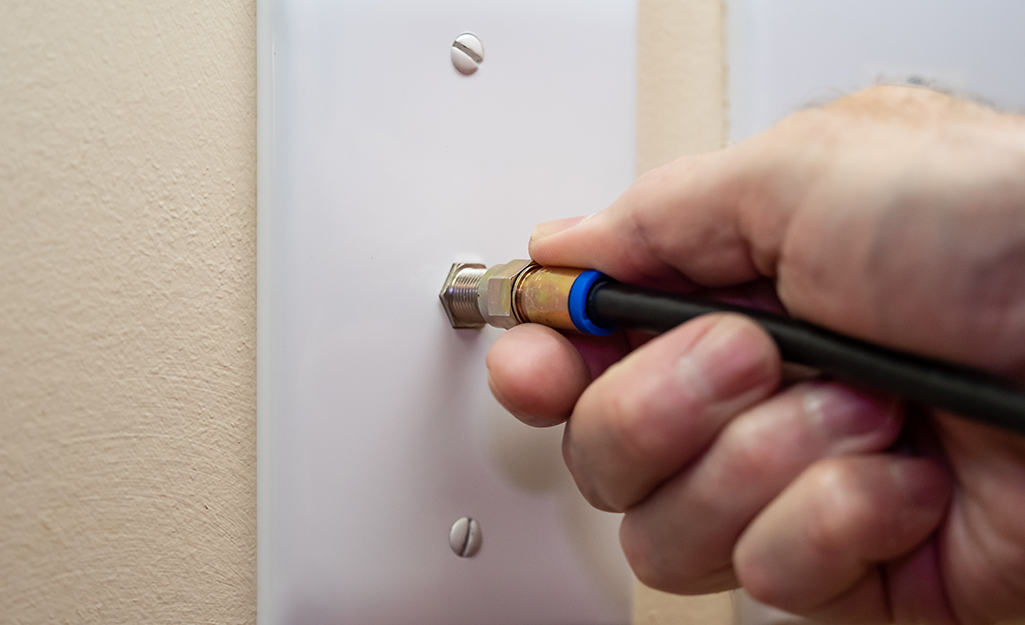
- Connect to the Wall Plate: Take the prepared end of the coax cable with its attached F-connector and screw it firmly onto the F-connector terminal on the back of your coax wall plate. Hand-tighten it, then give it a slight turn with a wrench or pliers, being careful not to overtighten and strip the threads.
- Mount the Wall Plate: Gently push the excess cable back into the wall cavity, leaving just enough to comfortably mount the plate. Align the wall plate over the mounting bracket and screw it into place using the provided screws. Don’t overtighten, as this can crack the plastic plate.
- Connect to the Source (if applicable): If you’re connecting this new run to a splitter or directly to your main service line, repeat the cable preparation and F-connector attachment steps for that end of the cable. Then, screw that end onto the appropriate port of your splitter or service entry point. Ensure all connections are finger-tight, then gently snugged with a wrench.
The Moment of Truth: Testing Your New Coax Outlet
The final, and most satisfying, step is to test your newly installed outlet.
- Connect Your Device: Plug your cable modem, television, or set-top box into the new coax outlet using a short, high-quality patch cable.
- Power Up and Test:
- For Internet: Power on your cable modem. Observe its indicator lights. It should typically cycle through connection stages (power, receive, send, online) and eventually show a solid “online” or “internet” light. If it’s blinking indefinitely or showing an error, there might be a signal issue. Try connecting a device (computer, phone) to the modem and check for internet access.
- For TV: Power on your television or set-top box. Scan for channels if it’s a direct TV connection, or check for picture and sound quality with your set-top box. Look for clear images and strong signal indications.
- Troubleshooting (Initial Check): If you encounter issues (no signal, poor picture, modem offline), first re-check all connections at the wall plate, the device, and the source. Ensure all F-connectors are tightly secured. A common culprit is a poorly made F-connector, so inspect it carefully for stray strands or an improper strip.
By following these detailed steps, you’ll successfully install a functional coax outlet, adding significant value and convenience to your home’s technological infrastructure. This DIY achievement not only saves money but also strengthens your capabilities as a savvy homeowner and tech enthusiast.
Optimizing Performance and Troubleshooting Common Issues
Even with careful installation, sometimes issues can arise. Knowing how to optimize your setup and troubleshoot common problems can save you further time and frustration, reinforcing your status as a tech-savvy homeowner.
Optimizing Performance:
- Quality Components: Always use high-quality RG6 coaxial cable (preferably quad-shielded for sensitive applications), and opt for compression F-connectors. Cheap cables and connectors are a primary cause of signal degradation.
- Minimize Splits: Every splitter in your coax line causes signal loss. If you don’t need a connection, remove any unnecessary splitters. If you must use a splitter, choose one with the fewest outputs necessary and ensure it’s rated for the frequencies your services use (e.g., 5-1000 MHz or higher for modern broadband).
- Proper Cable Management: Avoid sharp bends (which can damage the cable’s internal structure), kinks, or crushing the cable. Secure runs neatly with appropriate coax staples that don’t pinch the cable.
- Avoid Interference: Keep coaxial cables away from power lines, fluorescent lights, and large electrical appliances as much as possible, as these can introduce electromagnetic interference (EMI).
- Weather Protection: If any part of your coax run is outdoors, ensure all outdoor connections are sealed with weatherproof caps or silicone sealant to prevent moisture ingress, which can corrode connectors and cause signal loss.
Troubleshooting Common Issues:
- No Signal / Modem Offline:
- Check All Connections: Start at the device and work backward: device to wall plate, wall plate to internal cable, internal cable to splitter, splitter to main line. Ensure every F-connector is tight and correctly installed.
- Inspect F-Connectors: This is the most common failure point for DIY installations. Remove the connector from the wall plate and carefully inspect the center conductor. Is it straight? Is it protruding slightly? Are there any stray strands of braided shield touching the center conductor (a “short”)? If you see a short, you’ll need to re-strip and re-connect the F-connector.
- Test Source Signal: If you have another working coax outlet, try connecting your device there to confirm the device itself isn’t faulty and that the main signal coming into your home is active.
- Bypass Splitters: Temporarily connect the new run directly to the main line (if safely accessible) to rule out a faulty splitter.
- Poor Picture Quality / Slow Internet Speeds:
- Check for Loose Connections: Even a slightly loose connection can introduce noise and signal degradation.
- Inspect Cable for Damage: Look for any kinks, cuts, or crushed areas along the entire length of your newly run cable.
- Replace Patch Cables: The short coax cable connecting your device to the wall outlet can also be a culprit. Try a new, high-quality patch cable.
- Signal Strength: Some cable modems have diagnostic pages (often accessible via 192.168.100.1 in your browser) that show signal levels. Research what constitutes good signal levels for your provider. If levels are too low or too high, it indicates an issue.
- Intermittent Signal:
- Often points to a loose connection or a faulty F-connector that’s making intermittent contact. Re-tighten and re-inspect all connectors.
- Environmental factors like weather changes affecting outdoor connections can also cause this.
By applying these optimization tips and systematically troubleshooting, you can ensure your self-installed coax outlet delivers robust, reliable performance, maximizing the benefits of your DIY efforts for your home’s connectivity and your ongoing digital productivity.
Conclusion: Empowering Your Home with DIY Connectivity
Installing a coax outlet is more than just running a cable through a wall; it’s an act of empowerment. In an age where digital connectivity is the backbone of modern living, taking control of your home’s infrastructure is a strategic move that pays dividends in both convenience and cost savings. This detailed guide has shown you that with the right tools, careful planning, and a methodical approach, a task often outsourced to professionals is well within your grasp.
You’ve learned to navigate the nuances of cable selection, master the precision of stripping and connecting F-connectors, and strategically place an outlet for optimal performance. By embracing this kind of “Tech” DIY, you not only save “Money” on technician fees but also gain invaluable practical skills that enhance your understanding of home systems. This confidence can open doors to tackling further home improvement projects, from smart home integrations to advanced networking setups, all while building a more resilient and personalized living space.
So, the next time your entertainment setup needs a tweak, or your internet modem demands a new location, remember the satisfaction of a job well done. You now possess the knowledge and skill to ensure your home remains seamlessly connected, embodying the smart, self-sufficient spirit of the modern homeowner. Congratulations on boosting your home’s connectivity – and your own capabilities – one coax outlet at a time!
aViewFromTheCave is a participant in the Amazon Services LLC Associates Program, an affiliate advertising program designed to provide a means for sites to earn advertising fees by advertising and linking to Amazon.com. Amazon, the Amazon logo, AmazonSupply, and the AmazonSupply logo are trademarks of Amazon.com, Inc. or its affiliates. As an Amazon Associate we earn affiliate commissions from qualifying purchases.