In the digital age, managing files efficiently is paramount for individuals and businesses alike. From sharing large documents with colleagues to backing up precious personal photos, the ability to compress and decompress files quickly and reliably is a fundamental skill. While most operating systems offer basic file compression tools, they often fall short in terms of features, compression ratio, and format compatibility. This is where 7-Zip steps in as a powerful, free, and open-source file archiver that has earned its reputation as an indispensable utility for millions of users worldwide.
7-Zip stands out not only for its robust capabilities but also for its commitment to being a cost-effective solution in a landscape often dominated by proprietary software. For those keen on maximizing productivity, safeguarding digital assets, or simply decluttering their digital workspace, understanding how to install and utilize 7-Zip is a critical step. This comprehensive guide will walk you through every stage of the 7-Zip installation process, from initial download to first use, ensuring you can harness its full potential with confidence. We’ll delve into why 7-Zip is the preferred choice for many, how to ensure a seamless setup, and even touch upon basic usage to get you started on your journey towards more efficient file management.
Understanding 7-Zip: More Than Just a Compressor
Before diving into the installation process, it’s beneficial to understand what makes 7-Zip such a compelling tool in the digital toolkit. In an era where digital security and resource management are key, having a reliable file archiver can significantly impact your workflow and data integrity.
What is 7-Zip and Why is it Essential?
At its core, 7-Zip is a free and open-source file archiver with a high compression ratio. Developed by Igor Pavlov, it primarily operates with the 7z archive format, offering significantly better compression than standard ZIP formats, especially for certain file types. But its utility extends far beyond just its native format. 7-Zip supports a vast array of other archiving formats, including ZIP, GZIP, BZIP2, TAR, WIM, and XZ, for both compression and decompression. Furthermore, it can decompress even more formats, such as RAR, ARJ, LZH, CHM, MSI, and ISO, making it a versatile universal opener for almost any archived file you might encounter.
Its essentiality stems from several key advantages:
- Open-Source and Free: This is perhaps 7-Zip’s most attractive feature. Unlike many commercial alternatives that come with hefty price tags or subscription models, 7-Zip is completely free for both personal and commercial use. This aligns perfectly with a focus on smart financial decisions, as it provides enterprise-grade functionality without the associated cost, making it an excellent investment for anyone on a budget, from individual users to startups.
- Superior Compression: Utilizing advanced compression algorithms, particularly the LZMA and LZMA2 algorithms for the 7z format, 7-Zip consistently achieves higher compression ratios compared to traditional ZIP files. This means smaller file sizes, faster uploads/downloads, and more efficient use of storage space – a direct benefit for data management and, indirectly, for operational costs related to storage.
- Robust Security Features: For those concerned about digital security, 7-Zip offers strong AES-256 encryption for 7z and ZIP formats. This allows users to password-protect sensitive archives, adding an essential layer of security to confidential data before sharing or storing it. In today’s world of heightened cyber threats, this feature alone makes 7-Zip an invaluable tool for protecting your “digital brand” and sensitive information.
- Integration and Usability: 7-Zip integrates seamlessly with Windows Shell, providing convenient context menu options (right-click) for quick archiving and extraction. Its clean, intuitive interface makes it accessible even for novice users, while its powerful features cater to power users.
Why Choose 7-Zip Over Other Utilities?
While Windows includes a built-in ZIP compression utility, and other commercial options like WinRAR and WinZip are popular, 7-Zip often emerges as the preferred choice for several compelling reasons:
- Cost-Effectiveness: As mentioned, 7-Zip is free. WinRAR and WinZip are trialware that eventually require a purchase for continued full functionality. For individuals and businesses looking to optimize their spending without compromising on quality, 7-Zip presents an undeniable financial advantage.
- Performance: In many head-to-head comparisons, 7-Zip’s 7z format consistently outperforms other formats in terms of compression ratio, meaning you get smaller files. This efficiency can translate to significant time savings when transferring large files over networks, which is crucial for productivity.
- Format Support: While others support common formats, 7-Zip’s extensive list of supported archive types for both compression and decompression is truly impressive, making it a versatile tool for nearly any archiving task. This broad compatibility minimizes the need for multiple archiving programs, streamlining your software suite.
- Open-Source Reliability: Being open-source means its code is publicly available for review, contributing to transparency and often, higher security due to community scrutiny. This “brand” of transparency and community support can be a deciding factor for tech-savvy users and organizations prioritizing trustworthy software.
Preparing for Installation: Ensuring a Smooth Setup
A smooth installation process begins with proper preparation. Taking a few moments to understand system requirements and locate the correct download source can save you time and frustration later.
Checking System Compatibility and Requirements
7-Zip is renowned for its broad compatibility and minimal system requirements, making it accessible to a wide range of users. However, it’s always good practice to confirm your system meets the basic criteria:
- Operating System: 7-Zip primarily supports Microsoft Windows operating systems, ranging from Windows 2000/XP up to the latest versions like Windows 10 and 11. There are also unofficial ports and command-line versions available for Linux/macOS, but the graphical installer we’re focusing on is Windows-specific.
- Processor Architecture: This is crucial. Modern computers use either a 32-bit (x86) or 64-bit (x64) processor architecture. You need to download the 7-Zip version that matches your system.
- To check your system type on Windows 10/11: Right-click the Start button, select “System,” and look for “System type” under “Device specifications.” It will typically say “64-bit operating system, x64-based processor” or “32-bit operating system, x86-based processor.”
- Installing the wrong version might lead to compatibility issues or the software not running optimally, though 64-bit Windows can often run 32-bit applications. For best performance, always match the architecture.
- Disk Space: 7-Zip is a lightweight application, requiring very little disk space – typically less than 10 MB for the installation files themselves. This makes it an incredibly efficient addition to your system, conserving valuable storage that might be critical for other applications or data.
- RAM: Any modern system with 512 MB of RAM or more will run 7-Zip comfortably. Its resource footprint is negligible.
Safely Downloading the Official 7-Zip Installer
The internet is rife with unofficial download sites that might bundle legitimate software with adware, malware, or outdated versions. To ensure the integrity and security of your system, it is imperative to download 7-Zip only from its official source. This not only protects your digital security but also reinforces the trust in the 7-Zip “brand” itself.
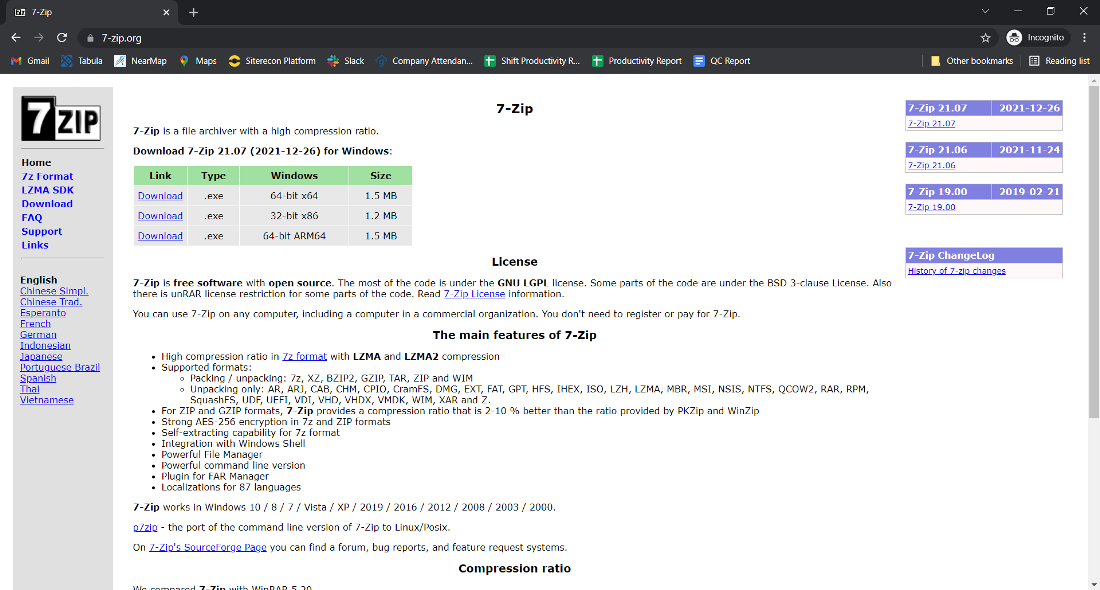
- Visit the Official Website: Open your web browser and navigate to the official 7-Zip website:
www.7-zip.org. Be wary of similar-looking URLs or sponsored search results that might lead to impostor sites. - Identify the Download Section: On the homepage, you’ll typically find a prominent “Download” section or links.
- Choose the Correct Version: The download page will list several versions based on the operating system and processor architecture.
- Look for “Windows (64-bit) x64” if your system is 64-bit.
- Look for “Windows (32-bit) x86” if your system is 32-bit.
- Select the latest stable version, usually indicated by the highest version number.
- Initiate Download: Click the “Download” link next to the appropriate version. Your browser will download the installer file, which usually has a
.exeextension (e.g.,7z2301-x64.exe). - Save the File: Save the installer file to a location you can easily find, such as your “Downloads” folder or desktop.
By strictly adhering to downloading from the official site, you protect your system from potential threats, ensuring you receive the clean, legitimate version of 7-Zip, which is a crucial aspect of maintaining digital security and productivity.
Step-by-Step Guide: Installing 7-Zip on Your System
With the correct installer downloaded, you’re ready to proceed with the installation. The process is straightforward, designed for ease of use, even for those who are not particularly tech-savvy.
Initiating the Installation Process
- Locate the Installer File: Navigate to the folder where you saved the 7-Zip installer (e.g., your Downloads folder).
- Run as Administrator: It’s best practice to run executable files that install software as an administrator to prevent potential permission issues.
- Right-click on the
7z*.exeinstaller file. - Select “Run as administrator” from the context menu.
- If prompted by User Account Control (UAC), click “Yes” to allow the app to make changes to your device.
- Right-click on the
Navigating the Setup Wizard
The 7-Zip Setup Wizard is minimalistic and efficient, guiding you through the few necessary steps.
- Choose Installation Location: The first screen will ask you to choose the installation folder.
- By default, 7-Zip suggests a standard location (e.g.,
C:Program Files7-Zipon a 64-bit system orC:Program Files (x86)7-Zipon a 32-bit system). - For most users, the default location is perfectly acceptable and recommended. If you have a specific reason to change it (e.g., installing on a different drive), you can click the “Browse…” button to select a new path.
- Click “Install.”
- By default, 7-Zip suggests a standard location (e.g.,
- Wait for Installation: The installation process is extremely fast, usually completing in a matter of seconds due to 7-Zip’s small footprint. A progress bar will briefly appear and disappear.
- Complete Installation: Once the installation is finished, a final screen will indicate that 7-Zip has been successfully installed. Click “Close” to exit the setup wizard.
That’s it! 7-Zip is now installed on your computer. There are no tricky checkboxes for bundled software, no hidden options – just a clean, quick installation.
Verifying a Successful Installation
To confirm that 7-Zip has been installed correctly and is ready for use, you can perform a quick check:
- Check for Program Files:
- Open File Explorer.
- Navigate to the installation directory (e.g.,
C:Program Files7-Zip). - You should see the 7-Zip executable (
7zFM.exe– the File Manager) and other program files within this folder.
- Verify Context Menu Integration: This is the most practical way to confirm 7-Zip’s readiness.
- Locate any file on your computer (e.g., a
.txtdocument, an image). - Right-click on the file.
- You should now see a new context menu entry, typically labeled “7-Zip” or a small 7-Zip icon. Hovering over it will reveal sub-options like “Add to archive…”, “Compress to [filename].7z”, “Extract files…”, etc.
- If you see these options, 7-Zip is successfully integrated into your system and ready to use.
- Locate any file on your computer (e.g., a
Beyond Installation: Leveraging 7-Zip’s Capabilities
While installation is the first step, truly benefiting from 7-Zip comes from understanding its basic operations and exploring its more advanced features. This will significantly boost your productivity and help you manage your digital assets more effectively, aligning with principles of good tech usage and even saving money by optimizing storage.
Basic Operations: Compressing and Extracting Files
The most common tasks you’ll perform with 7-Zip are compressing files into an archive and extracting files from an existing archive.
-
Compressing Files (Creating an Archive):
- Select Files/Folders: Locate the files or folders you wish to compress. You can select multiple items by holding down
CtrlorShift. - Right-Click: Right-click on the selected items.
- 7-Zip Context Menu: From the context menu, hover over “7-Zip.”
- Choose Compression Option:
- “Add to archive…“: This opens the full 7-Zip “Add to Archive” dialog, giving you complete control over archive format (7z, zip, tar, etc.), compression level, password protection (encryption), split archives, and more. This is ideal for customized archiving.
- “Compress to ‘[filename].7z’” (or
.zip): This is a quick option that creates a 7z (or zip) archive with default settings in the same directory as your selected files, named after the primary selected item. It’s perfect for fast, no-frills archiving. - “Compress to ‘[filename].7z’ and email“: This option compresses the files and then automatically attaches the resulting archive to a new email draft in your default email client.
- Confirm: If you chose “Add to archive…”, configure your settings (e.g., archive format, compression level, password) and click “OK.” 7-Zip will then create the archive file.
- Select Files/Folders: Locate the files or folders you wish to compress. You can select multiple items by holding down
-
Extracting Files (Decompressing an Archive):
- Locate Archive: Find the archive file you want to extract (e.g., a
.7z,.zip,.rarfile). - Right-Click: Right-click on the archive file.
- 7-Zip Context Menu: Hover over “7-Zip.”
- Choose Extraction Option:
- “Extract files…“: This opens the “Extract” dialog, allowing you to specify the destination path for the extracted files, manage password entry (if encrypted), and control other extraction parameters.
- “Extract Here“: This extracts all files directly into the current folder where the archive is located. Use with caution to avoid clutter, especially for archives containing many files directly at the root.
- “Extract to ‘[folder_name]’“: This is often the safest and most convenient option. It creates a new subfolder with the same name as the archive (e.g.,
myarchive.zipextracts to a new folder namedmyarchive) and extracts all contents into it, keeping your current folder tidy.
- Confirm: If you chose “Extract files…”, confirm the destination and click “OK.” If the archive is password-protected, you’ll be prompted to enter the password.
- Locate Archive: Find the archive file you want to extract (e.g., a
Exploring Advanced Features for Enhanced Productivity
While basic compression and extraction cover most daily needs, 7-Zip offers several advanced features that can significantly enhance productivity and digital security, providing real value for power users and businesses.
- Password Protection and Encryption: When creating an archive using the “Add to archive…” dialog, you can enter a password under the “Encryption” section. For
7zandZIPformats, 7-Zip uses strong AES-256 encryption, providing a robust security layer for your sensitive data. This is crucial for protecting intellectual property or personal financial documents, safeguarding your “brand” against data breaches. - Split Archives (Multi-Volume Archives): If you need to transfer very large files that exceed email attachment limits or fit on specific storage media (like older USB drives), 7-Zip allows you to split an archive into multiple smaller volumes. In the “Add to archive…” dialog, under “Split to volumes, bytes:”, you can select predefined sizes or enter a custom size.
- Self-Extracting Archives (SFX): 7-Zip can create self-extracting archives (SFX files) for the 7z format. These are executable files (
.exe) that contain the archived data and a small program to extract it, meaning the recipient doesn’t need 7-Zip installed to decompress the files. This is invaluable for distributing software or large files to users who may not have file archiving software. - Command-Line Version: For IT professionals, system administrators, or anyone involved in scripting and automation, 7-Zip offers a powerful command-line version (
7z.exe). This allows for batch processing, automated backups, and integration into scripts, significantly streamlining workflows and saving time (and thus money) through automation. - Benchmarking Tool: 7-Zip includes a built-in benchmark tool (
Tools > Benchmarkin the File Manager) that can test your CPU’s compression and decompression speed. This can be useful for comparing system performance or understanding how different hardware configurations affect archiving speeds.
Troubleshooting Common Installation and Usage Issues
While 7-Zip is generally robust and easy to use, you might occasionally encounter minor issues. Knowing how to troubleshoot these can save you time and frustration.
Addressing Installation Errors and Access Denied Messages
- “Access Denied” during Installation: This is almost always a permission issue. Ensure you ran the installer “as administrator” (right-click the installer .exe and choose “Run as administrator”). If you’re on a corporate network, your IT department might have restrictions that prevent software installation; in such cases, contact them for assistance.
- Installer Fails to Launch or Crashes:
- Corrupted Download: The installer file itself might be corrupted. Delete the downloaded
.exefile and re-download it from the official 7-zip.org website. - Antivirus Interference: Your antivirus software might be blocking the installation. Temporarily disable your antivirus (if you’re sure the file is from a trusted source) and try again. Remember to re-enable it immediately after installation.
- System Incompatibility: Double-check that you downloaded the correct 32-bit or 64-bit version matching your operating system.
- Corrupted Download: The installer file itself might be corrupted. Delete the downloaded
- 7-Zip Not Appearing in Program List/Start Menu: While 7-Zip primarily integrates via the context menu, you should still find its File Manager (
7zFM.exe) in your installed programs. If not, the installation might have failed. Try uninstalling any partial installation (via Windows “Add or Remove Programs”) and then reinstalling from scratch, ensuring you run as administrator.
Resolving File Association Problems
Sometimes, after installation, other programs might still open .zip or other archive files, or the context menu options might not appear correctly.
- Missing 7-Zip Context Menu Options:
- Restart Explorer: Sometimes, Windows Explorer needs a refresh. Restart your computer after installation.
- Check 7-Zip Settings: Open the 7-Zip File Manager (
7zFM.exefrom your Start Menu or program files). Go toTools > Options.... In the “System” tab, ensure that7zandZIP(and any other formats you frequently use) are checked under “Associate 7-Zip with:”. Also, ensure “Integrate 7-Zip to shell context menu” is checked. Click “Apply” and “OK.”
- Wrong Program Opening Archive Files:
- If another program (e.g., WinRAR, WinZip, or even Windows Explorer) is opening
.zipfiles by default and you want 7-Zip to handle them, you can change the default program. - Right-click on an archive file (e.g., a
.zipfile). - Select “Open with” > “Choose another app.”
- From the list, select “7-Zip File Manager.”
- Crucially, check the box that says “Always use this app to open .zip files” (or the relevant file type).
- Click “OK.” Repeat this for other archive types (like
.raror.7z) if needed.
- If another program (e.g., WinRAR, WinZip, or even Windows Explorer) is opening
- Updates and Conflicts: If you update 7-Zip or install another archiving program, conflicts can sometimes arise. Re-running the “Associate 7-Zip with:” settings from the 7-Zip File Manager Options can often resolve these.
By following these troubleshooting steps, you can quickly overcome most common issues and ensure 7-Zip functions optimally, allowing you to maintain peak productivity and manage your files without interruption.

Conclusion
Installing 7-Zip is a small investment of time that yields significant returns in terms of file management efficiency, data security, and overall digital productivity. As we’ve explored, 7-Zip isn’t just another utility; it’s a powerful, free, and open-source solution that challenges commercial alternatives with its superior compression ratios, extensive format support, and robust encryption capabilities. For anyone operating in the digital realm, from individual users to small businesses, its adoption aligns perfectly with smart tech choices, optimal financial management by leveraging free resources, and strengthening digital security practices.
By carefully following the steps outlined in this guide – from verifying system compatibility and securely downloading the official installer to navigating the straightforward installation wizard and confirming its integration – you can ensure a seamless setup. Beyond installation, understanding how to effectively compress and extract files, and even delving into advanced features like password protection and self-extracting archives, will unlock 7-Zip’s full potential, transforming the way you handle digital information.
Embracing tools like 7-Zip is a testament to savvy technology use, providing a competitive edge in managing your digital life or business operations. It empowers you to handle large files with ease, protect sensitive data, and optimize your storage, all without incurring additional costs. We encourage you to integrate 7-Zip into your daily workflow and explore its extensive features. For more comprehensive guides on enhancing your digital toolkit, exploring the latest in technology trends, or optimizing your digital security, stay tuned to our Tech section.