In our increasingly interconnected world, a reliable internet connection isn’t just a luxury; it’s a necessity. From remote work and online education to streaming entertainment and staying in touch with loved ones, our digital lives hinge on stable network access. Yet, one of the most common roadblocks to achieving this seamless connectivity is often overlooked: the network driver. Whether you’ve just built a new PC, reinstalled your operating system, or are troubleshooting an existing internet issue, knowing how to properly install network drivers is a fundamental skill for any computer user. This guide will walk you through everything you need to know, ensuring your system is always ready to connect.
Understanding Network Drivers: The Foundation of Your Online World
Before we dive into the “how-to,” it’s crucial to understand the “what” and “why.” A clear grasp of what network drivers are and their vital role can make the installation process much more intuitive and less daunting.
What Exactly Is a Network Driver?
At its core, a driver is a piece of software that allows your computer’s operating system (like Windows, macOS, or Linux) to communicate with a specific hardware device. Think of it as a translator. Your computer speaks one language (binary code, operating system commands), and your hardware device (in this case, your network adapter or Wi-Fi card) speaks another. The driver bridges this communication gap, enabling the operating system to send instructions to the hardware and receive data back.
A network driver, specifically, is the software that allows your computer to use its network adapter to connect to a network, whether it’s through an Ethernet cable (wired connection) or Wi-Fi (wireless connection). Without the correct network driver installed, your operating system won’t recognize the network adapter, rendering it useless for connecting to the internet or any local network. It’s like having a car without an engine – all the parts are there, but nothing will work.
Why Are Network Drivers So Important?
The importance of network drivers cannot be overstated. They are the invisible backbone of your internet access. Here’s why they are so critical:
- Enabling Connectivity: This is the most obvious reason. Without the right driver, your computer simply cannot connect to the internet. You won’t see Wi-Fi networks, and an Ethernet cable won’t register.
- Optimal Performance: Even if your network adapter is recognized, an outdated or incorrect driver can lead to poor performance. This might manifest as slow internet speeds, frequent disconnections, high latency (lag), or reduced signal strength for Wi-Fi. Updated drivers often contain bug fixes and performance enhancements that ensure your hardware operates at its peak.
- Security and Stability: Drivers can also impact the security and stability of your system. Outdated drivers might have vulnerabilities that could be exploited, or they could cause system crashes (Blue Screen of Death on Windows) due to compatibility issues or bugs. Keeping them updated is a crucial part of digital security and system maintenance.
- Access to Features: Modern network adapters come with various features, from advanced Wi-Fi standards (like Wi-Fi 6E) to specific power-saving modes. The driver is what unlocks and manages these features, allowing you to take full advantage of your hardware’s capabilities.
Symptoms of missing or outdated network drivers often include a small yellow exclamation mark next to your network adapter in Device Manager, an X over the network icon in your taskbar, or the complete absence of Wi-Fi options. Recognizing these signs is the first step toward resolving connectivity issues.
Identifying Your Network Adapter and Locating the Right Drivers
The most challenging part of installing a network driver, especially on a fresh system, is often knowing which driver you need and where to find it. This section will guide you through identifying your specific hardware and navigating the landscape of driver downloads.
Pinpointing Your Network Hardware
Before you can download a driver, you need to know what hardware you have. This can be tricky if you don’t have the original packaging or documentation for your computer or network adapter. Here are a few reliable methods:
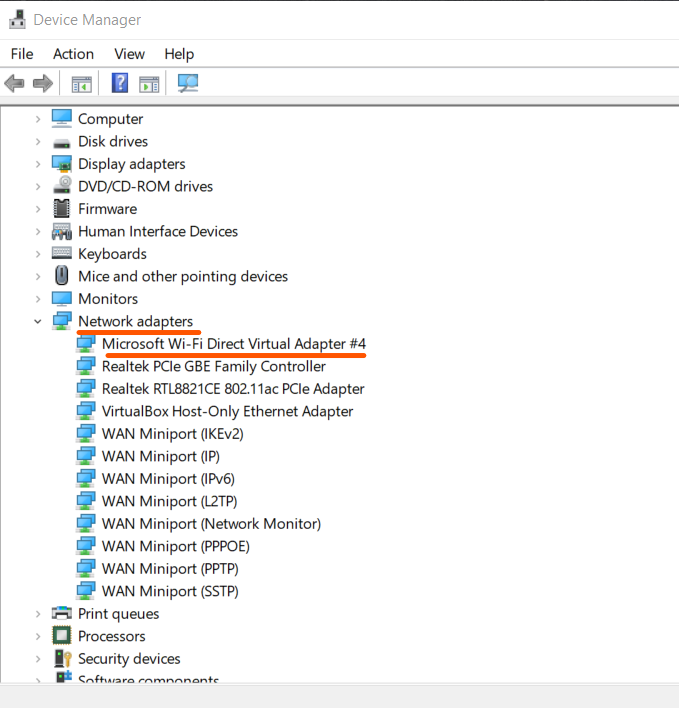
- Using Device Manager (Windows):
- If you have some connectivity: Press
Windows key + Xand selectDevice Manager. Expand the “Network adapters” section. Here, you should see a list of your wired (e.g., “Realtek PCIe GbE Family Controller”) and wireless (e.g., “Intel Wi-Fi 6 AX200”) adapters. Make a note of the exact model names. - If you have no connectivity (fresh install): You might see “Ethernet Controller” or “Network Controller” under “Other devices” with a yellow exclamation mark. Double-click on it, go to the “Details” tab, and select “Hardware Ids” from the dropdown menu. The Vendor ID (VEN) and Device ID (DEV) can be used to search for the driver online from another device. For example,
VEN_8086&DEV_27DCindicates an Intel device.
- If you have some connectivity: Press
- System Information (Windows): Press
Windows key + R, typemsinfo32, and press Enter. Navigate to “Components” > “Network” > “Adapter.” This can provide detailed information about your network hardware, including manufacturer and model. - Physical Inspection: If you built your PC, you likely know your motherboard model. Check its specifications online; most motherboards have integrated network adapters (LAN and/or Wi-Fi). For dedicated Wi-Fi cards or USB adapters, the model number is usually printed on the device itself.
- Laptop Model Number: For laptops, knowing the exact model (e.g., “Dell XPS 15 9500”) is often enough. Manufacturers typically list all compatible drivers on their support websites for specific laptop models.
Where to Find Reliable Driver Downloads
Once you’ve identified your network adapter, the next crucial step is finding the correct driver. Always prioritize reliability and security when downloading software.
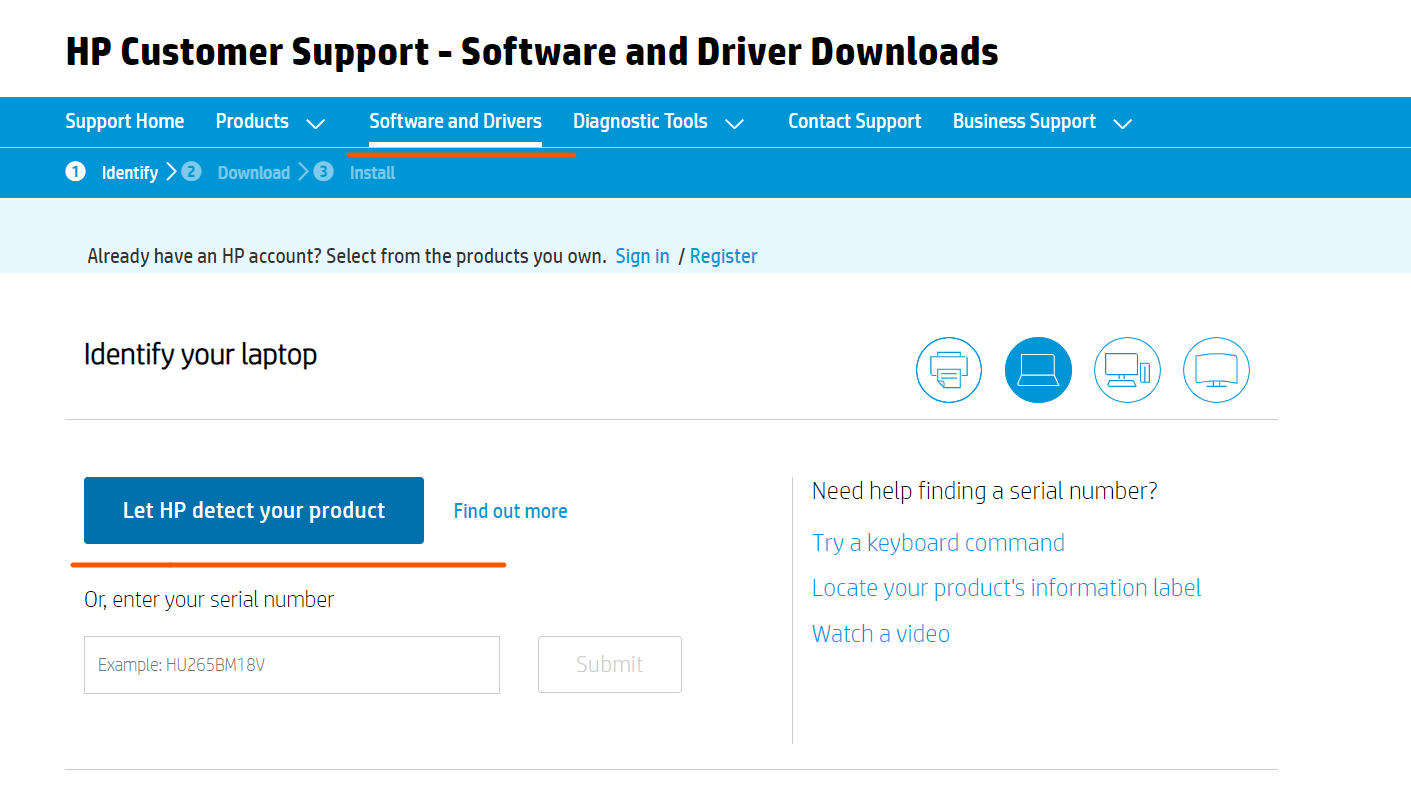
- Manufacturer’s Official Website (Recommended): This is by far the safest and most reliable source.
- For Motherboard/Laptop Integrated Adapters: Go to your motherboard manufacturer’s website (e.g., ASUS, MSI, Gigabyte) or your laptop manufacturer’s website (e.g., Dell, HP, Lenovo). Search for your specific model, then navigate to the “Support” or “Downloads” section. You’ll typically find drivers categorized by operating system.
- For Dedicated Network Cards/USB Adapters: Go directly to the manufacturer’s website for the network adapter itself (e.g., Intel, Realtek, TP-Link, D-Link). Search for your specific model.
- Why it’s best: Drivers from the manufacturer are tested for compatibility with their hardware, often include custom features or management software, and are free from malware or bloatware.
- Windows Update: In many cases, Windows can automatically find and install basic drivers, especially for older or more common hardware. After a fresh install, if you manage to get a basic internet connection (perhaps with a generic driver), running Windows Update can often download the correct, more optimized drivers.
- Driver Update Utilities (Use with Caution): There are many third-party driver update tools available. While some are legitimate, many can be problematic, installing incorrect drivers, bloatware, or even malware. Exercise extreme caution. If you must use one, research its reputation thoroughly and ensure it comes from a trusted source. Often, these are unnecessary if you follow the manufacturer’s website advice.
- Backup Disks: Some older hardware used to come with driver CDs/DVDs. While less common now, if you have one, it could be a last resort, though the drivers will likely be outdated.
Important Security Note: Never download drivers from unofficial or suspicious-looking websites. Stick to the official manufacturer’s site to avoid installing malicious software that could compromise your system. When downloading, ensure you select the driver version compatible with your operating system (e.g., Windows 10 64-bit) and architecture.
Step-by-Step Driver Installation Methods
With your driver file downloaded, it’s time to install it. There are a few common methods, depending on whether the driver comes as an executable installer or needs to be manually pointed to by your system.
Method 1: Installing Drivers Using an Executable File (Most Common)
Most modern drivers come packaged as an executable file (e.g., .exe). This is the easiest method and is usually recommended by manufacturers.
- Locate the Downloaded File: Find the driver file you downloaded, typically in your “Downloads” folder. It might be a
.zipfile, in which case you’ll need to extract its contents first (right-click the.zipfile and select “Extract All”). - Run the Installer: Double-click the
.exefile to start the installation wizard. - Follow On-Screen Prompts: The wizard will guide you through the installation process. This typically involves:
- Accepting a License Agreement.
- Choosing an installation location (usually default is fine).
- Clicking “Next,” “Install,” or “Finish.”
- Restart Your Computer: After the installation is complete, the installer will usually prompt you to restart your computer. It’s crucial to do this, as it allows the operating system to fully integrate the new driver and apply all changes.
- Verify Installation: Once your computer restarts, check your internet connection. You can also go to Device Manager (as described earlier) and ensure there are no exclamation marks next to your network adapter.
Method 2: Manual Installation via Device Manager (Offline Installation)
This method is particularly useful if you have a driver package (a folder containing multiple files like .inf, .sys, .cat) but no executable installer, or if the executable installer fails. It’s also the go-to method when performing an offline installation (no internet access).

- Extract the Driver Files: If your driver came in a
.zipfile, extract it to a known location (e.g., a new folder on your desktop). Make sure you know the path to this folder. - Open Device Manager: Press
Windows key + Xand selectDevice Manager. - Locate the Network Adapter:
- If the driver is missing, you’ll likely see an “Unknown device” or “Network Controller” under “Other devices” with a yellow exclamation mark.
- If you’re updating an existing driver, expand “Network adapters” and find your specific adapter.
- Update Driver Software: Right-click on the network adapter (or unknown device) and select “Update driver” or “Update driver software.”
- Choose Manual Search: Select “Browse my computer for drivers.”
- Specify Location: Click “Browse…” and navigate to the folder where you extracted the driver files. Do not go into subfolders unless instructed by the manufacturer; just select the main folder you extracted to.
- Install: Click “Next.” Windows will search the specified folder for compatible driver files and install them.
- Restart and Verify: Once the installation is complete, restart your computer and verify that your network connection is working and the Device Manager shows no issues.
Method 3: Online Installation via Device Manager (Updating an Existing Driver)
This method relies on Windows’ ability to search for drivers online and is primarily used when you already have some form of internet connection and want to update an existing driver.
- Open Device Manager: Press
Windows key + Xand selectDevice Manager. - Locate the Network Adapter: Expand “Network adapters” and find your specific adapter.
- Update Driver Software: Right-click on the network adapter and select “Update driver.”
- Choose Automatic Search: Select “Search automatically for drivers.”
- Windows Searches: Windows will now search your computer and the internet (Windows Update servers) for the best available driver.
- Install and Verify: If a newer driver is found, Windows will download and install it. Restart your computer if prompted, and then verify your network connection.
Troubleshooting Common Network Driver Issues
Even with the correct steps, you might encounter issues. Here are some common problems and their solutions.
“No Internet Access” After Installation
- Check Cables/Wi-Fi Switch: Ensure your Ethernet cable is securely plugged in or that your laptop’s Wi-Fi switch (if it has one) is turned on.
- Restart Router/Modem: Sometimes, the issue isn’t your PC but your network equipment. Power cycle your router and modem.
- Check IP Configuration: Open Command Prompt (
Windows key + R, typecmd, press Enter) and typeipconfig /all. Look for your network adapter. If it has a self-assigned IP (e.g., 169.254.x.x), it’s not communicating with your router. - Windows Network Troubleshooter: Right-click the network icon in the taskbar and select “Troubleshoot problems.” Windows can often identify and fix common issues.
- Firewall/Antivirus: Temporarily disable your firewall or antivirus to see if they are blocking the connection. If so, configure them to allow network access.
Driver Rollback and Reinstallation
If a newly installed driver causes problems, you can often revert to a previous, working version.
- Open Device Manager: Press
Windows key + Xand selectDevice Manager. - Locate the Network Adapter: Expand “Network adapters” and find your specific adapter.
- Access Driver Properties: Right-click the adapter and select “Properties.”
- Roll Back Driver: Go to the “Driver” tab. If the “Roll Back Driver” button is active, click it and follow the prompts. This will revert to the previous driver.
- Uninstall and Reinstall: If rolling back isn’t an option or doesn’t work, you can uninstall the driver. On the “Driver” tab, click “Uninstall Device.” Check the box that says “Delete the driver software for this device” (if available), then click “Uninstall.” Restart your computer. Windows will often try to install a generic driver or you can follow Method 1 or 2 again to install a known good driver.
Dealing with Unknown Devices
If you see an “Unknown device” or “Network Controller” with a yellow exclamation mark in Device Manager, and you’re unsure of its exact model:
- Use Hardware IDs: Double-click the “Unknown device,” go to the “Details” tab, and select “Hardware Ids” from the dropdown. Copy the string (e.g.,
PCIVEN_8086&DEV_27DC&SUBSYS_E0000000&REV_01). - Search Online: On another device with internet access, paste this hardware ID into a search engine (like Google). This will almost always lead you to the manufacturer and model of the device, allowing you to find the correct driver on their official website. Websites like
PCI Databaseare also very useful for deciphering these IDs.
Best Practices for Network Driver Management
Maintaining your network drivers is an ongoing process that contributes to overall system health, security, and productivity.
Keeping Your Drivers Up-to-Date (But Not Too Often)
While it’s important to have up-to-date drivers, there’s no need to update them every week. Generally, you should update network drivers when:
- You’re experiencing connectivity issues.
- A new operating system version is released (e.g., upgrading from Windows 10 to Windows 11).
- The manufacturer releases a critical update that fixes security vulnerabilities or significantly improves performance.
- You notice performance degradation (slow speeds, drops).
Avoid updating drivers simply for the sake of it, as sometimes new drivers can introduce new bugs. “If it ain’t broke, don’t fix it” often applies to drivers.
The Importance of System Restore Points
Before installing any significant driver update, especially if you’re experimenting or troubleshooting, it’s a good habit to create a system restore point. This allows you to easily revert your system to a previous, stable state if the new driver causes problems.
- Search for “Create a restore point” in the Windows search bar and open it.
- Click “Create…” and give the restore point a descriptive name (e.g., “Before Network Driver Update 2023-10-27”).
- Click “Create” and wait for the process to complete.
Digital Security and Driver Downloads
As emphasized earlier, the security implications of downloading drivers cannot be overstated. Downloading from unofficial sources is a major cybersecurity risk. Malicious actors often disguise malware as legitimate drivers, tricking users into installing software that can steal data, hijack your system, or hold your files for ransom.
- Always use official manufacturer websites.
- Verify URLs: Double-check that the website URL is legitimate (e.g.,
intel.com,realtek.com, notintel-drivers-download.ru). - Scan downloads: Even from official sites, it’s a good practice to quickly scan downloaded executable files with your antivirus software before running them, as an extra layer of protection.
- Be wary of unsolicited driver update notifications: These are often scams.
By following these best practices, you not only ensure your network connectivity but also contribute to a more secure and stable computing environment, allowing you to focus on productivity and enjoying your digital life without interruption.
In conclusion, installing network drivers might seem like a technical hurdle, but by understanding their function, identifying your hardware correctly, and following reliable installation methods, you can empower yourself to troubleshoot and maintain your computer’s essential connection to the internet. Keep this guide handy, and you’ll always be prepared to ensure seamless connectivity, keeping you productive and connected in the digital world.
aViewFromTheCave is a participant in the Amazon Services LLC Associates Program, an affiliate advertising program designed to provide a means for sites to earn advertising fees by advertising and linking to Amazon.com. Amazon, the Amazon logo, AmazonSupply, and the AmazonSupply logo are trademarks of Amazon.com, Inc. or its affiliates. As an Amazon Associate we earn affiliate commissions from qualifying purchases.