Minecraft, the quintessential sandbox game, offers an unparalleled canvas for creativity and exploration. Yet, for many seasoned players, the vanilla experience, while profound, eventually gives way to a desire for something more. This is where the vibrant world of Minecraft mods enters the picture. Mods, short for modifications, are fan-made additions that can alter nearly every aspect of the game, from subtle quality-of-life improvements to entirely new dimensions, creatures, and gameplay mechanics. For PC players, unlocking this universe of possibilities is a straightforward process, transforming your beloved blocky world into an even more expansive and personalized adventure.

This comprehensive guide will walk you through the entire journey of installing a mod on Minecraft PC (specifically Java Edition), ensuring you can confidently enhance your gameplay experience. We’ll delve into the necessary prerequisites, explore the critical role of mod loaders, highlight safe practices for sourcing mods, and provide step-by-step instructions to get you up and running. By the end, you’ll not only know how to install mods but also understand the underlying principles that make the modding community one of gaming’s most innovative forces.
Understanding Minecraft Mods and Their Appeal
Before diving into the technicalities, it’s crucial to grasp what mods are, why they’re so popular, and the fundamental differences in Minecraft editions that dictate the modding process.
Why Mod Your Minecraft Experience?
The allure of modding lies in its ability to inject fresh life into a game many have spent thousands of hours exploring. Mods offer a myriad of benefits that appeal to different types of players:
- Enhanced Creativity and Customization: Mods like “Chisel & Bits” allow for intricate block detailing, while “Biomes O’ Plenty” adds breathtaking new landscapes, vastly expanding building and exploration opportunities. For those focused on “brand” building within their Minecraft worlds, mods provide unique elements that make their creations stand out.
- Quality-of-Life Improvements: Not all mods are about grand changes. Many, such as “JEI (Just Enough Items)” which displays crafting recipes, or “OptiFine” for performance optimization and graphical enhancements, streamline gameplay and make the experience smoother. These are often productivity boosters for serious players.
- New Gameplay Mechanics and Content: From technological advancements in “IndustrialCraft” or “Applied Energistics” to magical systems in “Thaumcraft,” mods can introduce entirely new progression paths, resource management challenges, and combat systems that feel like brand-new games within Minecraft.
- Community and Innovation: The modding community is a testament to collective innovation, constantly pushing the boundaries of what’s possible within Minecraft’s framework. Many mod developers, driven by passion, release their work for free, contributing immense value to the gaming ecosystem. Some even build personal “brands” around their popular mod creations, demonstrating the intersection of tech and brand development.
Java vs. Bedrock Edition: A Crucial Distinction
It’s paramount to understand that modding primarily applies to the Java Edition of Minecraft on PC. The Java Edition, which has been around since the game’s inception, boasts a vast and mature modding ecosystem. This is due to its open architecture and the dedication of countless developers.
The Bedrock Edition, available on Windows 10/11, consoles, and mobile, uses a different codebase. While it offers “add-ons” and “marketplace content,” these are generally more limited in scope compared to Java Edition mods and operate through a different installation method, often involving in-game purchases or official content packs. This guide focuses exclusively on the Java Edition, as it’s the gateway to the most extensive and free modding possibilities. If you’re a Bedrock player looking for similar customization, you’ll need to explore the in-game marketplace or specific add-on communities.
The Essential Mod Loaders: Forge and Fabric
To make sense of the vast array of individual mods and ensure they can interact harmoniously with your game, you need a “mod loader.” A mod loader is a fundamental piece of software that modifies your Minecraft client, allowing it to load and run other mods. Without a mod loader, most mods simply won’t work. The two dominant players in the Minecraft Java modding scene are Forge and Fabric.
Forge: The Venerable Standard
Minecraft Forge has long been the most popular and established mod loader. It provides an extensive API (Application Programming Interface) that mod developers use to create their modifications, ensuring compatibility and functionality.
- Pros:
- Vast Mod Library: Historically, more mods have been developed for Forge, meaning you’ll find a massive selection, especially for older Minecraft versions.
- Maturity and Stability: Being the elder statesman, Forge is generally very stable and well-supported, with a wealth of documentation and community resources.
- Modpack Support: Most large-scale modpacks (curated collections of many mods) are built on Forge.
- Cons:
- Can Be Resource Intensive: Due to its comprehensive nature, Forge can sometimes consume more system resources, potentially leading to lower performance on less powerful PCs, especially with many mods.
- Slower Updates: Forge updates for new Minecraft versions can sometimes lag behind the official game releases as developers adapt the complex API.
Forge is ideal if you’re looking for a broad selection of content-rich mods, complex technical mods, or if you plan to play popular modpacks.
Fabric: The Lightweight Alternative
Fabric emerged as a newer, more lightweight, and modular alternative to Forge. It focuses on providing a minimal API, making it faster to update for new Minecraft versions and generally more performant.
- Pros:
- Faster Updates: Fabric typically updates to new Minecraft versions much quicker than Forge, allowing modders to develop for the latest game releases sooner.
- Performance-Oriented: Its lightweight design often results in better performance, especially crucial for players with mid-range PCs or those who prefer performance-enhancing mods.
- Modern Modding Toolchain: Fabric often attracts developers interested in modern programming practices and faster iteration cycles.
- Cons:
- Smaller Mod Library (but growing): While rapidly expanding, Fabric still has fewer mods than Forge overall, though many popular ones are now available for both.
- Fewer Large Modpacks: While Fabric modpacks exist, the sheer scale and complexity of some Forge modpacks are less common.
Fabric is an excellent choice if you prioritize playing on the latest Minecraft versions, seek better performance, or are interested in a growing collection of innovative, often smaller, utility-focused mods.
Crucial Note: Forge and Fabric are not compatible with each other. You cannot run Forge mods on a Fabric installation or vice-versa. You must choose one mod loader for a given Minecraft profile and ensure all your chosen mods support that specific loader and Minecraft version.
Step-by-Step Installation of a Mod Loader
Regardless of whether you choose Forge or Fabric, the installation process is remarkably similar. We’ll use Forge as our example, but the steps are easily adaptable for Fabric.
- Download the Mod Loader Installer:
- For Forge: Visit the official Forge website (files.minecraftforge.net).
- For Fabric: Visit the official Fabric website (fabricmc.net).
- On either site, navigate to the “Download” section or the specific Minecraft version you intend to mod. It’s crucial that the mod loader version matches your target Minecraft version (e.g., Minecraft 1.20.1 Forge). Download the “Installer” version, typically the recommended one.
- Run the Installer:
- Once downloaded, locate the
.jarfile (Java Archive) you just downloaded. - Double-click the
.jarfile to run the installer. If it doesn’t open, you might need to ensure you have the correct version of Java installed on your PC. Minecraft 1.17+ requires Java 17, while older versions typically use Java 8.
- Once downloaded, locate the
- Install Client:
- The installer window will appear. Select “Install client.”
- Ensure the “Install Directory” points to your default Minecraft installation folder (usually
C:Users[YourUsername]AppDataRoaming.minecraft). - Click “OK.” The installer will download and set up the necessary files.
- Verify Installation:
- Open your Minecraft Launcher.
- You should now see a new “installation profile” (e.g., “forge” or “fabric-loader”) in the lower-left corner of the launcher, next to the “Play” button.
- Select this profile. This new profile allows you to launch Minecraft with the mod loader active, ready to accept your mods.
Congratulations! Your chosen mod loader is now installed and ready to be populated with your desired modifications.
Discovering and Installing Your Desired Mods
With your mod loader in place, the exciting part begins: finding and installing the mods that will transform your Minecraft experience. This section focuses on safe sourcing, compatibility checks, and the final installation steps.
Sourcing Mods Safely and Reliably
The internet is a vast place, and while most mod developers are reputable, exercising caution is vital to protect your digital security. Always download mods from trusted sources to avoid malware or broken files.
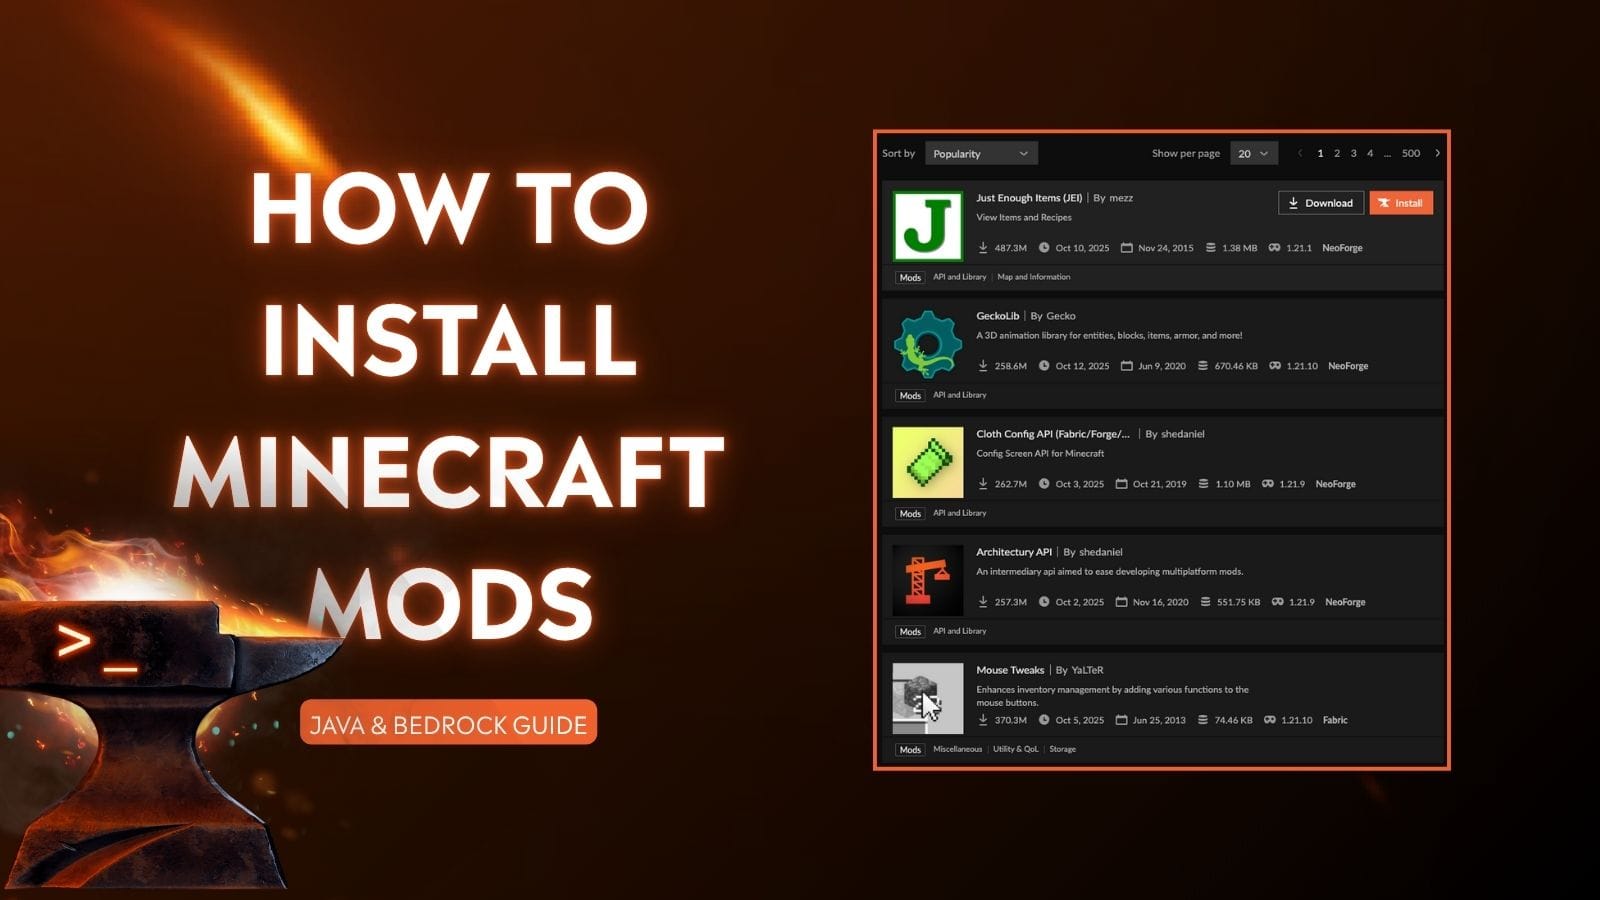
- CurseForge: This is by far the largest and most reliable repository for Minecraft mods. (curseforge.com)
- Features: Huge selection, clear categorization, download counts, user reviews, official developer pages, built-in virus scanning, and strong community oversight.
- Recommendation: Always start your mod search here. It’s a crucial digital platform for the modding “economy” and community.
- Modrinth: A newer, rapidly growing platform known for its user-friendly interface and focus on open-source projects. (modrinth.com)
- Features: Good search filters, modern design, often faster updates for newer versions, supports both Forge and Fabric.
- Recommendation: An excellent alternative or supplementary source, especially for Fabric mods and newer Minecraft versions.
- Official Mod Developer Websites/GitHub: Some developers host their mods directly on their own websites or GitHub repositories. If you find a mod via a recommendation, always try to trace it back to its official source.
- Avoid: Untrusted third-party sites, download mirrors, or forums that don’t directly link to CurseForge, Modrinth, or an official developer page. These carry a higher risk of malicious software or outdated versions. Think of it as protecting your personal “tech brand” by only using trusted software.
Navigating Compatibility: Minecraft Version & Mod Loader
This is arguably the most critical step to prevent crashes and ensure a smooth modded experience. Every mod is developed for specific Minecraft versions and specific mod loaders.
- Know Your Minecraft Version: Before you even look for mods, know exactly which Minecraft version you’ve set up your mod loader for (e.g., 1.20.1, 1.19.2, 1.16.5).
- Match Mod Loader: Ensure the mods you download are compatible with your chosen mod loader (Forge or Fabric). Most mod pages explicitly state this.
- Check Mod Version: On the mod’s download page (e.g., CurseForge), carefully select the file that matches both your Minecraft version and your mod loader. For example, if you’re running Minecraft 1.20.1 with Fabric, download the “1.20.1 – Fabric” version of the mod.
- Dependencies: Some mods require “dependencies” – other small utility mods to function. The mod description on CurseForge or Modrinth will clearly list any required dependencies. You’ll need to download and install these dependency mods just like any other mod. Common examples include “Library” mods or API mods that provide shared code for multiple projects.
Failing to match these three criteria is the leading cause of “game crashes” or “mods not loading.” Always double-check!
The Installation Process: From Download to Play
Once you’ve safely downloaded your .jar mod files (and any dependencies), the installation itself is refreshingly simple.
- Locate Your
.minecraftFolder:- Open your Minecraft Launcher.
- Go to the “Installations” tab.
- Hover over the Forge/Fabric profile you created.
- Click the small folder icon that appears. This will open your
.minecraftdirectory. - Alternatively, you can type
%appdata%into your Windows Search bar and press Enter, then open the.minecraftfolder.
- Create the
modsFolder (if it doesn’t exist):- Inside your
.minecraftfolder, look for a folder namedmods. - If it doesn’t exist (it usually gets created automatically by the mod loader), simply right-click in an empty space, select “New,” then “Folder,” and name it
mods(all lowercase).
- Inside your
- Place Your Mod Files:
- Drag and drop all the
.jarfiles you downloaded (your chosen mods and any dependencies) directly into themodsfolder. Do not extract them; keep them as.jarfiles.
- Drag and drop all the
- Launch Minecraft:
- Close the
.minecraftfolder and return to your Minecraft Launcher. - Ensure the correct mod loader profile (Forge or Fabric) is selected in the lower-left corner.
- Click the “Play” button.
- Close the
Minecraft will now launch, loading your selected mod loader and all the .jar files within your mods folder. You might notice a slightly longer loading time, especially with many mods, as the game initializes everything. Once in the main menu, many modded clients will show a “Mods” button or indicate the mod loader version, confirming a successful launch. Start a new world (or load an existing one after backing it up!) and enjoy your enhanced Minecraft experience!
Troubleshooting and Best Practices for a Seamless Modded Experience
Modding, while rewarding, can sometimes present challenges. Knowing how to troubleshoot common issues and adopting best practices will ensure your modded adventures remain enjoyable and stable.
Common Issues and Quick Fixes
- Game Crashes on Startup: This is the most frequent issue.
- Mismatch Alert: Double-check that all your mods are compatible with the exact Minecraft version and mod loader you are using. This is the prime suspect.
- Dependency Check: Are all required dependency mods installed? Read the mod descriptions carefully.
- Conflicting Mods: Some mods simply don’t play well together. Try removing mods one by one (or in small batches) to identify the culprit. Start by removing recently added mods.
- Out of Memory: If you have many large mods, Minecraft might be running out of RAM. You can allocate more RAM to Minecraft through the Launcher’s “Installations” settings for your modded profile (Edit -> More Options -> JVM Arguments, change
-Xmx2Gto-Xmx4Gor higher, depending on your system’s available RAM). - Java Version: Ensure you have the correct Java Development Kit (JDK) installed for your Minecraft version (Java 8 for 1.16.5 and older, Java 17 for 1.17+).
- Mod Not Appearing In-Game:
- Correct Folder: Is the
.jarfile actually in the.minecraft/modsfolder? - Active Profile: Are you launching the game with the correct Forge/Fabric profile in the Minecraft Launcher?
- Server-Side Only: Some mods are designed only for servers and won’t have a client-side effect.
- Correct Folder: Is the
- Lag and Performance Issues:
- OptiFine/Rubidium/Sodium: Install performance-enhancing mods like OptiFine (Forge) or Sodium/Rubidium (Fabric) with complementary mods like Lithium and Phosphor. These are essential “tech” improvements.
- Reduce Render Distance: Lower your in-game render distance, simulation distance, and other graphical settings.
- Allocate More RAM: As mentioned above, more RAM can help, but don’t over-allocate to the point where your OS struggles.
- Check for Resource Hogs: Some mods are simply more demanding. Identify and potentially remove them if performance is critical.
When troubleshooting, always check the crash report. It’s often a long text file that appears when the game crashes, and it can point to the specific mod or file causing the issue. Online communities and forums are also invaluable resources for decoding crash reports.
Maintaining Your Modded World: Essential Tips
To ensure a long and happy life for your modded Minecraft installations, consider these best practices:
- Backup Your Worlds Regularly: This is perhaps the most crucial tip. Before adding new mods, updating existing ones, or making significant changes, always back up your save files. Corrupted mods can irrevocably damage your world. You can find your saves in the
.minecraft/savesfolder. Copy the entire world folder to a safe location. This is a sound “digital security” habit. - Start New Worlds for Major Mod Changes: While you can add mods to existing worlds, especially smaller utility mods, it’s generally recommended to start a new world when adding large content-altering mods (e.g., new biomes, dimensions, tech trees). Removing such mods from a world they were once part of can often lead to corruption or missing blocks.
- Keep Mods Updated (Carefully): Mod developers often release updates for bug fixes, performance improvements, and new features. However, always check the changelog before updating to ensure compatibility with your other mods and world. Never update a mod or your Minecraft version mid-playthrough without backing up first.
- Organize Your
modsFolder: If you have many mods, consider creating subfolders (e.g., “activemods,” “disabledmods”) to keep things tidy, though Minecraft only loads.jarfiles directly in themodsfolder. You can move mods you temporarily don’t want to use out of the activemodsfolder. - Utilize Modpack Launchers: For a more streamlined experience, especially with many mods, consider using modpack launchers like the CurseForge App, ATLauncher, or MultiMC. These tools simplify the process of installing, updating, and managing multiple modded instances of Minecraft, even allowing you to switch between different Minecraft versions and mod setups easily. This can save you a lot of “money” (time) in management.
- Support Mod Developers: Many mod developers pour countless hours into their creations. If you enjoy a mod, consider leaving a positive review, donating via Patreon or Ko-fi if they offer it, or simply sharing their work. Their passion fuels the innovation that enriches our Minecraft experiences. This highlights the “money” and “brand” aspects, supporting the creators who build this digital economy.
In conclusion, installing mods on Minecraft PC is a gateway to an incredibly rich and diverse gaming experience. By understanding the core concepts of mod loaders, exercising caution in sourcing, and adhering to best practices, you can effortlessly transform your vanilla game into an endless realm of personalized adventures. From subtle tweaks to game-changing overhauls, the modding community ensures that Minecraft remains fresh, exciting, and perpetually inviting for every player eager to explore beyond the blocks. So, equip your mod loader, choose your favorite enhancements, and prepare to redefine your Minecraft journey.
aViewFromTheCave is a participant in the Amazon Services LLC Associates Program, an affiliate advertising program designed to provide a means for sites to earn advertising fees by advertising and linking to Amazon.com. Amazon, the Amazon logo, AmazonSupply, and the AmazonSupply logo are trademarks of Amazon.com, Inc. or its affiliates. As an Amazon Associate we earn affiliate commissions from qualifying purchases.