In the intricate symphony of components that power your personal computer, the Power Supply Unit (PSU) often plays the unsung hero. It’s the vital organ that converts alternating current (AC) from your wall socket into the direct current (DC) needed by every single component inside your PC, from the CPU to the GPU, hard drives, and fans. Yet, despite its critical role, it’s frequently the most overlooked part when users think about their system’s specifications. Understanding what PSU you have isn’t just a technical detail for enthusiasts; it’s a crucial piece of knowledge for anyone looking to upgrade, troubleshoot, optimize energy consumption, or simply maintain the health and longevity of their valuable tech investment.
Navigating the world of PC hardware can feel daunting, but knowing your PSU empowers you with insights into your system’s capabilities and limitations. Whether you’re planning to install a new, powerful graphics card, diagnosing mysterious system crashes, or simply curious about your energy footprint, identifying your PSU is the first step. This guide will walk you through various methods to uncover this vital information, integrating perspectives from technology trends, brand importance, and financial implications to provide a holistic understanding.
Why Knowing Your PSU is Crucial for Every PC User
Before diving into the “how,” it’s essential to understand the “why.” Your PSU isn’t just a brick that supplies power; it’s the foundation upon which your entire system operates. Its specifications dictate much about your PC’s potential and stability.
The Silent Guardian of Your Components
A good quality, appropriately powerful PSU acts as the silent guardian for all your expensive PC components. It delivers stable, clean power, protecting sensitive parts from voltage fluctuations and power surges. An underpowered or failing PSU, conversely, can lead to system instability, random reboots, data corruption, and even permanent damage to your motherboard, CPU, or GPU. Knowing your PSU’s brand and wattage allows you to assess its reliability and ensure it’s up to the task of protecting your significant investment in other branded tech. This ties into the “Money” aspect – a cheap, unreliable PSU might save you a few dollars upfront, but the cost of replacing damaged components far outweighs that initial saving.
Powering Upgrades and Future-Proofing
One of the most common reasons users need to know their PSU is when planning an upgrade, particularly for graphics cards or CPUs. Modern GPUs, in particular, are power-hungry beasts, often requiring specific wattage and connector types. If your current PSU doesn’t meet the requirements of a new component, you’ll not only face compatibility issues but also potential system failure or underperformance. Knowing your existing PSU’s wattage and available connectors helps you determine if it can handle the increased load or if a PSU upgrade needs to be factored into your budget. This foresight prevents costly mistakes and ensures your new tech purchase delivers its full potential. From a “Tech” perspective, staying abreast of power requirements for new components is key to seamless upgrades.
Energy Efficiency and Your Wallet
The efficiency of your PSU directly impacts your electricity bill, linking directly to the “Money” topic. PSUs come with an 80 Plus certification (Bronze, Silver, Gold, Platinum, Titanium), indicating how efficiently they convert AC to DC power. A higher efficiency rating means less energy is wasted as heat, resulting in lower electricity consumption and, consequently, lower utility bills. While a higher-rated PSU might have a slightly higher upfront cost, the long-term savings in energy can often justify the investment, especially for PCs that run many hours a day. Understanding your current PSU’s efficiency helps you evaluate potential savings if you were to upgrade to a more efficient model.
Troubleshooting and System Stability
When your PC starts acting erratically – unexpected shutdowns, freezes, or performance dips – the PSU is often a prime suspect. Identifying its model and specifications helps in diagnosing potential issues. Is it an old unit that might be failing? Is it insufficient for your current hardware configuration? Knowing these details allows you to research common issues associated with your specific model or determine if its capacity is being pushed beyond its limits. This diagnostic capability is invaluable in maintaining system stability and preventing minor glitches from escalating into major problems.
The Hands-On Approach: Physical Inspection
The most definitive way to identify your PSU’s specifics is to physically inspect the unit itself. While it requires opening your PC case, it’s a straightforward process that yields accurate and comprehensive information.
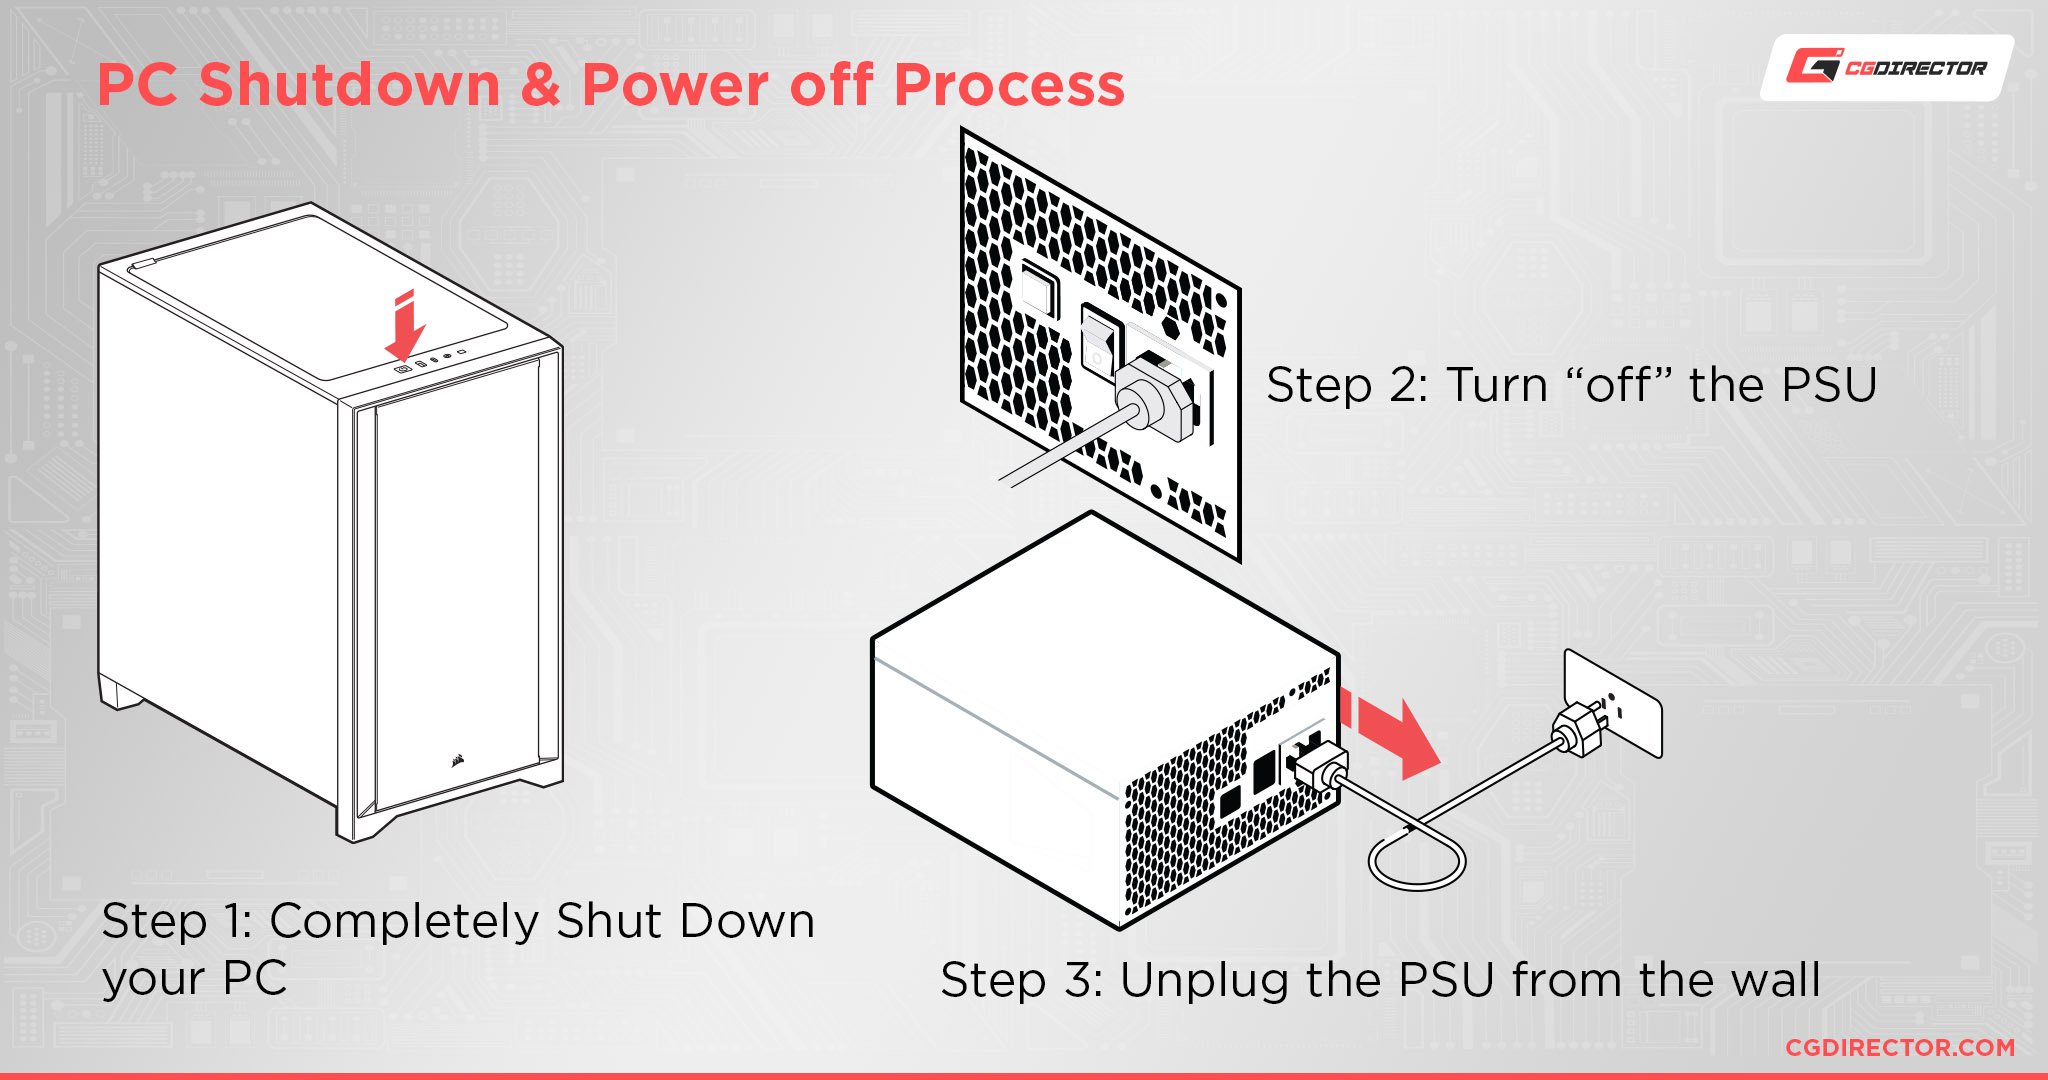
Safety First: Before You Open Your PC
Before you even think about touching the inside of your computer, safety is paramount. Always, always ensure your computer is completely powered off and unplugged from the wall socket. Press and hold the power button for a few seconds after unplugging to discharge any residual power. For added safety and to protect your components from static electricity, consider wearing an anti-static wrist strap connected to an unpainted metal part of your PC case. Taking these precautions protects both you and your valuable “Tech” components.
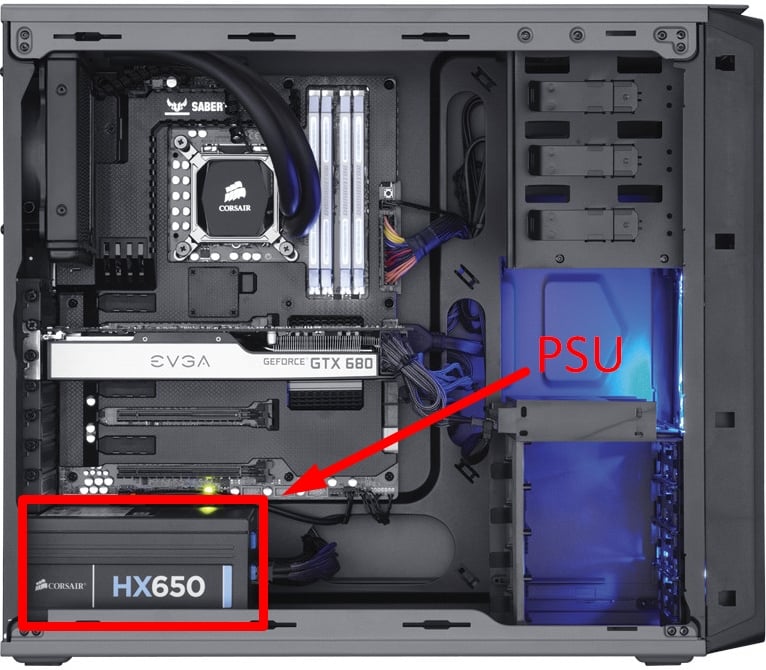
Locating Your PSU
Most desktop PCs have their PSU located at the bottom or top rear of the case. It’s typically a rectangular metal box with a large fan, and numerous cables emerging from it, connecting to your motherboard, graphics card, and drives. You’ll usually need to remove one of the side panels of your PC case to gain access. Depending on your case design, the PSU might be partially obscured by a shroud, but its main label should still be visible once you look inside.
Deciphering the PSU Label
Once you’ve located the PSU, look for a large sticker or label affixed to one of its sides. This label is a goldmine of information, providing all the critical details you need. Here’s what to look for:
- Brand/Manufacturer: This is usually prominently displayed (e.g., Corsair, EVGA, Seasonic, Cooler Master, be quiet!, etc.). Recognizing reputable “Brand” names is often an indicator of quality.
- Model Name/Number: A specific series or model number (e.g., CX750M, SuperNova G3 650, Focus Plus Gold 750W). This is crucial for looking up detailed specifications online.
- Wattage (Total Output Power): This is the maximum power the PSU can deliver, typically expressed in Watts (W). This is one of the most important numbers, especially for upgrades.
- Efficiency Rating: Look for an “80 Plus” certification (Bronze, Silver, Gold, Platinum, Titanium). This indicates its energy efficiency, directly impacting your “Money” through electricity costs.
- Input/Output Specifications: Details on the AC input voltage and frequency, and the various DC output voltages (e.g., +12V, +5V, +3.3V) along with their respective amperage. The +12V rail’s amperage is particularly important as it supplies power to the CPU and GPU.
- Certifications and Safety Marks: Various regional safety certifications.
- Serial Number: Useful for warranty claims or specific product support from the “Brand.”
Take a clear photo of this label with your smartphone, or carefully write down all the relevant information. This ensures you have an accurate record for future reference, avoiding the need to open your case again.
Connectors and Cables: A Visual Clue
While the label provides the core data, observing the cables and connectors can offer additional context, especially regarding a PSU’s age and capabilities. Modern PSUs will have a range of connectors:
- 20+4 Pin ATX Connector: For the motherboard.
- 4+4 Pin EPS/CPU Connector: For CPU power.
- 6+2 Pin PCIe Connectors: For graphics cards (high-end cards might need two or three of these). The number available hints at multi-GPU support.
- SATA Power Connectors: For hard drives and SSDs.
- Molex Connectors: For older peripherals or case fans.
The presence and number of these connectors can give you a rough idea of the PSU’s intended power class and age. For instance, a PSU with multiple 6+2 pin PCIe connectors is clearly designed for gaming or workstation PCs with powerful graphics cards, suggesting a higher wattage.
Leveraging Software and System Information
While physical inspection is the most reliable, some digital methods can provide clues or confirm information, though direct software identification of a PSU’s specific model and wattage is surprisingly rare.
Operating System Limitations: Why Direct Software Isn’t Always Possible
Unlike components like the CPU or GPU, which have direct data interfaces and drivers that communicate their specifics to the operating system, PSUs are essentially “dumb” power delivery devices. They don’t have a direct data link to your OS to report their model number, wattage, or efficiency rating. This is a common misconception, where users expect a software tool to magically list their PSU details alongside their CPU and RAM. Therefore, relying solely on typical system information tools for direct PSU identification will often lead to disappointment.
System Information Tools (Third-Party)
While these tools won’t tell you your PSU’s brand or wattage directly, they can provide valuable indirect information related to power consumption, which is crucial for determining if your PSU is sufficient. Tools like:

- HWMonitor / HWInfo: These applications can monitor real-time sensor data from various components, including power draw for your CPU and GPU. While they don’t identify the PSU itself, seeing the maximum power draw of your main components helps you understand the load your PSU is under. This is vital for “Tech” enthusiasts who want to ensure their system has adequate headroom.
- AIDA64: A more comprehensive diagnostic tool that can provide extremely detailed information about almost every component in your system. Again, it excels at reporting component power usage and system stability rather than the PSU’s label data.
- Speccy: A user-friendly tool that gives a quick overview of your system’s hardware. Like the others, it’s unlikely to identify your PSU by model.
The utility of these tools lies in assessing your power needs rather than identifying the PSU. If you’re consistently seeing high power draw figures close to your PSU’s rated wattage, it might be an indicator that you’re running close to the limit, prompting you to verify your PSU’s exact specifications through physical inspection or documentation. This helps manage the “Money” aspect by avoiding premature component failure due to an overworked PSU.
The Digital Paper Trail: Receipts and Online Accounts
Often, the easiest and safest way to identify your PSU without opening your case is to consult your purchase history.
- Retailer Receipts/Invoices: If you bought a pre-built PC or purchased the PSU separately, the receipt, invoice, or packing slip will almost certainly list the make and model of the PSU. Dig through your physical or digital archives.
- Online Order History: For purchases made online (Amazon, Newegg, Best Buy, etc.), log into your account and check your order history. The product page for the PSU or the system build will contain all the necessary details. This is especially useful for those who frequently buy “Tech” components online.
- PC Manufacturer’s Website: If you own a pre-built PC from a major brand (Dell, HP, Lenovo, Acer, etc.), visit their support website. Enter your PC’s service tag or serial number, and it will often provide a detailed list of all original components, including the PSU. Be aware that pre-builts sometimes use proprietary PSUs or less common models.
- System Builder Documentation: If your PC was custom-built by a local shop, they usually provide an invoice or spec sheet detailing all parts used. This documentation is invaluable.
This “digital paper trail” method leverages good record-keeping and is a low-effort, high-reward approach that directly identifies the “Brand” and model without technical intervention.
Understanding PSU Specifications: What the Numbers Mean
Once you’ve found the label or documentation, deciphering the specifications is key to making informed decisions about your “Tech” and “Money.”
Wattage: The Heart of the Matter
The wattage (W) is arguably the most critical number. It represents the maximum continuous power output the PSU can provide. A common misconception is that a higher wattage PSU draws more power; this is false. A PSU only draws as much power as your components demand. However, having sufficient headroom (e.g., a 750W PSU for a system that typically draws 450W) is beneficial for efficiency, stability, and future upgrades. Online PSU calculators can help you estimate your system’s total power draw, allowing you to gauge if your existing PSU is adequate or if an upgrade is necessary. This directly impacts your “Money” in terms of potential upgrade costs.
Efficiency Ratings (80 Plus): Saving Money and the Planet
The “80 Plus” certification indicates a PSU’s energy efficiency at different load levels (20%, 50%, 100%). The ratings are:
- 80 Plus Standard/White: At least 80% efficiency.
- 80 Plus Bronze: At least 82% efficiency.
- 80 Plus Silver: At least 85% efficiency.
- 80 Plus Gold: At least 87% efficiency.
- 80 Plus Platinum: At least 89% efficiency.
- 80 Plus Titanium: At least 90% efficiency.
Higher efficiency means less power is wasted as heat, leading to lower operating temperatures for the PSU and, crucially, lower electricity bills. While a Gold or Platinum rated PSU might cost more upfront, the “Money” saved over its lifespan through reduced energy consumption can be substantial, especially for systems running 24/7. This aligns with modern “Tech” trends focusing on sustainability and efficiency.
Modularity: Managing Your Cables
PSUs come in three main modularity types:
- Non-Modular: All cables are permanently attached. This is often found in budget PSUs or older models, leading to more cable clutter inside the case, potentially hindering airflow.
- Semi-Modular: The essential cables (24-pin ATX, CPU) are fixed, while others (PCIe, SATA) are detachable. This offers a good balance of cost and cable management.
- Fully Modular: All cables are detachable. This provides the ultimate flexibility for cable management, only using the cables you need, which improves airflow and aesthetics.
While modularity doesn’t affect power delivery, it’s a significant quality-of-life feature for building and maintaining your “Tech” setup, impacting ease of installation and future upgrades.
Form Factors and Connectors
Most desktop PCs use an ATX form factor PSU. Smaller systems might use SFX or SFX-L units. Understanding your form factor is vital if you’re replacing your PSU. Additionally, knowing the types and numbers of connectors (e.g., 6+2 pin PCIe for graphics cards) ensures compatibility with your current or planned components.
Brand Reputation and Warranty
The “Brand” of your PSU matters significantly. Reputable brands like Seasonic, Corsair, EVGA, be quiet!, and Cooler Master have a track record of producing reliable, well-built units with excellent customer support and warranties (often 5-10 years). Opting for a lesser-known or generic brand, especially for an unknown PSU, can be a risky “Money” decision, as these units may use lower-quality components, leading to instability or premature failure. Checking the warranty period listed on the label or the brand’s website provides insight into the manufacturer’s confidence in their product.
When and Why to Upgrade Your PSU
Identifying your current PSU’s capabilities inevitably leads to the question: Is it sufficient, or do I need an upgrade? Here are common scenarios where a PSU upgrade becomes a wise “Money” and “Tech” decision:
New Graphics Card or CPU
This is the most frequent trigger for a PSU upgrade. Modern high-end graphics cards often demand 600W-850W or even more from the PSU, plus specific PCIe power connectors. If your existing PSU is, for example, a 550W unit, it likely won’t cut it for a new RTX 4080 or RX 7900 XT. Similarly, upgrading to a high-core-count CPU might push a borderline PSU. Always check the recommended PSU wattage for your new component.
System Instability or Random Shutdowns
If your PC experiences frequent crashes, freezes, or random reboots, especially under load (e.g., during gaming), an aging or insufficient PSU could be the culprit. Over time, components degrade, and a PSU might no longer deliver its rated power stably. Upgrading to a new, reliable unit can resolve these frustrating “Tech” issues and restore system stability.
Pursuing Better Efficiency
As discussed, upgrading from an 80 Plus Bronze to an 80 Plus Gold or Platinum PSU can lead to measurable “Money” savings on your electricity bill over time. For always-on servers or workstations, this ROI can be quite attractive.
Investing in Reliability: Protecting Your Investment
Sometimes, you might discover you have a very old, generic, or low-quality PSU, even if its wattage currently meets your needs. While it might be working, it could be a ticking time bomb, putting your expensive CPU, GPU, and motherboard at risk. Proactively replacing it with a reputable “Brand” PSU offers peace of mind and safeguards your overall “Tech” investment from potential catastrophic failure.
In conclusion, understanding what PSU you have is far more than a trivial hardware detail. It’s a cornerstone of responsible PC ownership, impacting everything from performance and stability to upgrade potential and long-term financial savings. By leveraging a combination of physical inspection, checking digital records, and understanding key specifications, you empower yourself to make informed decisions that protect your technology investments and optimize your computing experience. Don’t let the silent guardian remain unknown; take the time to identify your PSU and unlock a deeper understanding of your PC.
aViewFromTheCave is a participant in the Amazon Services LLC Associates Program, an affiliate advertising program designed to provide a means for sites to earn advertising fees by advertising and linking to Amazon.com. Amazon, the Amazon logo, AmazonSupply, and the AmazonSupply logo are trademarks of Amazon.com, Inc. or its affiliates. As an Amazon Associate we earn affiliate commissions from qualifying purchases.