Python has cemented its position as one of the most versatile and widely-used programming languages in the world. From powering robust web applications and complex data analysis to driving the latest advancements in artificial intelligence and machine learning, its applications are virtually limitless. For anyone looking to dive into the exciting realm of programming, whether as a hobbyist, a student, or a seasoned developer, Python often serves as the perfect starting point. Its clean syntax and extensive ecosystem make it incredibly beginner-friendly while offering powerful tools for expert-level tasks. In the ever-evolving landscape of technology, staying abreast of essential tools like Python is paramount for innovation and productivity, making it a cornerstone for anyone engaged in software development, data science, or even automation.
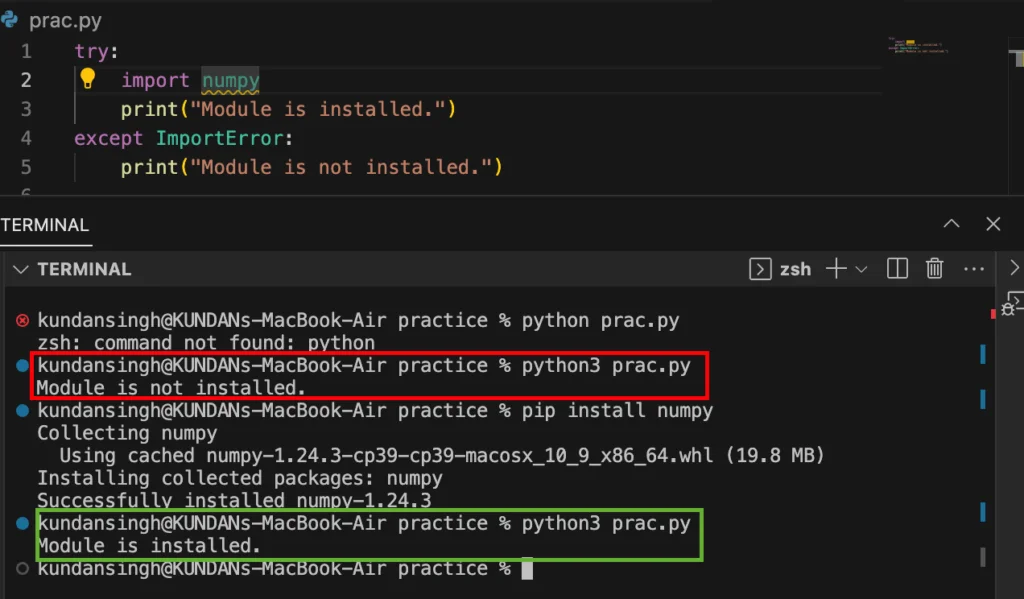
However, before you can write your first line of code or run an existing script, a fundamental question often arises: “Is Python even installed on my Windows machine?” This seemingly simple query is a crucial first step for many. Whether you’ve just acquired a new computer, inherited a system, or are simply unsure of your previous installations, verifying Python’s presence and version is essential. An incorrect assumption can lead to frustrating “command not found” errors, confusion about conflicting versions, or wasted time trying to troubleshoot issues that don’t exist. Moreover, knowing your Python environment is critical for seamless integration with AI tools, deploying new applications, or simply following online tutorials without hitting roadblocks.
This comprehensive guide is designed to walk you through various methods to confidently check for Python’s installation on Windows. We’ll cover quick command-line checks, delve into system configurations, and explore graphical user interface (GUI) options. Beyond just verifying, we’ll also equip you with troubleshooting tips for common problems, advice on managing multiple Python versions, and guidance on what to do if Python isn’t found at all. By the end of this article, you’ll be able to quickly and accurately determine your Python setup, setting the stage for a smooth and productive coding journey, enhancing your digital security through proper setup, and boosting your overall technical productivity.
Quick & Efficient Command-Line Checks
The command line is often the fastest and most direct way to interact with your operating system, and checking for Python is no exception. These methods rely on commands executed within the Command Prompt or PowerShell, offering immediate feedback on Python’s presence and configuration. Mastering these simple commands is a fundamental skill for any developer, streamlining your workflow and enabling rapid diagnostics within your tech environment.
The python --version Command
This is arguably the most common and intuitive method for checking Python’s installation. When you execute this command, your system attempts to find an executable named python in its defined search paths and, if found, requests its version number. This immediate feedback loop makes it an indispensable first step in Python verification.
How to Use It:
- Open Command Prompt or PowerShell:
- Press
Win + R, typecmd, and press Enter. - Alternatively, search for “Command Prompt” or “PowerShell” in the Windows search bar and open it.
- Press
- Type the Command: In the console window, type
python --versionand press Enter.
Expected Outcomes:
- Python is Installed and in PATH: You will see an output similar to
Python 3.9.7orPython 3.10.5. This indicates that Python is installed, and its executable is accessible from your system’s PATH environment variable. The version number tells you exactly which iteration of Python is installed as the primarypythoncommand. - Python is Installed but Not in PATH (or not found by default alias): You might receive an error message like:
'python' is not recognized as an internal or external command,

operable program or batch file.
This doesn’t necessarily mean Python isn’t installed. It usually means that the system doesn’t know where to find thepython.exefile. This is a common issue we’ll address in the troubleshooting section. - Python is Not Installed: The same “not recognized” error message would appear, indicating a complete absence of a Python installation discoverable by your system.
Tip: Note the version number carefully. Python 2 and Python 3 are distinct, and most modern development relies on Python 3. If you see a Python 2.x.x version, you likely need to install Python 3 alongside it or update your setup. This distinction is crucial for compatibility with current libraries and frameworks.
Exploring python3 and py
While python --version is standard, Windows users often encounter scenarios where Python is installed but not directly accessible via the python command. This is where python3 and the Python Launcher (py) come into play. These alternatives offer flexibility and robustness, especially when dealing with nuanced installation setups or multiple Python versions.
python3 --version: Some Python installations, particularly those acquired through certain package managers or Linux-like environments (like WSL – Windows Subsystem for Linux), might set up the executable aspython3. Ifpython --versionfails, trypython3 --version. The output will be similar toPython 3.x.x. This is particularly common in environments where Python 2 and 3 coexist, andpythondefaults to version 2.py --version(Python Launcher): The official Python installer for Windows often includes a utility called the Python Launcher (py.exe). This tool is designed to manage multiple Python versions and makes it easier to run scripts without worrying about PATH configurations. Ifpy.exeis installed and in your PATH (which it usually is by default with a standard Python.org installation), you can use it to check the default Python 3 version it’s configured to use.- Type
py --versionin Command Prompt/PowerShell. - You might see
Python 3.x.x(if a Python 3 version is set as default) orPython 2.x.xif an older version is prioritized. - To specifically check for a Python 3 version via the launcher, you can use
py -3 --version. Similarly,py -2 --versionwould check for a Python 2 installation.
- Type
These alternative commands provide more options for discovery, especially if you have multiple Python versions or non-standard installations, making them valuable assets in your troubleshooting toolkit.
Locating Python with where python
Beyond just checking the version, you might want to know where the python.exe executable is located on your system. The where command in Command Prompt (or Get-Command python in PowerShell) can help you pinpoint its exact path. This is particularly useful for verifying installations, managing environment variables, or understanding which specific executable is being invoked.
How to Use It:
- Open Command Prompt.
- Type
where pythonand press Enter. (In PowerShell, useGet-Command pythonor(Get-Command python).Path).
Expected Outcomes:
- Python Found: The command will return one or more file paths where
python.exeis located. For example:
C:UsersYourUserAppDataLocalProgramsPythonPython39python.exe

C:Python27python.exe
This indicates not only that Python is installed but also its specific location(s). If multiple paths are listed, it means you have several Python installations, and the one listed first is typically what the system will execute when you just typepython. Understanding these paths is key to advanced configuration and debugging. - Python Not Found: If Python is not in your PATH, or not installed, you’ll receive a message like:
INFO: Could not find files for the given pattern(s).
This reinforces that the system cannot locatepython.exethrough its environment variables, indicating a need for either installation or PATH adjustment.
The where command is invaluable for identifying the source of your Python installation, which is crucial for troubleshooting PATH issues or managing multiple versions effectively. It provides granular insight that simple version checks might not offer.
Deeper Dive: System & GUI Checks
While the command line offers speed, sometimes a visual confirmation or a look into system settings provides a more comprehensive understanding of your Python installation. These methods help confirm Python’s presence through Windows’ graphical interface and environment configurations, appealing to those who prefer a more visual approach to system management.
Inspecting Environment Variables (PATH)
The PATH environment variable is a critical system setting that tells Windows which directories to search for executable files when you type a command without specifying its full path. If Python is installed but not in your PATH, or if an incorrect path is listed, the system won’t recognize the python command. Understanding and managing the PATH is a core skill for any user dealing with command-line tools.
How to Check:
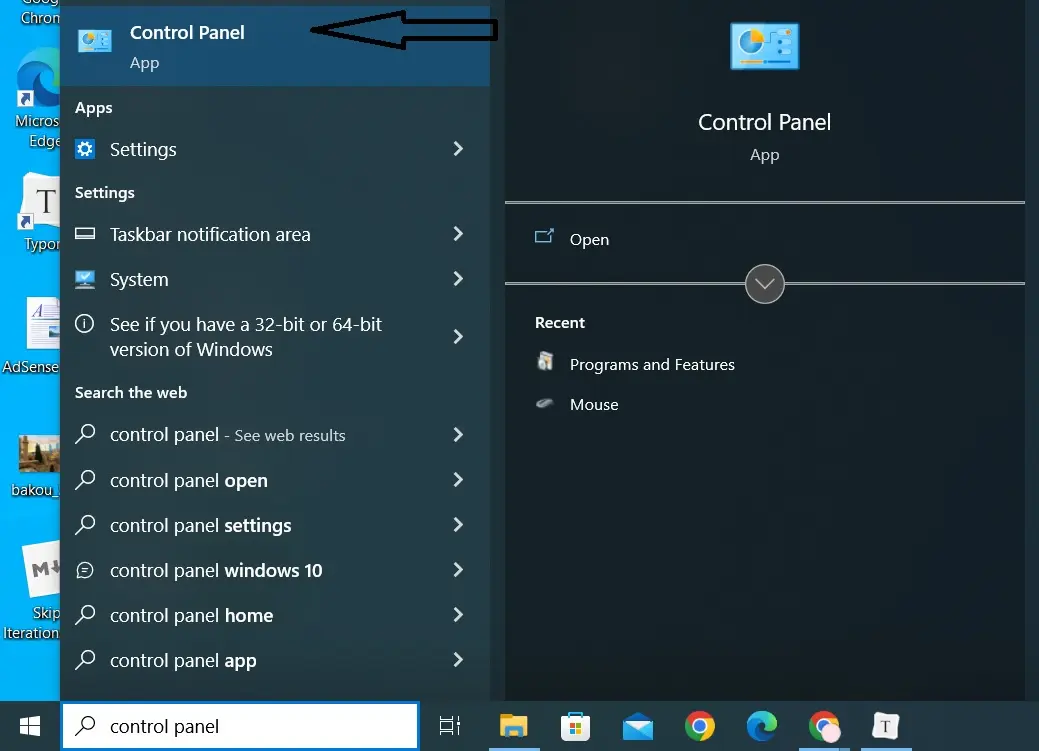
- Open System Properties:
- Right-click on “This PC” (or “My Computer”) and select “Properties.”
- Alternatively, search for “Environment Variables” in the Windows search bar and select “Edit the system environment variables.”
- Access Environment Variables: In the System Properties window, click on “Advanced system settings” on the left pane. Then, in the “System Properties” dialog, click the “Environment Variables…” button.
- Examine the PATH Variable:
- In the “Environment Variables” dialog, you’ll see two sections: “User variables for [YourUser]” and “System variables.”
- Look for a variable named
Path(case-insensitive) in both sections. SelectPathand click “Edit…”. - A new window will open, listing all directories included in the PATH. Look for entries that point to your Python installation, typically something like:
C:UsersYourUserAppDataLocalProgramsPythonPython39ScriptsC:UsersYourUserAppDataLocalProgramsPythonPython39C:Python38ScriptsC:Python38- Also look for the Python Launcher entry:
C:UsersYourUserAppDataLocalProgramsPythonLauncher
What to Look For:
The presence of these paths confirms that Python should be accessible from the command line. If Python is installed but these paths are missing, that’s likely the cause of “Python not recognized” errors. Conversely, if you find these paths but still get errors, it might indicate a corrupted installation or a conflict with another program. Proper PATH configuration is crucial for productivity and avoiding frustrating errors.
The “Add or Remove Programs” Method
This is a straightforward graphical method to see if Python has been formally installed on your system via an installer package. It provides a quick, visual confirmation and is generally the first place users look for installed applications.
How to Check:
- Open Apps & Features:
- Right-click on the Start button and select “Apps and Features.”
- Alternatively, go to
Settings > Apps > Apps & features.
- Search for Python: In the “Apps & features” list, you can either scroll through the installed programs alphabetically or use the search bar at the top (type “Python”).
Expected Outcomes:
- Python Listed: If Python was installed using the official installer from python.org or the Microsoft Store, you will typically see entries like “Python 3.x.x (64-bit)” or “Python 3.x.x Launcher.” This is a clear indicator of installation. The presence of specific version numbers makes this a reliable method.
- Python Not Listed: If you don’t find Python here, it could mean:
- Python was never installed.
- Python was installed manually (e.g., by simply unzipping a portable version) without using an installer.
- Python was installed as part of another development environment (like Anaconda), which might list the entire environment rather than “Python” itself.
This method is excellent for a quick visual confirmation and is also where you would go if you ever needed to uninstall Python, making it a critical part of managing your software landscape.
Verifying the Python Launcher (py.exe)
As mentioned earlier, the Python Launcher (py.exe) is a robust utility included with official Python installations on Windows. It’s designed to make managing multiple Python versions easier and to run Python scripts without explicit path declarations. Its presence confirms a well-configured Python environment.
How to Check:
- Open Command Prompt/PowerShell.
- Type
pyand press Enter.
Expected Outcomes:
- Python Launcher Active: If the launcher is working, it will typically open an interactive Python shell for the default Python 3 version installed. You’ll see something like:
Python 3.9.7 (tags/v3.9.7:c026b03, Sep  1 2021, 15:32:21) [MSC v.1929 64 bit (AMD64)] on win32

Type "help", "copyright", "credits" or "license" for more information.

>>>
This confirms that the launcher is installed and functional, and Python is ready to accept commands. You can then typeexit()and press Enter to leave the interactive shell. - “py” Not Recognized: If you receive
'py' is not recognized..., it means the Python Launcher is either not installed or not in your system’s PATH.
The py command is often a more reliable first check than python because the launcher is specifically designed to handle Python versions on Windows, irrespective of potential PATH conflicts with other python.exe files (e.g., from WSL or Git Bash), boosting your productivity by minimizing version-related headaches.
Running a Simple Test Script
The ultimate test of a functional Python installation is to actually run a Python script. This method confirms not just the presence of the executable but also its ability to interpret code correctly, ensuring your entire Python toolchain is operational. It’s the “proof of concept” that everything is set up as it should be.
How to Do It:
- Create a Python File:
- Open Notepad (or any text editor).
- Type the following line of code:
python

print("Hello, Python is installed and working!")
- Save the file as
test.py(or any name ending with.py) to your Desktop or an easily accessible folder.
- Execute the Script:
- Open Command Prompt/PowerShell.
- Navigate to the directory where you saved
test.pyusing thecdcommand (e.g.,cd C:UsersYourUserDesktop). - Type
python test.pyand press Enter. (Ifpythonisn’t recognized, trypy test.pyorpython3 test.py).
Expected Outcomes:
- Successful Execution: If Python is installed and configured correctly, you will see the output:
Hello, Python is installed and working!
This is the most definitive proof that your Python environment is ready for use, confirming that not only is the interpreter present, but it can also process valid Python syntax. - Error: If you get an error like “No such file or directory” (check your
cdcommand and file path) or “Python not recognized” (refer to troubleshooting), then there’s an issue with your installation or configuration.
This method verifies the complete pipeline, from interpreter location to script execution, making it a robust final check for any tech enthusiast or professional.
Troubleshooting & Next Steps
You’ve tried the checks, and now you have a clearer picture. What if Python isn’t there, or if something isn’t quite right? This section provides solutions to common problems and outlines the logical next steps for setting up your Python environment, ensuring you can quickly overcome hurdles and continue your development journey.
What if Python Isn’t Installed?
If all checks indicate that Python is not installed or not accessible, the solution is straightforward: install it! Choosing the right installation method can impact your future development experience, so consider your needs carefully.
Recommended Installation Methods for Windows:
- Official Python Website (python.org): This is the most common and recommended method for general development.
- Go to
www.python.org/downloads/windows/. - Download the latest stable version of Python 3 (e.g., “Windows installer (64-bit)”).
- Crucial Step During Installation: When running the installer, make sure to check the box that says “Add Python X.X to PATH” (where X.X is the version number). This ensures that Python is automatically added to your system’s environment variables, making it easily accessible from the command line. If you forget this step, you’ll need to manually add it to PATH later.
- Follow the on-screen instructions to complete the installation.
- Go to
- Microsoft Store: For many users, installing Python from the Microsoft Store offers a simpler, more sandboxed experience. It handles PATH setup automatically and provides easier updates. Search for “Python” in the Microsoft Store and install the latest Python 3 version.
- Note: The Microsoft Store version might have some minor differences in how it interacts with system files compared to the official
python.orginstaller, but for most general use cases, it’s perfectly fine and often preferred for its ease of management.
- Note: The Microsoft Store version might have some minor differences in how it interacts with system files compared to the official
- Anaconda (for Data Science/Machine Learning): If your primary interest is data science, machine learning, or scientific computing, consider installing Anaconda. It’s a popular distribution that includes Python along with a vast collection of pre-installed packages (like NumPy, pandas, scikit-learn) and a powerful environment manager. This is an excellent choice for those focusing on AI tools and data analysis.
After installation, repeat the initial command-line checks (python --version, py --version) to confirm everything is working as expected.
Resolving “Python Not Recognized” Errors (PATH Issues)
This is perhaps the most common frustration for new Python users on Windows. If you see 'python' is not recognized as an internal or external command..., it almost certainly points to an issue with your system’s PATH environment variable. Rectifying this is key to seamless command-line operation.
Solutions:
- Add Python to PATH Manually (if forgotten during installation):
- Locate your Python installation directory. If you installed from python.org, it’s typically something like
C:UsersYourUserAppDataLocalProgramsPythonPython39(replaceYourUserandPython39with your specifics). You’ll also need theScriptssubdirectory, e.g.,C:UsersYourUserAppDataLocalProgramsPythonPython39Scripts. - Go to “Environment Variables” (as described in the “Inspecting Environment Variables” section).
- In the “System variables” section (or “User variables” if you prefer user-specific installation), select the
Pathvariable and click “Edit…”. - Click “New” and add the path to your Python executable (e.g.,
C:UsersYourUserAppDataLocalProgramsPythonPython39). - Click “New” again and add the path to your Python’s
Scriptsdirectory (e.g.,C:UsersYourUserAppDataLocalProgramsPythonPython39Scripts). This is crucial for commands likepipto work. - Click “OK” on all open windows to save changes.
- Important: Close and reopen any Command Prompt or PowerShell windows for the changes to take effect.
- Locate your Python installation directory. If you installed from python.org, it’s typically something like
- Verify Order in PATH: If you have multiple Python versions or other programs with
python.exe(e.g., Git Bash, Anaconda), the order in the PATH variable matters. Windows executes the firstpython.exeit finds. Ensure the desired Python version’s path is listed before others to prevent unintended version conflicts. - Use the Python Launcher (
py.exe): If manual PATH configuration seems too complex, remember that thepycommand (Python Launcher) is often added to PATH automatically by the official installer. Try usingpyinstead ofpythonto run scripts or check versions (e.g.,py --version,py your_script.py). The launcher often provides a more robust way to manage multiple Python versions without direct PATH manipulation.
The Importance of pip for Package Management
Python’s strength lies not just in its core language but also in its vast ecosystem of third-party libraries and frameworks. These are managed using pip, Python’s package installer. If Python is installed, pip usually comes with it, but it’s vital to ensure pip is also working correctly, as it’s the gateway to extending Python’s capabilities.
How to Check pip:
- Open Command Prompt/PowerShell.
- Type
pip --versionand press Enter.
Expected Outcomes:
pipis Installed and Working: You’ll see an output likepip 21.2.4 from C:UsersYourUserAppDataLocalProgramsPythonPython39libsite-packagespip (python 3.9). This confirmspipis ready to install packages.pipNot Recognized: Ifpipis not recognized, it usually means your PythonScriptsdirectory (wherepip.exeresides) is not in your system’s PATH. Refer to the manual PATH configuration steps above to add it.pipis Outdated: The version might be older. You can update it usingpython -m pip install --upgrade pip. Keepingpipupdated is a good digital security practice.
Having a functional pip is essential for any serious Python development, allowing you to easily extend Python’s capabilities and leverage the vibrant open-source community’s contributions.
Managing Multiple Python Versions
It’s common for developers to need multiple Python versions on their system (e.g., Python 3.8 for an older project, Python 3.10 for a new one). This can lead to conflicts if not managed properly, potentially affecting different applications or environments.
Best Practices:
- Python Launcher (
py.exe): Thepylauncher is your best friend on Windows for this. It intelligently determines which Python version to use based on configuration or explicit commands.- To run a specific version:
py -3.8 script.py(runs with Python 3.8). - To check a specific version:
py -3.9 --version(checks Python 3.9).
- To run a specific version:
- Virtual Environments (
venvorconda): For project-specific dependencies and to isolate different Python environments, always use virtual environments. This is a crucial practice for maintaining a clean and manageable development setup.venv(built-in):python -m venv my_project_envconda(with Anaconda/Miniconda):conda create -n my_env python=3.9- Activating a virtual environment ensures that any packages you install and the
pythoncommand you use are specific to that project, preventing conflicts with other projects or your global Python installation. This promotes productivity and reduces debugging time.
- Be Mindful of PATH: When installing multiple Python versions, carefully manage your PATH to avoid conflicts, or rely primarily on the
pylauncher and virtual environments to abstract away PATH complexities.

Uninstalling Python on Windows
If you need to remove a Python installation (e.g., to clean up old versions or resolve a corrupted installation), the process is straightforward and helps maintain system hygiene.
- Go to
Settings > Apps > Apps & features. - Search for “Python” in the list.
- Select the Python version you wish to uninstall.
- Click “Uninstall” and follow the prompts.
- Optional: Manually check your PATH environment variable to ensure any old Python paths have been removed. If not, delete them to avoid residual clutter.
Conclusion:
Verifying your Python installation on Windows is a foundational step that paves the way for a smooth and productive coding experience. By utilizing the various command-line and GUI methods outlined in this guide, you can quickly determine Python’s presence, version, and configuration. Whether you’re just starting your journey into programming, managing complex development environments, or troubleshooting an existing setup, these techniques provide the clarity you need to move forward confidently.
In the fast-paced world of technology trends and AI tools, having a reliably configured Python environment is not just convenient, but essential. Remember that a robust Python environment relies on not only a correct installation but also a functional pip for package management and an understanding of how to leverage tools like the Python Launcher and virtual environments. Armed with this knowledge, you are now well-equipped to ensure Python is always ready to execute your ideas, contributing to your technical proficiency, enhancing your digital security through proper setup, and allowing you to harness the full power of this incredibly versatile language. Happy coding!