In today’s digitally driven world, Python stands as one of the most versatile and widely used programming languages. From web development and data science to artificial intelligence and automation, Python’s elegant syntax and vast ecosystem of libraries make it a go-to choice for developers and tech enthusiasts alike. For Mac users, understanding how to manage Python installations is a fundamental step towards harnessing its power for various projects and tasks.
Whether you’re a seasoned developer setting up a new machine, a data scientist needing a specific Python version, or a beginner embarking on your coding journey, knowing how to verify Python’s presence on your macOS system is crucial. macOS, by default, has historically included a system version of Python, primarily Python 2. However, with Python 2 officially reaching its end-of-life and Python 3 becoming the universal standard, navigating these versions and ensuring you have the correct setup is more important than ever. This comprehensive guide will walk you through the essential steps to check your Python installation on a Mac, interpret the results, and provide clear directions on what to do next, ensuring your development environment is precisely configured for success.

The Primary Method: Using the Terminal to Verify Python
The most direct and reliable way to check for Python on your Mac is through the command-line interface, specifically using the Terminal application. The Terminal provides a powerful window into your system’s underlying software, allowing you to execute commands and retrieve detailed information about installed programs, including Python.
Accessing the Terminal
Before we dive into the commands, you first need to open the Terminal. There are a couple of straightforward ways to do this:
- Through Spotlight Search: Press
Command (⌘) + Spacebarto open Spotlight Search, then type “Terminal” and hitEnter. - Through Finder: Navigate to
Applications > Utilities > Terminal.
Once the Terminal window is open, you’ll see a command prompt, typically displaying your username and machine name, followed by a dollar sign ($). This indicates that the system is ready to accept your commands.
Checking for Python 3 Installation
Python 3 is the current and actively maintained version of the language. Most modern development and projects require Python 3. To check if Python 3 is installed and to see its version number, type the following command into your Terminal and press Enter:
python3 --version
Interpreting the Output:
- If Python 3 is installed: You will see an output similar to
Python 3.x.y, wherexandyrepresent the minor and micro version numbers (e.g.,Python 3.9.7orPython 3.10.12). This confirms that Python 3 is installed and indicates its specific version. - If Python 3 is not found: You might see a message like
zsh: command not found: python3(if you’re using Zsh, the default shell in newer macOS versions) orbash: python3: command not found(if you’re using Bash). This means that apython3executable is not directly accessible in your system’s PATH, suggesting it’s either not installed or not configured correctly for command-line access. - If you get a prompt to install Xcode Command Line Tools: macOS might sometimes prompt you to install Xcode Command Line Tools if it detects a need for Python but doesn’t find a direct installation. While these tools include a basic Python, it’s generally recommended to install Python directly via Homebrew or the official installer for a more robust development setup.
It’s important to note that macOS Ventura and later versions no longer include Python 3 by default. While macOS Monterey and earlier might have included a system Python 3, it’s often an older version and not ideal for development purposes as it’s intended for system scripts. For dedicated development, a user-installed version is always preferred.
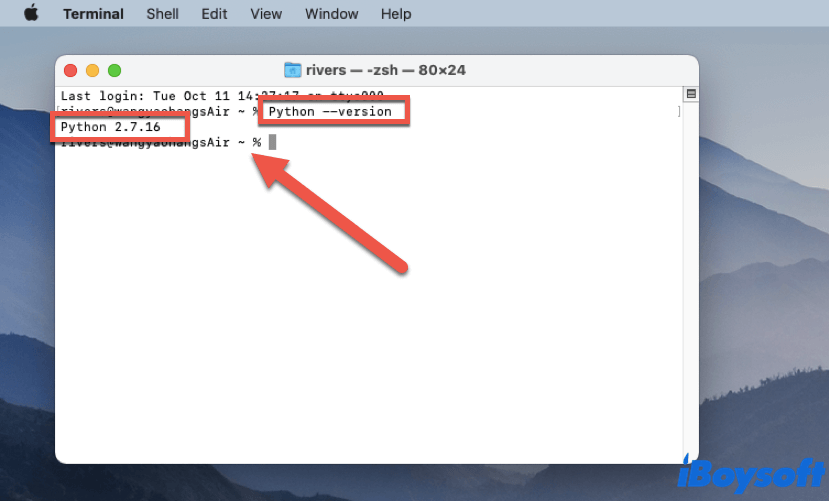
Checking for Python 2 (Legacy) Installation
Historically, macOS came pre-installed with Python 2 for system scripts. While Python 2 reached its end-of-life in 2020 and is no longer recommended for new projects, you might still encounter it or need to check for its presence if you’re working with older codebases.
To check for Python 2, use the following command:
python --version
And sometimes explicitly:
python2 --version
Interpreting the Output:
- If Python 2 is installed: You will likely see an output such as
Python 2.7.x. This confirms the presence of Python 2. - If Python 2 is not found: You’ll see a
command not foundmessage. Newer macOS versions might not include Python 2 by default, or it might have been removed.
Important Note on python --version: On many systems, particularly older ones or those with specific PATH configurations, the python command might still default to Python 2. This is why explicitly using python3 is crucial when you intend to work with Python 3. If you have both Python 2 and Python 3 installed, and your python command points to Python 2, it’s a good practice to always use python3 for Python 3 projects to avoid confusion. Some developers also configure aliases or use tools like pyenv to manage which python command points to which version.
Understanding Your Python Landscape: Location and Multiple Versions
Once you’ve run the basic version checks, it’s beneficial to understand where your Python installations reside on your system. This knowledge is particularly useful when you have multiple Python versions, which is common for developers working on diverse projects.
Locating Python Executables
Knowing the full path to your Python executable can help troubleshoot issues, confirm which installation is being used, and understand how your system’s PATH variable is configured.
To find the location of your python3 executable, use the which command:
which python3
Expected Output:
You might see paths like:
/usr/local/bin/python3: This often indicates a Python 3 installation managed by Homebrew or a similar package manager, which is a common and recommended setup./Library/Frameworks/Python.framework/Versions/3.x/bin/python3: This path typically points to an installation from the official Python.org installer./usr/bin/python3: This path usually indicates a system-provided Python 3. While present on some macOS versions, it’s generally best not to modify or rely on this for development as it’s reserved for macOS system processes.~/.pyenv/shims/python3: If you are usingpyenv(a popular Python version manager), thewhichcommand will point to apyenvshim, which then redirects to the actual Python installation managed bypyenv.
Similarly, you can check the location of the python (Python 2) executable:
which python
The output for python might be /usr/bin/python (the original system Python 2) or another path if you’ve installed Python 2 through other means.
Differentiating Between System Python and User-Installed Python
One of the most critical distinctions for Mac users is understanding the difference between the Python versions that come with macOS (System Python) and those you install yourself (User-Installed Python).
- System Python: Located in
/usr/bin/python(Python 2) or sometimes/usr/bin/python3(on older macOS versions). Apple includes these for internal macOS operations and scripts. It is strongly advised never to modify, upgrade, or remove System Python. Doing so can lead to unexpected system behavior or even break macOS functionalities that rely on specific Python versions. - User-Installed Python: These are versions you install using methods like Homebrew, the official Python.org installer, or via version managers like
pyenv. These installations typically reside in/usr/local/bin(Homebrew) or within your user library. User-installed Python is isolated from the system’s core, allowing you to manage and update it without affecting macOS. This is the version you should use for all your development projects.
The which command helps you identify if you’re inadvertently relying on a System Python or if your PATH is correctly configured to prioritize your user-installed version. For robust development, ensuring your which python3 command points to a user-installed path (e.g., /usr/local/bin/python3) is key.
What If Python Isn’t Installed (or You Need a Different Version)?
If your Terminal checks indicate that Python 3 isn’t installed, or if you need a specific version of Python different from what you currently have, there are several reliable ways to get it set up on your Mac. For modern development, installing Python 3 is paramount.
Homebrew: The Recommended Way to Install Python
Homebrew is an open-source package manager for macOS that simplifies the installation of software. It’s widely regarded as the easiest and most robust way to install and manage development tools, including Python, on a Mac.
1. Install Homebrew (if you haven’t already):
Open Terminal and paste the following command. Follow the on-screen instructions, which might involve entering your password and installing Xcode Command Line Tools.
/bin/bash -c "$(curl -fsSL https://raw.githubusercontent.com/Homebrew/install/HEAD/install.sh)"
2. Install Python 3 using Homebrew:
Once Homebrew is installed, you can install Python 3 with a single command:
brew install python
Homebrew will download and install the latest stable version of Python 3, along with its associated tools like pip (Python’s package installer). Homebrew automatically symlinks the python3 command to this new installation, ensuring it’s in your PATH.
3. Verify the Installation:
After the installation completes, run the python3 --version command again to confirm that the new Python version is recognized. You should see the version number of the Python just installed by Homebrew.
python3 --version
Benefits of Homebrew:
- Simplicity: Easy commands for installation and updates.
- Isolation: Installs Python in
/usr/local/bin, keeping it separate from System Python. - Dependencies: Automatically handles dependencies required by Python packages.
- Updates: Easily update Python to newer versions with
brew upgrade python.
Python.org Installer
Another straightforward method is to download the official Python installer directly from the Python Software Foundation’s website (python.org).
1. Download the Installer:
Visit python.org/downloads/macos/ and download the latest macOS installer package (a .pkg file) for Python 3.
2. Run the Installer:
Double-click the downloaded .pkg file and follow the on-screen instructions. This is a standard graphical installer process.
3. Verify the Installation:
After installation, open Terminal and run python3 --version. The installer typically sets up the necessary PATH configurations, but sometimes you might need to restart your Terminal or open a new one for changes to take effect.
Considerations:
- This method provides a direct, official installation.
- Managing multiple Python versions or dependencies can be slightly more manual compared to Homebrew.
Using pyenv for Version Management
For developers who work on multiple projects requiring different Python versions (e.g., one project needs Python 3.8, another 3.10), pyenv is an invaluable tool. It allows you to easily switch between various Python versions without conflicts.
1. Install pyenv via Homebrew:
brew install pyenv
2. Configure your shell:
Add pyenv initialization commands to your shell’s configuration file (e.g., ~/.zshrc for Zsh or ~/.bash_profile for Bash). The output of brew install pyenv will typically provide these exact lines. It usually looks something like this:
echo 'eval "$(pyenv init --path)"' >> ~/.zprofile # or ~/.zshrc or ~/.bash_profile
echo 'eval "$(pyenv init -)"' >> ~/.zprofile # or ~/.zshrc or ~/.bash_profile
Then, reload your shell configuration: source ~/.zprofile (or your respective file).
3. Install Python versions with pyenv:
pyenv install 3.9.18
pyenv install 3.11.8
4. Set global or local Python versions:
- Global: To set a default Python version for all new shells:
bash

pyenv global 3.11.8
- Local: To set a specific Python version for a project directory (creating a
.python-versionfile):
bash

cd my_project_folder

pyenv local 3.9.18
5. Verify:
Now, python --version and python3 --version will reflect the version set by pyenv for your current context.
pyenv offers immense flexibility, allowing you to test code against different Python versions and ensuring project-specific dependencies are met without system-wide conflicts.
Best Practices and Next Steps for Python Development
Once Python is installed and configured on your Mac, there are several best practices and next steps to ensure a smooth and efficient development workflow. These practices align with the broader “Tech” topics of productivity and software management.
Working with Virtual Environments
One of the most crucial best practices in Python development is the use of virtual environments. A virtual environment is an isolated directory that contains its own Python interpreter and its own set of installed packages. This isolation prevents conflicts between different projects that might require different versions of the same library.
Why use virtual environments?
- Dependency Management: Each project gets its own
site-packagesdirectory. Project A can userequests==2.20.0while Project B usesrequests==2.28.0without clashing. - Cleanliness: Your global Python installation remains pristine, free from project-specific clutter.
- Reproducibility: Easily share
requirements.txtfiles, allowing others to recreate your exact development environment.
How to create and activate a virtual environment (using venv):
- Navigate to your project directory:
bash

cd /path/to/your/project
- Create a virtual environment (named
venvby convention):
bash

python3 -m venv venv
This command uses thepython3executable in your PATH to create a new virtual environment. - Activate the virtual environment:
bash

source venv/bin/activate
Your Terminal prompt will change to indicate that the virtual environment is active (e.g.,(venv) your_user@your_mac). Now, anypip installcommands will install packages into this isolated environment. - Deactivate the virtual environment:
When you’re done working on the project, simply type:
bash

deactivate
Choosing a Code Editor or Integrated Development Environment (IDE)
While Python code can be written in any text editor, using a dedicated code editor or IDE significantly enhances productivity, debugging, and overall development experience.
- Visual Studio Code (VS Code): A free, open-source, and highly popular code editor developed by Microsoft. It offers excellent Python support via extensions, including intelligent code completion, linting, debugging, and virtual environment integration. Its lightweight nature and vast extension marketplace make it suitable for almost any Python project.
- PyCharm: A powerful and feature-rich IDE specifically designed for Python development by JetBrains. It comes in both a free Community Edition and a paid Professional Edition. PyCharm provides advanced debugging, refactoring tools, database integration, web framework support, and deep virtual environment management. It’s often preferred for larger, more complex projects.
- Sublime Text: A fast and highly customizable text editor known for its speed and sleek interface. While not a full IDE, it can be extended with Python-specific packages to provide syntax highlighting, code completion, and other developer-friendly features.
Choosing the right tool depends on your project size, personal preferences, and the level of integration you require. Most developers start with VS Code due to its versatility and free cost.
Staying Updated and Secure
Keeping your Python installation and its packages up-to-date is crucial for performance, security, and access to the latest features.
- Updating Python: If you installed Python via Homebrew, updating is as simple as
brew update && brew upgrade python. If usingpyenv, you’d install a newer version and then switch to it. For the python.org installer, you’d download and run the new installer. - Updating
pip:pipitself often receives updates. You can update it within an active virtual environment (or globally if necessary) usingpython3 -m pip install --upgrade pip. - Updating Packages: Regularly update your project’s dependencies to benefit from bug fixes and security patches. Within an active virtual environment, you can use
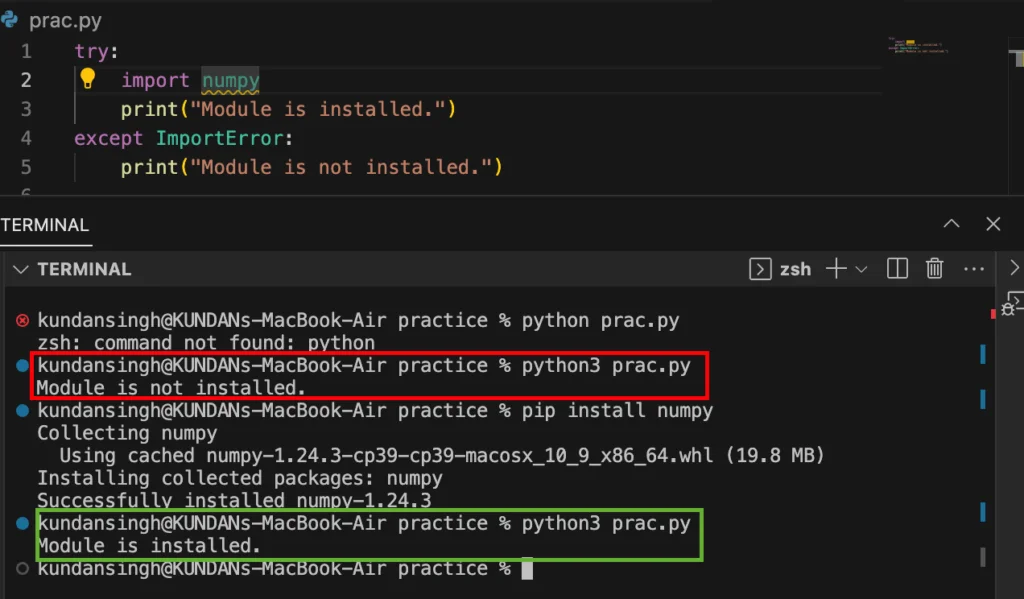
pip list --outdatedto see out-of-date packages, andpip install --upgrade package_nameto update them. For a complete update of all outdated packages, various scripts or tools exist, but typically updating on a per-package orrequirements.txtbasis is safer for specific project stability. - Digital Security: While Python itself is secure, using outdated packages or downloading packages from untrusted sources can introduce vulnerabilities. Always get packages from PyPI (Python Package Index) and keep your system and development tools updated.
Conclusion
Checking if Python is installed on your Mac, understanding its version, and knowing its location are foundational steps for any developer or enthusiast working with the language. By leveraging the Terminal commands python3 --version, python --version, and which python3, you gain immediate insights into your system’s Python landscape.
When Python 3 isn’t present or if you need a specific version, tools like Homebrew, the official Python.org installer, and pyenv offer reliable pathways to set up a robust and flexible development environment. Crucially, always prioritize user-installed Python versions and consistently employ virtual environments to manage project dependencies effectively.
Embracing these best practices – from selecting a suitable code editor like VS Code or PyCharm to diligently updating your installations – will not only streamline your workflow but also enhance your productivity and ensure the stability and security of your Python projects. With Python’s omnipresence in technology, mastering its initial setup on macOS paves the way for countless innovation opportunities, making your Mac a powerful hub for everything from scripting small automations to building complex AI applications.
aViewFromTheCave is a participant in the Amazon Services LLC Associates Program, an affiliate advertising program designed to provide a means for sites to earn advertising fees by advertising and linking to Amazon.com. Amazon, the Amazon logo, AmazonSupply, and the AmazonSupply logo are trademarks of Amazon.com, Inc. or its affiliates. As an Amazon Associate we earn affiliate commissions from qualifying purchases.