In the rapidly evolving world of technology, staying current with the essential tools is paramount for developers, IT professionals, and even hobbyists dabbling in digital projects. Node.js, a powerful JavaScript runtime environment, has become an indispensable component for building dynamic web applications, server-side logic, and a vast array of other software. Whether you’re embarking on a new development project, troubleshooting an existing setup, or simply curious about your system’s capabilities, knowing how to verify Node.js installation is a fundamental skill.
This guide will walk you through the straightforward process of checking if Node.js is installed on your system, offering clear instructions for various operating systems. We’ll delve into the command-line interfaces that unlock this information and provide insights into what the results signify. Understanding this basic step is the first hurdle to leveraging the immense potential of Node.js, opening doors to a world of innovation in web development, application building, and beyond.

Why Verify Your Node.js Installation?
Before we dive into the “how-to,” it’s crucial to understand why you might need to confirm Node.js is present on your machine. The reasons are varied and touch upon several key aspects of the tech landscape:
1. Setting Up Your Development Environment
For aspiring or seasoned web developers, Node.js is often the bedrock of their toolkit. Many modern JavaScript frameworks and libraries, such as React, Angular, and Vue.js, rely heavily on Node.js for their build processes, package management, and development servers. If you’re aiming to start a new project or contribute to an existing one that uses these technologies, a correctly installed Node.js is non-negotiable. Without it, you won’t be able to install necessary dependencies, run development scripts, or even get your project up and running locally.
2. Troubleshooting Installation or Project Issues
Have you ever encountered cryptic error messages like “command not found: node” or encountered unexpected behavior in a project you’re working on? Often, these problems stem from an incomplete or corrupted Node.js installation, or even the absence of Node.js altogether. Being able to quickly check if Node.js is installed can be the first step in diagnosing and resolving such issues, saving you valuable time and frustration. It helps isolate whether the problem lies with the Node.js environment itself or with other aspects of your project.
3. Understanding System Capabilities
Beyond active development, some users might need to confirm Node.js installation for other reasons. Perhaps a specific application or tool you’re using requires Node.js to function. Or, if you’re managing a server or a shared hosting environment, you might need to verify the presence of certain runtimes to ensure compatibility or security. This check provides a snapshot of your system’s software capabilities, aiding in planning and resource management.
4. Exploring New Technologies and Frameworks
The world of tech is constantly evolving. New JavaScript frameworks, build tools, and server-side technologies emerge regularly, and many of them are built upon or integrate with Node.js. If you’re interested in exploring these new frontiers, from the latest AI tools to innovative productivity apps, understanding your Node.js status is a foundational step. It empowers you to experiment and adopt cutting-edge solutions more effectively.
Checking Node.js Installation Across Operating Systems
The most common and reliable way to check for Node.js installation is through your system’s command-line interface (CLI). This approach works consistently across Windows, macOS, and Linux.
Using the Command Prompt (Windows) or Terminal (macOS/Linux)
The command you’ll use is node -v or node --version. This command queries the system for the Node.js executable and, if found, returns its installed version number.
On Windows:
- Open Command Prompt: You can do this by searching for “Command Prompt” in the Windows search bar and selecting it, or by pressing
Win + R, typingcmd, and pressing Enter. - Type the command: In the Command Prompt window, type
node -vand press Enter.
On macOS:
- Open Terminal: You can find Terminal in your Applications folder, under Utilities, or by searching for “Terminal” using Spotlight (Command + Space).
- Type the command: In the Terminal window, type
node -vand press Enter.
On Linux:
- Open Terminal: Most Linux distributions have a Terminal application readily accessible from your application menu or by using a keyboard shortcut (often
Ctrl + Alt + T). - Type the command: In the Terminal window, type
node -vand press Enter.
Interpreting the Results
-
If Node.js is installed: You will see a version number printed to the console, typically in a format like
v18.12.1orv20.5.0. This output confirms that Node.js is installed and accessible via your system’s PATH environment variable. The number indicates the specific version of Node.js that is currently active. -
If Node.js is NOT installed: You will likely receive an error message.
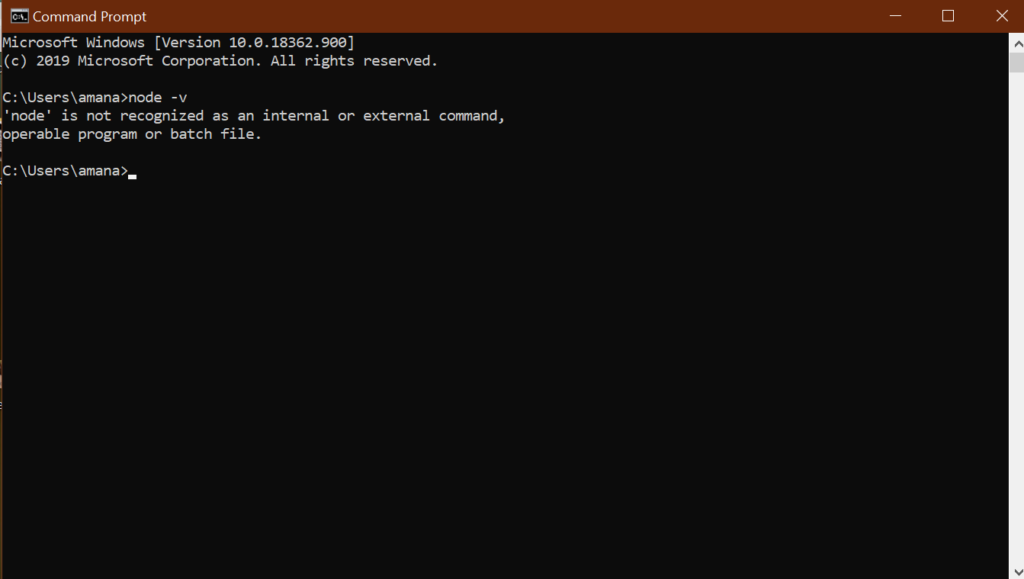
- On Windows, it might say something like:
'node' is not recognized as an internal or external command, operable program or batch file. - On macOS or Linux, it might state:
command not found: node.
- On Windows, it might say something like:
These error messages clearly indicate that the node command is not recognized, meaning Node.js is either not installed or not properly configured in your system’s PATH.
Checking Node.js Version and npm Version
While checking the Node.js version is the primary goal, it’s also beneficial to check the version of npm (Node Package Manager). npm is bundled with Node.js and is essential for managing project dependencies.
How to Check the npm Version
The command to check your npm version is npm -v or npm --version.
Steps:
- Open your Command Prompt or Terminal (as described in the previous section).
- Type the command:
- To check npm version:
npm -vand press Enter.
- To check npm version:
Interpreting the Results:
-
If npm is installed: You will see a version number for npm, such as
9.8.0. This confirms that npm is installed and functional, which is expected if Node.js itself is installed correctly. -
If npm is NOT installed: You might receive a similar “command not found” error as with Node.js. However, this is less common, as npm is typically installed automatically with Node.js. If you do encounter this, it might indicate a corrupted Node.js installation or a manual removal of npm.
Why Checking Both Node.js and npm Versions is Important
Verifying both Node.js and npm versions provides a more comprehensive understanding of your JavaScript runtime environment.
-
Compatibility: Different versions of Node.js and npm have varying feature sets and compatibility with specific libraries. Knowing your versions helps ensure that the tools and dependencies you intend to use will work as expected. Many modern libraries will specify minimum required versions for Node.js and npm.
-
Troubleshooting: If you’re facing issues with package installation or running certain Node.js applications, comparing your versions against project requirements or documented solutions can quickly pinpoint potential conflicts.
-
Best Practices: Keeping both Node.js and npm updated to their latest stable versions is generally recommended for security, performance, and access to the newest features. Checking your versions is the first step toward deciding if an update is necessary.
What to Do If Node.js is Not Installed
If your checks reveal that Node.js is not installed on your system, don’t worry! The installation process is generally straightforward. The official Node.js website provides installers for Windows, macOS, and Linux, making it accessible for everyone.
Downloading and Installing Node.js
- Visit the Official Node.js Website: Go to https://nodejs.org/.
- Choose Your Download: You’ll typically see two prominent download options:
- LTS (Long Term Support): This is the recommended version for most users, as it’s stable and well-tested, making it ideal for production environments.
- Current: This version includes the latest features but may be less stable and is better suited for testing new functionalities.
- Download the Installer: Click on the recommended version (usually LTS) for your operating system. The website should automatically detect your OS.
- Run the Installer: Once the download is complete, run the installer package and follow the on-screen prompts. The default installation options are usually sufficient for most users. The installer will typically add Node.js and npm to your system’s PATH, making them accessible from the command line.
- Verify the Installation: After the installation is complete, close and reopen your Command Prompt or Terminal window. This is crucial because environment variables (like PATH) are often loaded when a terminal session starts. Then, repeat the
node -vandnpm -vcommands to confirm that Node.js and npm are now installed and recognized.
Managing Multiple Node.js Versions
For developers who work on multiple projects, each potentially requiring a different Node.js version, managing installations can become complex. Fortunately, tools like nvm (Node Version Manager) for macOS/Linux and nvm-windows for Windows exist to simplify this process. These tools allow you to install, switch between, and manage multiple Node.js versions on a single machine without conflicts. If you anticipate needing to work with various Node.js versions, exploring these tools after your initial installation is highly recommended.
By understanding how to check for Node.js installation and knowing what to do if it’s missing, you’ve taken a significant step towards unlocking the powerful capabilities of this essential JavaScript runtime. Whether you’re building your next groundbreaking application, refining your digital marketing strategy with new tools, or managing your personal finance with innovative apps, a solid foundation in your system’s software is key. This knowledge empowers you to navigate the ever-expanding tech landscape with confidence and efficiency.
aViewFromTheCave is a participant in the Amazon Services LLC Associates Program, an affiliate advertising program designed to provide a means for sites to earn advertising fees by advertising and linking to Amazon.com. Amazon, the Amazon logo, AmazonSupply, and the AmazonSupply logo are trademarks of Amazon.com, Inc. or its affiliates. As an Amazon Associate we earn affiliate commissions from qualifying purchases.