In the fast-paced world of technology, where software development, content creation, and collaborative projects are the norm, efficient version control is not just a luxury—it’s a fundamental necessity. Git stands as the undisputed champion in this domain, a distributed version control system that empowers developers, designers, and even content strategists to track changes, collaborate seamlessly, and maintain a robust history of their work. From open-source marvels to enterprise-level applications, Git underpins the very fabric of modern digital production.
If you’re embarking on a new coding project, joining a development team, or simply curious about managing your digital assets with professional-grade tools, the first step is often to ascertain whether Git is already part of your toolkit. This article will guide you through the straightforward process of checking for Git’s presence on your system, regardless of your operating system. We’ll also delve into why Git is so crucial, what to do if it’s not installed, and how to verify its functionality, ensuring you’re ready to leverage this powerful technology.

Understanding Git: The Cornerstone of Modern Development
Before diving into the technical checks, it’s worth understanding why Git is so universally adopted and why its presence on your system is often a prerequisite for many tech-related endeavors. Git isn’t just a tool; it’s a paradigm shift in how digital projects are managed, fostering collaboration, ensuring reliability, and dramatically boosting productivity.
What is Git and Why is it Indispensable?
At its core, Git is a Distributed Version Control System (DVCS). This means that instead of relying on a single, central server to store all versions of a project’s files (as in older, centralized systems), every developer’s computer holds a complete copy of the entire repository and its history. This distributed nature offers several profound advantages:
- Robustness and Reliability: Should the central server or a developer’s local machine crash, the complete history of the project is safe on other collaborators’ machines. There’s no single point of failure. This contributes significantly to digital security by offering multiple redundant backups.
- Offline Work: Developers can work entirely offline, committing changes to their local repository, and then synchronize with the main project when they regain an internet connection. This enhances productivity, especially for remote teams or those on the go.
- Enhanced Collaboration: Git excels at managing contributions from multiple people. Its branching and merging capabilities allow developers to work on separate features independently without interfering with the main project, and then seamlessly integrate their work when ready. This is pivotal for scaling development teams and accelerating project delivery.
- Complete History Tracking: Every single change, no matter how minor, is recorded. You can view who made what changes, when, and why. This meticulous history is invaluable for debugging, auditing, and understanding the evolution of a project. If a bug is introduced, you can easily pinpoint the commit that caused it and revert to a stable state.
- Speed and Efficiency: Git is designed for performance, especially when dealing with large repositories. Its ability to quickly fetch, commit, and merge changes keeps workflows fluid and minimizes waiting times, directly impacting overall project efficiency and time-to-market.
- Open Source Foundation: As an open-source project, Git benefits from a massive community of contributors and users, leading to continuous improvement, extensive documentation, and a wealth of tools and integrations.
Who Needs Git?
While Git is famously associated with software development, its utility extends far beyond just coding. Anyone involved in creating, managing, or collaborating on digital content can significantly benefit from using Git:
- Software Developers: From individual freelancers to large enterprise teams, Git is the standard for managing source code, collaborating on features, and deploying applications.
- Web Developers and Designers: Managing website code, assets, and design files, Git ensures consistent versions and smooth updates.
- Data Scientists and Analysts: Versioning Jupyter notebooks, data scripts, and analytical models is crucial for reproducible research and collaborative data projects.
- Technical Writers and Content Creators: Markdown files, documentation, and even blog posts can be version-controlled, allowing for easy tracking of edits, contributions, and revisions. This enhances the “Brand” aspect of consistency and quality in communication.
- System Administrators and DevOps Engineers: Managing configuration files, infrastructure as code (IaC), and deployment scripts is streamlined with Git, ensuring consistency and ease of rollback.
- Academics and Researchers: Collaborating on papers, code, and data sets benefits immensely from Git’s versioning capabilities, making research more transparent and reproducible.
In essence, if you’re working with text-based files that evolve over time and require collaboration or a reliable history, Git is an indispensable tool that dramatically improves your workflow, security, and productivity.
The Essential Check: Determining Git’s Presence
Now that we understand the profound importance of Git, let’s get down to the practical steps of checking if it’s already installed on your machine. The process involves using your system’s command-line interface (CLI) – either Command Prompt/PowerShell on Windows, or Terminal on macOS and Linux.
Checking Git on Windows
Windows users have a couple of primary ways to access the command line, both of which will work for checking Git.
-
Open Command Prompt or PowerShell:
- Command Prompt: Press
Win + R, typecmd, and press Enter. - PowerShell: Press
Win + X, and select “Windows PowerShell” or “Windows Terminal (Admin)” from the menu. PowerShell is generally more powerful and preferred for modern Windows development.
- Command Prompt: Press
-
Type the Git Version Command:
Once your command line interface is open, type the following command and press Enter:git --version -
Interpret the Output:
- If Git is installed: You will see a response indicating the version number, something like:
git version 2.39.2.windows.1
The exact numbers may vary depending on when Git was installed and what updates have occurred, but the presence of “git version” confirms its installation. - If Git is not installed (or not in your PATH): You will likely see an error message similar to:
'git' is not recognized as an internal or external command, operable program or batch file.
or in PowerShell:
git : The term 'git' is not recognized as the name of a cmdlet, function, script file, or operable program. Check the spelling of the name, or if a path was included, verify that the path is correct and try again.
This indicates that Git is either not installed or its executable path is not correctly configured in your system’sPATHenvironment variable.
- If Git is installed: You will see a response indicating the version number, something like:
Checking Git on macOS
For macOS users, the default command-line interface is the Terminal.
-
Open Terminal:
- Go to
Applications>Utilities>Terminal. - Alternatively, press
Cmd + Spaceto open Spotlight search, typeTerminal, and press Enter.
- Go to
-
Type the Git Version Command:
In the Terminal window, type the following command and press Enter:git --version -
Interpret the Output:
- If Git is installed: You will see an output similar to:
git version 2.39.0 (Apple Git-142)
macOS often includes Git as part of its Xcode Command Line Tools. If you don’t have Xcode installed, running this command might even prompt you to install the command-line developer tools, which include Git. - If Git is not installed: You might see a prompt to install the Xcode Command Line Tools:
xcode-select: note: install requested for command line developer tools
If you haven’t installed developer tools before, accepting this prompt and following the instructions will install Git. Otherwise, you’ll get an error like:
git: command not found
This means Git is not present on your system.
- If Git is installed: You will see an output similar to:
Checking Git on Linux
Linux distributions universally rely on the Terminal for command-line operations. The process is similar across most distributions, though package managers differ.
-
Open Terminal:
- The method varies slightly by desktop environment, but commonly you can find it in your applications menu, or use a shortcut like
Ctrl + Alt + T.
- The method varies slightly by desktop environment, but commonly you can find it in your applications menu, or use a shortcut like
-
Type the Git Version Command:
In the Terminal window, type the command:git --version -
Interpret the Output:
- If Git is installed: You will see a response like:
git version 2.34.1
The version number will vary. - If Git is not installed: You’ll typically get an error indicating the command is not found:
Command 'git' not found, but can be installed with:

sudo apt install git  # For Debian/Ubuntu-based systems

sudo yum install git  # For Fedora/CentOS/RHEL-based systems
Many modern Linux distributions are helpful enough to even suggest the installation command for your specific system.
- If Git is installed: You will see a response like:
By following these simple steps, you can quickly and accurately determine whether Git is ready for action on your operating system. If you receive a version number, congratulations! Git is installed. If not, don’t worry—the next section will guide you through the straightforward installation process.
Git Not Found? How to Get Started with Installation
Discovering that Git isn’t installed is a common scenario, especially on fresh operating system installations or machines not primarily used for development. Fortunately, installing Git is a straightforward process, and official installers or package managers make it quite seamless across different platforms. This section will walk you through the installation for each major OS.
Installing Git on Windows
For Windows users, the official “Git for Windows” installer is the recommended and easiest method.
-
Download the Installer:
- Navigate to the official Git website:
git-scm.com/download/win - The website should automatically detect your Windows version (32-bit or 64-bit) and offer the appropriate installer. Click to download the executable.
- Navigate to the official Git website:
-
Run the Installer:
- Locate the downloaded
.exefile (usually in yourDownloadsfolder) and double-click it to start the installation wizard. - Follow the Prompts: The installer offers many configuration options. For most users, accepting the default options is perfectly fine.
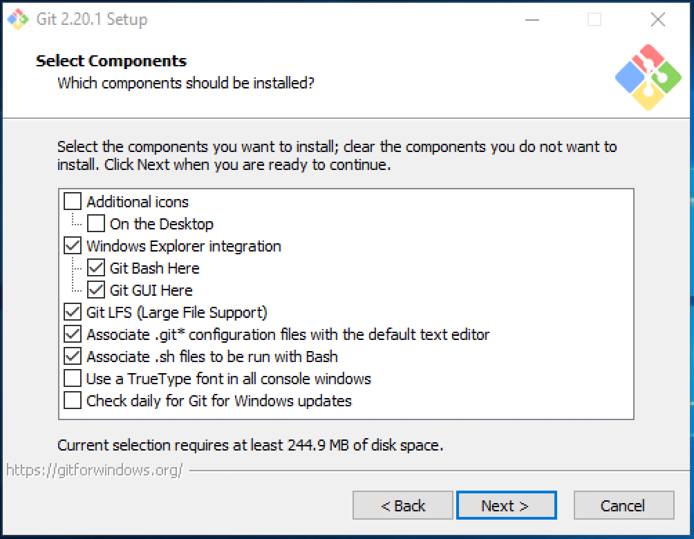
- “Select Components”: Defaults are generally good.
- “Adjusting your PATH environment”: This is crucial. The default option “Git from the command line and also from 3rd-party software” is recommended. This ensures Git commands are available in Command Prompt, PowerShell, and other terminals.
- “Choosing the default editor”: Select an editor you’re comfortable with (e.g., VS Code, Notepad++, Nano, Vim).
- “Adjusting the name of the initial branch”: “Let Git decide” is a safe default, though “Override the default branch name for new repositories” to
mainis common practice now. - Continue clicking “Next” and “Install” until the process is complete.
- Locate the downloaded
-
Alternative: Chocolatey (Package Manager)
If you’re a power user on Windows and already use Chocolatey, a package manager, you can install Git with a single command:choco install git(You might need to run PowerShell as an administrator for this.)
-
Verify Installation:
After installation, open a new Command Prompt or PowerShell window (close any existing ones first to refresh environment variables) and run:
bash

git --version
You should now see the Git version number.
Installing Git on macOS
macOS users have a few options, with Homebrew being the most popular and recommended for developers.
-
Homebrew (Recommended):
Homebrew is a popular package manager for macOS, simplifying the installation of many developer tools.- Install Homebrew (if you don’t have it): Open Terminal and paste the following command:
bash

/bin/bash -c "$(curl -fsSL https://raw.githubusercontent.com/Homebrew/install/HEAD/install.sh)"
Follow the on-screen instructions. - Install Git with Homebrew: Once Homebrew is installed, simply run:
bash

brew install git
- Install Homebrew (if you don’t have it): Open Terminal and paste the following command:
-
Xcode Command Line Tools:
If you only need Git and other basic developer tools, Apple provides them as part of the Xcode Command Line Tools.- Open Terminal and type:
bash

xcode-select --install
- A dialog will appear prompting you to install the tools. Follow the instructions.
- Open Terminal and type:
-
Official Git Installer:
Similar to Windows, you can also download a dedicated Git installer for macOS from the official website:git-scm.com/download/mac. This is less common for developers who prefer Homebrew but works perfectly well. -
Verify Installation:
After any of these methods, open a new Terminal window and run:
bash

git --version
You should see the Git version number.
Installing Git on Linux
Linux distributions typically use their own package managers, which offer the most straightforward way to install Git.
-
Debian/Ubuntu-based Systems (e.g., Ubuntu, Mint, Debian):
- Open Terminal and use
apt:
bash

sudo apt update

sudo apt install git
sudo apt updaterefreshes your package lists, andsudo apt install gitinstalls Git.
- Open Terminal and use
-
Fedora/CentOS/RHEL-based Systems (e.g., Fedora, CentOS Stream, RHEL):
- Open Terminal and use
dnf(oryumfor older systems):
bash

sudo dnf install git  # For Fedora 22+

# Or for older CentOS/RHEL:

# sudo yum install git
- Open Terminal and use
-
Arch Linux:
- Open Terminal and use
pacman:
bash

sudo pacman -S git
- Open Terminal and use
-
Other Distributions:
Consult your distribution’s documentation for the correct package manager command (e.g.,zypperfor openSUSE,apkfor Alpine Linux). -
Verify Installation:
After installation, run the following in your Terminal:
bash

git --version
You should see the Git version number.
Post-Installation Verification and Basic Configuration
Once Git is successfully installed, there are two crucial configuration steps you should take immediately to ensure your commits are properly attributed.
-
Set Your User Name:
git config --global user.name "Your Name"Replace
"Your Name"with your actual name. This name will be attached to all your future Git commits. -
Set Your User Email:
bash

git config --global user.email "your.email@example.com"
Replace"your.email@example.com"with your actual email address. This email will also be associated with your commits and is often used by platforms like GitHub to link commits to your profile.
These global configurations mean you only need to set them once, and they will apply to all your Git repositories on that machine. You can verify your settings by running:
git config --global --list
This command will display all your global Git configurations.
Beyond the Basics: Confirming Git’s Functionality and Next Steps
Verifying the installation and setting up your basic configuration are excellent first steps. However, true confirmation of Git’s functionality comes from using it. Let’s briefly touch upon running your first commands and some common troubleshooting tips.
Running Your First Git Commands
To truly confirm Git is working as expected, you can create a simple local repository and perform a basic commit. This not only verifies Git’s operational status but also introduces you to fundamental Git workflow.
-
Create a New Directory for Your Project:
Open your terminal or command prompt and navigate to a location where you’d like to create a sample project. Then, create and enter a new directory:mkdir my_first_git_project cd my_first_git_project -
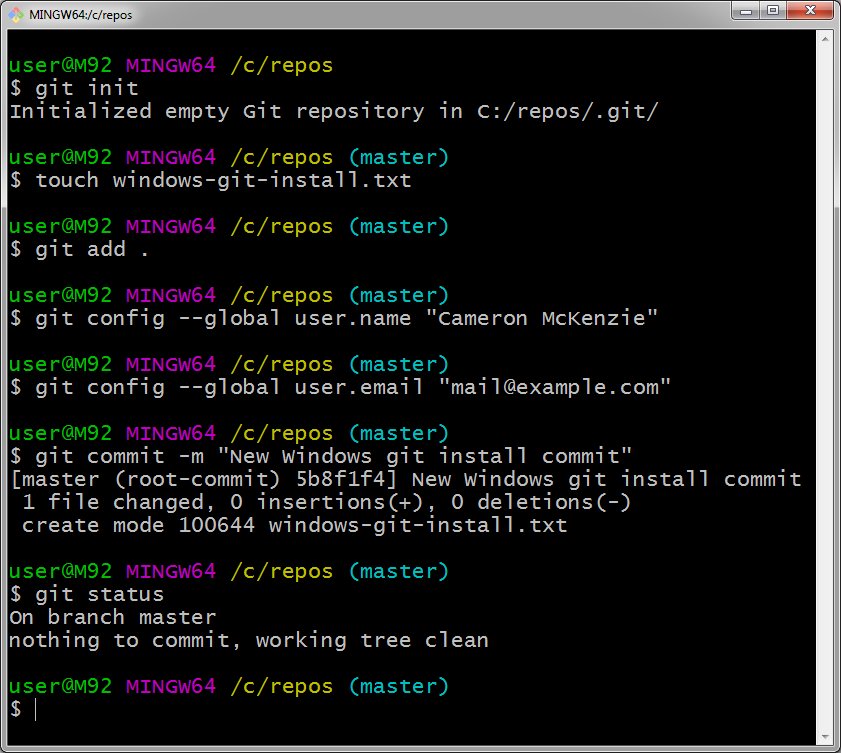
Initialize a Git Repository:
Inside your new project directory, initialize Git:git initYou should see output like:
Initialized empty Git repository in /path/to/my_first_git_project/.git/ -
Create a Simple File:
Use your preferred text editor or command-line tool to create a file (e.g.,README.md) within themy_first_git_projectdirectory.# On Windows: echo "Hello, Git!" > README.md # On macOS/Linux: echo "Hello, Git!" > README.mdOr simply open a text editor, type “Hello, Git!”, and save the file as
README.mdin your project folder. -
Check Git Status:
See what Git knows about your project:git statusYou should see
README.mdlisted under “Untracked files.” This means Git sees the file but isn’t yet tracking its changes. -
Add the File to Staging:
Tell Git to stageREADME.mdfor the next commit:git add README.md -
Commit Your Changes:
Save the staged changes to your repository’s history:
bash

git commit -m "Initial commit: Added README.md"
The-mflag allows you to add a commit message directly. You’ll see output confirming the commit, including your user name and email.
Congratulations! You’ve just performed your first full Git workflow. This confirms that Git is not only installed but also fully functional and ready to manage your projects.
Common Issues and Troubleshooting Tips
While Git installation is generally smooth, you might encounter minor hiccups. Here are a few common issues and their solutions:
'git' is not recognized(or similar error) after installation:- Solution: This almost always means your system’s
PATHenvironment variable hasn’t been updated or refreshed.- Windows: Close and reopen your Command Prompt or PowerShell window. If that doesn’t work, restart your computer. During installation, ensure you selected the option to add Git to your PATH.
- macOS/Linux: Close and reopen your Terminal. If you manually installed Git and didn’t use a package manager, you might need to manually add Git’s executable directory to your shell’s
PATHconfiguration file (e.g.,.bashrc,.zshrc,.profile).
- Solution: This almost always means your system’s
- Outdated Git Version:
- Solution: If
git --versionshows a very old version, it’s a good idea to update.- Windows: Download and run the latest Git for Windows installer again. It usually handles updates smoothly.
- macOS (Homebrew):
brew update && brew upgrade git - Linux (apt):
sudo apt update && sudo apt upgrade git - Linux (dnf):
sudo dnf update git
- Solution: If
- Permissions Issues:
- Solution: Ensure you have the necessary administrative privileges when installing Git (e.g., using
sudoon Linux/macOS, or running the installer as administrator on Windows).
- Solution: Ensure you have the necessary administrative privileges when installing Git (e.g., using
If you encounter persistent issues, the official Git documentation (git-scm.com/doc) is an invaluable resource, as are online communities like Stack Overflow. The vibrant Git community ensures that solutions to common problems are usually just a quick search away.
Git is an indispensable tool in the modern tech landscape, streamlining workflows, safeguarding projects, and enabling unparalleled collaboration. Knowing how to quickly check for its installation and get it set up correctly is a fundamental skill for anyone engaging with technology, from aspiring developers to seasoned professionals. By following the steps outlined in this guide, you can confidently confirm Git’s presence on your system or get it installed and configured in no time. Embrace Git, and unlock a new level of efficiency and control over your digital projects, whether for personal development, contributing to open source, or managing your enterprise’s critical codebase.
aViewFromTheCave is a participant in the Amazon Services LLC Associates Program, an affiliate advertising program designed to provide a means for sites to earn advertising fees by advertising and linking to Amazon.com. Amazon, the Amazon logo, AmazonSupply, and the AmazonSupply logo are trademarks of Amazon.com, Inc. or its affiliates. As an Amazon Associate we earn affiliate commissions from qualifying purchases.