Chromebooks have become ubiquitous in recent years, lauded for their simplicity, speed, and affordability. Running on Google’s lightweight Chrome OS, they excel at web browsing, cloud-based tasks, and basic productivity. However, for many users, particularly those deeply embedded in the tech world or requiring more robust software, Chrome OS can feel restrictive. This is where Ubuntu, a powerful and popular Linux distribution, enters the picture. Installing Ubuntu on your Chromebook transforms it from a web-centric device into a versatile machine capable of running a vast array of desktop applications, offering enhanced productivity, and opening doors to software development, advanced AI tools, and a level of customization not possible with Chrome OS alone.
This comprehensive guide will walk you through the various methods of bringing Ubuntu to your Chromebook, from the officially supported, sandboxed approach to more traditional, albeit complex, installations. We’ll explore the ‘why’ behind this transformation, detail the essential preparations, and provide step-by-step instructions to empower you to get the most out of your hardware. Whether you’re a developer seeking a powerful coding environment, a creative professional needing specific software, or simply someone looking to revitalize an older gadget, installing Ubuntu on your Chromebook is a compelling pathway to unlocking its full potential.
Why Ubuntu on a Chromebook? Understanding the Transformation
The decision to install Ubuntu on a Chromebook isn’t just about curiosity; it’s often driven by a genuine need for greater functionality and flexibility. While Chrome OS has its undeniable strengths, its inherent design philosophies often clash with the demands of power users and specific professional workflows.
The Allure of Chrome OS and Its Limitations
Chrome OS offers a streamlined, secure, and user-friendly experience built around the Chrome browser and Google’s suite of web applications. Its advantages are clear: rapid boot times, automatic updates, robust security features (thanks to its sandboxed environment), and excellent battery life. For students, casual users, and those primarily relying on cloud services, a Chromebook is often the perfect gadget.
However, its limitations become apparent when users require desktop-grade applications. Graphic design software like Adobe Photoshop, video editing suites like DaVinci Resolve, specific IDEs (Integrated Development Environments) for programming, or even certain legacy applications simply aren’t available natively on Chrome OS. While Android apps and Progressive Web Apps (PWAs) have bridged some gaps, they don’t always offer the full functionality or performance of their desktop counterparts. This is where the “walled garden” feel of Chrome OS can become a significant hurdle, limiting productivity and restricting access to a world of powerful software.
The Power of Ubuntu: A Gateway to Advanced Software and Development
Ubuntu, on the other hand, represents the open and expansive world of Linux. It is a full-fledged operating system known for its stability, security, and an incredibly vast software repository. With Ubuntu, you gain access to thousands of free and open-source applications, including:
- Productivity Suites: LibreOffice (a powerful alternative to Microsoft Office), various note-taking apps, and project management tools.
- Development Tools: Full-featured IDEs like VS Code, Eclipse, and IntelliJ IDEA; compilers for almost every programming language (Python, Java, C++, Go, etc.); Docker for containerization; and Git for version control. This makes it an ideal environment for software engineers and data scientists.
- Creative Software: GIMP and Krita for image manipulation, Inkscape for vector graphics, Blender for 3D modeling, and Audacity for audio editing.
- System Utilities: Advanced file managers, terminal emulators, and customization options that give you complete control over your system.
- AI Tools & Frameworks: The ability to install and run frameworks like TensorFlow, PyTorch, and scikit-learn, enabling local development for AI and machine learning projects, assuming the Chromebook’s hardware supports it.
By installing Ubuntu, your Chromebook transforms into a flexible workstation, capable of handling tasks far beyond its original design. It’s a fundamental shift from a consumption device to a creation machine, significantly enhancing its utility and longevity.
Breathing New Life into Your Device
For older Chromebook models, installing Ubuntu can be a fantastic way to extend their lifespan. As Chrome OS updates become more demanding, or if a particular model reaches its end-of-life for official support, the device might start to feel sluggish. Ubuntu, especially lighter desktop environments like XFCE or LXDE, can run remarkably well on hardware that struggles with the latest Chrome OS versions or even Windows. This makes an old Chromebook a viable, cost-effective Linux laptop, giving it a second life as a dedicated development machine, a media server, or a robust system for learning Linux. This approach aligns perfectly with sustainable tech practices and smart personal finance, maximizing your investment in a gadget.
Essential Preparations Before You Begin
Before embarking on any major operating system modification, preparation is key. Failing to take these steps can lead to data loss or a frustrating installation experience. Digital security and data integrity should always be paramount.
Backing Up Your Precious Data
This is arguably the most critical step. While some methods like Crostini are relatively safe, others like Crouton or a full Ubuntu install involve deeper system modifications that carry a risk of data corruption or erasure. Assume the worst-case scenario and back up everything you value.
- Cloud Storage: Google Drive is seamlessly integrated with Chrome OS. Ensure all your documents, photos, and other files are synced there.
- External Drive: For larger files or if you prefer local backups, copy important data to a USB flash drive or an external hard drive.
- Bookmarks and Settings: Chrome OS syncs most of this, but it’s good practice to double-check.
Remember, once developer mode is enabled (a requirement for Crouton), your Chromebook will perform a “powerwash,” wiping all local data. Be absolutely prepared for this.
Ensuring Compatibility and System Requirements
Not all Chromebooks are created equal, and some methods work better or exclusively on certain models.
- Processor Architecture: Most modern Chromebooks use x86-64 (Intel/AMD) processors, which are fully compatible with standard Ubuntu distributions. Older or budget models might use ARM processors, which require a specific ARM-compatible Ubuntu build, though these are less common for direct installation methods like Crouton or full installs. Crostini handles this abstraction well.
- RAM and Storage: While Ubuntu can run on minimal resources, at least 4GB of RAM and 16GB of free storage space (beyond what Chrome OS uses) are recommended for a comfortable experience. More is always better, especially if you plan to install many apps or run demanding software.
- Chrome OS Version: Ensure your Chromebook is updated to the latest stable version of Chrome OS. Newer versions often include crucial fixes and better support for features like Crostini. Go to
Settings > About Chrome OS > Check for updates.
Understanding Developer Mode (for Crouton) or Crostini Pre-requisites
Different installation methods have different initial requirements.
- For Crostini (Linux Beta): This method is the simplest and officially supported. It requires a relatively modern Chromebook (most models from 2018 onwards) and a stable Chrome OS version. No special “developer mode” is needed for the entire system; Crostini runs in a secure virtual machine.
- For Crouton: This method requires enabling “Developer Mode” on your Chromebook. This is a critical step that comes with trade-offs:
- Powerwash: Enabling developer mode will factory reset your Chromebook, erasing all local data.
- Security Risk: It disables some of Chrome OS’s built-in security features, such as verified boot. Each time you boot up, you’ll see a warning screen (the “OS verification is off” message), and you’ll need to press
Ctrl+D(or wait) to proceed. This is a deliberate design choice by Google to warn users about the modified state of their device. - Warranty: While generally not voiding your warranty, modifications like this might make troubleshooting more complex if you need support later.
Understand these implications thoroughly before proceeding.
Method 1: The Modern Approach – Linux (Beta) via Crostini
For most users wanting to leverage the power of Linux applications without sacrificing the core Chrome OS experience, Crostini is the recommended and simplest method. It offers a secure, integrated way to run Linux apps alongside your Chrome OS environment.
What is Crostini and How Does it Work?
Crostini is Google’s official implementation of a virtual machine environment that allows you to run a full Debian Linux distribution (and by extension, Ubuntu applications) directly on your Chromebook. It operates within a secure container, meaning the Linux environment is isolated from Chrome OS. This isolation is a major advantage for digital security, as any issues within the Linux container are unlikely to affect the stability or security of your main Chrome OS.
When you enable Crostini, Chrome OS sets up a lightweight virtual machine running Debian Linux. You then interact with this Linux environment via a terminal, installing applications using standard Linux commands (apt install). These applications integrate remarkably well with Chrome OS: they appear in your app launcher, can be pinned to the shelf, and can access files in your Chrome OS “Downloads” folder seamlessly.
Step-by-Step: Enabling Linux (Beta) on Your Chromebook
- Access Settings: Click on the time/status area in the bottom-right corner of your screen, then click the gear icon to open Settings.
- Navigate to Linux (Beta): In the Settings menu, scroll down to the “Linux (Beta)” section in the left-hand sidebar.
- Turn On: Click “Turn On” next to “Linux (Beta).”
- Setup Wizard: A setup wizard will appear. Click “Next.”
- Choose Username and Disk Size: You’ll be prompted to create a username and allocate disk space for your Linux environment. The default disk size is usually sufficient to start, but you can adjust it based on your needs. For general use, 10-20GB is a good starting point. You can always expand it later.
- Install: Click “Install.” The installation process will begin, downloading and setting up the Linux container. This might take several minutes, depending on your internet speed and Chromebook’s performance.
- Terminal Window: Once complete, a Linux terminal window will automatically open. You now have a working Debian Linux environment!
Installing and Managing Ubuntu Applications Within Chrome OS
While Crostini initially sets up Debian, you can easily install Ubuntu applications because both distributions share a common package management system (apt).
- Update Package List: Before installing anything, it’s good practice to update your package lists:
bash

sudo apt update
- Upgrade Installed Packages (Optional but Recommended):
bash

sudo apt upgrade
- Install an Application: To install a common Ubuntu application, use
sudo apt install [package-name]. For example, to install the popular GIMP image editor:
bash

sudo apt install gimp
Or, to install a code editor like VS Code (after adding its repository):
bash

sudo apt install code
(Note: Some applications require adding their specific repositories first. Check their official installation instructions for Linux.) - Launch Applications: Once installed, Linux applications will appear in your Chrome OS app launcher, usually within a “Linux apps” folder. You can launch them just like any other Chrome OS or Android app.
- Access Files: Your Chrome OS “Downloads” folder is automatically mounted within Linux under
/mnt/chromeos/MyFiles/Downloads, making it easy to share files between the two environments. You can also right-click files in the Chrome OS Files app and select “Share with Linux” to move them into the Linux file system.
Advantages for Productivity and Digital Security
Crostini offers several compelling advantages:
- Seamless Integration: Linux apps feel like native Chrome OS apps, appearing in the launcher and running in their own windows.
- Security: The containerized environment provides excellent digital security, isolating potential threats from your primary Chrome OS.
- Ease of Use: No complex developer mode activation or firmware modifications are required. It’s a simple toggle in settings.
- Automatic Updates: The Linux container automatically gets updates alongside Chrome OS, simplifying maintenance.
- No Powerwash: Enabling Crostini does not trigger a powerwash, preserving your local Chrome OS data.

For most users, Crostini is the ideal way to bring Linux power to their Chromebook, enhancing productivity without compromising the core Chrome OS experience.
Method 2: The Classic Method – Installing Ubuntu with Crouton
Crouton (Chromium OS Universal Chroot Environment) was once the go-to method for installing a full desktop Linux environment on a Chromebook. While Crostini is now Google’s preferred approach, Crouton remains a viable and sometimes necessary option, particularly for older Chromebooks that don’t support Crostini, or for users who desire more direct hardware access for specific tasks.
Delving into Crouton: A Chroot Environment Explained
Unlike Crostini, which uses a virtual machine, Crouton utilizes a “chroot” environment. A chroot (change root) essentially creates an isolated Linux file system that shares the same kernel as Chrome OS. This means that while you’re running a full Linux distribution (like Ubuntu) with its own desktop environment (XFCE, Unity, GNOME, KDE, etc.), it’s still fundamentally operating on the Chrome OS kernel.
This approach has distinct characteristics:
- Direct Hardware Access: Because it shares the kernel, Crouton can offer closer access to hardware resources, which can sometimes translate to better performance for graphics or other hardware-intensive tasks compared to a virtualized environment.
- Shared Resources: It shares system resources (RAM, CPU) directly with Chrome OS rather than dedicating a fixed amount, leading to dynamic allocation.
- Switching: You can instantly switch between your Chrome OS desktop and your Ubuntu desktop using a simple keyboard shortcut.
Prerequisites and Gathering Necessary Tools
- Enable Developer Mode: As discussed earlier, this is a mandatory step for Crouton. Be prepared for a powerwash and the boot-up warning screen.
- Download Crouton Script: Open the Chrome browser on your Chromebook. Go to the official Crouton GitHub page:
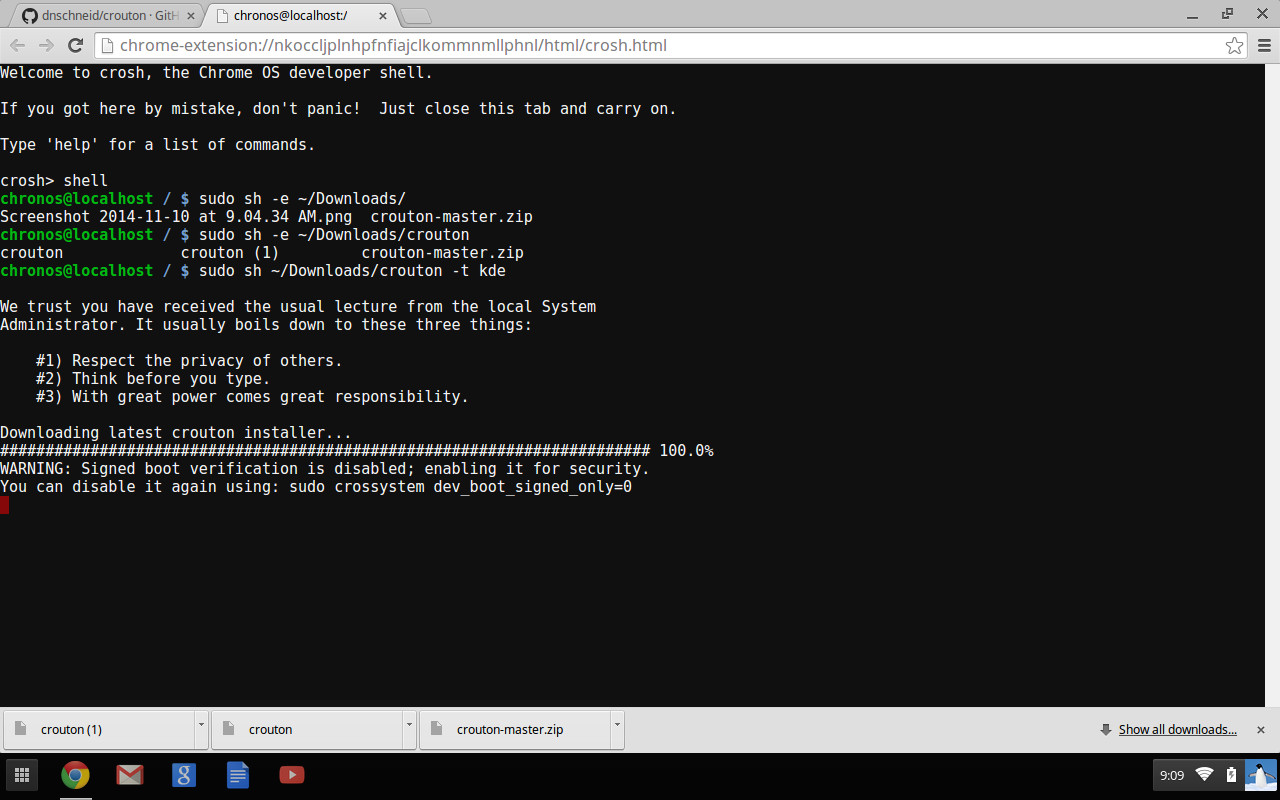
https://github.com/dnschneid/croutonand click the “crouton” link to download the script. It will download ascrouton(no file extension) to your Downloads folder. - Open a Shell: Press
Ctrl + Alt + Tto open a Chrome OS terminal window (called “crosh”). - Enter Shell Mode: Type
shelland press Enter. This will put you into a more powerful command-line environment where you can execute the Crouton script.
The Installation Process: From Script to System
The Crouton installation command can be customized to your preferences. Here are some common options:
- Install Ubuntu with XFCE (Lightweight Desktop): This is often recommended for better performance on Chromebook hardware.
bash

sudo sh ~/Downloads/crouton -t xfce
- Install Ubuntu with GNOME (More Features, Heavier):
bash

sudo sh ~/Downloads/crouton -t gnome
- Install with specific Ubuntu release (e.g., Focal Fossa – Ubuntu 20.04 LTS):
bash

sudo sh ~/Downloads/crouton -r focal -t xfce
(You can replacefocalwith other release codenames likejammyfor 22.04 LTS,bionicfor 18.04 LTS, etc.) - Install with Keyboard Layout (e.g., for US layout):
bash

sudo sh ~/Downloads/crouton -t xfce -k us
- Full Installation Example (XFCE, core components, audio, keyboard, X server):
bash

sudo sh ~/Downloads/crouton -t xfce,keyboard,audio,core,xiwi
Thexiwitarget allows you to run Ubuntu in a Chrome browser tab or window, which is very convenient.
After entering your chosen command, the installation will begin. This process downloads and installs the entire Ubuntu environment, which can take a significant amount of time (30 minutes to several hours) depending on your internet speed and the desktop environment you chose.
- Follow Prompts: During installation, you’ll be prompted to create a Linux username and password. Remember these credentials!
- Completion: Once finished, you’ll be returned to the Chrome OS shell prompt.
Seamlessly Switching Between Chrome OS and Ubuntu
- Enter Ubuntu: To switch into your newly installed Ubuntu environment, type:
bash

sudo startxfce
(Replacexfcewithgnomeor your chosen desktop environment.)
If you installed withxiwi, you can usesudo enter-chroot -n [chroot-name] xiwito run it in a tab. - Exit Ubuntu/Switch Back to Chrome OS:
- If running in full screen: Press
Ctrl + Alt + Shift + Back(left arrow key) andCtrl + Alt + Shift + Forward(right arrow key). On some keyboards, it might beCtrl + Alt + F1andCtrl + Alt + F2. Experiment with your Chromebook’s specific function keys. - If running in a tab (via xiwi): Simply close the tab or switch to another Chrome OS tab.
- If running in full screen: Press
- Update Crouton: To update your Crouton installation (for script improvements, not Ubuntu updates):
bash

sudo sh ~/Downloads/crouton -u -n [chroot-name]
(If you didn’t specify a name, it’s usuallyprecise,trusty,xenial, etc. based on the Ubuntu version).
Pros, Cons, and Considerations for Legacy Devices
Pros of Crouton:
- Full Desktop Experience: Get a complete Ubuntu desktop environment.
- Performance: Can sometimes offer better performance than virtualized solutions on older hardware due to shared kernel.
- Hardware Access: Potentially better access to certain hardware features.
- No Google Account: No direct tie-in to Google services for the Linux environment.
Cons of Crouton:
- Developer Mode Required: Implies a security warning at boot, powerwash, and potential reduction in digital security.
- Manual Management: Requires command-line interaction for installation and updates.
- Not Officially Supported: If something breaks, Google won’t assist. You’re reliant on the Crouton community.
- No Hardware Acceleration: Often lacks full hardware graphics acceleration within the chroot, impacting some applications.
- Less Secure Isolation: Less secure than Crostini’s containerization.
Crouton remains a powerful tool, especially for older Chromebooks that cannot run Crostini or for users who are comfortable with the command line and understand the security implications of developer mode. It effectively revitalizes these gadgets, giving them a new lease on life as fully capable Linux machines.
Beyond the Basics: Post-Installation & Advanced Considerations
Once you have Ubuntu up and running, whether via Crostini or Crouton, the journey doesn’t end there. There are crucial steps to take to optimize your new environment, ensure its security, and unlock its full potential for productivity.
Essential First Steps: Updates, Drivers, and Software
Immediately after installation, the first thing you should do is ensure your Ubuntu system is fully updated.
- Update Package Lists:
bash

sudo apt update
- Upgrade Installed Packages:
bash

sudo apt upgrade
This command will download and install the latest versions of all software packages and system components, including security patches. - Install Essential Software: Now you can begin installing the applications you need. Consider:
- Web Browser: Firefox or Chrome (if you prefer it over the Chrome OS version).
- Productivity Suite: LibreOffice is a must-have for documents, spreadsheets, and presentations.
- Code Editor/IDE: VS Code, Sublime Text, or a full IDE like PyCharm or IntelliJ for developers.
- Communication Tools: Discord, Slack, Zoom (if native Linux versions are available).
- Media Players: VLC for comprehensive media playback.
- File Management: A more robust file manager like Nemo or Thunar, if your desktop environment’s default is too basic.
Many applications can be found in the Ubuntu Software Center (if installed with a full desktop environment) or by using sudo apt install [package-name]. For specialized software like certain AI tools or proprietary applications, you might need to add third-party repositories or install .deb packages directly.
Customizing Your Ubuntu Environment for Peak Productivity
Ubuntu is highly customizable, allowing you to tailor it to your workflow.
- Desktop Environment Settings: If you installed a full desktop (like XFCE, GNOME, etc.), explore its settings. Change themes, icons, fonts, and panel layouts to make it visually appealing and efficient.
- Keyboard Shortcuts: Learn and customize keyboard shortcuts to speed up common tasks.
- Terminal Configuration: For command-line users, personalize your terminal with different themes, fonts, and shell customizations (e.g., using
zshwith Oh My Zsh). - Dotfiles: Advanced users often manage their configuration files (“dotfiles”) with Git, allowing them to quickly set up new environments or sync settings across multiple machines.
- Productivity Apps: Explore the vast array of Linux apps designed to boost productivity, from tiling window managers for efficient multitasking to task managers and note-taking applications.
Navigating Digital Security in Your New Dual-OS Setup
While Ubuntu is generally secure, maintaining a dual-OS setup requires vigilance.
- Regular Updates: Keep both Chrome OS and Ubuntu updated. Security patches are crucial.
- Strong Passwords: Use strong, unique passwords for your Linux user account.
- Firewall: Ubuntu comes with
ufw(Uncomplicated Firewall). Ensure it’s enabled and configured to block unnecessary incoming connections.
bash

sudo ufw enable

sudo ufw status
- Antivirus/Anti-Malware: While Linux generally has fewer viruses than Windows, it’s not immune. Consider installing tools like ClamAV if you frequently transfer files from other operating systems, especially Windows.
- Permissions: Be mindful of
sudo(superuser do) commands. Only execute commands withsudoif you understand what they do and trust the source. - Browser Security: If using a browser within Ubuntu, follow standard best practices: use ad blockers, privacy extensions, and be cautious about suspicious websites.
When to Consider a Full Ubuntu Install (And Why It’s More Complex)
For most Chromebook users, Crostini or Crouton will suffice. However, a small subset of advanced users might consider a “full” Ubuntu installation, where Ubuntu is installed directly onto the Chromebook’s internal storage, either as the sole operating system or in a dual-boot configuration with Chrome OS (or replacing Chrome OS entirely).
When to Consider a Full Install:
- Maximum Performance: For the absolute best performance and full hardware acceleration (especially graphics), a native install is superior.
- Complete Control: You have full control over the boot process, partitions, and system settings without Chrome OS in the background.
- Specific Hardware Needs: If you need to utilize very specific hardware features or drivers that struggle with Crouton or Crostini.
- No Chrome OS: If you want to completely ditch Chrome OS for a pure Linux laptop experience.
Why It’s More Complex:
- Firmware Modification: This typically requires flashing custom UEFI firmware (like
mrchromebox.techfirmware) to enable booting from a USB drive and installing a standard Linux distribution. This is a much higher-risk operation than enabling developer mode. - Potential to Brick: Incorrectly flashing firmware can render your Chromebook unusable.
- Challenging Installation: Requires knowledge of Linux partitioning, bootloaders (GRUB), and potentially troubleshooting driver issues.
- Warranty Concerns: This level of modification will almost certainly void your warranty.
- No Chrome OS Rollback: Reverting to Chrome OS often requires restoring the original firmware and can be a complex process.
A full Ubuntu installation is an advanced endeavor recommended only for experienced users who are comfortable with the risks and have a deep understanding of Linux system administration. It truly transforms a Chromebook into a high-performance Linux laptop, but it’s a path few users need to tread for daily productivity.

Conclusion: Empowering Your Chromebook for the Future
Installing Ubuntu on your Chromebook is more than just a technical hack; it’s a strategic move to unlock your device’s full potential and extend its utility. Whether you opt for the secure, integrated experience of Crostini or the more direct, full-desktop environment of Crouton, you are effectively transforming a focused web device into a versatile workstation.
This transformation allows you to access a vast ecosystem of software – from powerful development tools and AI frameworks to comprehensive creative applications and robust productivity suites. It empowers you to perform tasks that were previously impossible on Chrome OS, dramatically increasing your productivity and opening up new avenues for learning and creation. Furthermore, it offers a sustainable way to breathe new life into older hardware, turning what might have been an obsolete gadget into a capable and relevant machine.
By carefully following the steps outlined in this guide and understanding the implications of each method, you can confidently navigate the installation process. Embrace the flexibility, power, and open-source spirit that Ubuntu brings to your Chromebook. This isn’t just about installing an operating system; it’s about empowering yourself with choice, control, and access to a world of technological possibilities that will serve you well into the future.
aViewFromTheCave is a participant in the Amazon Services LLC Associates Program, an affiliate advertising program designed to provide a means for sites to earn advertising fees by advertising and linking to Amazon.com. Amazon, the Amazon logo, AmazonSupply, and the AmazonSupply logo are trademarks of Amazon.com, Inc. or its affiliates. As an Amazon Associate we earn affiliate commissions from qualifying purchases.