In the ever-evolving landscape of digital technology, understanding fundamental file formats and their applications is crucial for anyone looking to optimize their tech experience. Among these, the ISO file stands out as a ubiquitous and incredibly versatile format. Often encountered when downloading operating systems, large software suites, or system recovery tools, knowing how to properly “install” or deploy an ISO file is an essential skill for IT professionals, hobbyists, and everyday users alike. This guide aims to demystify ISO files, providing a comprehensive walkthrough of their uses and the various methods for installation, ensuring you can harness their full potential efficiently and securely.
Understanding ISO Files: More Than Just a Digital Archive
At its core, an ISO file (often referred to as an “ISO image”) is a single file that is an exact replica of an entire optical disc, such as a CD, DVD, or Blu-ray. The “ISO” in its name comes from the ISO 9660 standard, which defines the file system for CD-ROMs. Think of it as a digital snapshot of a physical disc, containing not only all the files and folders but also the disc’s original file system structure, boot information, and other attributes. This perfect replication makes ISO files ideal for distributing large datasets, especially operating systems and complex software packages, ensuring that the recipient gets an identical copy of the original disc.
The importance of ISOs has grown significantly in the digital age. They offer unparalleled efficiency and preservation benefits. Instead of needing multiple physical discs, one can download a single ISO file, store it digitally, and deploy it whenever needed. This not only saves physical space but also prevents wear and tear on optical media and eliminates the need for an optical drive, which is becoming increasingly rare in modern laptops and even desktops. For global software distribution, ISOs minimize bandwidth requirements by packaging all necessary files into one cohesive unit and streamline the delivery process, making them a cornerstone of modern digital logistics. While other disc image formats like MDS/MDF or BIN/CUE exist, the ISO format remains dominant due to its widespread support and simplicity.
Common Scenarios for ISO Installation
The versatility of ISO files means they are utilized across a multitude of scenarios, each requiring a slightly different “installation” approach. Understanding these common uses helps in selecting the most appropriate deployment method.
- Operating System Installation: This is arguably the most prevalent use case. Whether you’re installing a fresh copy of Windows, experimenting with various Linux distributions (like Ubuntu, Fedora, or Mint), or even dealing with macOS recovery, ISO files are the standard distribution format. They contain all the necessary boot sectors and installation files to initiate and complete an OS setup on a blank drive or over an existing one.
- Software Suites & Applications: Many large software packages, especially development environments, database systems, or older commercial applications, are distributed as ISOs. This ensures all components, including dependencies and licensing files, are bundled together for a consistent installation experience, mimicking a physical disc installation.
- Bootable Utilities & Rescue Disks: For troubleshooting, data recovery, or security scans, bootable ISOs are indispensable. Tools like antivirus rescue disks, partition managers, or memory diagnostic utilities can be run directly from an ISO, often without needing to install an operating system first. This is crucial for fixing systems that are unable to boot normally.
- Gaming: Gamers often encounter ISOs, especially for archiving older titles or running games that originally came on physical media. Mounting an ISO can make a game believe a physical disc is inserted, allowing it to run without the actual disc. This is a form of digital preservation and convenience.
Preparing Your ISO for Installation: Essential Tools and Considerations
Before you embark on the actual “installation” process, a few critical preparatory steps are necessary. These steps ensure the integrity of your ISO file and help you choose the most effective deployment method, minimizing potential headaches down the line.
Verifying ISO Integrity: A Crucial Security Step
One of the most overlooked yet vital steps is verifying the integrity of your downloaded ISO file. A corrupted or tampered ISO can lead to failed installations, system instability, or, more critically, introduce malware onto your system. Verifying an ISO involves checking its cryptographic hash (checksum). Reputable sources typically provide checksums (MD5, SHA1, SHA256) for their files.
How to Verify an ISO:
- Locate the Checksum: Find the official checksum on the download page of the software publisher.
- Calculate Your ISO’s Checksum:
- Windows: Open PowerShell and use commands like
Get-FileHash -Algorithm SHA256 "C:PathToYourFile.iso". - macOS/Linux: Open Terminal and use commands like
md5sum /path/to/your/file.isoorshasum -a 256 /path/to/your/file.iso.
- Windows: Open PowerShell and use commands like
- Compare: Compare the calculated checksum with the official one. If they don’t match, your ISO is corrupted or potentially malicious, and you should download it again from a trusted source. This step is a cornerstone of digital security and productivity, ensuring that the time invested in installation is not wasted due to a faulty file.
Acquiring ISOs Safely and Choosing the Right Method
Always download ISO files from official sources or trusted mirror sites. Avoid unofficial repositories or torrents unless you are absolutely certain of their legitimacy, as these are common vectors for malware. Official sources guarantee that the software is genuine and untampered, protecting your brand’s reputation (if you’re deploying on corporate machines) and personal financial data (by avoiding malicious software that could compromise your online income or personal finance).
Once you have a verified ISO, the next decision is choosing the right installation method. This largely depends on your goal:
- Accessing Files/Running Software within an existing OS: Mounting the ISO as a virtual drive is ideal.
- Installing an Operating System or Running a Live Environment: Creating a bootable USB drive is the most common and efficient method.
- Legacy Systems or Archival Purposes: Burning the ISO to a physical disc might still be necessary.
Methods for “Installing” an ISO File
The term “install” with an ISO file can be a bit misleading, as it often refers to deploying, mounting, or otherwise utilizing the contents of the ISO rather than a traditional software installation process. Here, we’ll cover the three primary methods for leveraging your ISO file.
Method 1: Mounting the ISO as a Virtual Drive
Mounting an ISO makes your computer treat the ISO file as if it were a physical CD, DVD, or Blu-ray inserted into an optical drive. This allows you to access its contents, copy files, or run setup programs directly from the virtual drive, without needing to burn it to physical media.
When to Use:
- To install software from an ISO within an existing operating system.
- To browse the contents of a disc image.
- To run portable applications or old games that require a disc to be present.
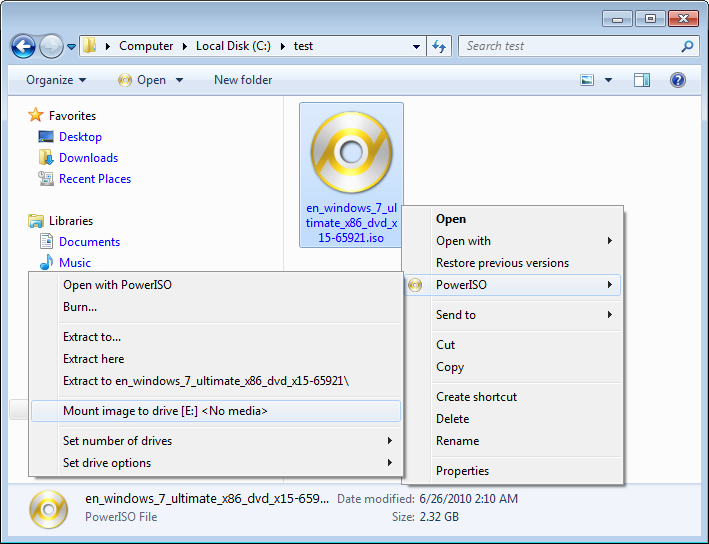
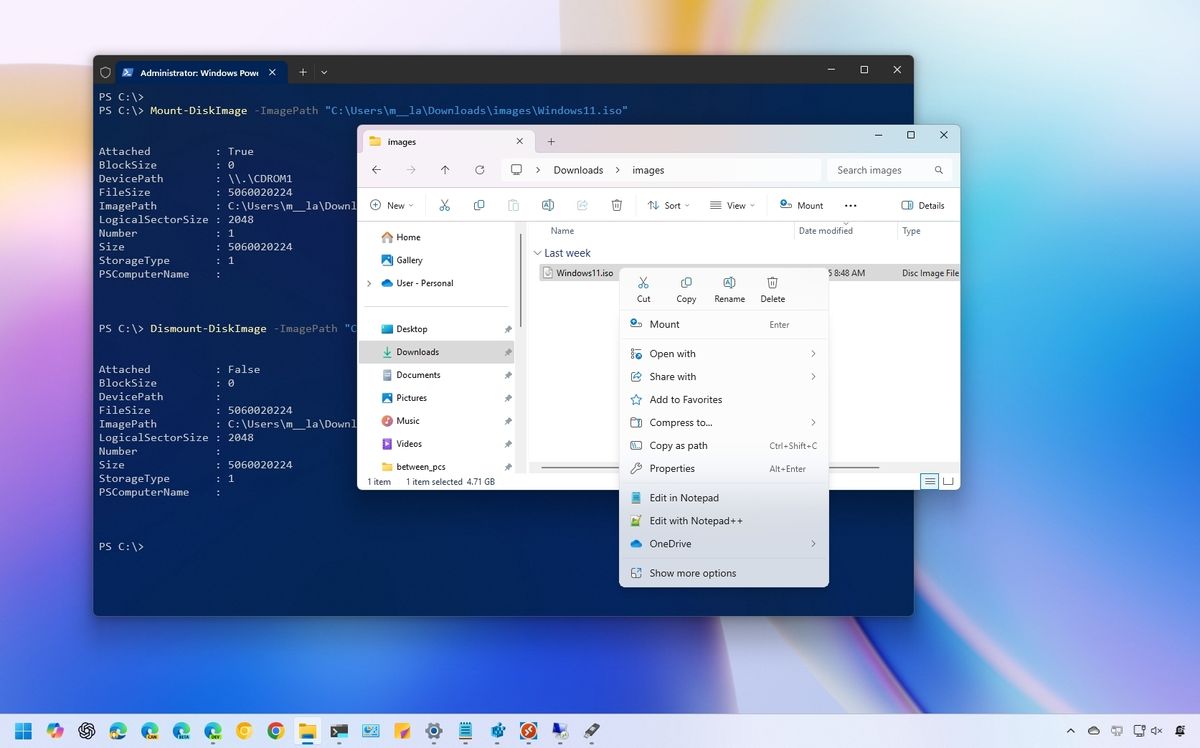
How-to Mount an ISO:
- Windows (Windows 8, 10, 11):
- Locate your ISO file in File Explorer.
- Right-click the ISO file.
- Select “Mount” from the context menu.
- A new virtual drive will appear under “This PC,” displaying the contents of the ISO. You can then navigate it like any other drive.
- To unmount, right-click the virtual drive and select “Eject.”
- (For Windows 7 and older, or for advanced features, third-party tools like Daemon Tools Lite or PowerISO might be required.)
- macOS:
- Locate your ISO file in Finder.
- Double-click the ISO file.
- The ISO will automatically mount, and its contents will appear as a new volume in Finder and on your desktop.
- To unmount, drag the volume icon to the Trash or right-click it and select “Eject.”
- Linux:
- Open a Terminal window.
- Create a mount point:
sudo mkdir /media/iso(you can choose any directory). - Mount the ISO:
sudo mount -o loop /path/to/your/file.iso /media/iso - Access the contents in
/media/iso. - To unmount:
sudo umount /media/iso
- (Many desktop environments like GNOME or KDE allow mounting ISOs by simply double-clicking them.)
Pros: Fast, convenient, no physical media required, environmentally friendly, no wear and tear on an optical drive.
Cons: Not suitable for creating bootable installations (e.g., installing an OS from scratch).

Method 2: Creating a Bootable USB Drive
This is the most common and recommended method for installing operating systems or running live environments. It involves transferring the bootable contents of the ISO to a USB flash drive, making the USB drive capable of booting a computer.
When to Use:
- Installing an operating system (Windows, Linux) on a new computer or formatted drive.
- Running a “Live” version of an OS (e.g., Linux distributions) without installing it.
- Using bootable diagnostic tools, system recovery utilities, or firmware updates.
How-to Create a Bootable USB (using popular tools):
- Using Rufus (Windows-specific, highly recommended):
- Download Rufus from its official website (
rufus.ie). It’s a lightweight, portable application. - Insert your USB flash drive (ensure it has enough space – typically 8GB or more for OS ISOs).
- Launch Rufus. Select your USB drive under “Device.”
- Click “SELECT” and browse to your ISO file.
- Rufus will automatically configure optimal settings for the ISO (e.g., Partition scheme like MBR/GPT, Target system like BIOS/UEFI). You can usually leave these as default unless you have specific requirements.
- Click “START.” Rufus will warn you that all data on the USB drive will be erased. Confirm to proceed.
- Once completed, close Rufus. Your USB drive is now bootable.
- Download Rufus from its official website (
- Using Etcher (Balena Etcher – Cross-platform: Windows, macOS, Linux):
- Download Etcher from
balena.io/etcher. - Insert your USB drive.
- Launch Etcher. Click “Flash from file” and select your ISO.
- Click “Select target” and choose your USB drive.
- Click “Flash!” Etcher will write the ISO to the USB and verify it.
- Wait for the process to complete.
- Download Etcher from
- Using Ventoy (Advanced, Multi-boot Capable):
- Download Ventoy from
ventoy.net. - Extract and run
Ventoy2Disk.exe(Windows) orVentoyWeb.sh(Linux). - Select your USB drive. Click “Install” (this will format the drive once).
- After Ventoy is installed on the USB, simply drag and drop multiple ISO files directly onto the Ventoy partition on the USB drive. Ventoy will create a boot menu for them. This is incredibly productive for tech professionals managing various OS installations or diagnostic tools.
- Download Ventoy from
Pros: Fast installation (USB is typically faster than optical drives), reusable media, universally supported by modern computers, convenient for carrying multiple bootable utilities.
Cons: Requires a USB drive, potential for data loss on the drive if not careful (always back up data before creating a bootable USB).
Method 3: Burning the ISO to a Physical Disc (CD/DVD/Blu-ray)
While less common now, burning an ISO to a physical optical disc remains a valid method, especially for older systems or for long-term physical archival.
When to Use:
- Installing an OS on legacy computers that lack USB boot support.
- Creating a physical backup of software or an OS.
- Distributing software where physical media is still preferred or required.
How-to Burn an ISO:
- Windows (Windows 7, 8, 10, 11):
- Insert a blank CD, DVD, or Blu-ray into your optical drive.
- Locate your ISO file in File Explorer.
- Right-click the ISO file and select “Burn disc image.”
- In the Windows Disc Image Burner window, select your disc burner from the “Disc burner” drop-down menu.
- (Optional but recommended): Check “Verify disc after burning” to ensure data integrity.
- Click “Burn.”
- macOS:
- Insert a blank disc.
- Locate your ISO file in Finder.
- Right-click (or Control-click) the ISO file and select “Burn Disk Image ‘filename.iso’ to Disc…”
- In the dialog box, select your burner and click “Burn.”
- Linux (using Brasero or K3b):
- Install a disc burning application like Brasero (GNOME) or K3b (KDE).
- Insert a blank disc.
- Open the burning application. Look for an option like “Burn Image” or “Burn CD/DVD Image.”
- Select your ISO file and follow the on-screen prompts to burn it to the disc.
- (Command-line alternative:
sudo wodim -v dev=/dev/sr0 speed=4 blank=fast /path/to/your/file.iso– replace/dev/sr0with your optical drive path.)
Pros: Universally compatible with older machines, provides a physical backup, useful for specific legacy applications.
Cons: Slower process, requires an optical drive and blank media, less convenient and more costly than digital methods, discs can be scratched or degraded over time.
Post-Installation Considerations and Best Practices
Once you’ve successfully deployed your ISO, whether by mounting, USB booting, or disc burning, the journey isn’t quite over. Several critical steps and best practices ensure a stable, secure, and productive environment.
Verifying the Installation and Initial Setup
After installing an operating system or a major software suite from an ISO, it’s essential to verify that everything functions as expected. For OS installations, this includes:
- Basic Functionality Tests: Can you browse the web? Is the network working?
- Driver Checks: Ensure all hardware drivers are installed and functioning correctly (e.g., graphics card, sound, Wi-Fi).
- System Integrity: Check system logs for any critical errors or warnings.
For mounted software installations, simply run the program and perform basic tasks to ensure it launches correctly and all components are accessible.
Digital Security Post-Installation: Protecting Your Investment
This is paramount, especially after an OS installation. A freshly installed system is a vulnerable system.
- Immediate Updates: Always run system updates immediately after installation. This patches security vulnerabilities that might have been present in the ISO’s build. This is a critical aspect of digital security, protecting your data and potentially your online income streams from exploits.
- Antivirus/Anti-malware: Install reputable antivirus and anti-malware software and perform an initial scan.
- Change Default Passwords: If the ISO led to a fresh OS install, ensure you’ve set strong, unique passwords for all user accounts.
- Firewall Configuration: Verify your firewall is active and configured correctly to block unwanted inbound connections.
- Regular Backups: Implement a regular backup strategy for your new system. This links directly to productivity and financial security, safeguarding your work and investments from data loss.
Performance Optimization and Troubleshooting
Initial setup often involves fine-tuning. Install necessary drivers, remove bloatware, and configure your system to your preferences. If you encounter issues:
- Installation Errors: Re-verify the ISO checksum, try a different USB drive/burning tool, or check your hardware compatibility.
- Boot Issues: Ensure your BIOS/UEFI settings are configured to boot from the correct device (USB or DVD).
- Slow Performance: Check system resources (RAM, CPU, disk usage) and ensure drivers are up to date.
The Future of ISOs and Digital Distribution
While the core functionality of ISOs remains consistent, their role continues to evolve alongside broader tech trends. Cloud-based operating system deployment, where OS images are streamed directly to hardware, is gaining traction for corporate environments. Containerization technologies like Docker and Kubernetes offer lightweight, portable ways to package and deploy applications, potentially reducing the reliance on full OS ISOs for software distribution. Virtualization platforms (VMware, VirtualBox, Hyper-V) increasingly use ISOs to install guest operating systems, providing isolated and flexible testing and development environments.
For brands, the efficient distribution enabled by ISOs, and later by cloud-native methods, is crucial for maintaining a strong corporate identity and delivering a consistent user experience globally. It reflects a commitment to digital security and user convenience. For individuals managing personal finance and aiming for online income, leveraging efficient tech tools like ISOs for system maintenance and software deployment contributes to productivity and reduces downtime, directly impacting their ability to operate effectively in the digital economy. The evolution of ISOs underscores a continuous shift towards more agile, secure, and resource-efficient digital distribution methods, keeping them relevant in an increasingly interconnected world.
In conclusion, the ISO file format remains a fundamental pillar of digital distribution, essential for everything from installing operating systems to deploying critical software and troubleshooting tools. By understanding what ISOs are, how to prepare them, and mastering the various methods of “installation”—whether by mounting, creating a bootable USB, or burning to disc—you empower yourself with a crucial skill set. This knowledge enhances your productivity, bolsters your digital security, and ensures you can confidently navigate the complexities of modern computing, making the most of your technology resources.
aViewFromTheCave is a participant in the Amazon Services LLC Associates Program, an affiliate advertising program designed to provide a means for sites to earn advertising fees by advertising and linking to Amazon.com. Amazon, the Amazon logo, AmazonSupply, and the AmazonSupply logo are trademarks of Amazon.com, Inc. or its affiliates. As an Amazon Associate we earn affiliate commissions from qualifying purchases.