Installing a new operating system can feel like a daunting task, especially for those who aren’t deeply immersed in the world of technology. However, when it comes to upgrading or performing a fresh installation of Windows 10, the process has become remarkably streamlined, particularly when utilizing a USB drive. This method offers a significant advantage over traditional DVD installations, being faster, more reliable, and far more convenient in today’s world of increasingly slimmer laptops that often omit optical drives altogether. In this guide, I’ll walk you through my tried-and-true method for installing Windows 10 from a USB drive, breaking down each step with clarity and practical advice.

The allure of a clean Windows 10 installation is undeniable. It can breathe new life into an aging computer, resolve persistent software glitches, and provide a pristine environment for your digital endeavors. Whether you’re looking to optimize your system for productivity, enhance your digital security, or simply want a fresh start, understanding how to leverage a USB drive for this process is an invaluable skill. This isn’t just about installing an operating system; it’s about taking control of your technology and ensuring your digital workspace is as efficient and secure as possible.
Preparing for a Smooth Installation
Before we dive into the actual installation, meticulous preparation is key to a seamless experience. This stage often gets overlooked, but it’s where many potential hiccups can be avoided. Think of it as setting the foundation for a sturdy building; rushing this part can lead to instability later.
Gathering Your Essential Tools
The first and most crucial element is the USB drive itself. For a Windows 10 installation, you’ll need a USB flash drive with a minimum capacity of 8GB. While 4GB drives were once sufficient, the Windows 10 installation media has grown, making 8GB the recommended minimum. It’s also worth noting that the contents of the USB drive will be completely erased during the creation process, so ensure you’ve backed up any important data stored on it.
Beyond the USB drive, you’ll need a reliable internet connection. This is essential for downloading the Windows 10 Media Creation Tool from Microsoft’s official website, which is the primary software we’ll use to prepare our bootable USB. A stable internet connection will also be vital during the installation process itself, as Windows 10 will often download updates and drivers automatically.
Finally, you’ll need your Windows 10 product key. While you can install Windows 10 without a product key and activate it later, having it ready will streamline the activation process. If you’re reinstalling Windows 10 on a machine that was previously activated, the digital license associated with your Microsoft account should automatically activate the OS upon connection to the internet, often negating the need for a manual product key entry.
Understanding the Windows 10 Media Creation Tool
Microsoft provides a free and straightforward tool specifically designed for this purpose: the Media Creation Tool. This utility allows you to download the latest version of Windows 10 directly from Microsoft servers and create a bootable USB drive or an ISO file. Its brilliance lies in its simplicity and efficiency, abstracting away much of the technical complexity for the user.
When you run the Media Creation Tool, you’ll be presented with a few key options. The most relevant for us here is “Create installation media (USB flash drive, DVD, or ISO file) for another PC.” Selecting this option will guide you through the process of choosing the correct Windows 10 edition (Home, Pro, etc.) and language, ensuring that the installation media is tailored to your needs. It’s important to select the correct architecture (32-bit or 64-bit) for your target computer. Most modern PCs are 64-bit, but it’s always wise to double-check your system’s specifications if you’re unsure.
The tool then takes over, downloading the necessary files and formatting your USB drive to become bootable. This process can take some time depending on your internet speed and the size of the Windows 10 installation files. Patience is key here, and it’s advisable to let the tool complete its work without interruption.
Creating Your Bootable Windows 10 USB Drive
With all your preparations in place, we can now move on to the core of the process: creating the bootable USB drive. This is where the Media Creation Tool truly shines, making a technically complex operation surprisingly accessible.
Step-by-Step Guide to Using the Media Creation Tool
-
Download the Media Creation Tool: Navigate to the official Microsoft Windows 10 download page. Look for the “Download tool now” button and click it. Save the executable file to a convenient location on your computer.
-
Run the Media Creation Tool: Double-click the downloaded executable file. You’ll be prompted to accept the license terms. Read them carefully, and if you agree, click “Accept.”
-
Choose “Create installation media”: On the “What do you want to do?” screen, select “Create installation media (USB flash drive, DVD, or ISO file) for another PC” and click “Next.”
-
Select Language, Edition, and Architecture: The tool will usually suggest options based on your current PC. However, it’s best to uncheck “Use the recommended options for this PC” if you want to ensure you’re creating media for a different computer or specific configuration. Choose your desired language, edition (e.g., Windows 10 Home, Windows 10 Pro), and architecture (64-bit is most common). Click “Next.”
-
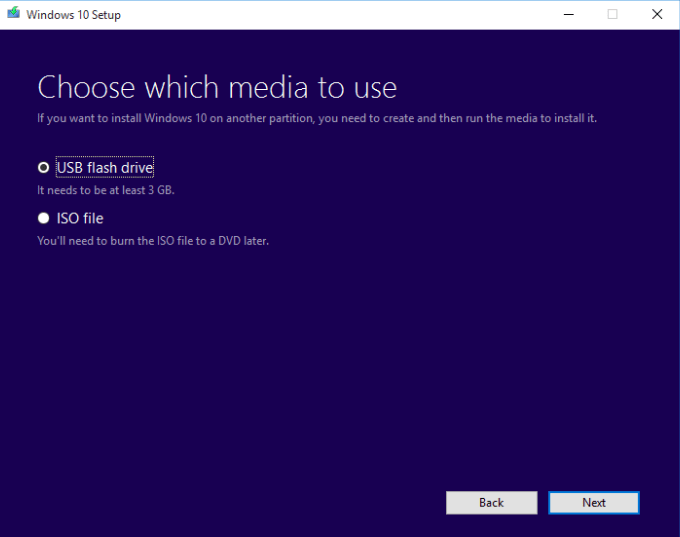
Choose “USB flash drive”: On the “Choose which media to use” screen, select “USB flash drive” and click “Next.”
-
Select Your USB Drive: The tool will list all connected USB drives. Ensure your 8GB (or larger) USB drive is plugged in, select it from the list, and click “Next.” Remember, all data on this drive will be erased.
-
The Tool Does the Work: The Media Creation Tool will now download the Windows 10 files and make your USB drive bootable. This process can take a significant amount of time, so be patient. You’ll see a progress indicator. Once it’s complete, it will inform you that your USB flash drive is ready. Click “Finish.”
Your bootable Windows 10 USB drive is now ready to be used for installation. It’s a good practice to label your USB drive with “Windows 10 Installer” so you can easily identify it in the future.
Installing Windows 10 from Your Bootable USB
The moment of truth has arrived! With your bootable USB drive in hand, we can now proceed with the actual installation of Windows 10 onto your target computer. This process involves configuring your computer to boot from the USB drive and then following the on-screen prompts.
Booting from the USB and Initiating the Installation
-
Connect the USB Drive: Insert the bootable Windows 10 USB drive into a USB port on the computer where you want to install Windows 10.
-
Access the BIOS/UEFI Settings: This is a crucial step that varies depending on your computer’s manufacturer and model. You’ll need to restart your computer and, immediately upon startup, press a specific key to enter the BIOS or UEFI setup. Common keys include F2, F10, F12, DEL, or ESC. Look for a message on the screen during boot that says something like “Press [Key] to enter Setup” or “Press [Key] for BIOS.”
-
Change the Boot Order: Once you’re in the BIOS/UEFI settings, navigate to the “Boot” or “Boot Order” section. You’ll see a list of devices your computer can boot from. You need to change this order to prioritize your USB drive. Use the arrow keys to select your USB drive and move it to the top of the list. The exact method for moving items in the boot order varies, but it’s usually indicated within the BIOS interface (e.g., using F5/F6 or +/- keys).
-
Save Changes and Exit: After setting the USB drive as the first boot device, navigate to the “Save and Exit” section. Select “Save Changes and Exit” (often assigned to the F10 key) and confirm your choice. Your computer will restart.
-
Windows 10 Setup Begins: If you’ve correctly set the boot order, your computer will now boot from the USB drive, and you should see the Windows 10 setup screen appear. It will likely say “Press any key to boot from USB…” If you see this, press any key on your keyboard.
Navigating the Windows 10 Installation Wizard
Once the Windows 10 setup wizard launches, you’ll be guided through a series of intuitive steps.
-
Language, Time, and Keyboard: The first screen will ask you to select your preferred language, time and currency format, and keyboard or input method. Choose your preferences and click “Next.”
-
Install Now: Click the prominent “Install now” button.
-
Product Key Entry (Optional): If you have your product key, you can enter it now. If you don’t have it handy or are reinstalling on a previously activated machine, you can click “I don’t have a product key.”
-
Choose Operating System: If you skipped the product key, you’ll need to select the edition of Windows 10 you wish to install (e.g., Windows 10 Home, Windows 10 Pro). Make sure this matches the edition your license is for. Click “Next.”
-
Accept License Terms: Read the Microsoft software license terms and check the box that says “I accept the license terms.” Click “Next.”
-
Choose Installation Type: This is a critical decision point. You’ll be presented with two options:
- Upgrade: This option installs Windows 10 and keeps your files, settings, and applications. This is only available if you are running a compatible version of Windows already.
- Custom: Install Windows only (advanced): This option performs a clean installation. It will erase everything on the selected drive and install a fresh copy of Windows 10. This is the recommended option for a clean start and to resolve persistent issues. Select “Custom” for a clean install.
-
Drive Selection and Formatting: If you chose “Custom,” you’ll see a list of drives and partitions on your computer.
- For a clean installation on the primary drive: Select the partition where your current Windows is installed (usually labeled “Primary”). Click “Format” to erase it. This will delete all data on that partition. You can also choose to delete existing partitions and create new ones, but be very careful if you do so, especially if you have multiple drives.
- Once the desired partition is formatted (or if you’re installing on an unallocated space), select it and click “Next.”
-
Installation Progress: Windows will now begin copying files, installing features, and installing updates. Your computer will restart several times during this process. Do not remove the USB drive until you reach the final setup stages where Windows prompts you to restart without it.
-
Out-of-Box Experience (OOBE): After the installation is complete and your computer restarts for the final time, you’ll enter the Windows 10 Out-of-Box Experience (OOBE). This is where you’ll set up your region, keyboard layout, connect to a network, create a user account (local or Microsoft account), set up privacy settings, and personalize your Windows 10 experience. Follow the on-screen prompts carefully.

Post-Installation Essentials: Drivers and Updates
Once you’ve successfully logged into your freshly installed Windows 10, your work isn’t entirely done. A few crucial post-installation steps will ensure your system runs smoothly and securely.
-
Connect to the Internet: If you haven’t already, connect your computer to the internet. This is vital for downloading drivers and Windows updates.
-
Run Windows Update: Open the Start Menu, go to Settings (the gear icon), then Update & Security, and click “Check for updates.” Install all available updates. This will install crucial security patches and may even download many of the necessary drivers for your hardware.
-
Install Drivers: While Windows Update is good, it’s not always perfect. For optimal performance, especially for graphics cards, network adapters, and chipsets, it’s highly recommended to visit the manufacturer’s website for your specific hardware components (motherboard, graphics card, laptop manufacturer) and download the latest drivers. You can usually find these in the “Support” or “Downloads” section of their websites.
-
Install Essential Software: Now is the time to reinstall your favorite productivity applications, web browsers, security software, and any other programs you need.
By following these steps diligently, you’ll have a clean, optimized, and up-to-date Windows 10 installation. The process of installing Windows 10 from a USB drive is not only efficient but also empowers you to take full control of your computing environment. It’s a fundamental skill in today’s digital landscape, ensuring your technology serves you reliably and securely.
aViewFromTheCave is a participant in the Amazon Services LLC Associates Program, an affiliate advertising program designed to provide a means for sites to earn advertising fees by advertising and linking to Amazon.com. Amazon, the Amazon logo, AmazonSupply, and the AmazonSupply logo are trademarks of Amazon.com, Inc. or its affiliates. As an Amazon Associate we earn affiliate commissions from qualifying purchases.