In the intricate world of automotive technology, few systems are as crucial yet often overlooked as the Tire Pressure Monitoring System (TPMS). Designed to safeguard drivers and passengers by continuously monitoring tire inflation levels, TPMS has become a standard feature in modern vehicles. It’s a silent guardian, providing real-time data that can prevent catastrophic blowouts, improve fuel efficiency, and extend tire life. Whether you’re a seasoned DIY enthusiast looking to save on repair costs, or simply curious about the tech behind your ride, understanding how to install TPMS sensors is an invaluable skill.

This comprehensive guide will demystify the process of TPMS sensor installation, taking you from preparation to post-installation checks. We’ll delve into the technology, outline the necessary tools, and provide a step-by-step walkthrough, all while emphasizing safety and efficiency. Beyond just the mechanics, we’ll explore how mastering this aspect of car maintenance aligns with smart financial planning and maintaining your vehicle’s overall integrity.
Understanding TPMS: Why This Technology Matters
Before diving into the installation process, it’s essential to grasp the fundamental importance of TPMS. This isn’t just another gadget; it’s a vital safety system mandated in many countries due to its proven ability to reduce accidents. Low tire pressure is a leading cause of tire failure, which can lead to loss of vehicle control, increased stopping distances, and dangerous blowouts.
The Role of TPMS in Vehicle Safety
The primary function of TPMS is to alert the driver when one or more tires are significantly under-inflated, typically by 25% or more below the manufacturer’s recommended pressure. This early warning allows drivers to address the issue before it escalates into a serious safety hazard. Beyond immediate accident prevention, proper tire pressure ensures optimal vehicle handling, braking performance, and stability, especially during adverse weather conditions.
From a Tech perspective, TPMS represents a significant advancement in automotive safety. It moved from being an optional luxury to a standard necessity, leveraging sensor technology to provide critical real-time data. This integration of smart sensors into everyday vehicle components underscores the continuous evolution of automotive engineering towards safer and more intelligent transportation.
Direct vs. Indirect TPMS Systems
It’s important to distinguish between the two main types of TPMS before considering installation:
- Direct TPMS: This is the most common and involves individual pressure sensors mounted inside each tire, usually attached to the valve stem. These sensors directly measure the air pressure and temperature within the tire and transmit this data wirelessly to the vehicle’s onboard computer. If a tire’s pressure drops below a predetermined threshold, the system triggers a warning light on the dashboard. Direct TPMS offers precise, real-time readings and can identify which specific tire has an issue. When we talk about “installing TPMS sensors,” we are almost exclusively referring to direct TPMS sensors.
- Indirect TPMS: This system doesn’t use physical pressure sensors inside the tires. Instead, it relies on the anti-lock braking system’s (ABS) wheel speed sensors to monitor tire rotation speeds. When a tire loses pressure, its diameter slightly decreases, causing it to rotate at a different speed compared to the other tires. The vehicle’s computer detects this discrepancy and triggers a warning. Indirect TPMS is generally less accurate and cannot provide specific pressure readings or identify which tire is under-inflated. Installation or replacement for indirect systems typically involves a system reset rather than sensor replacement.
For our purposes, this guide focuses on the installation of direct TPMS sensors, which are the physical components requiring mechanical installation within the tire.
Preparing for TPMS Sensor Installation
Successful TPMS sensor installation begins with thorough preparation. Having the right tools, understanding your vehicle’s specific needs, and acquiring the correct parts are paramount to a smooth and effective process. This preparation phase is where you can significantly impact both your time investment and potential costs, aligning with smart Money management.
Essential Tools and Materials
Attempting any automotive work without the proper tools is a recipe for frustration and potential damage. For TPMS sensor installation, gather the following:
- Vehicle Jack and Jack Stands: Absolutely critical for safely lifting and supporting your vehicle. Never work under a vehicle supported only by a jack.
- Lug Nut Wrench or Impact Wrench: To remove and re-install wheel lug nuts.
- Tire Valve Stem Remover Tool: To unscrew the old valve stem core and deflate the tire.
- Tire Changer Machine (Optional but Recommended): While it’s possible to break a tire bead manually with specialized tools, a tire changer makes the process significantly easier and safer, especially for amateur mechanics. Alternatively, a shop might provide this service for a small fee.
- Bead Breaker: If not using a tire changer, you’ll need a manual bead breaker.
- Tire Spoons/Levers: Used to carefully pry the tire bead off the rim.
- TPMS Valve Stem Torque Wrench: Essential for tightening the sensor to the manufacturer’s specified torque. Overtightening can damage the sensor; undertightening can lead to leaks.
- New TPMS Sensors: Ensure they are compatible with your vehicle’s make, model, and year.
- Valve Stem Rebuild Kit (Optional): If reusing existing sensors but replacing valve stems.
- Tire Sealant/Lubricant: To aid in re-seating the tire bead.
- Air Compressor and Tire Inflator: To re-inflate the tire.
- Wheel Balancer: After any tire work that involves dismounting and remounting, re-balancing the wheel is crucial for smooth driving.
- TPMS Programming/Relearn Tool (Scanner): Necessary to program new sensors to your vehicle’s ECU.
- Safety Glasses and Gloves: Always protect your eyes and hands.
- Shop Rags/Clean Cloths: For general cleaning.
Investing in quality tools, particularly a good torque wrench and a reliable TPMS programming tool, is a smart financial decision if you plan on doing regular DIY car maintenance. It saves you money on labor costs in the long run and gives you greater control over your vehicle’s upkeep.
Choosing the Right TPMS Sensors
Selecting the correct replacement sensors is paramount. There are generic universal sensors and OEM-specific sensors.
- OEM (Original Equipment Manufacturer) Sensors: These are identical to the sensors originally installed in your vehicle and are generally plug-and-play, often requiring less complex programming. They are typically more expensive.
- Aftermarket/Universal Sensors: These are designed to be compatible with a wide range of vehicles. Some require specific programming to ‘clone’ the old sensor’s ID or generate a new compatible ID before installation. They are usually more affordable.
When choosing, always check your vehicle’s make, model, and year against the sensor’s compatibility list. Look for sensors from reputable Brand manufacturers to ensure reliability and accuracy. Low-quality sensors might fail prematurely, leading to repeated work and costs. Consider purchasing a complete set of four if you suspect other sensors might be nearing the end of their lifespan, as their batteries typically last 5-10 years. This proactive approach can save you money and inconvenience later.
Step-by-Step Guide to Installing TPMS Sensors
The actual installation process requires patience and attention to detail. Follow these steps carefully to ensure a successful and safe installation.
Safely Lifting and Removing the Wheel
- Park on a Level Surface: Engage the parking brake.
- Loosen Lug Nuts: Use your lug nut wrench to slightly loosen the lug nuts on the wheel you’ll be working on. Do not remove them completely yet.
- Lift the Vehicle: Place your jack under the vehicle’s frame at the manufacturer-recommended jacking point. Lift the vehicle until the wheel is off the ground.
- Secure with Jack Stands: Position jack stands under appropriate frame points near the jack and slowly lower the vehicle onto the stands. This is a critical safety step – never work under a vehicle supported only by a jack.
- Remove Lug Nuts and Wheel: Fully remove the loosened lug nuts and carefully take the wheel off the vehicle.
Deflating the Tire and Breaking the Bead
- Deflate the Tire: Use the valve stem remover tool to unscrew and remove the Schrader valve core. The air will quickly escape.
- Break the Tire Bead: This is the most challenging part without a tire changer.
- Using a Tire Changer: Position the wheel on the changer, lubricate the tire bead, and use the machine’s bead breaker arm to push the tire bead away from the rim, both on the front and back sides of the wheel.
- Manual Method: Lay the wheel flat. Lubricate the bead. Use a manual bead breaker tool or carefully drive a vehicle over the tire’s sidewall (away from the rim) to break the bead. Be extremely careful not to damage the rim or tire. Break both inner and outer beads.
Removing the Old Sensor (if applicable)
- Locate and Remove Valve Stem Nut: Once the bead is broken, you’ll see the TPMS sensor attached to the inside of the rim, usually held in place by a nut on the outside of the valve stem. Unscrew this nut.
- Push Sensor Through: Carefully push the old sensor and valve stem assembly out from the inside of the rim. Some sensors may have a retaining screw that needs to be removed first. Inspect the rim’s valve stem hole for any damage or corrosion.
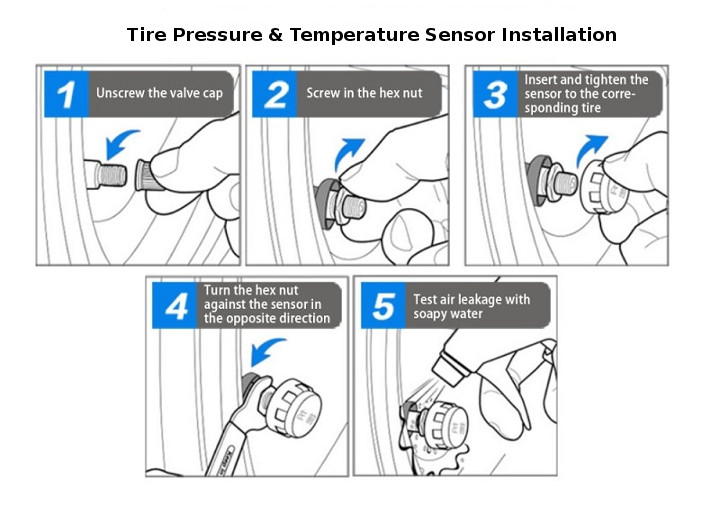
Installing the New TPMS Sensor
- Prepare the New Sensor: If your new sensor comes with separate components (valve stem, sensor body, washer, nut), assemble them according to the manufacturer’s instructions.
- Insert the Sensor: From the inside of the rim, feed the valve stem of the new sensor through the valve stem hole. Ensure the sensor body is positioned correctly and securely against the rim. The orientation often matters; ensure the sensor body points towards the tire’s center and won’t interfere with the tire bead.
- Secure the Sensor: From the outside of the rim, thread the retaining nut onto the valve stem. Crucially, use a TPMS valve stem torque wrench to tighten the nut to the manufacturer’s specified torque. This is vital to prevent air leaks and sensor damage. Overtightening can crack the sensor housing; undertightening will result in a leak.
Re-seating the Tire and Inflating
- Lubricate Beads: Apply tire lubricant generously to both the tire beads and the rim flanges.
- Re-mount the Tire:
- Using a Tire Changer: Use the machine’s arms to carefully guide the tire back onto the rim, starting with the bottom bead, then the top bead. Ensure the TPMS sensor is not pinched or damaged during this process.
- Manual Method: Use tire spoons to carefully lever the tire beads back onto the rim. Be extremely cautious not to damage the sensor.
- Re-inflate the Tire: Re-install the Schrader valve core into the new TPMS valve stem. Connect your air compressor and inflate the tire to the manufacturer’s recommended pressure. You should hear the beads ‘pop’ into place. Check for leaks around the valve stem and bead with soapy water.
Balancing the Wheel
After any tire work where the tire has been dismounted, re-balancing the wheel is absolutely essential. An unbalanced wheel can cause vibrations, premature tire wear, and affect vehicle handling, diminishing your driving experience and potentially costing more in tire replacements down the line. Take the wheel to a shop with a wheel balancer, or if you possess the equipment, balance it yourself. This ensures even weight distribution and a smooth ride.
Programming and Relearning the Sensors
This is arguably the most critical step from a Tech standpoint, as the physical installation is useless without proper electronic integration. New TPMS sensors must communicate with your vehicle’s onboard computer (ECU). There are typically a few methods for “relearning” or “programming” new sensors:
- Auto Relearn (Drive Cycle): Some vehicles can automatically detect new sensors after a specific drive cycle. This usually involves driving at a certain speed for a duration (e.g., 15-20 minutes above 20-30 mph). Check your owner’s manual for the specific procedure.
- OBD-II Tool (Diagnostic Scanner): Many vehicles require an OBD-II diagnostic scanner with TPMS relearn capabilities. You connect the tool to your car’s OBD-II port, select the TPMS relearn function, and follow the on-screen prompts. This usually involves activating each sensor individually (often with a separate TPMS activation tool that emits a radio frequency) while the scanner is connected.
- Manual Relearn (Magnet/Button): Older systems, or some specific manufacturers (like certain Honda or Toyota models), might use a magnet or a sequence of button presses to put the car into relearn mode, then activate each sensor.
- TPMS Relearn Tool (Dedicated): This specialized tool wirelessly communicates with each sensor to wake it up and transmit its ID to the vehicle’s ECU. It’s the most common and reliable method for most modern vehicles.
Failing to properly program the new sensors will result in the TPMS warning light remaining on, and the system not functioning correctly. This negates all your installation efforts and compromises safety. This is where investing in a quality TPMS programming tool or understanding when to consult a professional can save you significant time and frustration, representing a shrewd Money decision.
Post-Installation Considerations and Troubleshooting
Once the sensors are physically installed and programmed, your work isn’t quite done. A few final checks and an understanding of potential issues will ensure the system operates flawlessly.
Verifying Sensor Functionality
- Check Dashboard Light: After successful programming and driving the vehicle for a short period, the TPMS warning light on your dashboard should turn off. If it remains on, re-verify your programming steps.
- Monitor Tire Pressures: If your vehicle provides individual tire pressure readings (common in direct TPMS), confirm that the dashboard display shows accurate pressures for all four tires. Compare these readings to a reliable manual tire pressure gauge.
- Drive Test: Take the vehicle for a test drive, mimicking normal driving conditions. Pay attention to any unusual vibrations (potentially from an unbalanced wheel) or continued TPMS warnings.
Common Issues and How to Address Them
- TPMS Light Remains On:
- Incorrect Relearn Procedure: Double-check your vehicle’s specific relearn procedure and ensure it was followed precisely.
- Sensor Not Programmed: The sensors might be installed but not electronically linked to the vehicle. Re-attempt programming.
- Incompatible Sensor: The new sensors might not be compatible with your vehicle.
- Faulty New Sensor: Though rare, a new sensor could be defective.
- Other TPMS System Fault: There might be an issue with the TPMS receiver or ECU, requiring professional diagnosis.
- Slow Leaks: Even after proper torque, a small leak can occur if the valve stem seal wasn’t seated correctly or if there’s rim damage. Use soapy water to pinpoint the leak.
- Vibrations After Installation: This almost always indicates an unbalanced wheel. Re-balance the wheel immediately.
Addressing these issues promptly ensures that your investment in DIY TPMS installation pays off. Ignoring warning lights or vibrations can lead to further costly repairs or safety hazards, undermining your Money savings.
When to Consult a Professional
While installing TPMS sensors yourself can be a rewarding and cost-effective endeavor, there are times when professional assistance is warranted:
- Lack of Specialized Tools: If you don’t have access to a tire changer, wheel balancer, or a TPMS programming tool, it might be more efficient to pay a professional for the specific steps you can’t perform. Many tire shops offer mount, balance, and TPMS relearn services for a reasonable fee.
- Persistent TPMS Light: If you’ve followed all installation and programming steps correctly, but the TPMS light remains on, there might be a more complex underlying issue with the vehicle’s TPMS module or wiring. A professional with advanced diagnostic equipment can identify and resolve these problems.
- Damaged Wheel/Tire: If you accidentally damage the wheel or tire during the installation process, a professional can assess and repair the damage safely.
- Time Constraints/Comfort Level: If you’re short on time or simply uncomfortable performing the task, a certified technician can complete the job quickly and correctly, offering peace of mind.
Remember, the goal of DIY is to save Money and gain satisfaction, but not at the expense of safety or vehicle integrity. Knowing your limits is crucial. A good mechanic uses quality tools and follows best practices, often leveraging their established Brand reputation to ensure customer satisfaction and repeat business.

Conclusion
Installing TPMS sensors might seem like a daunting task, but with the right knowledge, tools, and a methodical approach, it’s a manageable DIY project that offers significant benefits. By understanding the Tech behind these essential safety devices, carefully preparing for the job, and following each step diligently, you can ensure your vehicle’s TPMS functions correctly, enhancing safety and performance.
Beyond the immediate satisfaction of a job well done, mastering this skill contributes to your overall financial well-being. Performing your own TPMS sensor installation can save you a substantial amount in labor costs compared to professional services. Furthermore, maintaining proper tire pressure through a functioning TPMS system translates into improved fuel efficiency, extended tire life, and reduced risk of expensive accident-related repairs – all smart Money moves.
Ultimately, taking an active role in your vehicle’s maintenance, especially concerning critical safety features like TPMS, empowers you as a vehicle owner. It transforms what might seem like a complex technological challenge into a valuable skill, bolstering your confidence and ensuring your journeys are safer and more economical.
aViewFromTheCave is a participant in the Amazon Services LLC Associates Program, an affiliate advertising program designed to provide a means for sites to earn advertising fees by advertising and linking to Amazon.com. Amazon, the Amazon logo, AmazonSupply, and the AmazonSupply logo are trademarks of Amazon.com, Inc. or its affiliates. As an Amazon Associate we earn affiliate commissions from qualifying purchases.