Embarking on the journey to install solar panels on your roof is a significant step towards energy independence, environmental stewardship, and savvy financial management. In an era increasingly defined by technological innovation and sustainable practices, harnessing solar power directly from your home offers a myriad of benefits that resonate across personal finance, brand identity, and cutting-edge technology. While the prospect of installing solar panels might seem daunting, understanding the process, from initial assessment to final grid connection, demystifies this powerful home improvement. This comprehensive guide will walk you through the essential steps, considerations, and insights needed to bring solar energy to your doorstep, exploring how it intersects with the tech trends, financial gains, and branding implications relevant in today’s digital landscape.
The Solar Revolution: Why Go Rooftop?
The surge in rooftop solar adoption isn’t merely a fleeting trend; it represents a fundamental shift in how we perceive and consume energy. Driven by advancements in photovoltaic technology, a growing consciousness about climate change, and compelling economic incentives, homeowners are increasingly turning their roofs into personal power plants. The installation of solar panels transforms an often-underutilized asset – your roof – into a productive component of your home, contributing to a more resilient and sustainable future. This decision impacts not only your utility bills but also your property’s market value and your personal brand as an early adopter of smart, green technology.
Unpacking the Benefits: Tech, Finance, and Future-Proofing
The advantages of rooftop solar span multiple domains. From a Tech perspective, modern solar panel systems are marvels of engineering. They integrate highly efficient monocrystalline or polycrystalline cells, smart inverters that optimize energy conversion, and sophisticated monitoring software accessible via apps on your smartphone. These systems often incorporate AI-driven diagnostics, predictive maintenance capabilities, and seamless integration with smart home ecosystems, allowing for granular control and real-time insights into energy production and consumption. The ability to monitor your energy output, identify inefficiencies, and even manage battery storage solutions represents the forefront of home energy management technology.
Financially, the appeal of solar is undeniable. This is where the “Money” aspect comes into sharp focus. Installing solar panels significantly reduces or even eliminates your monthly electricity bills. Furthermore, many regions offer generous incentives, including federal tax credits, state rebates, and local programs that can substantially offset the initial investment. Net metering policies allow you to sell excess electricity back to the grid, potentially turning your home into a revenue generator. Over time, the return on investment (ROI) for solar installations can be remarkably high, especially considering the long lifespan of solar panels (typically 25-30 years with minimal degradation). Property values also tend to increase with the addition of a solar array, making it a sound long-term financial decision. For those looking for “Online Income” or “Side Hustles,” excess energy generation can even create a passive income stream, embodying a modern approach to financial independence.
Finally, embracing solar panels also serves as a powerful statement about your “Brand.” For individuals, it signals a commitment to sustainability, innovation, and self-sufficiency, enhancing your personal brand as a forward-thinking and responsible citizen. For residential properties, it elevates the home’s appeal, positioning it as a modern, eco-conscious dwelling. Businesses, in particular, often leverage their solar installations in their “Corporate Identity” and “Marketing” efforts, demonstrating environmental responsibility and attracting eco-conscious consumers. In essence, installing solar panels is not just an upgrade; it’s an investment in a cleaner planet, a healthier bank account, and a smarter lifestyle.
Preparing for Your Solar Journey: Essential Pre-Installation Steps
Before a single panel is mounted, a thorough preparation phase is crucial. This stage involves a blend of technical assessment, administrative navigation, and strategic decision-making that lays the foundation for a successful and compliant solar installation. Neglecting any of these steps can lead to costly delays, performance issues, or even safety hazards.
Assessing Your Roof and Site: Structural Integrity and Sunlight Exposure
The first and most critical step is a comprehensive assessment of your roof. Solar panels are a long-term investment, and they require a robust, well-maintained foundation. Professionals will evaluate:
- Roof Condition and Age: Older roofs may need repairs or replacement before solar panels are installed, as the panels are designed to last for decades, and you don’t want to remove them for a roof repair just a few years down the line.
- Structural Integrity: An engineer may assess your roof’s load-bearing capacity to ensure it can support the weight of the panels and mounting hardware, especially crucial in regions prone to heavy snow loads or high winds.
- Roofing Material: While most roofing materials (shingles, tile, metal) are suitable, specific mounting techniques are required for each. For instance, metal roofs might offer easier installation compared to delicate slate tiles.
- Shading Analysis: This is paramount for maximizing energy production. Using specialized tools and software (some even leveraging AI for predictive analysis), installers will map out potential shading from trees, chimneys, adjacent buildings, and other obstructions throughout the year. Even minor shading can significantly reduce a panel’s efficiency.
- Sunlight Exposure and Orientation: South-facing roofs in the Northern Hemisphere (and north-facing in the Southern Hemisphere) generally offer the best solar exposure. The optimal tilt angle for panels will also be determined, often matching the roof pitch, but adjustable mounting systems can be used for flat roofs to optimize sun capture.
This assessment is often facilitated by advanced Tech tools, including drone inspections and 3D modeling software, which provide highly accurate data for optimal system design.
Navigating Permits and Regulations: Legalities and Local Codes
One of the most complex aspects of solar installation is navigating the maze of local, state, and sometimes federal regulations. This administrative burden can be a significant barrier for DIY installers but is typically handled by professional solar companies. Key aspects include:
- Building Permits: Most jurisdictions require a building permit for solar panel installations to ensure they meet structural, electrical, and safety codes.
- Electrical Permits: Specific electrical permits are needed to ensure the system’s wiring, inverters, and grid connection comply with National Electrical Code (NEC) standards.
- Homeowners Association (HOA) Rules: If you live in an HOA, you’ll need to check their specific rules regarding solar panel installations. Many states have “solar access rights” laws that prevent HOAs from outright banning solar, but they may impose restrictions on placement or aesthetics.
- Utility Interconnection Agreements: Before your system can connect to the grid and participate in net metering, you must have an interconnection agreement with your local utility company. This ensures compatibility and safety for both your system and the wider electrical grid.
Understanding and adhering to these regulations is critical, not just for compliance but also for securing financial incentives and ensuring your system operates safely and effectively. This process highlights the importance of choosing a reputable installer who is well-versed in local “Financial Tools” and regulatory compliance.
Designing Your System: From Panel Selection to Inverter Technology
With the roof assessment complete and regulatory pathways understood, the next step is designing a system tailored to your energy needs and site specifics. This involves several key decisions:
- Energy Needs Analysis: Based on your historical electricity bills, an installer will determine your average daily and annual energy consumption. This forms the basis for sizing your solar array.
- Panel Selection: Choosing the right solar panels is crucial. Options include:
- Monocrystalline Panels: Known for their higher efficiency and sleek black appearance, they are generally more expensive.
- Polycrystalline Panels: Slightly less efficient but more affordable, with a blue hue.
- Thin-Film Panels: Less common for residential rooftops due to lower efficiency but can be flexible.
The “Tech” aspect here is vital – considering panel efficiency, temperature coefficient (how well they perform in heat), durability, and warranty. Leading “Brand” names often provide superior products and guarantees.
- Inverter Technology: Inverters convert the DC electricity generated by panels into AC electricity usable by your home and the grid.
- String Inverters: Traditional and cost-effective, but if one panel is shaded, it can affect the entire string’s output.
- Microinverters: Installed on each individual panel, they optimize the output of each panel independently, mitigating shading issues and offering panel-level monitoring.
- Power Optimizers: Combine aspects of both, installed on each panel to optimize DC voltage before sending it to a central string inverter.
Microinverters and power optimizers represent significant “Tech Trends” in solar, offering enhanced performance and resilience.
- Battery Storage (Optional but Recommended): Integrating a solar battery allows you to store excess energy generated during the day for use at night or during power outages, further increasing energy independence and potentially allowing you to draw less from the grid during peak pricing hours, leveraging your “Money” investment more effectively.
A Step-by-Step Guide to Rooftop Solar Installation
Once all planning, permits, and equipment are ready, the physical installation process begins. While specific steps may vary slightly depending on the system and roof type, the general sequence remains consistent. This phase typically requires specialized tools and expertise, making professional installation the preferred route for most homeowners.
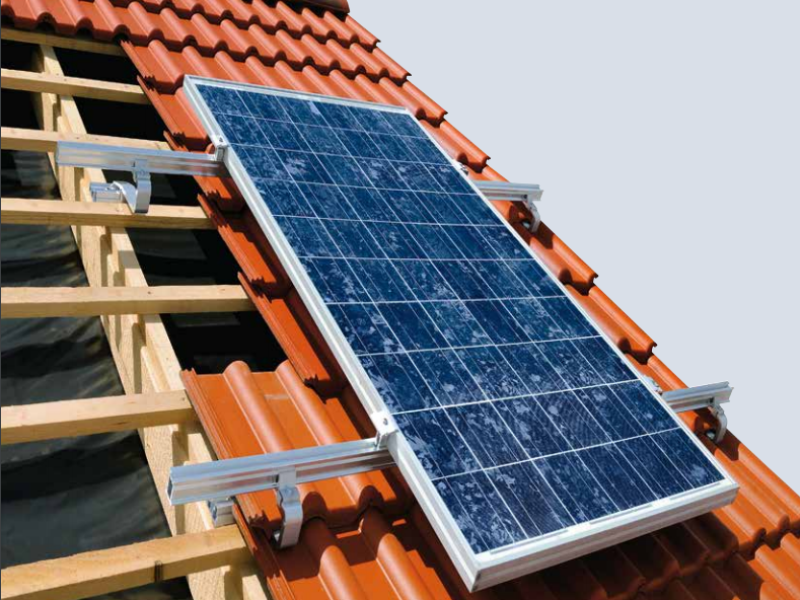
Securing the Mounting System: Racking and Rails
The structural integrity of your solar array starts with the mounting system, often referred to as racking. This is the framework that securely holds the panels to your roof.
- Locating Rafters: Installers first identify and mark the roof rafters, which are the structural beams beneath your roofing material. This ensures the mounting hardware is anchored into solid wood, not just the sheathing.
- Attaching Flashing and Standoffs: Holes are drilled through the roofing material into the rafters. Flashing (a waterproof barrier, usually metal) is installed over these holes and sealed to prevent leaks. Standoffs or L-feet are then bolted to the rafters through the flashing, providing a raised attachment point.
- Installing Rails: Aluminum rails are then attached to the L-feet. These rails run parallel to each other across the roof, providing the foundation upon which the solar panels will rest. The precise spacing and leveling of these rails are critical for a uniform and stable array.
This stage requires meticulous attention to detail and adherence to engineering specifications to ensure the system can withstand environmental forces like wind and snow, protecting your “Money” investment from potential damage.
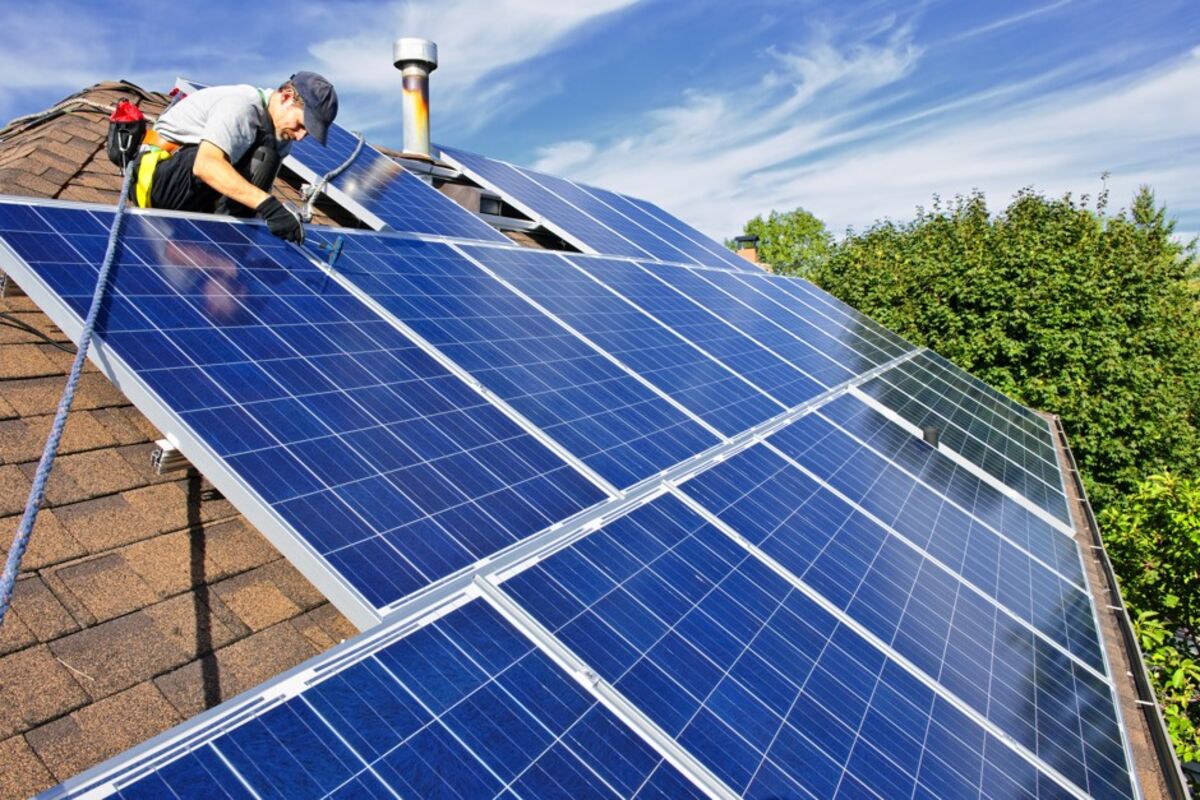
Installing the Solar Panels: The Powerhouse Modules
With the racking firmly in place, the solar panels themselves are carefully lifted onto the roof and secured.
- Lifting Panels: Panels are typically lifted onto the roof using safety ropes, lifts, or by hand, depending on the height and accessibility. Extreme care is taken to avoid damaging the delicate cells or frames.
- Mounting Panels: Each panel is placed onto the rails and secured with specialized clamps. These clamps hold the panels firmly in place while allowing for minor thermal expansion and contraction.
- Orientation and Alignment: Panels are precisely aligned to ensure uniform aesthetics and optimal performance. Proper spacing between panels is also maintained for ventilation and access.
The quality of panels and their installation significantly impact efficiency, making the choice of “Brand” and installer expertise paramount.
Wiring and Electrical Connections: The Heart of Your System
This is arguably the most critical stage, where the individual panels are connected to form a complete electrical circuit, and the DC power is prepared for conversion.
- Panel Wiring (DC Wiring): Solar panels are connected in series (for string inverters) or individually to microinverters/power optimizers. Connectors (typically MC4 connectors) ensure weatherproof and secure connections. All DC wiring is carefully routed and secured to the racking system, away from sharp edges and potential pinch points, following strict electrical codes.
- Conduit Installation: Wires are run from the solar array, typically through conduit (protective tubing), down to the inverter and then to the electrical service panel (main breaker box). The conduit protects the wiring from environmental exposure and physical damage.
- Grounding: A robust grounding system is installed for both the panels and the racking to protect against lightning strikes and electrical faults, a critical safety measure that adheres to strict “Digital Security” principles for electrical systems.
Inverters, Monitoring, and Grid Connection: Bringing It All Online
The final electrical components are installed, and the system is prepared for activation and connection to the utility grid.
- Inverter Installation: The inverter (or multiple microinverters/power optimizers) is installed. String inverters are typically mounted on a wall in a cool, dry place (e.g., garage or basement), while microinverters are mounted directly under each panel.
- AC Wiring: The inverter converts the DC electricity from the panels into AC electricity. This AC power is then wired into your home’s main electrical service panel, often through a dedicated breaker.
- Utility Meter Upgrade: Often, your existing utility meter will need to be replaced with a bidirectional “net meter” that can measure both electricity drawn from the grid and electricity sent back to the grid.
- Monitoring System Setup: This is where the “Tech” truly shines. Monitoring hardware is connected, allowing you to track your system’s performance in real-time via a web portal or smartphone app. This data is invaluable for ensuring your system is operating optimally and can help you identify any issues quickly, optimizing your “Productivity” in energy management.
- Final Inspection and Activation: Once all components are installed and wired, the system undergoes a final inspection by local authorities and the utility company. Upon approval, the system is officially activated, and you begin generating your own clean electricity.
Post-Installation: Maximizing Your Solar Investment
The installation isn’t the end of your solar journey; it’s just the beginning. Maximizing the benefits of your new system involves ongoing management, monitoring, and understanding the long-term financial and technological implications.
Maintenance and Monitoring: Ensuring Peak Performance
Modern solar panel systems require surprisingly little maintenance. However, periodic checks can ensure optimal performance and longevity, safeguarding your “Money” investment.
- Cleaning: While rain often cleans panels naturally, accumulated dust, pollen, or bird droppings can reduce efficiency. Occasional cleaning with water and a soft brush may be necessary, especially in dry, dusty climates.
- Monitoring: Regularly checking your system’s performance via the associated app or web portal is crucial. Sudden drops in production can signal an issue, such as shading, a faulty panel, or inverter problem. Early detection allows for prompt resolution.
- Professional Check-ups: An annual or biennial professional inspection can identify potential issues before they become serious, ensuring your system continues to operate at peak efficiency and comply with “Digital Security” best practices for connected devices.
Financial Returns and Long-Term Value: The Money Aspect
The financial benefits of solar panels extend far beyond immediate utility bill savings.
- ROI and Payback Period: Calculate your system’s return on investment over its lifespan. While the initial investment might seem significant, the energy savings, incentives, and potential for net metering often lead to a payback period of 5-10 years, after which your electricity is essentially free.
- Increased Property Value: Homes with solar panels typically sell for a premium and often sell faster than comparable non-solar homes, directly boosting your “Business Finance” or personal assets.
- Protection Against Rising Energy Costs: By generating your own electricity, you effectively hedge against future increases in utility rates, providing long-term financial stability.
- Eligibility for Future Incentives: As climate policies evolve, new incentives for renewable energy often emerge, which solar homeowners are well-positioned to leverage. Keep an eye on local “Financial Tools” and grants.

The Future of Rooftop Solar: Tech Innovations and Smart Integration
The solar industry is constantly evolving, driven by rapid Tech innovation. Looking ahead, rooftop solar systems will become even more sophisticated:
- Higher Efficiency Panels: Research continues to push the boundaries of photovoltaic efficiency, allowing more power generation from smaller roof footprints.
- Integrated Solar Roofing Materials: Building-Integrated Photovoltaics (BIPV), such as solar shingles or tiles, are becoming more aesthetically pleasing and seamlessly integrated into the roof structure.
- Advanced Battery Storage: Improvements in battery technology (e.g., solid-state batteries) will lead to cheaper, more efficient, and longer-lasting energy storage solutions.
- AI and IoT Integration: AI will play an even larger role in predicting energy demand, optimizing panel performance, and managing smart home energy flows. The Internet of Things (IoT) will enable seamless communication between solar systems, smart appliances, and the grid, fostering truly intelligent energy management. This continuous innovation highlights “Tech Trends” that redefine our relationship with energy.
Installing solar panels on your roof is a rewarding endeavor that converges cutting-edge technology, sound financial strategy, and a strong personal commitment to sustainability. By carefully planning, understanding the installation process, and embracing the ongoing benefits, you can transform your home into a beacon of modern, clean energy. It’s an investment that pays dividends not only for your wallet but also for the planet and your future.
aViewFromTheCave is a participant in the Amazon Services LLC Associates Program, an affiliate advertising program designed to provide a means for sites to earn advertising fees by advertising and linking to Amazon.com. Amazon, the Amazon logo, AmazonSupply, and the AmazonSupply logo are trademarks of Amazon.com, Inc. or its affiliates. As an Amazon Associate we earn affiliate commissions from qualifying purchases.