In the dynamic world of technology, data reigns supreme. From powering vast social networks to enabling intricate e-commerce platforms and managing enterprise resources, databases are the invisible engines driving nearly every digital interaction. Among the pantheon of database management systems, MySQL stands out as a colossal and enduring force. It’s an open-source relational database management system (RDBMS) that has been the backbone for countless applications, both small-scale and colossal, thanks to its robust performance, reliability, and ease of use. If you’re venturing into web development, data science, or simply seeking to master essential software for your tech toolkit, understanding how to install and configure MySQL is a fundamental skill.

This comprehensive guide is designed to demystify the installation process across the most common operating systems: Windows, macOS, and Linux. Whether you’re a seasoned developer or just starting your journey into the world of databases, mastering MySQL installation is a critical step. Beyond the technical specifics, we’ll also touch upon why MySQL remains a critical component in the modern tech landscape, its implications for businesses and personal productivity, and the crucial steps for securing your newly installed database – a vital aspect of digital security in today’s interconnected environment. Prepare to unlock the power of data management as we embark on this detailed tutorial.
Understanding MySQL: The Backbone of Data Management
Before diving into the nuts and bolts of installation, it’s essential to grasp what MySQL is and why its presence is so pervasive in the digital realm. MySQL, originally created by MySQL AB and now owned by Oracle Corporation, is a mature and highly optimized RDBMS that uses Structured Query Language (SQL) for managing and manipulating data. Its open-source nature has fostered a massive community, leading to extensive documentation, abundant resources, and continuous innovation.
Why MySQL Reigns Supreme in the Tech Landscape
MySQL’s enduring popularity isn’t accidental; it’s a direct result of several compelling advantages that align perfectly with modern technology trends and business needs.
Firstly, its performance and scalability are remarkable. MySQL can handle colossal amounts of data and thousands of concurrent users, making it suitable for everything from a personal blog to high-traffic websites like Facebook, YouTube, and various enterprise applications. This scalability is a key factor for businesses aiming for growth, ensuring their digital infrastructure can keep pace with increasing demands.
Secondly, its reliability and data integrity are paramount. MySQL enforces ACID (Atomicity, Consistency, Isolation, Durability) properties in its transactions, guaranteeing that data remains accurate and consistent even in the event of system failures. For any brand, maintaining the integrity of customer data, financial records, or operational information is non-negotiable. A robust database system like MySQL directly contributes to a brand’s reputation and trustworthiness.
Thirdly, the cost-effectiveness of MySQL is a significant draw. As an open-source solution, the community edition is free to use, which drastically reduces the initial investment for startups and small businesses. While enterprise versions offer additional features and support, the foundational technology is accessible to everyone. This aspect ties directly into the ‘Money’ topic of our website, as it empowers individuals and businesses to leverage powerful database technology without incurring prohibitive licensing fees, thus optimizing financial resources.
Finally, ease of use and extensive compatibility with programming languages (like PHP, Python, Java, Node.js) and operating systems make it incredibly versatile. For developers, this translates into higher productivity and less friction when integrating MySQL into various applications. Furthermore, the strong community support means that solutions to common issues are readily available, saving time and reducing troubleshooting costs. In an era of AI tools and complex software ecosystems, having a stable, well-understood database component simplifies development and deployment considerably.
Prerequisites and Preparation
Before initiating the installation, a brief check of your system and some preparatory steps can smooth the process:
- Operating System: Ensure your OS (Windows, macOS, Linux distribution like Ubuntu, Debian, CentOS, Fedora) is up-to-date.
- System Resources: While MySQL can run on modest hardware, allocate sufficient RAM and disk space, especially for production environments. A minimum of 2GB RAM is generally recommended for development, with significantly more for production.
- Administrative Privileges: You’ll need administrator rights on Windows or sudo privileges on Linux/macOS to perform the installation.
- Internet Connection: Required for downloading installers or packages.
- Existing Installations: If you have a previous MySQL installation, consider backing up data and fully uninstalling it to avoid conflicts, unless you intend to run multiple versions (which is an advanced scenario).
Step-by-Step Installation Guides Across Platforms
The installation process for MySQL varies significantly depending on your operating system. We’ll cover the most common and recommended methods for each platform.
Installing MySQL on Windows: The Graphical Installer Approach
For Windows users, the easiest and most recommended method is to use the MySQL Installer for Windows. This comprehensive package allows you to install not only the MySQL server but also other essential components like MySQL Workbench (a graphical tool for database administration), command-line clients, and connectors for various programming languages.
-
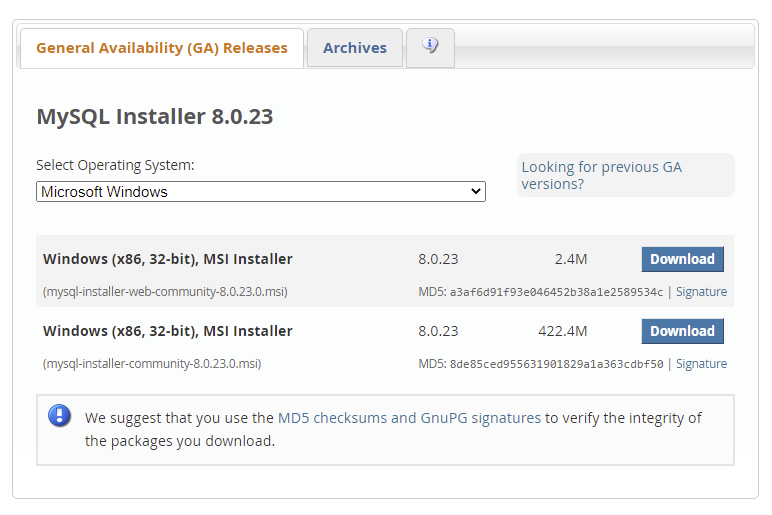
Download the MySQL Installer:
- Navigate to the official MySQL Community Downloads page:
dev.mysql.com/downloads/installer/. - Choose the “Windows (x86, 64-bit), MySQL Installer MSI” option. You’ll typically want the “Web Community” version, which is smaller and downloads only the components you select, or the “Full” version if you want everything pre-packaged. Download the
mysql-installer-community-x.x.x.x.msifile.
- Navigate to the official MySQL Community Downloads page:
-
Run the Installation Wizard:
- Double-click the downloaded MSI file to launch the installer.
- Choose a Setup Type:
- Developer Default: Installs MySQL Server, Workbench, Shell, Router, Connectors, Documentation, and Samples. This is usually the best choice for developers.
- Server Only: Installs only the MySQL server.
- Client Only: Installs only the client tools.
- Full: Installs all available MySQL products.
- Custom: Allows you to manually select the products you want to install.
- For most users, Developer Default is sufficient. Click “Next.”
- Check Requirements: The installer will check for necessary prerequisites (like Visual C++ Redistributable). If any are missing, it will prompt you to install them. Follow the instructions to resolve any dependencies.
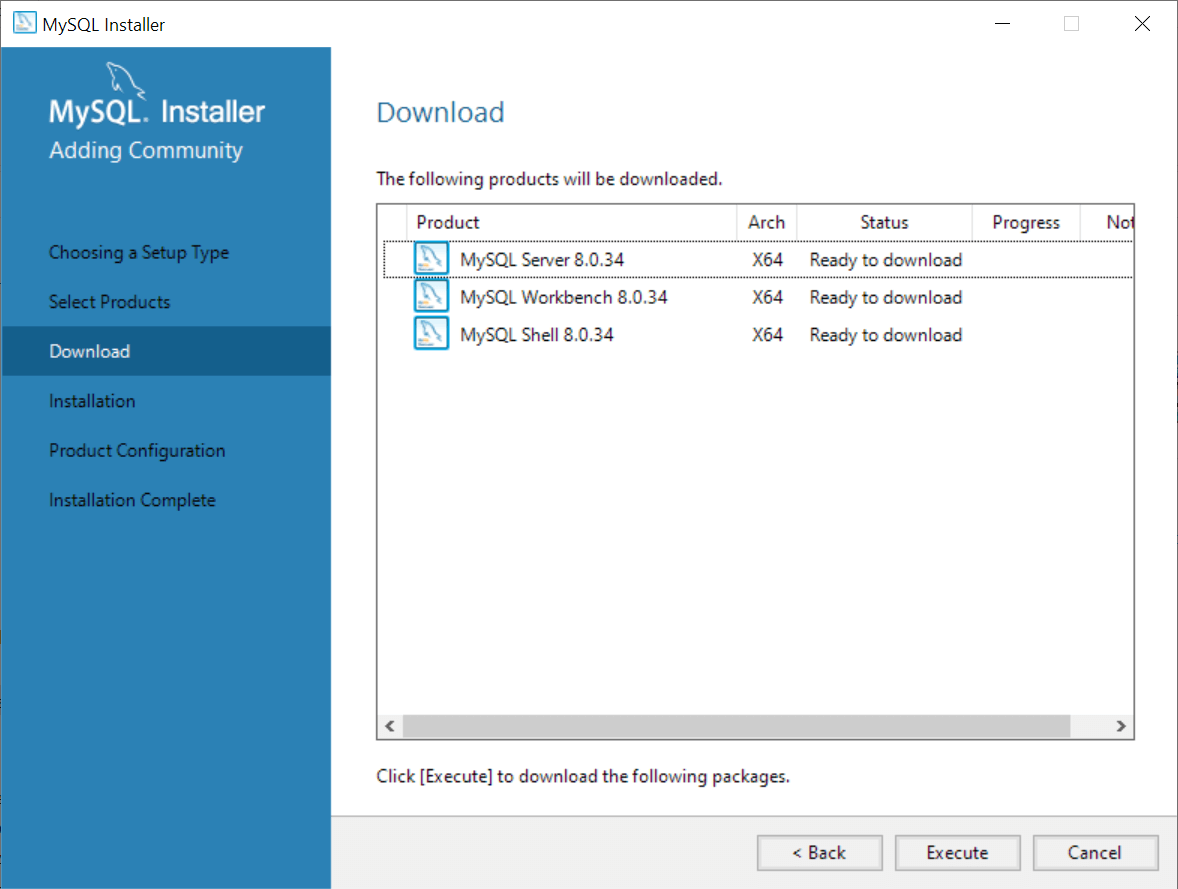
- Installation: Review the list of products to be installed and click “Execute.” The installer will download and install the selected components.
-
Product Configuration:
- After installation, the “Product Configuration” phase begins. Select “MySQL Server” and click “Next.”
- High Availability: Choose “Standalone MySQL Server / Classic MySQL Replication” for a typical setup. Click “Next.”
- Type and Networking:
- Config Type: Select “Development Computer” for a local development environment. For production, choose “Server Computer” or “Dedicated Computer.”
- Port: The default port is
3306. It’s generally safe to keep this unless it conflicts with another service. - Open Windows Firewall port for network access: Ensure this is checked if you need to connect to MySQL from other machines or applications. Click “Next.”
- Authentication Method:
- Use Strong Password Encryption for Authentication (Recommended): This is the default and most secure option. Keep this selected.
- Use Legacy Authentication Method (MySQL 5.x Compatible): Only use this if you have legacy applications that require it, as it’s less secure. Click “Next.”
- Accounts and Roles:
- MySQL Root Password: This is critically important. Enter a strong password for the
rootuser and confirm it. Remember this password, as it’s required for administrative tasks. - MySQL User Accounts: You can add additional user accounts with specific roles here if needed. For now, the
rootuser is sufficient. Click “Next.”
- MySQL Root Password: This is critically important. Enter a strong password for the
- Windows Service:
- Configure MySQL Server as a Windows Service: Check this box so MySQL starts automatically when Windows boots.
- Service Name: Leave as default (
MySQL). - Standard System Account: Use this for simplicity unless specific security requirements dictate otherwise. Click “Next.”
- Apply Configuration: Review your choices and click “Execute.” The installer will apply the configurations. Once all steps show “Completed,” click “Finish.”
- Router Configuration (if selected): If you chose to install MySQL Router, you’ll go through a similar configuration for it.
- Connect to Server: If MySQL Workbench was installed, you might be prompted to connect to the server. Enter the
rootpassword you set earlier.
-
Post-Installation Checks:
- Open the Command Prompt as an administrator.
- Navigate to the MySQL bin directory (e.g.,
cd "C:Program FilesMySQLMySQL Server 8.0bin"). - Run
mysql -u root -pand enter your root password. If you see themysql>prompt, your installation is successful. Typeexitto quit.
Installing MySQL on macOS: Simplicity with Homebrew or DMG
macOS users have a couple of popular options: using the package manager Homebrew for a developer-friendly approach or the traditional DMG archive.
Using Homebrew (Recommended for Developers)
Homebrew is a highly recommended package manager for macOS, known for its simplicity and efficiency. It allows you to install developer tools with single commands, enhancing productivity.
-
Install Homebrew (if not already installed):
- Open your Terminal (Applications > Utilities > Terminal).
- Run the command:
/bin/bash -c "$(curl -fsSL https://raw.githubusercontent.com/Homebrew/install/HEAD/install.sh)" - Follow the on-screen instructions, which may include installing Xcode Command Line Tools.
-
Install MySQL via Homebrew:
- In the Terminal, execute:
brew install mysql - Homebrew will download and install the latest stable version of MySQL.
- In the Terminal, execute:
-
Start MySQL Service:
- To start MySQL immediately:
brew services start mysql - To stop:
brew services stop mysql - To restart:
brew services restart mysql - MySQL will now automatically start when your Mac boots.
- To start MySQL immediately:
-
Secure the Installation:
- Run the security script:
mysql_secure_installation - This script will guide you through setting a strong
rootpassword, removing anonymous users, disallowing remoterootlogin, removing test databases, and reloading privilege tables. Answer ‘Y’ to the prompts to enhance digital security.
- Run the security script:
Using the DMG Archive
This method involves downloading a .dmg file and using a graphical installer, similar to Windows.
- Download the DMG Archive:
- Go to
dev.mysql.com/downloads/mysql/. - Select “macOS” from the operating system dropdown.
- Download the
.dmgarchive for your macOS version (e.g., “macOS 14 (ARM64)” for Apple Silicon or “macOS 14 (x86, 64-bit)” for Intel).
- Go to
-
Run the Installer:
- Double-click the downloaded
.dmgfile to mount it. - Double-click the
mysql-x.x.x-macos.pkgfile inside the mounted disk image. - Follow the steps in the installation wizard.
- Introduction, License, Destination Select: Proceed through these standard steps.
- Installation Type: Click “Install.”
- Configuration: During or after installation, you will be prompted to set the initial
rootpassword. Choose “Use Strong Password Encryption (Recommended)” and set a strong password. Note this password carefully. - If prompted about
Launchd, choose to have MySQL start automatically at startup.
- Double-click the downloaded
-
Add MySQL to your PATH (Optional but Recommended):
- This allows you to run MySQL commands from any directory in the Terminal without specifying the full path.
- Find your shell configuration file:
.bash_profile,.zshrc, or.profilein your home directory. - Open it with a text editor:
nano ~/.zshrc(if you use Zsh). - Add the following line (adjust version number if needed):
export PATH="/usr/local/mysql/bin:$PATH" - Save and exit (Ctrl+X, Y, Enter for Nano).
- Apply the changes:
source ~/.zshrc
-
Secure the Installation:
- Open Terminal and run:
mysql_secure_installation - Enter the
rootpassword you set during the installation. - Follow the prompts to secure your installation (setting password validation policy, removing anonymous users, disallowing remote root login, etc.).
- Open Terminal and run:
Installing MySQL on Linux: Command-Line Mastery
Linux users typically install MySQL using their distribution’s package manager, offering a streamlined and integrated approach. We’ll cover Ubuntu/Debian (using apt) and RHEL/CentOS/Fedora (using yum/dnf).
Ubuntu/Debian (APT Package Manager)
-
Update Package Lists:
- Open your terminal.
sudo apt update
-
Install MySQL Server:
sudo apt install mysql-server- During the installation, you might be prompted to set a
rootpassword. If so, create a strong one. If not, themysql_secure_installationscript will handle it.
-
Check Service Status:
sudo systemctl status mysql- You should see
active (running).
-
Initial Security Configuration:
sudo mysql_secure_installation- This script is crucial for securing your MySQL installation.
- VALIDATE PASSWORD COMPONENT: You’ll be asked if you want to set up the password validation policy. It’s highly recommended to enable this for stronger passwords, aligning with digital security best practices.
- Set a strong
rootpassword (if not prompted duringapt install). - Answer ‘Y’ to remove anonymous users, disallow remote
rootlogin, remove the test database, and reload privilege tables.
RHEL/CentOS/Fedora (YUM/DNF Package Manager)
-
Add MySQL Repository:
- First, download and install the MySQL Yum repository configuration file from the official MySQL website. Replace
x.xwith the desired MySQL version (e.g.,8.0). sudo dnf install https://dev.mysql.com/get/mysql80-community-release-el8-1.noarch.rpm(for RHEL 8/CentOS 8/Fedora)- For older versions (RHEL 7/CentOS 7):
sudo yum install https://dev.mysql.com/get/mysql80-community-release-el7-1.noarch.rpm
- First, download and install the MySQL Yum repository configuration file from the official MySQL website. Replace
-
Install MySQL Server:
sudo dnf install mysql-server(orsudo yum install mysql-serverfor older systems).- Accept the GPG key if prompted.
-
Start MySQL Service:
sudo systemctl start mysqldsudo systemctl enable mysqld(to start on boot)
-
Retrieve Temporary Root Password:
- For fresh installations, MySQL generates a temporary
rootpassword and stores it in the error log. sudo grep 'temporary password' /var/log/mysqld.log- Copy this password.
- For fresh installations, MySQL generates a temporary
-
Initial Security Configuration:
sudo mysql_secure_installation- When prompted for the current
rootpassword, paste the temporary password you retrieved. - You will then be forced to set a new, strong
rootpassword. - Proceed with the remaining prompts to secure your installation (password validation, remove anonymous users, disallow remote
rootlogin, remove test database, reload privilege tables).
Post-Installation Essentials: Securing and Verifying Your MySQL Setup
Installing MySQL is only half the battle. Properly securing and verifying its operation is paramount for any production environment and even for development, ensuring your data is protected and the service is running as expected. This aligns directly with the “Digital Security” aspect of our website’s Tech focus.
Hardening Your MySQL Installation: Crucial for Digital Security
A default MySQL installation, while functional, might not be fully secure. The mysql_secure_installation script (which you should have run) is a great start, but here are some additional considerations:
- Strong Password Policies: Beyond the
rootpassword, ensure all user accounts have strong, unique passwords. Implement password validation components if your installation didn’t prompt for it. Regular password rotation is also a good practice. - User Management and Permissions:
- Principle of Least Privilege: Never grant more privileges than necessary. Each application or user should have its own specific MySQL user account with only the permissions required for its tasks (e.g.,
SELECT,INSERT,UPDATEon specific databases/tables, but notDROPorGRANT). - Remove Unnecessary Users: Delete any default or test users that are not explicitly needed.
ALTER USER 'your_user'@'localhost' IDENTIFIED BY 'new_strong_password';REVOKE ALL PRIVILEGES ON *.* FROM 'unnecessary_user'@'%';DROP USER 'unnecessary_user'@'%';
- Principle of Least Privilege: Never grant more privileges than necessary. Each application or user should have its own specific MySQL user account with only the permissions required for its tasks (e.g.,
- Network Access Control:
- Bind Address: By default, MySQL might listen on all available network interfaces (
0.0.0.0). For most development setups, it’s safer to bind to127.0.0.1(localhost) to prevent external connections. Edit themy.cnf(Linux) ormy.ini(Windows) file:
bind-address = 127.0.0.1 - Restart the MySQL service after making changes.
- Firewall Configuration: Configure your operating system’s firewall (e.g., Windows Defender Firewall,
ufwon Linux,pfon macOS) to only allow connections to MySQL port3306from trusted IP addresses or internal networks.
- Bind Address: By default, MySQL might listen on all available network interfaces (
- Logging: Enable and regularly review MySQL’s error logs, general query logs, and slow query logs. These provide invaluable insights into database activity, potential security breaches, and performance bottlenecks.
- Regular Backups: Implement a robust backup strategy. Data loss can be catastrophic for any brand or business. Regular backups are a non-negotiable part of financial stability and data recovery.
Verifying MySQL Service and Connectivity
Once installed and secured, it’s crucial to confirm that your MySQL server is running correctly and that you can connect to it.
-
Checking Service Status:
- Windows: Open “Services” (search for it in the Start menu). Look for “MySQL” (or
MySQL80). Its status should be “Running.” You can start, stop, or restart it from here. - macOS (Homebrew):
brew services listorbrew services status mysql - Linux:
sudo systemctl status mysql(ormysqldfor RHEL/CentOS)
- Windows: Open “Services” (search for it in the Start menu). Look for “MySQL” (or
-
Connecting via Command Line Client:
- Open your terminal or command prompt.
mysql -u root -p- When prompted, enter the
rootpassword you set during installation. - If successful, you’ll see the
mysql>prompt. This indicates you’ve successfully connected to your database server. - You can run simple SQL commands to test:
SHOW DATABASES;SELECT VERSION();
- Type
exitand press Enter to disconnect.
Troubleshooting Common Installation Hiccups & Next Steps
Even with the best instructions, installations can sometimes encounter unexpected issues. Knowing how to troubleshoot common problems can save considerable time and frustration, enhancing your overall productivity.
Addressing Installation Errors and Access Issues
- Port Conflicts: If MySQL fails to start, another service might be using port
3306. Check logs for messages like “Can’t start server: Bind on TCP/IP port: Address already in use.” You can either stop the conflicting service or change MySQL’s port in its configuration file (my.cnformy.ini). - Firewall Blocks: If you can’t connect remotely, your OS firewall is likely blocking connections. Ensure port
3306is open for incoming TCP connections. - Missing Libraries/Dependencies: On Linux, ensure all necessary libraries are installed.
aptoryum/dnfusually handle this, but manual tarball installations might require additional dependency resolution. - Forgotten Root Password:
- Windows: You can re-run the MySQL Installer and select “Reconfigure” for the MySQL Server component.
- macOS/Linux: Stop the MySQL server. Start it with the
--skip-grant-tablesoption (allowing root access without password). Connect, reset the password, then restart MySQL normally. Be extremely cautious as this temporarily bypasses security.
Access deniedErrors: Double-check the username and password. Ensure the user has privileges from the host you are connecting from (e.g.,user@'localhost'vs.user@'%').
Leveraging Your New MySQL Database
Congratulations! You’ve successfully installed and secured MySQL. This foundational step opens up a world of possibilities:
- Database Design: Learn to design efficient database schemas using MySQL Workbench or other ERD tools.
- Application Integration: Connect your installed MySQL server with popular programming languages and frameworks (e.g., Python with Django/Flask, PHP with Laravel, Node.js with Express and Sequelize/TypeORM).
- Data Analysis: Use SQL queries to extract insights from your data, a crucial skill for data scientists and business intelligence professionals.
- Career Opportunities: Proficiency in MySQL is a highly valued skill for database administrators, back-end developers, and data analysts, directly impacting your potential for online income and career growth within the tech sector.
The ability to manage and interact with databases is indispensable in today’s digital economy. By mastering the installation of MySQL, you’ve taken a significant step towards becoming more proficient in managing the digital assets that power modern technology.
In conclusion, installing MySQL is a critical gateway to robust data management, whether for personal projects, academic endeavors, or building the next generation of web applications. The detailed steps outlined for Windows, macOS, and Linux, combined with essential security and verification practices, provide a solid foundation. Remember, a well-configured and secure database is not just a technical detail; it’s a strategic asset that underpins the reliability of your software, the trustworthiness of your brand, and the financial health of your operations. Continue to explore, experiment, and learn, as the world of databases is vast and constantly evolving.
aViewFromTheCave is a participant in the Amazon Services LLC Associates Program, an affiliate advertising program designed to provide a means for sites to earn advertising fees by advertising and linking to Amazon.com. Amazon, the Amazon logo, AmazonSupply, and the AmazonSupply logo are trademarks of Amazon.com, Inc. or its affiliates. As an Amazon Associate we earn affiliate commissions from qualifying purchases.