Fiber Reinforced Plastic (FRP) panels are an increasingly popular choice for a wide range of commercial and residential applications, offering a compelling blend of durability, hygiene, and aesthetic appeal. From bustling restaurant kitchens and sterile hospital environments to high-traffic bathrooms and utility rooms in homes, FRP panels provide a robust, moisture-resistant, and easy-to-clean surface solution. Understanding how to properly install these panels is crucial to harnessing their full potential, ensuring longevity, and achieving a professional finish. This comprehensive guide will walk you through the entire process, transforming what might seem like a daunting task into an achievable DIY project, or at least providing the knowledge to oversee a professional installation effectively.
The decision to install FRP panels often stems from a need for a resilient surface that can withstand moisture, impact, and frequent cleaning without deteriorating. Unlike traditional drywall or tiles, FRP offers superior protection against mold and mildew, making it ideal for environments where sanitation is paramount. Moreover, its flexibility and ease of maintenance present a significant advantage, often translating into long-term cost savings – a smart financial move for any property owner. By leveraging modern installation techniques and tools, what might once have been a specialized job is now accessible to the informed individual, aligning perfectly with the “Tech” aspect of smart home improvements and productivity hacks.
Preparing for a Flawless FRP Panel Installation
The success of any FRP panel installation hinges significantly on thorough preparation. Skipping steps here can lead to frustrating issues down the line, such as uneven surfaces, poor adhesion, or panels detaching prematurely. Think of this stage as laying the digital foundation for a robust software application; without meticulous planning and robust code, the system is prone to bugs. Similarly, a well-prepared surface and the right tools are your bug-free code for FRP installation.
Assembling Your Essential Tools and Materials
Before you even think about cutting the first panel, ensure you have all the necessary tools and materials readily available. This not only streamlines the process but also prevents costly delays and multiple trips to the hardware store.
- FRP Panels: Measure your walls accurately and purchase panels, accounting for cuts, waste, and potential errors. It’s always wise to have a little extra.
- FRP Adhesive: There are various types, including water-based mastic adhesives and solvent-based construction adhesives. Choose one specifically designed for FRP panels and compatible with your substrate. Always refer to the manufacturer’s recommendations.
- Trowel: The adhesive manufacturer will specify the correct notch size for the trowel. This is critical for applying the adhesive evenly and at the correct thickness, ensuring maximum bond.
- J-Roller (or Laminate Roller): Essential for pressing the panels firmly onto the adhesive and eliminating air bubbles, guaranteeing full contact and preventing delamination.
- Trim Pieces: Depending on your installation, you’ll need various FRP trim pieces such as inside corners, outside corners, division bars (H-molds), and end caps. These provide a professional finish and protect panel edges.
- Caulk Gun and Silicone Caulk: For sealing seams, corners, and around fixtures. Choose a mold-resistant, waterproof silicone sealant that matches your panels or trim.
- Measuring Tools: A tape measure, a long straightedge (like a 4-foot level or a metal ruler), and a carpenter’s square are indispensable for accurate measurements and straight cuts.
- Cutting Tools: A utility knife with multiple sharp blades is suitable for scoring and snapping thinner FRP panels. For thicker panels or intricate cuts, a fine-tooth saw blade (like a carbide-tipped plywood blade) on a circular saw, jigsaw, or table saw is recommended.
- Safety Gear: Always wear safety glasses, gloves, and a dust mask, especially when cutting panels, as FRP dust can be irritating.
- Cleaning Supplies: Rags, sponges, and a mild cleaner for surface preparation and post-installation cleanup.
- Fasteners (Optional): While adhesive is the primary bonding agent, some installations may benefit from mechanical fasteners (like rivets or screws with washers) for added security, especially in high-stress areas or if the substrate isn’t perfectly flat.
- Laser Level or Chalk Line: For establishing perfectly straight reference lines, crucial for ensuring your panels are aligned horizontally and vertically.
Masterful Surface Preparation
The condition of your substrate (the wall surface) directly impacts the adhesion and appearance of your FRP panels. A clean, dry, and structurally sound surface is non-negotiable.
- Clean the Surface Thoroughly: Remove any dirt, grease, oil, old wallpaper, loose paint, or debris. A degreaser or mild detergent followed by a thorough rinse and drying is often necessary. Residual contaminants will prevent the adhesive from bonding properly.
- Repair and Level Imperfections: Patch any holes, cracks, or significant depressions in the wall using a suitable patching compound. Sand down any bumps or high spots. FRP panels are flexible, but they will conform to major imperfections, leading to an uneven and unsightly finish. Aim for a surface that is as flat and smooth as possible.
- Ensure Dryness: Moisture is the enemy of adhesion. The wall must be completely dry before installation. If there’s any concern about latent moisture, consider using a moisture meter.
- Prime if Necessary: Some substrates, like bare drywall or very porous surfaces, might benefit from a primer specifically recommended for use with FRP adhesives. Primer can improve adhesion and prevent the substrate from absorbing too much adhesive.
- Remove Obstructions: Take off electrical outlet covers, switch plates, light fixtures, and any other wall-mounted items that will be covered by the panels.
- Establish Reference Lines: Use a laser level or a chalk line to mark a perfectly plumb (vertical) line and a level (horizontal) line on the wall. This will serve as your starting point and guide for keeping panels straight. Often, it’s best to start in a corner or an inconspicuous area, working outwards.
The Step-by-Step Guide to FRP Panel Application
With preparation complete, you’re ready to begin the actual installation. This phase requires precision, patience, and adherence to best practices to ensure a durable and aesthetically pleasing result.
Precision Cutting and Sizing
Accurate cutting is paramount for a professional look, minimizing gaps and waste.
- Measure Twice, Cut Once: This old adage is particularly true for FRP. Carefully measure the area where each panel will go, accounting for any trim pieces that will overlap the panel edges. Remember to allow for small expansion gaps (typically 1/16 to 1/8 inch) around the perimeter and between panels if using division bars, as temperature fluctuations can cause slight expansion and contraction.
- Marking the Panels: Transfer your measurements onto the FRP panel using a pencil or marker and a straightedge.
- Cutting Techniques:
- Utility Knife (for thinner panels): Place the panel on a stable, flat surface. Score along your marked line several times with firm, even pressure using a sharp utility knife and a straightedge. Once deeply scored, you can often snap the panel along the line. Smooth any rough edges with sandpaper or a sanding block.
- Power Saws (for thicker panels or intricate cuts): Use a circular saw, jigsaw, or table saw equipped with a fine-tooth, carbide-tipped blade (often recommended for plastic laminates or plywood). Support the panel fully to prevent chipping and vibration. Cut slowly and steadily. For intricate cuts around outlets or fixtures, a jigsaw is ideal. Always cut from the finished side to minimize chipping on the visible surface.
- Dry Fit: Before applying adhesive, it’s highly recommended to dry-fit each cut panel into its intended position. This allows you to check for fit, make any necessary adjustments, and ensure all trim pieces align correctly.
Adhesive Application Techniques
The adhesive is the “glue” that holds your project together, so proper application is critical.
- Read Adhesive Instructions: Different adhesives have varying open times (how long they remain workable before skinning over) and curing times. Always follow the manufacturer’s specific instructions.
- Prepare the Adhesive: If it’s a two-part adhesive, mix it thoroughly according to directions.
- Apply to the Back of the Panel: Generally, FRP adhesive is applied to the back of the panel, not the wall. This allows for better control and even coverage.
- Use the Correct Trowel: Load your trowel with adhesive and spread it evenly across the entire back surface of the panel. Hold the trowel at a 45-degree angle to create consistent ridges of adhesive. The goal is 100% coverage, leaving no bare spots that could lead to bubbles or detached areas. Ensure the adhesive is spread from edge to edge.
- Work in Manageable Sections: Apply adhesive to one panel at a time, especially if working with a faster-setting adhesive or if you’re new to the process. This ensures you have enough time to place and roll the panel before the adhesive starts to skin over.
Panel Placement and Alignment
This is where your preparation and precision cutting pay off.
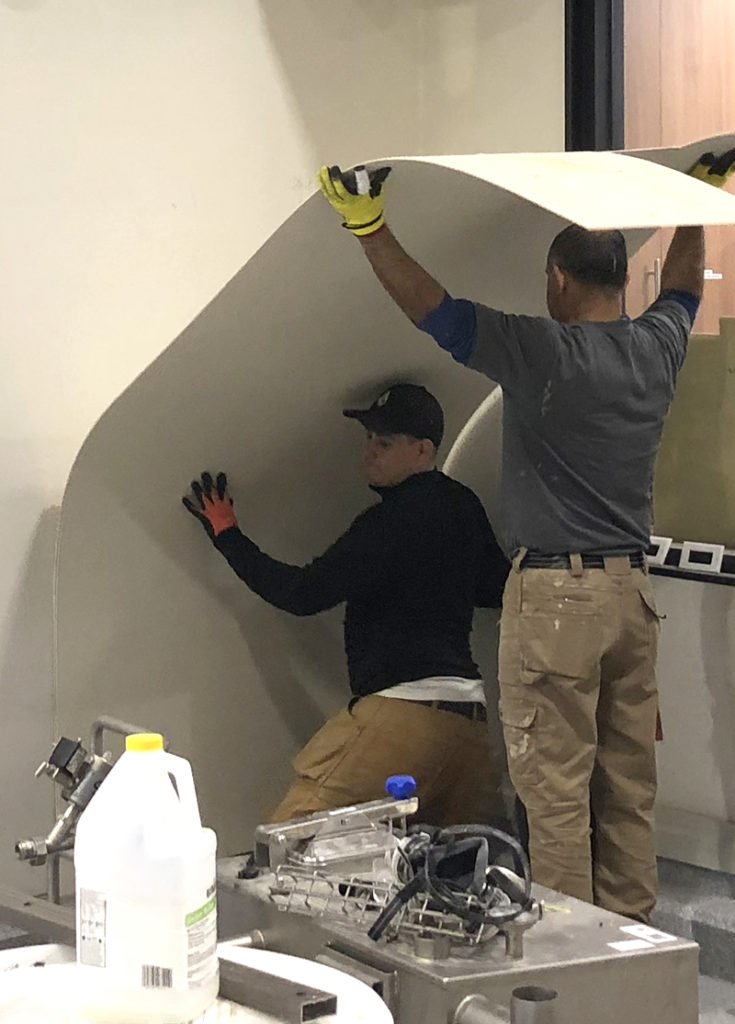
- Careful Placement: Lift the panel and carefully align its edges with your established reference lines or the previously installed panel. Gently press the panel into place, ensuring it’s positioned correctly.
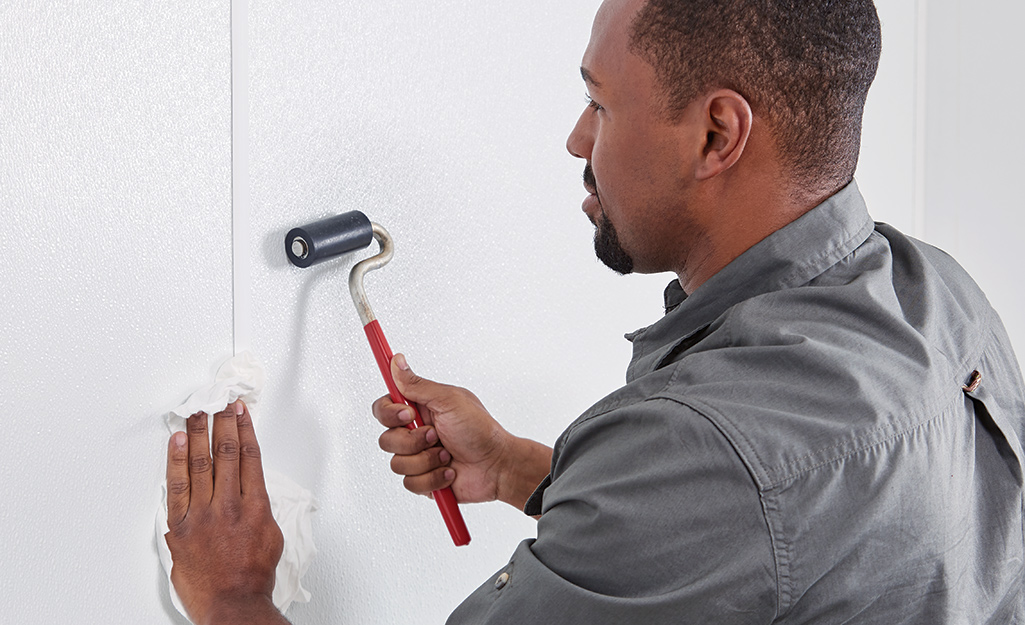
- Firm Pressure and Rolling: Once the panel is in position, immediately use your J-roller (laminate roller) to apply firm, even pressure across the entire surface of the panel. Roll from the center outwards to push out any trapped air bubbles and ensure full adhesive transfer. Pay particular attention to the edges and corners.
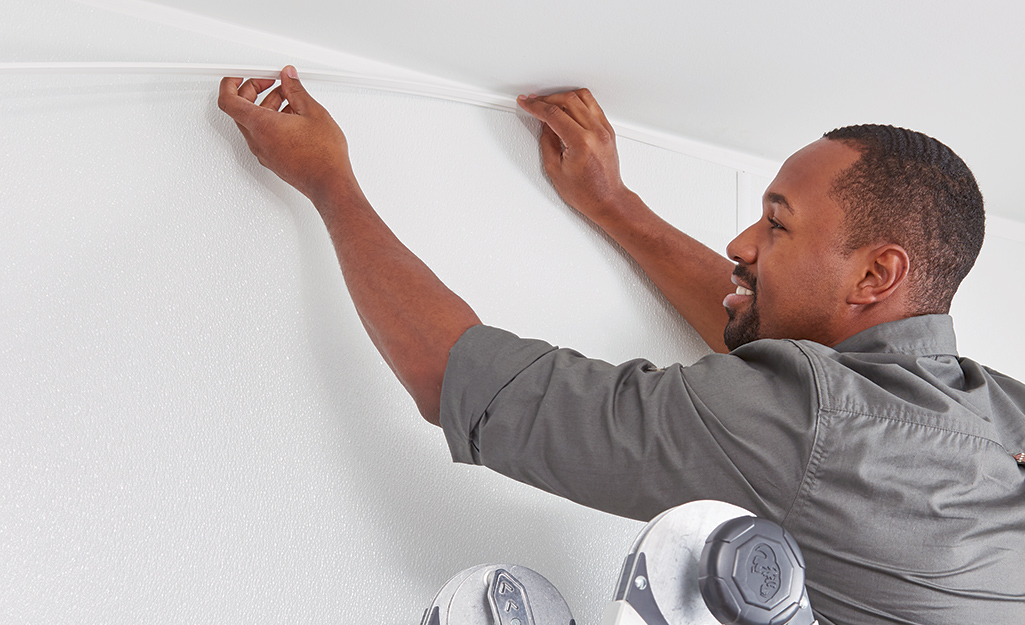
- Install Trim Pieces as You Go: If using division bars (H-molds), you’ll often install them between panels as you work your way across the wall. Slide the edge of the newly installed panel into one side of the division bar, then apply adhesive to the next panel and slide it into the other side of the bar. For corners and end caps, these are typically installed after the adjacent panels are in place, often with adhesive and/or mechanical fasteners.
- Wipe Away Excess Adhesive: As you install, any adhesive that squeezes out from under the edges or through trim pieces should be wiped away immediately with a damp cloth or sponge before it cures.
Securing and Sealing Edges and Seams
The final touches make all the difference in both aesthetics and functionality.
- Install Remaining Trim: Once all panels are adhered, install any remaining trim pieces like inside corners, outside corners, and end caps. Apply a bead of adhesive to the back of the trim before pressing it into place. Some trims might also require mechanical fasteners for added security, especially in high-traffic or damp areas.
- Caulking and Sealing: After all panels and trim are securely in place and the adhesive has begun to set (check manufacturer’s instructions for timing), apply a continuous bead of silicone caulk along all seams, corners, and around any penetrations (like outlets or pipes). This creates a watertight seal, preventing moisture intrusion and inhibiting mold growth, which is critical for the hygienic benefits of FRP. Smooth the caulk bead with a moistened finger or a caulking tool for a clean, professional finish.
- Clean Up: Remove any excess caulk and thoroughly clean any adhesive residue from the panel surfaces.
Post-Installation Care and Long-Term Considerations
Your FRP panel installation isn’t truly complete until the adhesive has fully cured and you’ve taken steps to ensure its longevity. This phase is about safeguarding your investment and maximizing the benefits of your work.
Curing, Cleaning, and Initial Maintenance
Patience is a virtue, especially when it comes to adhesives.
- Allow for Full Curing: Adhesives require time to fully cure, which can range from 24 hours to several days, depending on the product and environmental conditions (temperature, humidity). Avoid exposing the newly installed panels to heavy moisture or impact during this critical period. Ensure adequate ventilation in the area during curing.
- Initial Cleaning: Once cured, perform a final cleaning of all panel surfaces. A mild, non-abrasive cleaner and a soft cloth are usually sufficient to remove any lingering dust, fingerprints, or light smudges. Avoid harsh chemicals or abrasive scrubbing pads that could damage the panel’s finish.
- Check for Imperfections: After cleaning, do a final inspection. Look for any areas where caulk might be missing or uneven, or where trim pieces aren’t fully secured. Address these minor issues promptly.
Maximizing Longevity and Value
FRP panels are renowned for their durability, but proper care ensures they provide maximum value over their lifespan, contributing to the “Money” aspect through reduced maintenance and replacement costs.
- Routine Cleaning: FRP panels are exceptionally easy to clean. Regular wiping with a damp cloth and mild soap is usually all that’s needed. For tougher stains, consult the panel manufacturer’s guidelines for recommended cleaners. Avoid abrasive cleaners, scouring pads, or solvents like acetone, which can damage the panel surface.
- Inspect Seals Periodically: Over time, caulk lines can degrade or crack, especially in areas with significant temperature fluctuations or movement. Periodically inspect all sealed seams and recaulk as necessary to maintain a watertight and hygienic barrier. This proactive approach prevents costly water damage and mold growth.
- Understanding FRP’s Benefits: Remind yourself of why you chose FRP. Its impact resistance means fewer dents and dings than drywall. Its non-porous surface makes it inherently hygienic, preventing bacterial growth – a significant “Tech” advantage in cleanliness. Its moisture resistance protects your underlying structure, saving future repair costs (“Money”).
- Efficiency and Property Value: A well-installed FRP system enhances the efficiency of a space by making it easier to clean and maintain. For businesses, this translates to faster turnaround times for sanitation and reduced labor costs. For homes, it means a healthier environment and more time saved on chores. Furthermore, the modern, clean finish provided by properly installed FRP can subtly increase the perceived value and appeal of a property, a long-term “Money” benefit.
Conclusion
Installing FRP panels might seem like a specialized task, but with meticulous preparation, the right tools, and a systematic approach, it’s a highly achievable project for many DIY enthusiasts. From selecting the appropriate adhesive to ensuring every seam is perfectly sealed, each step plays a vital role in creating a durable, hygienic, and visually appealing surface.
By following this comprehensive guide, you’re not just putting up panels; you’re implementing a smart, long-term solution that protects your walls, simplifies maintenance, and enhances the overall functionality of your space. Whether you’re upgrading a commercial kitchen, renovating a bathroom, or fortifying a utility room, a properly executed FRP installation is an investment that pays dividends in longevity, hygiene, and peace of mind. Embrace the challenge, enjoy the process, and take pride in a job well done, leveraging modern materials and techniques for a truly productive outcome.
aViewFromTheCave is a participant in the Amazon Services LLC Associates Program, an affiliate advertising program designed to provide a means for sites to earn advertising fees by advertising and linking to Amazon.com. Amazon, the Amazon logo, AmazonSupply, and the AmazonSupply logo are trademarks of Amazon.com, Inc. or its affiliates. As an Amazon Associate we earn affiliate commissions from qualifying purchases.