The allure of Minecraft is undeniable, but for many, the true magic lies not just in the base game, but in the vast, ever-expanding universe of mods. These modifications can transform your gameplay experience, introducing new creatures, items, dimensions, and even entirely new mechanics. At the heart of many of these incredible transformations is Forge, the premier modding API for Minecraft. If you’ve ever wondered how to unlock this world of custom content, you’ve come to the right place. This guide will walk you through the process of installing Forge, ensuring you’re well on your way to a deeply personalized Minecraft adventure.

Our focus today is firmly rooted in the Tech pillar of our website, specifically within the realm of Software Tutorials and Digital Enhancement. While Forge itself doesn’t directly tie into Brand or Money, the communities that build and utilize mods often foster vibrant online brands and can even lead to opportunities for creators within the Online Income and Side Hustles categories. For now, though, let’s get down to the technical nuts and bolts.
Understanding Forge: The Gateway to Minecraft Modding
Before we dive into the installation process, it’s crucial to understand what Forge is and why it’s so important for Minecraft modding. Forge, short for Minecraft Forge, is a powerful open-source modding API (Application Programming Interface) that provides a framework for developers to create and integrate mods into Minecraft. Think of it as a standardized language and set of tools that allow mods to communicate with the game’s core code without directly altering it. This approach is vital because it ensures compatibility between different mods and prevents the game from breaking every time a new update is released.
Without Forge, installing mods would be a much more complex and often unstable process, requiring direct modification of game files. Forge simplifies this by offering a robust API that handles many of the underlying complexities, allowing modders to focus on their creative vision and players to enjoy a more seamless modding experience.
Why Mod Minecraft?
The reasons players choose to mod Minecraft are as diverse as the mods themselves. Here are a few compelling motivations:
- Enhanced Gameplay: Mods can introduce new challenges, mechanics, and goals, breathing new life into familiar gameplay loops. Imagine adding survival elements like realistic hunger, complex automation systems, or even entire questing systems.
- New Content: From mythical creatures and fantastical weapons to entirely new dimensions and biomes, mods can drastically expand the content available in your Minecraft world.
- Quality of Life Improvements: Many mods focus on making the game more user-friendly. This can include improved inventory management, enhanced visual effects, better mapping tools, or even simple quality-of-life tweaks that smooth out frustrating aspects of the vanilla game.
- Creative Expression: For players who enjoy building and designing, mods can provide an unprecedented array of new blocks, items, and tools to fuel their creativity.
- Technical Exploration: For aspiring programmers and tech enthusiasts, delving into Minecraft modding can be an excellent entry point into learning about software development, APIs, and game design.
Preparing for Installation: What You Need
Before you can embark on your modding journey, a few preparatory steps are necessary. These ensure a smooth installation process and minimize potential issues.
Ensure You Have Minecraft Installed
This might seem obvious, but it’s worth stating: you need a legitimate, installed copy of Minecraft Java Edition. Forge is designed to work with this version of the game. If you don’t have it already, you’ll need to purchase and download it from the official Minecraft website.
Identify Your Minecraft Version
This is perhaps the most critical step. Forge is version-specific. A Forge installer for Minecraft 1.18.2 will not work with Minecraft 1.19.3, and vice versa. You need to know which version of Minecraft you intend to play with mods. If you’re unsure, you can check your current Minecraft version by launching the game, and the version number will typically be displayed on the main menu screen.
Pro Tip: It’s generally recommended to stick to older, well-supported versions of Minecraft for modding, as newer versions might have less developed Forge support or fewer available mods. However, Forge support for newer versions is constantly improving.
Close Minecraft
Before running the Forge installer, ensure that Minecraft is completely closed. Running the game while the installer is active can lead to conflicts and errors.
Installing Forge: A Step-by-Step Tutorial
Now that you’re prepared, let’s walk through the actual installation process. This is a straightforward procedure that, when followed correctly, will have you ready to install mods in minutes.
Step 1: Download the Correct Forge Installer
- Visit the Official Forge Website: Navigate to the official Minecraft Forge website: https://files.minecraftforge.net/.
- Select Your Minecraft Version: On the left-hand side of the website, you’ll see a list of Minecraft versions. Click on the version of Minecraft for which you wish to install Forge.
- Choose Your Installer Type: Once you’ve selected a version, you’ll see two download options: “Download Recommended” and “Download Latest.”
- Recommended: This version is generally considered more stable and has been tested more extensively. It’s the preferred choice for most users, especially if you’re new to modding.
- Latest: This version contains the most recent features and bug fixes. While it might be more up-to-date, it could also be less stable.
For most users, downloading the “Recommended” version is the safest bet.
- Click “Installer”: Under your chosen version (Recommended or Latest), click the “Installer” button.
- Wait for the Ad: You’ll be taken to an advertisement page. Do NOT click on anything on this page except for the “SKIP” button that will appear in the top-right corner after a few seconds. Clicking on any other buttons or links on this page can lead to unwanted downloads or pop-ups.
- Save the Installer: Once you click “SKIP,” a JAR file will begin downloading. Save this file to a location you can easily find, such as your Desktop or a dedicated “Minecraft Mods” folder. The filename will typically start with “forge-” followed by the version numbers.
Step 2: Run the Forge Installer
- Locate the Downloaded JAR File: Find the Forge installer JAR file you just downloaded.
- Run as Administrator (Recommended): Right-click on the JAR file. From the context menu, select “Run as administrator.” This is a good practice to ensure the installer has the necessary permissions to modify your Minecraft installation. If you don’t see “Run as administrator,” try simply double-clicking the file.
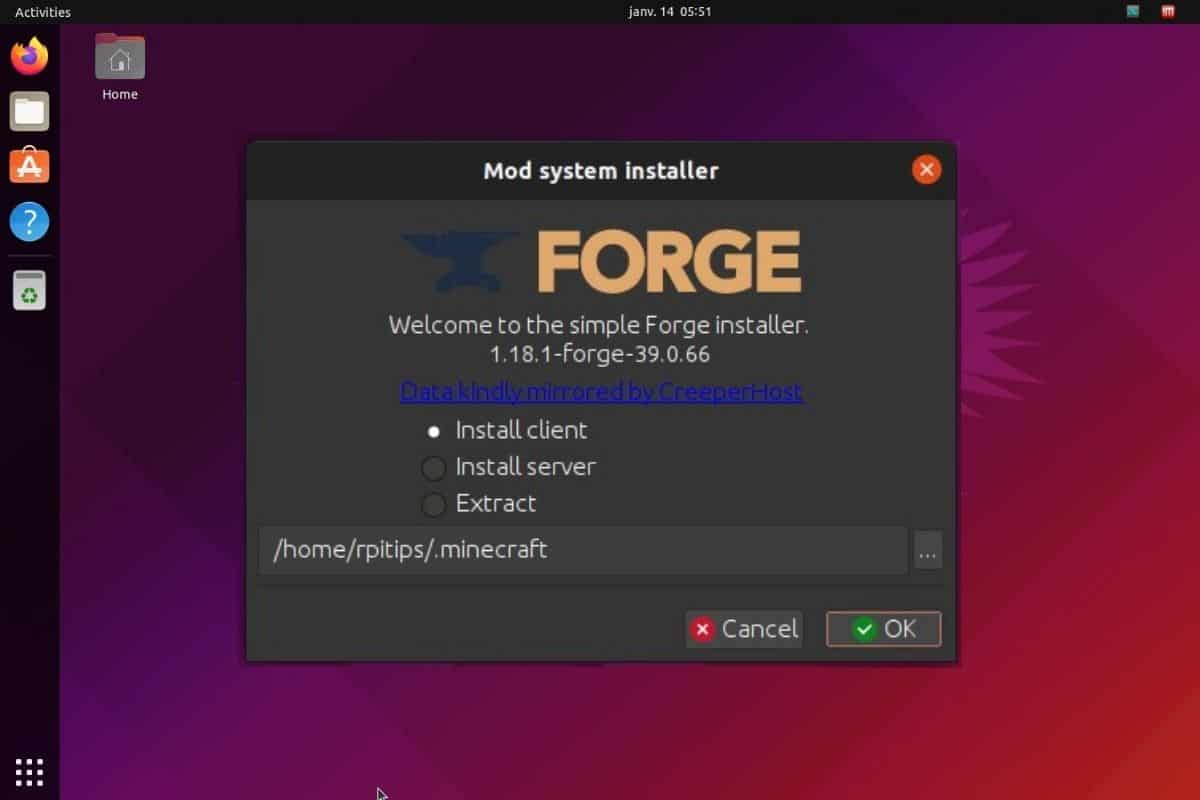
- The Forge Installer Window: A Forge installer window will pop up. You’ll see a few options:
- Install Client: This is the most common option and is what you’ll need to install Forge for playing the game with mods.
- Install Server: This option is for setting up a dedicated Forge server.
- Modpack: This option is usually for installing modpacks that have their own dedicated installers.
- Ensure “Install Client” is Selected: Make sure “Install client” is highlighted.
- Confirm Installation Directory: The installer will usually detect your default Minecraft installation directory correctly. If you have Minecraft installed in a non-standard location, you may need to browse and select the correct directory.
- Click “OK”: Click the “OK” button to begin the installation process.
- Wait for Completion: The installer will download necessary files and install Forge. You’ll see a progress bar. Once it’s finished, you’ll receive a success message. Click “OK” to close the installer.
Step 3: Launch Minecraft with Forge
- Open the Minecraft Launcher: Launch the official Minecraft Launcher.
- Select the Forge Profile: At the bottom-left of the launcher, you should see a dropdown menu for game versions. Click on it, and you should find a new profile labeled “forge” followed by the version number you installed (e.g., “forge-1.19.2”). Select this profile.
- Play: Click the “Play” button.
Minecraft will now launch with Forge installed. You might notice a slightly different loading screen, and in the main menu, you’ll typically see “Forge” displayed alongside the version number, indicating that the installation was successful. You should also see a new “Mods” button on the main menu.
Post-Installation: Organizing Your Mods and Troubleshooting
With Forge successfully installed, you’re ready to start populating your game with mods. However, a few points about managing mods and common issues are worth addressing.
The “mods” Folder
When you launch Minecraft with Forge for the first time after installation, Forge automatically creates a “mods” folder within your Minecraft directory. This is where you will place all of your downloaded mod JAR files.
To find your Minecraft directory:
- Windows: Press
Windows Key + R, type%appdata%.minecraft, and press Enter. - macOS: In Finder, click “Go” in the menu bar, hold down the Option key, and click “Library.” Then navigate to
Application Support/minecraft. - Linux: The Minecraft directory is usually located in
~/.minecraft.
Once inside your .minecraft folder, you’ll find the “mods” folder.
Installing Mods
Installing mods is as simple as downloading the mod’s JAR file and placing it directly into the “mods” folder you just located. Crucially, ensure that the mod you download is compatible with the exact version of Forge and Minecraft you have installed. Mod creators will always specify this.
Troubleshooting Common Issues
While the Forge installation process is generally smooth, occasional hiccups can occur. Here are some common problems and their solutions:
- Forge Installer Fails to Run:
- Java Installation: Ensure you have a compatible version of Java installed on your system. Forge typically requires Java 8 or later. You can download the latest Java Development Kit (JDK) from Oracle’s website.
- File Corruption: The downloaded JAR file might be corrupted. Try downloading it again.
- Permissions: Run the installer as administrator.
- Minecraft Crashes on Launch:
- Incorrect Forge Version: Double-check that you downloaded the Forge installer for the correct Minecraft version.
- Conflicting Mods: If you’ve already added mods, try removing them all and launching with just Forge to see if it works. Then, add mods back one by one to identify the culprit.
- Mod Compatibility: Ensure all your mods are for the correct Minecraft and Forge version.
- Outdated Java: Update your Java installation.
- “mods” Folder Not Created: Launching Minecraft with the Forge profile once should automatically create the “mods” folder. If it doesn’t, you can manually create a folder named
mods(all lowercase) in your.minecraftdirectory.

Beyond the Installation: Embracing the Modding Community
Installing Forge is the first step in a rewarding journey. The world of Minecraft modding is vibrant and constantly evolving. By understanding how to install Forge, you’ve unlocked the potential to explore an infinite number of possibilities within your favorite sandbox game.
Remember to always download mods from reputable sources to avoid malware. Websites like CurseForge are excellent hubs for finding a vast array of mods and modpacks, along with detailed descriptions and compatibility information. Engage with the modding community, read guides, and don’t be afraid to experiment. Your personalized Minecraft experience awaits!
aViewFromTheCave is a participant in the Amazon Services LLC Associates Program, an affiliate advertising program designed to provide a means for sites to earn advertising fees by advertising and linking to Amazon.com. Amazon, the Amazon logo, AmazonSupply, and the AmazonSupply logo are trademarks of Amazon.com, Inc. or its affiliates. As an Amazon Associate we earn affiliate commissions from qualifying purchases.