In an increasingly digital world, where high-resolution photos, 4K videos, extensive app libraries, and vast game files are the norm, internal device storage often feels like a finite resource. Whether you’re a professional photographer capturing thousands of raw images, a mobile gamer with an ever-growing collection, or simply someone who wants to keep precious memories safe and accessible, running out of space can be a constant frustration. This is where the humble yet powerful SD card steps in, offering a versatile, cost-effective, and highly portable solution to augment your device’s native storage.

From smartphones and tablets to digital cameras, drones, dashcams, and even gaming consoles, SD cards empower users to expand their digital horizons without breaking the bank or constantly juggling files. But for many, the process of installing and optimizing an SD card can seem daunting. This comprehensive guide, aligned with the principles of tech fluency and digital productivity, will demystify the installation process, help you choose the right card, and ensure you get the most out of your expanded storage. We’ll explore everything from the nuances of SD card types to device-specific installation steps and crucial post-installation optimization tips, ensuring your digital life remains seamless and expansive.
The Indispensable Role of SD Cards in Modern Tech
At its core, an SD card (Secure Digital card) is a non-volatile flash memory card used for storing digital information. Its small form factor, coupled with significant storage capacities and increasingly rapid data transfer speeds, has solidified its position as a cornerstone accessory in the vast landscape of personal and professional electronics. In a world driven by data, the ability to flexibly expand storage is not just a convenience but often a necessity for maintaining productivity and preserving digital assets.
Why Expand Your Storage? Understanding the Need
The reasons to expand your device’s storage are manifold and touch upon various aspects of digital living. For smartphones and tablets, an SD card can mean the difference between deleting cherished photos to make space for a new app and having ample room for everything. It allows users to download more media, install more applications, and capture more moments without the constant anxiety of a “storage full” notification. This directly translates to enhanced productivity for professionals who rely on their mobile devices for work, enabling them to carry large project files, extensive presentations, or critical datasets wherever they go.
For photographers and videographers, SD cards are not merely an option but an absolute requirement. Modern DSLRs and mirrorless cameras produce enormous file sizes with each shot or video clip. Multiple high-capacity SD cards ensure that a shooting session isn’t cut short by a lack of storage, preserving creative flow and preventing missed opportunities. Similarly, for drone pilots, SD cards capture breathtaking aerial footage, while dashcams rely on them for continuous loop recording, providing critical evidence in unforeseen events. Even in the realm of gaming, consoles like the Nintendo Switch utilize microSD cards to store downloaded games and save data, allowing gamers to carry their entire library with them. The cost-effectiveness of an SD card versus upgrading to a higher internal storage model of a device also makes it a smart financial decision for many tech consumers.
Diverse Applications: Where SD Cards Shine
The versatility of SD cards extends across a wide array of devices, each leveraging their capabilities in unique ways:
- Smartphones & Tablets: Primary storage for photos, videos, music, documents, and even some apps, especially for Android devices. This helps keep the device responsive by offloading internal memory.
- Digital Cameras (DSLRs, Mirrorless, Point-and-Shoot): The essential medium for storing high-resolution images (RAW, JPEG) and video footage (4K, 8K). High-speed cards are crucial for continuous shooting and high-bitrate video.
- Drones: Capture stunning aerial photography and videography, often in demanding conditions that require robust and fast memory solutions.
- Dashcams: Continuous loop recording for security and incident documentation, necessitating durable cards that can withstand constant overwriting.
- Gaming Consoles (e.g., Nintendo Switch): Expand digital game libraries and store save data, making consoles more versatile and less reliant on physical cartridges.
- Action Cameras (e.g., GoPro): Record extreme sports and adventures in high definition, requiring fast write speeds to handle intense video streams.
- GPS Devices: Store maps and navigation data.
- Security Cameras: Record surveillance footage, often 24/7, requiring reliable, high-endurance cards.
- Laptops (via card reader): Though less common as primary storage, SD cards can serve as convenient portable storage for file transfers or backups.
This broad utility underscores the importance of understanding how to properly select, install, and manage these tiny titans of data storage.
Preparing for Installation: Choosing the Right Card and Device Readiness
Before you even think about slotting an SD card into your device, a crucial preparatory phase is required. This involves understanding the various types of SD cards available and ensuring your device is compatible with your chosen card. Choosing the wrong card can lead to compatibility issues, slow performance, or even data loss, making this step paramount for a smooth experience.
Deciphering SD Card Types and Classes: Speed, Capacity, and Compatibility
The world of SD cards can seem a bit like an alphabet soup with various acronyms and numbers. However, understanding these classifications is key to making an informed purchase.
Standard SD vs. MicroSD: Physical Form Factors
The first distinction is physical size:
- Standard SD Card: The original, larger format, commonly used in DSLRs, camcorders, and some older laptops. Dimensions are typically 32mm x 24mm x 2.1mm.
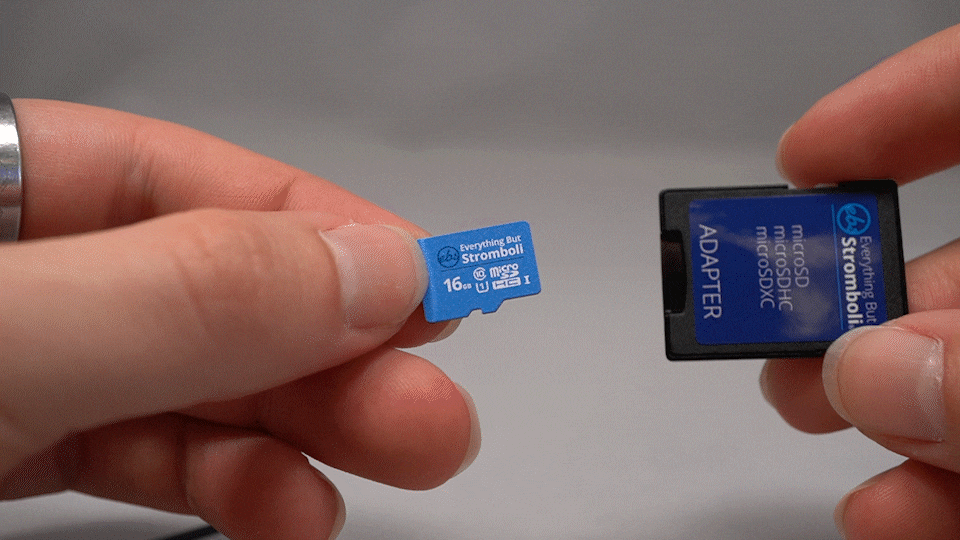
- MicroSD Card: A much smaller version (15mm x 11mm x 1mm), designed for compact devices like smartphones, tablets, drones, action cameras, and gaming consoles. Most microSD cards come with an SD adapter, allowing them to be used in standard SD card slots.
SDHC, SDXC, and SDUC: Capacity Standards
These classifications refer to the card’s capacity and the underlying file system it uses:
- SD (Standard Capacity): Up to 2GB. Older and rarely seen today. Uses FAT16 file system.
- SDHC (High Capacity): 2GB to 32GB. Commonly found and still widely used. Uses FAT32 file system.
- SDXC (Extended Capacity): 32GB to 2TB. The most prevalent standard for high-capacity cards today. Uses exFAT file system, enabling larger file sizes and capacities.
- SDUC (Ultra Capacity): 2TB to 128TB. The newest standard, still emerging, designed for future ultra-high-capacity needs.
Crucially, devices that support SDXC cards are backward compatible with SDHC and SD cards. However, older devices designed only for SD or SDHC may not recognize SDXC cards. Always check your device’s specifications.
Speed Classes: From Basic to Professional-Grade
Speed classes dictate the minimum sustained write speed of the card, vital for smooth recording of high-definition video and rapid-fire photography.
- Speed Class (C2, C4, C6, C10): Representing 2MB/s, 4MB/s, 6MB/s, and 10MB/s respectively. C10 (10MB/s) is the minimum recommended for Full HD video recording.
- UHS Speed Class (U1, U3): UHS (Ultra High Speed) is a newer bus interface for faster transfers. U1 guarantees a minimum write speed of 10MB/s, while U3 guarantees 30MB/s. U3 is essential for 4K video recording.
- Video Speed Class (V6, V10, V30, V60, V90): The latest standard, specifically designed for video capture. V6 guarantees 6MB/s, V10 (10MB/s), V30 (30MB/s), V60 (60MB/s), and V90 (90MB/s). For professional 4K and 8K video, V60 or V90 cards are often required.
Application Performance Classes: A1 and A2 for Mobile Devices
These classes are specifically designed for mobile devices running apps directly from the SD card. They indicate minimum random read/write IOPS (Input/Output Operations Per Second), which is critical for app performance.
- A1: Minimum random read of 1,500 IOPS, random write of 500 IOPS, and sustained sequential write of 10MB/s. Good for basic apps.
- A2: Minimum random read of 4,000 IOPS, random write of 2,000 IOPS, and sustained sequential write of 10MB/s. Offers significantly better performance for more demanding apps, leading to a smoother user experience.
When purchasing an SD card, consider your primary use case. For a smartphone primarily storing photos, an A1/U1 card might suffice. For a 4K camera or drone, a U3/V30 or higher is non-negotiable. Always choose reputable brands like SanDisk, Samsung, Kingston, or Lexar to ensure reliability and quoted performance. While cheaper alternatives exist, the risk of data loss or underperformance often outweighs the marginal cost savings, potentially impacting your digital security and productivity.
Ensuring Compatibility: Device-Specific Considerations
Before buying, always consult your device’s manual or manufacturer’s website to determine:
- Supported SD Card Format: Does it accept standard SD or microSD?
- Maximum Capacity: What is the largest capacity SDHC or SDXC card it can read? Some older devices may not support SDXC cards over 32GB, even if they physically fit.
- Required Speed Class: For video recording, especially 4K, there’s usually a minimum speed class specified.
Using an incompatible card can lead to the card not being recognized, data corruption, or simply not performing at its advertised speed.
Essential Pre-Installation Steps
Once you’ve selected the right SD card, a few quick checks can prevent headaches:
- Power Down Your Device: For most devices (especially smartphones, tablets, and cameras), it’s crucial to power off the device completely before inserting or removing an SD card to prevent data corruption or damage to the card or device.
- Locate the SD Card Slot: Familiarize yourself with where the slot is on your specific device. It could be a dedicated slot, a tray shared with the SIM card, or hidden under a battery cover.
- Check Card Orientation: SD cards are designed to be inserted in one specific way. Look for small arrows or diagrams on the card or near the slot that indicate the correct orientation. Never force an SD card into a slot; if it doesn’t go in easily, you’re likely inserting it incorrectly.
- Unlock the Card (if applicable): Some standard SD cards have a small physical write-protection switch on the side. Ensure it’s in the “unlocked” position if you intend to write data to the card. MicroSD cards do not have this switch themselves, but their adapters might.
Step-by-Step Installation Across Various Devices
The physical act of inserting an SD card is generally straightforward, but the exact mechanism varies by device type.
Installing an SD Card in Smartphones and Tablets
Most modern smartphones and tablets, particularly Android models, offer microSD card expansion.
Locating the SIM/SD Card Tray
- Ejector Tool Method: Many devices use a small tray, often located on the side of the device, that is ejected using a SIM ejector tool (usually included with your phone or readily available). Insert the tool into the small pinhole next to the tray and apply gentle pressure until the tray pops out.
- Rear Cover Method: Some older or rugged devices might have the SD card slot under a removable back cover, often near the battery. Open the cover and locate the slot.
Proper Insertion and Seating
- Once the tray or slot is exposed, carefully place the microSD card into its designated slot on the tray. It’s usually molded to fit only one way. Ensure the gold contacts are facing the correct direction, often down or as indicated by a diagram.
- Gently push the tray back into the device until it clicks securely into place. If under a cover, simply close and secure the cover.
- Power on your device.
Software Setup: Portable vs. Internal Storage
Upon powering on, your Android device will usually detect the new SD card. You’ll likely receive a notification prompting you to set it up:
- Portable Storage: This is the default and recommended option for most users. The SD card acts as a separate drive, perfect for storing media files (photos, videos, music) and documents. You can easily remove it and access its contents on another device (with an adapter). Apps typically cannot be moved to portable storage.
- Internal Storage (Adoptable Storage): This option (available on some Android versions) integrates the SD card as part of your device’s internal storage, essentially making it one large storage pool. This allows you to install apps directly onto the SD card. Caution: This process formats the card, encrypts it to your device, and makes it unusable in other devices unless reformatted. If you ever remove it, your device might become unstable. This is generally only recommended if your internal storage is critically low and you primarily want to store apps.
Always format the card (even if new) through your device’s settings after insertion to ensure it’s optimized for your specific device. Go to Settings > Storage > SD Card and look for the format option.
SD Card Installation for Digital Cameras and Camcorders
For cameras, the process is usually simpler as they primarily use standard SD cards (or microSD with an adapter).
- Locate the Slot: The SD card slot is typically on the side of the camera, under a small hinged door, or sometimes in the battery compartment.
- Insert Correctly: Gently push the SD card into the slot with the label facing the front or back of the camera (refer to the camera’s diagram). It should click into place when fully inserted.
- Power On and Format: Turn on your camera. It will likely prompt you to format the new card. Always do this through the camera’s menu (
Menu > Setup/Wrench Icon > Format Card) to ensure optimal compatibility and performance with your camera.
Integrating SD Cards with Drones, Dashcams, and Gaming Consoles (e.g., Nintendo Switch)
These devices almost exclusively use microSD cards.
- Drones & Dashcams: Power off the device. Locate the microSD slot (often small and tucked away, sometimes requiring a fingernail to push the card in until it clicks). Insert the card following the orientation guide. Power on and often no further setup is needed beyond formatting via the device’s internal settings if available.
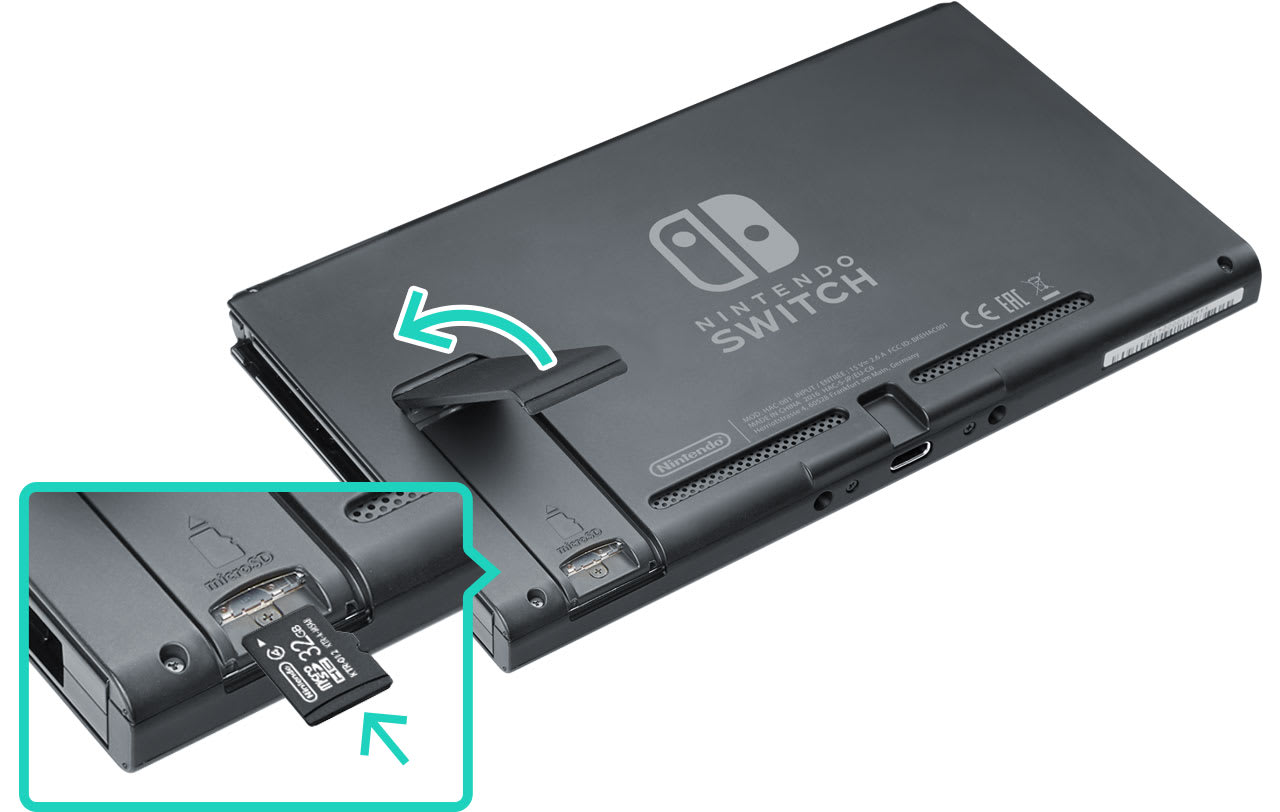
- Nintendo Switch: Power off the console completely. Open the kickstand on the back of the Switch to reveal the microSD card slot. Insert the card with the label facing away from the console until it clicks. Close the kickstand and power on. The Switch will automatically detect and format the card, allowing you to download games directly to it.
External Card Readers and Adapters: Bridging the Gap
If your computer or laptop doesn’t have an integrated SD card slot, or if you need to transfer files from a microSD card, an external card reader is an invaluable tool. These small USB devices accept various SD card formats and plug into your computer’s USB port, allowing you to access the card’s contents like any other drive. SD card adapters for microSD cards also allow smaller cards to fit into standard SD card slots, enhancing their versatility. This is particularly useful for transferring photos from a phone’s microSD card to a camera’s SD card slot, or vice versa, for example.
Post-Installation and Optimizing Your SD Card’s Performance
Installation is just the first step. To ensure longevity, optimal performance, and data integrity, certain post-installation practices are essential.
Formatting Your SD Card: Why and How
Formatting an SD card initializes it for use with a specific device, creating a file system and clearing any existing data. Even if a card is new, formatting it in the device it will be used with is highly recommended to ensure full compatibility and prevent potential issues.
Quick Format vs. Full Format
- Quick Format: This process simply erases the file system table, making the data invisible and recoverable with specialized tools. It’s faster and generally sufficient for day-to-day use.
- Full Format: This process writes zeros to every sector of the card, completely erasing all data and checking for bad sectors. It takes longer but ensures a clean slate and can help identify or isolate problematic areas on the card. This is recommended for older cards or those experiencing issues.
Choosing the Right File System: FAT32, exFAT, NTFS
When formatting on a computer, you might be given file system options:
- FAT32: Compatible with virtually all devices. However, it has a 4GB single file size limit and is less efficient for very large capacities. Ideal for older devices or smaller cards (<32GB).
- exFAT: The standard for SDXC cards (32GB and above). It supports very large file sizes and capacities, making it suitable for modern devices and large media files (e.g., 4K video). Most recent devices support exFAT.
- NTFS: Primarily for Windows computers. While compatible with some devices, it’s not ideal for SD cards due to its journaling overhead and limited cross-device compatibility. Avoid for general SD card use.
When formatting on a device like a phone or camera, the device will typically choose the optimal file system (usually exFAT for larger cards, FAT32 for smaller ones) automatically.
Managing Data: Transferring, Backing Up, and Organizing
Once your SD card is operational, effective data management is key to maintaining productivity and preventing data loss.
- Regular Backups: Treat your SD card data like any other valuable digital asset. Regularly transfer important photos, videos, and documents to a computer, cloud storage (e.g., Google Drive, Dropbox), or an external hard drive. This mitigates the risk of losing data if the card gets damaged, lost, or corrupted.
- Organized Folders: Create a logical folder structure on your SD card. For example, separate folders for “Photos,” “Videos,” “Documents,” and then subfolders by date or event. This makes locating files much easier.
- Avoid Overfilling: Try not to fill your SD card to its absolute maximum capacity. Leaving a small amount of free space (e.g., 5-10%) can help maintain performance and prevent corruption.
Safe Removal and Ejection Practices
Just like USB drives, SD cards should always be “safely ejected” or “unmounted” before physical removal, especially from computers, phones, or cameras that are powered on.
- Computers: In Windows, click the “Safely Remove Hardware” icon in the taskbar and select your SD card. In macOS, drag the SD card icon from your desktop to the Trash (which becomes an Eject icon).
- Smartphones/Tablets: Go to
Settings > Storage, find your SD card, and select “Eject” or “Unmount.” - Cameras/Drones/Consoles: Power off the device completely before removing the card.
Failing to safely eject can lead to data corruption, making the files on the card inaccessible or damaging the card itself.
Security and Longevity: Protecting Your Investment
SD cards, while robust, are not indestructible.
- Physical Protection: Store cards in protective cases when not in use. Avoid extreme temperatures, moisture, and direct sunlight.
- Data Security: If using an SD card for sensitive information, consider encrypting its contents, especially if used as adoptable storage on an Android device, or using third-party encryption tools.
- Beware of Counterfeits: Purchase SD cards from reputable vendors and brands. Counterfeit cards are rampant, often falsely advertising higher capacities or speeds, leading to data loss and frustration. Tools exist to verify an SD card’s true capacity and speed (e.g., H2testw for Windows).
- Card Lifespan: SD cards have a finite number of write cycles. While this number is very high for modern cards, constant overwriting (e.g., in dashcams or security cameras) can reduce their lifespan. Consider “high endurance” cards specifically designed for such applications.
Troubleshooting Common SD Card Issues
Despite careful installation and management, you might encounter issues. Here are common problems and solutions:
Card Not Detected: Diagnosing and Resolving
- Re-insert the Card: Power off the device, remove the card, ensure proper orientation, and re-insert firmly until it clicks.
- Check Compatibility: Confirm the card type (SD, SDHC, SDXC) and capacity are supported by your device.
- Test on Another Device: If possible, try the SD card in a different device (e.g., another phone, camera, or a computer with a card reader). If it works elsewhere, the issue might be with your original device’s slot. If it doesn’t work anywhere, the card itself might be faulty.
- Check Write Protection Switch: For standard SD cards, ensure the physical lock switch is in the unlocked position.
- Update Device Firmware/Drivers: Sometimes, a firmware update for your camera or device, or new drivers for your computer’s card reader, can resolve detection issues.
Slow Performance or Data Corruption
- Reformat the Card: Back up any accessible data, then perform a full format of the card (preferably in the device it will be used with or via a computer). This can resolve file system errors and improve performance.
- Check Card Speed Class: Ensure the card’s speed class meets the requirements of your task (e.g., 4K video needs U3/V30 or higher). An insufficient speed card will lead to dropped frames or slow file transfers.
- Clean Contacts: Gently clean the gold contacts on the SD card with a dry, lint-free cloth.
- Test for Bad Sectors: Use tools like H2testw on a computer to check the card for errors and verify its true capacity.
- Card Failure: If performance issues persist after formatting and testing, the card might be failing and should be replaced.
Unmounting and Reformatting as a Last Resort
If an SD card becomes unreadable or severely corrupted, and other troubleshooting steps fail, you may need to perform a forceful reformat using a computer. Use disk management tools (e.g., Disk Management in Windows, Disk Utility in macOS) to delete partitions and reformat the card with the appropriate file system (exFAT is usually a safe bet). Be aware that this will erase all data, and data recovery may not be possible afterward.
In conclusion, while installing an SD card might seem like a minor technical task, it’s a fundamental step toward expanding your digital potential. By understanding the different types of cards, ensuring compatibility, following proper installation protocols, and maintaining good data hygiene, you can unlock vast amounts of storage for your devices, enhancing your productivity, securing your memories, and ensuring a seamless digital experience. Choose wisely, install carefully, and manage diligently – your expanded digital life awaits.
aViewFromTheCave is a participant in the Amazon Services LLC Associates Program, an affiliate advertising program designed to provide a means for sites to earn advertising fees by advertising and linking to Amazon.com. Amazon, the Amazon logo, AmazonSupply, and the AmazonSupply logo are trademarks of Amazon.com, Inc. or its affiliates. As an Amazon Associate we earn affiliate commissions from qualifying purchases.