In today’s digital-first world, a reliable printer remains an indispensable tool for homes, small businesses, and educational environments alike. Despite the rise of paperless initiatives, the need to print documents, photos, labels, or essential forms persists. From students completing assignments to entrepreneurs managing invoices, a functioning printer is crucial for productivity and efficient workflow. However, the seemingly straightforward task of setting up a new printer can sometimes become a perplexing challenge, especially for those less familiar with technology. Different printer types, connection methods, and operating systems can introduce a myriad of variables that make the installation process feel daunting.
This comprehensive guide aims to demystify printer installation, transforming a potentially frustrating experience into a smooth and successful setup. We’ll delve into everything from the initial unboxing to troubleshooting common issues, ensuring your new device is up and running with minimal hassle. Whether you’re connecting a sleek new inkjet to your Wi-Fi network, wiring a robust laser printer via USB, or integrating a multifunction device into a shared office network, this article will equip you with the knowledge and steps needed to achieve seamless integration. By understanding the core principles and following our step-by-step instructions, you’ll not only get your printer working but also gain a deeper appreciation for the technology that drives your digital-to-physical output. Let’s embark on this journey to empower your printing capabilities.
Preparing for Printer Installation: The Essential First Steps
Before you even think about connecting cables or clicking installation wizards, a solid preparation phase is crucial. Skipping these initial steps can lead to unnecessary complications and extended setup times. Proper preparation ensures you have all the necessary components and information at hand, making the subsequent installation process significantly smoother. This foundational stage lays the groundwork for a successful and trouble-free printer setup, allowing you to quickly move from unboxing to printing your first document.
Unboxing and Physical Setup
The journey begins the moment you unbox your new printer. Manufacturers often pack devices with protective materials designed to safeguard them during transit. Your first task is to meticulously remove all these packaging elements. This includes tape, plastic wraps, foam inserts, and any cardboard bracing, particularly from the print head area, paper trays, and cartridge access points. Failure to remove all packing materials is a common oversight that can lead to paper jams, poor print quality, or even damage to the printer’s internal mechanisms. Consult the quick-start guide or user manual provided by the manufacturer for specific instructions on your model, as packaging can vary.
Once unpacked, choose a suitable location for your printer. Consider proximity to a power outlet, your computer (if connecting via USB), or your Wi-Fi router (for wireless models). Ensure the surface is stable, level, and strong enough to support the printer’s weight. Leave adequate space around the printer for proper ventilation, especially if it’s a laser model that generates heat. Also, consider accessibility for loading paper, replacing cartridges, and clearing potential paper jams. Finally, install the ink cartridges or toner according to the manufacturer’s instructions. This usually involves opening a specific access panel, removing protective strips from the cartridges, and inserting them into their designated slots until they click into place. After these steps, connect the power cord to the printer and then to a wall outlet, but hold off on turning it on until prompted by the software or later steps.
Gathering Necessary Tools and Information
Effective preparation isn’t just about physical setup; it also involves gathering the right information and ensuring your computer is ready. Before you proceed, make sure your computer meets the printer’s system requirements, which are typically listed in the manual or on the manufacturer’s website. This includes the operating system version (Windows, macOS, Linux) and available hard drive space.
Next, identify the type of connection you intend to use. For a wired USB connection, ensure you have a compatible USB cable (often not included with the printer). For wireless setup, you’ll need your Wi-Fi network name (SSID) and password. If you’re setting up a network printer via Ethernet, you’ll need an Ethernet cable and access to your network router or switch. It’s also wise to have the printer’s model number and serial number readily accessible, as these might be required during driver installation or for customer support.
Consider the security of your system. Before installing any new hardware or software, it’s good practice to ensure your operating system is up-to-date. This can resolve compatibility issues and improve overall system stability. Temporarily disabling your firewall or antivirus software might be necessary during driver installation in rare cases, but only do so if explicitly instructed by the manufacturer and remember to re-enable them immediately afterward. Having all this information and these tools prepared beforehand will streamline the entire installation process, saving you time and preventing potential headaches down the line.
Diverse Installation Methods: Connecting Your Printer
Printers offer a variety of connection methods, each suited for different environments and user preferences. Understanding these options is key to choosing the most appropriate setup for your needs. Whether you prioritize simplicity, flexibility, or network integration, there’s a connection method designed to meet those requirements.
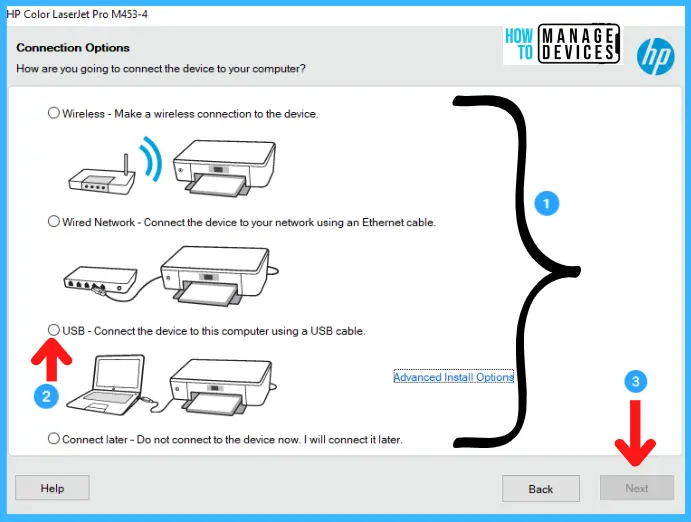
USB Installation: The Plug-and-Play Approach
The USB connection method remains one of the simplest and most common ways to install a printer, especially for personal use. It’s a direct, wired connection that typically offers a true “plug-and-play” experience. Once you’ve physically prepared the printer and installed cartridges, connect one end of a USB cable to the printer’s USB port (usually a square, Type-B port) and the other end to an available USB port on your computer.
Upon connection, most modern operating systems (Windows, macOS) will automatically detect the new hardware. They will then attempt to locate and install the appropriate drivers from their built-in repositories or download them from the internet. A notification will usually appear, indicating that a new device has been found and its drivers are being installed. This process might take a few minutes. Once completed, the printer should appear in your computer’s list of devices and be ready for use. This method is ideal for single-user setups where the printer doesn’t need to be shared across a network or accessed remotely. It’s reliable, secure, and generally requires minimal user intervention, making it a favorite for ease of use.
Wireless Installation: Embracing Connectivity
Wireless printer installation, primarily via Wi-Fi, offers unparalleled flexibility, allowing you to place your printer almost anywhere within your network’s range without the clutter of cables. This method is increasingly popular in homes and offices where multiple devices (laptops, smartphones, tablets) need to access the same printer.
There are generally two main ways to set up a wireless printer:
- Using the Printer’s Control Panel: Many printers feature a built-in LCD screen and navigation buttons. From the printer’s menu, navigate to “Network Settings” or “Wireless Setup.” Select “Wireless Setup Wizard” or “Wi-Fi Protected Setup (WPS).” If using the wizard, the printer will scan for available Wi-Fi networks. Select your network’s SSID from the list and enter your Wi-Fi password (network security key) using the printer’s keypad. If using WPS, you’ll typically be instructed to press the WPS button on your Wi-Fi router within a specific time frame, which then automatically establishes the connection.
- Using the Manufacturer’s Software: If your printer doesn’t have a screen or you prefer a software-guided approach, you can install the printer’s setup utility on your computer. This software will guide you through connecting the printer to your Wi-Fi network, often initially via a temporary USB connection or a direct Wi-Fi setup mode.
Once the printer is connected to your Wi-Fi network, your computer will typically be able to detect it as a network device. You might need to manually add the printer through your operating system’s printer settings (e.g., “Add a printer or scanner” in Windows, “Printers & Scanners” in macOS System Settings) and let it search for network printers. This method liberates your workspace from cables and enables printing from various devices, enhancing convenience and productivity.
Networked Printer Setup: For Shared Environments
For office environments or homes with multiple computers needing constant access to a single printer, a wired network connection (Ethernet) or a dedicated print server is often the most robust and reliable solution. This method provides stable connectivity and high-speed data transfer, crucial for handling larger print jobs or simultaneous requests from multiple users.
To set up an Ethernet-connected printer, simply plug one end of an Ethernet cable into the printer’s Ethernet port and the other end into an available LAN port on your network router, switch, or a wall jack connected to your network. Once connected, the printer will typically acquire an IP address from your network’s DHCP server.
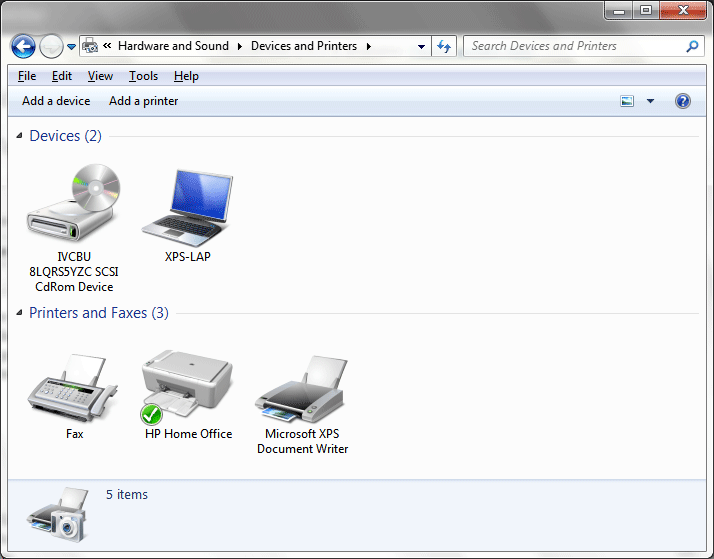
On your computer, you will then need to add the printer through your operating system’s printer settings.
- Windows: Go to “Settings” > “Bluetooth & devices” > “Printers & scanners” and click “Add device.” Select “The printer that I want isn’t listed,” then choose “Add a printer using a TCP/IP address or hostname.” Enter the printer’s IP address (which can often be found on the printer’s control panel under network settings, or by printing a network configuration page).
- macOS: Go to “System Settings” > “Printers & Scanners,” click the “+” button, and select “IP.” Enter the printer’s IP address and choose the appropriate protocol (e.g., HP Jetdirect – Socket, LPD, or IPP).
In shared environments, ensuring all relevant computers have the necessary drivers installed is also important. This can be done by sharing the printer from one computer (acting as a print server) or by having each computer install the drivers directly and connect to the printer’s IP address. Networked printing facilitates seamless collaboration and centralized management, making it an ideal choice for busy multi-user settings.
Driver Installation: Ensuring Optimal Performance
Printer drivers are essential software components that enable your computer to communicate with your printer. They translate print commands from your applications into a language your printer can understand, ensuring documents are rendered correctly. Without the right drivers, your printer won’t function, or its capabilities might be limited.
Automatic Driver Detection and Installation
Modern operating systems like Windows and macOS have become remarkably adept at automatically detecting new hardware and installing the appropriate drivers. When you connect a new printer via USB or connect to a networked printer, the OS often recognizes the device model and searches its extensive built-in driver library or connects to online repositories (like Windows Update) to download and install the necessary software.
This process is usually seamless. You’ll often see a notification indicating that a new device is being set up. Once the installation is complete, the printer will appear in your list of available printers, and you might receive a message confirming that the device is ready for use. While incredibly convenient, automatic installation might sometimes provide generic drivers that offer basic functionality but lack access to advanced features specific to your printer model (e.g., duplex printing, specific paper tray selections, or advanced color management). For basic printing needs, however, this method is usually sufficient and hassle-free.
Manual Driver Download from Manufacturer Websites
For the most up-to-date drivers and to unlock the full potential of your printer, downloading them directly from the manufacturer’s website is the recommended approach. This ensures you get drivers optimized for your specific printer model and operating system, often bundled with useful utility software that enhances printer management and productivity.
To do this, open your web browser and navigate to the support section of your printer’s manufacturer (e.g., HP Support, Epson Support, Canon Support, Brother Support). Look for a “Drivers,” “Downloads,” or “Support” section. You’ll typically be prompted to enter your printer’s model number or select it from a list. Be precise with the model number to ensure you download the correct drivers. Once you’ve located your model, select your operating system (e.g., Windows 11 64-bit, macOS Sonoma) and download the recommended driver package. This package often includes the full driver suite, installation utilities, and potentially scanner software if it’s a multifunction device.
Once downloaded, run the executable file (usually an .exe for Windows or .dmg for macOS) and follow the on-screen instructions. The installation wizard will guide you through the process, which often includes accepting license agreements, choosing installation options, and potentially connecting your printer at a specific stage. This method ensures you have the latest features, bug fixes, and optimal performance for your device.
Leveraging Installation Discs (If Applicable)
While less common with modern computers that often lack optical drives, some older printers or specific models may still include an installation CD or DVD. If your computer has an optical drive, this can be a straightforward way to install drivers and bundled software without needing an internet connection.
Simply insert the disc into your computer’s optical drive. Most operating systems will automatically prompt you to run the setup program from the disc. If not, open “File Explorer” (Windows) or “Finder” (macOS), navigate to your optical drive, and double-click the setup or install file. The installation wizard on the disc will then guide you through the process, similar to drivers downloaded from the website.
It’s important to note that drivers on an installation disc might be outdated. Even if you use the disc for initial setup, it’s a good practice to visit the manufacturer’s website afterward to check for and install any newer driver updates. This ensures your printer benefits from the latest performance enhancements and security patches. For users without an optical drive, this method is obsolete, making manufacturer websites the primary source for driver acquisition.
Verifying Installation and Troubleshooting Common Issues
After going through the steps of preparing, connecting, and installing drivers for your printer, the next crucial phase is to verify that everything is working as expected. This involves performing a test print and being prepared to address any common issues that might arise. Even with careful setup, occasional glitches can occur, but most are easily resolved with systematic troubleshooting.
Performing a Test Print
The most definitive way to confirm successful printer installation is to perform a test print. This simple action checks the entire communication chain: from your computer’s operating system, through the installed drivers, to the printer hardware itself.
There are several ways to initiate a test print:
- From the Printer’s Control Panel: Many printers have a self-test page option accessible directly from their built-in LCD screen. This prints a diagnostic page that doesn’t require computer interaction, verifying the printer’s internal mechanisms and ink/toner levels.
- From Operating System Settings:
- Windows: Go to “Settings” > “Bluetooth & devices” > “Printers & scanners.” Click on your printer, then select “Printer properties.” In the “General” tab, click “Print Test Page.”
- macOS: Go to “System Settings” > “Printers & Scanners.” Select your printer, then click “Open Print Queue.” In the “Printer” menu at the top of the screen, select “Print Test Page.”
- From Any Application: Open a simple document in a program like Notepad (Windows), TextEdit (macOS), or Microsoft Word. Type a few words, then go to “File” > “Print” and ensure your newly installed printer is selected before clicking “Print.”
If the test page prints successfully and looks as expected, congratulations! Your printer is installed and ready for use. If it doesn’t print or the output is not correct, you’ll need to move on to troubleshooting.
Addressing Connectivity Problems
Connectivity issues are among the most common reasons a printer might not work after installation. These can manifest as the printer being “offline,” “not detected,” or simply not responding to print commands.
- Check Physical Connections: For USB or Ethernet connections, ensure cables are firmly plugged into both the printer and the computer/router. Try a different USB port on your computer or a different Ethernet port on your router. If using USB, consider trying a different USB cable, as they can sometimes fail.
- Verify Wireless Connection: For Wi-Fi printers, ensure the printer’s Wi-Fi indicator light is on and stable, indicating it’s connected to your network. Double-check your Wi-Fi network name (SSID) and password. If the printer allows, print a network configuration page from its control panel to confirm its IP address and network status. Ensure your computer is on the same Wi-Fi network as the printer. Restarting your Wi-Fi router, printer, and computer can often resolve temporary network glitches.
- Printer Status: Go to your computer’s printer settings and check the printer’s status. If it says “Offline,” try right-clicking the printer icon and unchecking “Use Printer Offline.”
- Firewall/Antivirus: Occasionally, your computer’s firewall or antivirus software might block communication with the printer, especially for network connections. Temporarily disable them (briefly, and only if you suspect this is the issue) to see if it resolves the problem. Remember to re-enable them immediately.
Resolving Driver-Related Glitches
Even after installing drivers, issues can arise if they are corrupted, outdated, or incompatible.
- Update Drivers: As mentioned earlier, always check the manufacturer’s website for the latest drivers. Outdated drivers are a frequent cause of malfunctions, poor print quality, and compatibility issues with new operating system updates.
- Reinstall Drivers: If you suspect a driver issue, it’s often best to completely uninstall the current drivers and reinstall them from scratch.
- Windows: Go to “Settings” > “Bluetooth & devices” > “Printers & scanners.” Click on your printer, then “Remove.” Then, open “Run” (Win + R), type
printmanagement.msc, navigate to “Print Servers” > “[Your Computer Name]” > “Drivers,” and remove any instances of your printer’s driver. Reboot your computer, then reinstall the drivers using the manufacturer’s software. - macOS: Go to “System Settings” > “Printers & Scanners.” Select your printer, then click the “-” button to remove it. You might also need to reset the printing system by right-clicking (or Ctrl-clicking) in the blank area of the Printers & Scanners list and selecting “Reset Printing System…” Reboot, then add the printer again.
- Windows: Go to “Settings” > “Bluetooth & devices” > “Printers & scanners.” Click on your printer, then “Remove.” Then, open “Run” (Win + R), type
- Compatibility Mode (Windows): For older printers, if a specific driver isn’t working with a newer Windows version, try installing the driver in compatibility mode. Right-click the driver installer executable, go to “Properties,” then “Compatibility,” and select an older version of Windows.
- Spooler Service (Windows): The Print Spooler service manages print jobs. If it’s stuck, jobs won’t print. To restart it, open “Run” (Win + R), type
services.msc, find “Print Spooler,” right-click, and select “Restart.”
By methodically checking these points, you can isolate and resolve most common printer installation and functionality problems, getting your device back to peak performance.
Optimizing Your Printer Experience: Beyond Basic Setup
Successfully installing your printer is a significant first step, but the journey doesn’t end there. To truly maximize its utility and ensure a smooth, efficient printing workflow, there are several post-installation optimizations and maintenance practices to consider. These steps can enhance your productivity, save you money in the long run, and unlock advanced features that might otherwise go unnoticed.
Setting Default Printer and Preferences
For users with multiple printers or those who frequently use a specific printer for most tasks, setting a default printer is a simple yet effective way to streamline your workflow. When you print from any application, your system will automatically select the default printer, saving you the step of having to choose it manually every time.
- Windows: Navigate to “Settings” > “Bluetooth & devices” > “Printers & scanners.” You can toggle off the “Let Windows manage my default printer” option if it’s on. Then, click on your preferred printer and select “Set as default.”
- macOS: Go to “System Settings” > “Printers & Scanners.” From the “Default printer” dropdown menu, select the printer you wish to make your primary device.
Beyond setting a default, taking the time to configure printing preferences for frequently used settings can be a huge time-saver. Access your printer’s properties or preferences (usually found by right-clicking the printer in the “Printers & scanners” list and selecting “Printing preferences” or “Printer properties”). Here you can often set defaults for:
- Paper size and type: A4, Letter, photo paper, plain paper.
- Print quality: Draft, standard, high quality.
- Color vs. Black & White: Ideal for saving colored ink.
- Duplex printing (double-sided): Another excellent way to save paper.
- Orientation: Portrait or Landscape.
Configuring these settings once can prevent repeated adjustments for every print job, boosting your overall productivity and ensuring consistent output.
Essential Maintenance Tips for Longevity
Like any piece of technology, printers benefit from regular care and maintenance. Proper upkeep not only extends the life of your device but also ensures consistent performance and high-quality prints, ultimately saving you money on repairs or premature replacements. This aligns perfectly with the “Tech” and “Money” aspects of the website’s main topics, emphasizing both responsible tech ownership and financial prudence.
- Keep it Clean: Dust is a printer’s enemy. Regularly wipe down the exterior of your printer with a soft, dry, lint-free cloth. For inkjet printers, periodically run the print head cleaning utility (available in your printer’s software or control panel) to prevent clogs and ensure vibrant, clear prints. For laser printers, be careful when cleaning toner spills, as toner can be messy; a specialized toner vacuum or a damp cloth (not wet) is best.
- Use Quality Supplies: Always use genuine or high-quality compatible ink cartridges or toner. Cheap, refilled, or poor-quality alternatives can clog print heads, leak, produce inferior print quality, and potentially void your warranty. While the initial cost of genuine supplies might seem higher, they often offer better page yield and reliability, reducing long-term costs and frustration.
- Regular Use: For inkjet printers, regular use (even just printing a test page once a week) prevents ink from drying out and clogging the print heads. Laser printers are less prone to issues from infrequent use.
- Proper Shutdown: Avoid simply unplugging your printer without turning it off via its power button. Proper shutdown allows the print head to return to its capped position, preventing ink from drying out.
- Firmware Updates: Periodically check the manufacturer’s website for firmware updates. Firmware is the printer’s internal software, and updates can improve performance, add new features, fix bugs, and enhance compatibility.
By integrating these simple maintenance habits into your routine, you can significantly prolong the operational life of your printer, maintain optimal print quality, and avoid unnecessary service calls or replacement expenses.

Exploring Advanced Features and Software
Most modern printers come with a suite of advanced features and bundled software that can greatly enhance your printing experience beyond basic document output. Taking the time to explore these can unlock new levels of convenience and functionality.
- Scanning and Copying (MFPs): If you have a Multifunction Printer (MFP), delve into its scanning and copying capabilities. Manufacturer software often provides advanced options for scanning, such as saving to various formats (PDF, JPEG, TIFF), optical character recognition (OCR) for editable text, and direct scanning to cloud services or email.
- Mobile Printing: Embrace the convenience of printing directly from your smartphone or tablet. Most major printer brands support mobile printing technologies like Apple AirPrint, Google Cloud Print (though Google is deprecating it, many printers support native apps), Mopria Print Service for Android, or their own proprietary apps. These allow you to print photos, documents, and web pages without needing a computer.
- Cloud Printing: Some printers can connect directly to cloud services like Google Drive, Dropbox, or OneDrive, allowing you to print documents remotely or even without a computer, directly from the printer’s control panel.
- Printer Utility Software: The software suite provided by the manufacturer often includes tools for monitoring ink/toner levels, ordering supplies, managing print queues, calibrating the printer, and performing maintenance tasks. Familiarize yourself with these utilities to keep tabs on your printer’s health and optimize its settings.
- Security Features: For network printers, explore any built-in security features, such as setting up access controls, password protection for certain functions, or securing remote access. This is especially important in shared or business environments to protect sensitive information.
By fully leveraging these advanced features and integrated software, you transform your printer from a simple output device into a powerful hub for document management, digital conversion, and seamless connectivity, truly maximizing your technology investment and boosting your efficiency.
The journey from unboxing a new printer to seamlessly integrating it into your daily workflow can be incredibly rewarding. By following these comprehensive steps—from meticulous preparation and choosing the right connection method to installing optimized drivers, troubleshooting effectively, and engaging in proactive maintenance—you empower yourself to harness the full potential of your printing technology. A well-installed and maintained printer is more than just a peripheral; it’s a vital tool that enhances productivity, supports creativity, and bridges the gap between the digital and physical realms, proving its enduring value in our tech-driven lives.
aViewFromTheCave is a participant in the Amazon Services LLC Associates Program, an affiliate advertising program designed to provide a means for sites to earn advertising fees by advertising and linking to Amazon.com. Amazon, the Amazon logo, AmazonSupply, and the AmazonSupply logo are trademarks of Amazon.com, Inc. or its affiliates. As an Amazon Associate we earn affiliate commissions from qualifying purchases.