In the intricate world of computing, drivers are the unsung heroes, the vital bridge between your operating system and the hardware components that make up your device. From the graphics card rendering stunning visuals to the Wi-Fi adapter connecting you to the internet, every piece of hardware relies on specific software—a driver—to function correctly. While modern operating systems like Windows 10 and 11 often automate driver installation through Windows Update, there are numerous scenarios where knowing how to manually install a driver becomes not just a useful skill, but an absolute necessity.

This comprehensive guide will delve deep into the process of manual driver installation, explaining not just the ‘how,’ but also the ‘why’ and the crucial ‘what to watch out for.’ Whether you’re a seasoned tech enthusiast building a custom PC, a professional troubleshooting a stubborn hardware issue, or simply someone looking to optimize their system’s performance, understanding manual driver management is a cornerstone of digital literacy. We’ll explore everything from identifying the right drivers and preparing your system for installation to the step-by-step procedure and essential troubleshooting tips, all while keeping a keen eye on digital security and productivity best practices relevant to today’s evolving technology landscape.
Why Manual Driver Installation Matters in Modern Tech
While automatic updates are convenient, they aren’t a panacea. There are several compelling reasons why you might need to take matters into your own hands and manually install a driver. Embracing this skill allows for greater control over your system, crucial for optimizing performance, resolving persistent issues, and ensuring compatibility with the latest gadgets and software.
Overcoming Automatic Update Limitations
Windows Update is excellent for general stability and security patches, but it doesn’t always provide the absolute latest drivers or the specific versions required for niche hardware. Often, the drivers delivered through Windows Update are generic or slightly older versions that prioritize broad compatibility over cutting-edge performance or features. For instance, a gamer might need the very latest graphics driver directly from NVIDIA or AMD to squeeze every frame per second out of a new title, or a designer might require a specific display driver for optimal color accuracy. Manual installation bypasses these limitations, giving you access to the most current and specialized software for your hardware.
Troubleshooting Persistent Hardware Issues
When a piece of hardware isn’t working as expected—be it a faulty webcam, a scanner that won’t detect, or intermittent network connectivity—an outdated, corrupted, or incorrect driver is frequently the culprit. Automatic updates might miss the problem, or a generic driver could be causing conflicts. In such cases, manually downloading the latest stable driver directly from the manufacturer and performing a clean installation can often resolve the issue, restoring full functionality and preventing costly hardware replacements. This proactive approach to troubleshooting is a hallmark of efficient tech maintenance.
Supporting New or Specialized Hardware
Brand new hardware, especially less common peripherals or components in a custom-built PC, might not have their drivers immediately available through Windows Update. This is particularly true for emerging gadgets or specialized industrial hardware. Similarly, older legacy devices might cease receiving automatic updates, requiring manual intervention to keep them functional on newer operating systems. Manual installation ensures that your cutting-edge components or cherished older devices get the precise software they need to integrate seamlessly with your system, unlocking their full potential.
Optimizing Performance and Unlocking Features
Many hardware manufacturers continually release updated drivers that improve performance, add new features, or fix known bugs. A new graphics driver might introduce optimizations for the latest games, a sound card driver might enhance audio fidelity, or a touchpad driver could enable new gesture controls. By manually installing these updates, you’re not just ensuring compatibility; you’re actively enhancing your system’s capabilities, boosting productivity, and getting the most out of your hardware investment. This is where the connection between driver management and overall system performance truly shines.
Preparing for a Smooth Driver Installation
Before you dive into the technicalities of installing a driver, a thorough preparation phase is critical. This isn’t merely about gathering files; it’s about minimizing risks, ensuring compatibility, and establishing a safe rollback point. Neglecting these preparatory steps can lead to system instability, conflicts, or even data loss. Think of it as setting the stage for a successful operation, safeguarding your digital environment.
Identifying Your Hardware Accurately
The first and most crucial step is to know exactly what hardware you have. Installing the wrong driver can cause more problems than it solves.
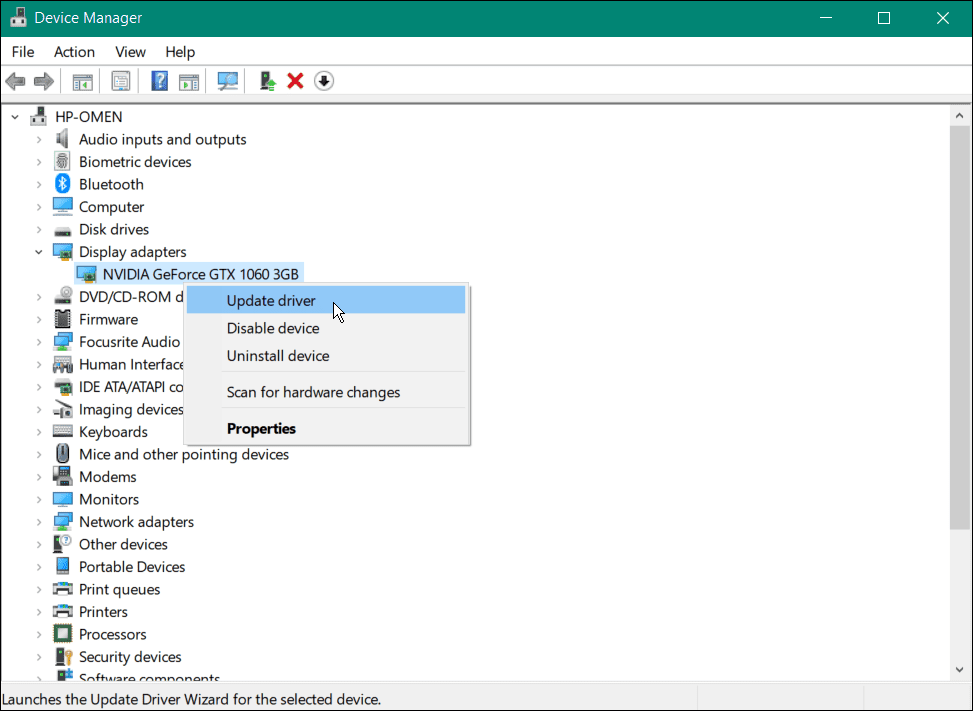
- Using Device Manager: This is your primary tool. Press
Win + Xand selectDevice Manager. Expand categories likeDisplay adapters,Network adapters,Sound, video and game controllers, etc. Note down the exact model names of the hardware components that need new drivers. For unknown devices (often marked with a yellow exclamation mark), right-click, selectProperties, then go to theDetailstab. In thePropertydropdown, chooseHardware Ids. These alphanumeric strings (e.g.,PCIVEN_10DE&DEV_1F06) are unique identifiers that can be used to search for specific drivers online. - System Information Tool: Press
Win + R, typemsinfo32, and pressEnter. This utility provides a detailed overview of your system’s hardware and software configuration, which can be useful for cross-referencing. - Third-Party Tools: Utilities like Speccy or HWMonitor can offer a user-friendly interface to identify all your system’s components, including less obvious ones.
Sourcing the Right Drivers: Prioritizing Security
Once you know your hardware, the next step is to find the correct drivers. This is where digital security becomes paramount, as downloading drivers from untrustworthy sources can introduce malware or system vulnerabilities.
- Manufacturer’s Official Website (Primary Source): Always start here. For a graphics card, go to NVIDIA or AMD’s website. For a motherboard, visit the manufacturer’s (e.g., ASUS, MSI, Gigabyte) support page for your specific model. For peripherals like printers or webcams, go to HP, Canon, Logitech, etc. These sites provide the most stable, secure, and compatible drivers.
- Specificity: Ensure you select the exact model number, operating system (Windows 10, 11), and architecture (32-bit or 64-bit) of your system.
- Version Control: Look for the “latest” or “recommended” driver version. Sometimes, an older, more stable version might be preferred over a bleeding-edge one that could still have bugs.
- Windows Update (Secondary, but often sufficient): While we’re discussing manual installation, it’s worth noting that for many devices, Windows Update provides perfectly functional drivers. If you’re only looking for basic functionality and not performance optimization, it’s a good first check.
- Driver Update Software (Use with Caution): While some reputable driver update utilities exist, many are glorified adware or even malware. If you choose to use one, research it thoroughly and ensure it comes from a trusted developer. Generally, manual sourcing is safer and more reliable. Avoid generic “driver download” sites, as these are often hotbeds for malicious software.
Creating a System Restore Point
Before making significant system changes like installing new drivers, creating a system restore point is an absolute must. This acts as a safety net, allowing you to revert your system to a previous working state if the new driver causes problems.
- How to Create One: Search for “Create a restore point” in the Windows search bar and open the
System Propertieswindow. Under theSystem Protectiontab, ensure system protection isOnfor your main drive. ClickCreate…, give your restore point a descriptive name (e.g., “Before new GPU driver”), and clickCreate. This simple step can save you hours of troubleshooting or even a complete system reinstall if things go awry. It’s a fundamental aspect of digital security and proactive system management.
Step-by-Step Guide to Manual Driver Installation
With your preparations complete, you’re ready to proceed with the actual driver installation. This section will walk you through the most common methods, focusing on the versatile Device Manager approach which offers granular control.
Uninstalling Existing Drivers (If Necessary)
Sometimes, especially when upgrading a graphics card or troubleshooting a stubborn issue, a clean slate is best. This means completely removing the old driver before installing the new one.
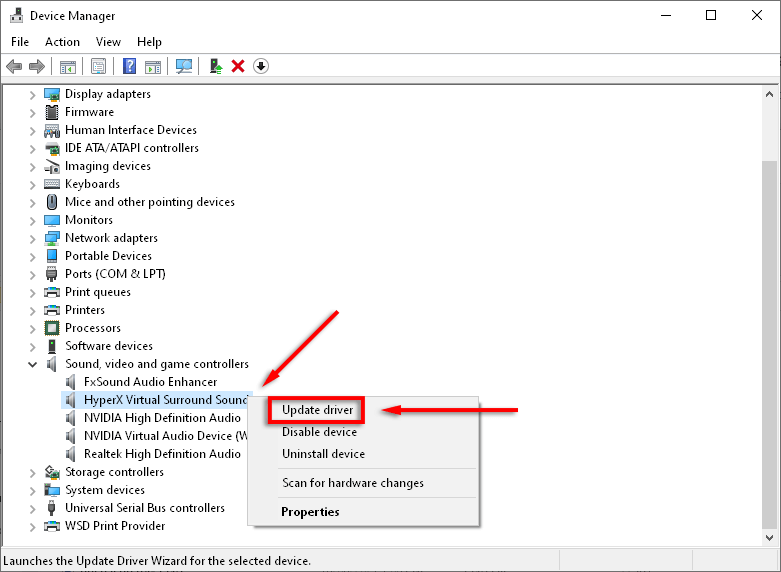
- Open Device Manager: Press
Win + Xand selectDevice Manager. - Locate the Device: Expand the relevant category (e.g.,
Display adaptersfor a graphics card). - Uninstall Driver: Right-click on the device (e.g., your graphics card) and select
Uninstall device. - Confirm Deletion: In the confirmation dialog, check the box that says
Attempt to remove the driver software for this device(if available and you want a clean install) and then clickUninstall.- Important Note: For critical components like display adapters, your screen might go black or revert to a low resolution during this process. This is normal.
- Restart Your PC: After uninstalling, it’s often a good practice to restart your computer to clear any lingering driver files from memory. For graphics drivers, specialized tools like Display Driver Uninstaller (DDU) are available for a more thorough clean.
Installing Drivers via Device Manager (The Standard Method)
This method is incredibly flexible and works for most driver types, especially when you have a .inf file or a folder containing driver files.
- Extract Driver Files: If your downloaded driver is a
.zipor.rarfile, extract its contents to an easily accessible folder (e.g.,C:DriversNewGPU). If it’s an executable installer (.exe), you can often run it directly, but for manual control, extracting is preferred if the manufacturer provides that option or you’re dealing with a standalone driver package. - Open Device Manager: Again,
Win + X>Device Manager. - Locate the Device: Find the hardware component for which you want to install the driver. If it’s a new device, it might appear as an
Unknown deviceor with a yellow exclamation mark underOther devices. - Update Driver: Right-click on the device and select
Update driver. - Choose Driver Search Method:
- “Search automatically for updated driver software”: This option will make Windows try to find a driver on your system or through Windows Update. It’s often not what we want for manual installation but can be a quick check.
- “Browse my computer for driver software”: This is the path we’ll take for manual installation. Click this option.
- Specify Driver Location:
- “Browse…”: Click
Browseand navigate to the folder where you extracted or saved your driver files (e.g.,C:DriversNewGPU). Make sure to checkInclude subfoldersas driver files are often nested within several directories. - Click
Next.
- “Browse…”: Click
- Installation Confirmation: Windows will now attempt to locate and install the best driver from the specified location. If successful, you’ll see a confirmation message.
Using the “Have Disk” Method (For Specific Driver Files)
Sometimes, the standard “Browse my computer” method might not pick up the correct .inf file, or you might need to force a specific driver. This is where “Have Disk” comes in handy. This method is particularly useful when you have multiple driver versions in one folder or when Windows insists on using a generic driver.
- Follow Steps 1-5 from “Installing Drivers via Device Manager”: Right-click device >
Update driver>Browse my computer for driver software. - Select “Let me pick from a list of available drivers on my computer”: Instead of browsing for the folder, choose this option.
- Click “Have Disk…”: In the subsequent window, click the
Have Disk...button. - Browse for the
.inffile: ClickBrowseand navigate to the folder containing your driver files. Instead of selecting the folder, you now need to specifically locate and select the.inffile (e.g.,oemsetup.inf,nv_dispi.inf, etc.). This is the driver information file that tells Windows how to install the driver. - Select the Device (If Multiple Options): After selecting the
.inffile, you might be presented with a list of compatible devices. Select your specific hardware from the list and clickNext. - Complete Installation: Windows will then install the driver. You might receive a warning about “unsigned drivers” if the driver isn’t digitally signed by Microsoft. While generally advisable to use signed drivers for security, some legitimate drivers for older hardware or specific industrial equipment might be unsigned. Proceed with caution and only if you trust the source.
- Restart Your PC: A restart is often required to finalize the driver installation and ensure the new driver is fully loaded and functioning.
Running an Executable Installer
Many manufacturers provide an .exe file that handles the entire installation process automatically, often with a user-friendly wizard.
- Download the
.exefile: From the manufacturer’s website. - Run as Administrator: Right-click the
.exefile and selectRun as administrator. This grants the installer the necessary permissions to make system-level changes. - Follow On-Screen Prompts: The installer will guide you through the process, often including license agreements, installation options (e.g., custom vs. express), and reboot prompts.
- Custom Installation: For advanced users, a custom installation might allow you to select specific components (e.g., just the driver, without bundled software or utilities you don’t need).
- Restart Your PC: As always, restart when prompted or after the installation finishes to ensure the changes take effect.
Advanced Scenarios and Troubleshooting
Even with careful preparation, driver installations can sometimes be tricky. This section addresses common challenges and provides solutions to help you navigate advanced scenarios and troubleshoot issues effectively.
Dealing with Unsigned Drivers
Windows prioritizes security by requiring drivers to be digitally signed by Microsoft. This ensures the driver hasn’t been tampered with and comes from a verified source. However, you might encounter legitimate unsigned drivers, especially for older hardware or specialized devices.
- Warning: When installing an unsigned driver, Windows will typically display a warning. Proceeding can expose your system to potential security risks or instability if the driver is malicious or poorly coded.
- Temporarily Disabling Driver Signature Enforcement: If you absolutely must install an unsigned driver, you can temporarily disable driver signature enforcement.
- Restart your PC while holding the
Shiftkey. - Go to
Troubleshoot>Advanced options>Startup Settings>Restart. - After the restart, you’ll see a list of startup options. Press
7orF7forDisable driver signature enforcement. - Your PC will boot, allowing you to install the unsigned driver. This setting reverts to default after the next restart, so the driver must be installed before that.
- Restart your PC while holding the
- Caution: Only disable signature enforcement if you are absolutely certain of the driver’s legitimacy and origin.
Rolling Back a Driver
If a newly installed driver causes issues (crashes, instability, features not working), Windows provides a way to revert to the previous working driver. This is a crucial troubleshooting step that aligns with the productivity aspect of system management.
- Open Device Manager:
Win + X>Device Manager. - Locate the Device: Find the hardware component that’s causing problems.
- Open Properties: Right-click on the device and select
Properties. - Go to the Driver Tab: Click on the
Drivertab. - Click “Roll Back Driver”: If the button is active, click it. Windows will ask for a reason for rolling back. Select one and confirm.
- Note: The
Roll Back Driverbutton will be grayed out if there’s no previous driver to revert to or if the driver was just installed for the first time.
- Note: The
- Restart Your PC: A restart is usually required for the rollback to take full effect.
Compatibility Mode and Administrator Privileges
Older drivers, or drivers designed for previous Windows versions, might struggle to install or run correctly on newer operating systems.
- Compatibility Mode: If you’re trying to run an older driver installer:
- Right-click the driver installer (
.exe) file. - Select
Properties. - Go to the
Compatibilitytab. - Check
Run this program in compatibility mode for:and select an older Windows version (e.g., Windows 7 or 8) that the driver was originally designed for. - Click
ApplyandOK, then try running the installer again.
- Right-click the driver installer (
- Administrator Privileges: Always run driver installers or perform manual installation steps in Device Manager with administrator privileges. Right-clicking an
.exeand selectingRun as administratoris standard practice. Similarly, ensure your user account has administrator rights to avoid permission-related errors during installation.
Utilizing Event Viewer for Diagnostics
When a driver installation fails or a device misbehaves, the Windows Event Viewer can offer valuable clues.
- Open Event Viewer: Search for
Event Viewerin the Windows search bar. - Check System Logs: Navigate to
Windows Logs>System. Look forErrororWarningevents around the time you attempted the driver installation or when the issue occurred. These logs often provide specific error codes or descriptions that can guide your troubleshooting efforts. This deep dive into system diagnostics is key for advanced tech users.
Best Practices for Driver Management
Effective driver management extends beyond just installation; it’s about maintaining system health, ensuring security, and maximizing productivity. Adopting a strategic approach to drivers can prevent future headaches and keep your technology running smoothly.
Regular, but Prudent, Driver Updates
While it’s generally good to keep drivers updated, this doesn’t mean blindly installing every new version that comes out.
- “If it ain’t broke, don’t fix it” philosophy: For stable, non-critical components, if everything is working fine, there’s often no urgent need to update. Windows Update usually handles security-critical driver updates.
- Prioritize key components: Focus on updating drivers for critical components like graphics cards (for performance), network adapters (for connectivity and security), and chipsets (for system stability) when new, verified versions are released.
- Read release notes: Before updating, always check the release notes from the manufacturer. These notes detail new features, bug fixes, and known issues, helping you decide if an update is beneficial for your specific use case. This informed approach is central to smart software management.
Maintaining Driver Backups
Having a backup of known good drivers can be a lifesaver, especially for older or less common hardware where drivers might become difficult to find online.
- Dedicated Driver Folder: Create a folder on a separate drive or cloud storage (e.g.,
D:Drivers Backup) and save all downloaded driver installers there, clearly labeled by component and version. - Third-Party Backup Tools: Some utilities can backup your currently installed drivers, though relying solely on manufacturer downloads is often safer.
- When to Backup: After a fresh OS installation or whenever you install a new component with a stable driver, make a copy of the installer.
The Impact of Drivers on System Stability and Security
Drivers operate at a very low level of the operating system, making them critical for both performance and security.
- System Stability: A buggy or incompatible driver can lead to system crashes (Blue Screen of Death), freezes, and unexpected behavior. This directly impacts productivity, turning work hours into troubleshooting sessions.
- Digital Security: Malicious drivers can open backdoors into your system, allowing attackers to gain deep control, bypass security measures, and steal sensitive data. This is why sourcing drivers only from official, trusted websites is paramount. Avoid unknown driver download sites at all costs. An outdated network driver, for instance, might have vulnerabilities that a newer version has patched, making the update crucial for your digital perimeter.
Enhancing Productivity with Optimized Drivers
The correct and updated drivers are not just about avoiding problems; they’re about unlocking the full potential of your hardware and, by extension, your productivity.
- Performance Gains: Optimized graphics drivers enhance gaming and professional application performance. Efficient chipset drivers improve data transfer speeds.
- Feature Enablement: New drivers can activate previously unavailable features in your hardware, such as new display modes, audio enhancements, or peripheral functionalities.
- Reliability: A stable driver environment means fewer crashes and less downtime, allowing you to focus on your tasks without interruption. For professionals reliant on specific hardware (e.g., CAD designers, video editors), optimized drivers are a non-negotiable aspect of their workflow.
Conclusion
Mastering the art of manual driver installation is an empowering skill for anyone navigating the complexities of modern technology. It grants you unparalleled control over your hardware, enabling you to troubleshoot stubborn issues, optimize performance, and ensure compatibility with a diverse range of components and gadgets. From the precise identification of hardware to the nuanced steps of installation via Device Manager, and the critical importance of a system restore point, each phase of this process is a testament to meticulous system management.
Beyond the immediate task of getting a piece of hardware to work, understanding driver management connects directly to broader themes in the tech world: digital security, through the emphasis on official sources; productivity, by ensuring optimal system performance; and personal empowerment, by taking command of your computing environment. While automatic updates offer convenience, the ability to manually intervene distinguishes a proactive user from a passive one. By following the best practices outlined in this guide, you equip yourself not just with the knowledge to install a driver, but with the wisdom to maintain a stable, secure, and high-performing digital ecosystem for years to come.
aViewFromTheCave is a participant in the Amazon Services LLC Associates Program, an affiliate advertising program designed to provide a means for sites to earn advertising fees by advertising and linking to Amazon.com. Amazon, the Amazon logo, AmazonSupply, and the AmazonSupply logo are trademarks of Amazon.com, Inc. or its affiliates. As an Amazon Associate we earn affiliate commissions from qualifying purchases.