In an increasingly digital world, the visual presentation of information is paramount. Whether you’re crafting a compelling presentation, designing marketing materials, developing a personal brand, or simply looking to add a touch of personality to your documents, fonts play a critical role. They convey tone, establish hierarchy, and can profoundly impact how your message is perceived. For many, however, the process of moving beyond the default system fonts and embracing the vast world of typography can seem daunting. This comprehensive guide will demystify the process, walking you through every step of installing fonts on your PC, ensuring you harness the full power of custom typefaces to elevate your digital presence.

Beyond mere aesthetics, the right font can enhance readability, improve user experience, and even subtly influence consumer behavior – a fact well understood in the realms of Brand Strategy and Marketing. From a Tech perspective, understanding how to manage these digital assets is a fundamental skill, akin to installing any other piece of software. And for those engaged in Online Income or Side Hustles through design, content creation, or digital marketing, having a diverse and well-managed font library is an invaluable asset, potentially saving Money on licensed fonts or allowing for unique creative outputs that command higher value. Let’s embark on this typographic journey.
The Foundation: Understanding Font Types, Sources, and Their Impact
Before diving into the mechanics of installation, it’s crucial to grasp what fonts are, why they matter, and where to acquire them responsibly. This foundational knowledge will empower you to make informed choices that benefit your projects and align with your broader digital goals.
What are Fonts and Why Do They Matter?
At its core, a font is a graphical representation of text. It encompasses the typeface (the design of the characters), along with its specific style, size, weight, and other attributes. Think of “Helvetica” as a typeface, and “Helvetica Bold 12pt” as a specific font. The digital world primarily uses several font formats, with the most common being:
- TrueType Font (TTF): One of the oldest and most widely supported formats, TTF fonts are single files containing both screen and print information. They are highly compatible across operating systems.
- OpenType Font (OTF): An evolution of TTF, OTF fonts offer greater typographic capabilities, including support for more characters, ligatures, contextual alternates, and stylistic sets. They are also cross-platform compatible and generally preferred for professional design work.
- Web Open Font Format (WOFF/WOFF2): These are specifically optimized for web use, allowing websites to display custom fonts quickly and efficiently without requiring users to have them installed locally. While crucial for web design, they are not typically installed on your PC for local application use.
The significance of choosing the right font extends far beyond mere readability. In Brand Strategy, typography is a cornerstone of corporate identity and personal branding. A sleek, modern sans-serif might convey innovation and approachability, while a classic serif font could evoke tradition and trustworthiness. In marketing, a distinctive font can make a logo memorable or a headline pop, directly impacting engagement and conversion rates. From a Tech standpoint, fonts are integral components of operating systems and applications, rendering all the text we consume daily. Learning to manage them means gaining control over your digital environment.
Where to Find Your Next Favorite Font
The internet is a treasure trove of fonts, ranging from free treasures to premium, professionally designed typefaces. However, navigating this landscape requires an understanding of licensing and quality to avoid potential legal issues or technical glitches.
- Free Font Websites:
- Google Fonts: An indispensable resource, Google Fonts offers hundreds of high-quality, open-source fonts. All fonts are licensed under the SIL Open Font License, making them free for personal and commercial use. This is an excellent starting point for anyone looking to build a diverse font library without financial outlay, especially valuable for Side Hustles and emerging Online Income ventures.
- DaFont and Font Squirrel: These sites host a vast collection of free fonts, often contributed by independent designers. Crucially, always check the licensing terms for each font. Many are free for personal use but require a commercial license for business projects. Neglecting this can lead to legal issues, impacting your Business Finance or reputation. Font Squirrel, in particular, often curates only commercially licensed fonts, making it a safer bet.
- Premium Font Marketplaces:
- MyFonts, Adobe Fonts (with Creative Cloud subscription), Fontspring, Envato Elements: These platforms offer professional-grade fonts, often designed with meticulous attention to detail and extensive character sets. While they come with a price tag, investing in high-quality fonts can be a strategic decision for established Brands or professionals whose livelihood depends on design. The cost is often an investment in versatility, reliability, and unique aesthetic appeal, reflecting good Financial Tools usage within a creative business.
- Custom Fonts: For larger Corporate Identity projects, businesses may even commission custom typefaces, ensuring a truly unique and protected brand asset.
When downloading fonts, always prioritize reputable sources to minimize the risk of malware or corrupted files. The reliability of your font files contributes to the overall Digital Security and stability of your PC.
Installing Fonts on Windows PCs: A Step-by-Step Guide
Windows, being the world’s most popular operating system for personal computers, offers straightforward methods for font installation. Whether you’re running Windows 10 or 11, the process remains largely similar and user-friendly.
Method 1: The Simple Drag-and-Drop (or Double-Click) Approach
This is often the quickest way to install a single font or a small batch of fonts.
- Download Your Font: Locate and download the font file(s) from your chosen source. They will typically be in a compressed .zip folder.
- Extract the Files: Right-click the .zip folder and select “Extract All…” to uncompress the contents. Make note of where these files are extracted, usually a new folder with the same name.
- Locate the Font File(s): Inside the extracted folder, you’ll find the actual font files, usually ending in
.ttfor.otf. - Install Individually (Double-Click):
- Double-click a
.ttfor.otffile. A preview window will open, displaying the font’s appearance. - In this window, you’ll see an “Install” button near the top left. Click it.
- Windows will install the font, and the button will grey out briefly, indicating completion.
- Double-click a
- Install Multiple Fonts (Right-Click):
- Select all the font files you wish to install (hold
Ctrland click each file, or draw a box around them). - Right-click on any of the selected font files.
- From the context menu, choose “Install” or “Install for all users.” “Install for all users” is generally recommended if multiple user accounts share the PC, ensuring the font is available system-wide.
- Select all the font files you wish to install (hold
- Verify Installation: Open an application like Microsoft Word, PowerPoint, or a design tool. The newly installed font should appear in the font selection dropdown list. If not, try restarting the application or even your PC.
This method exemplifies basic Tech proficiency, ensuring that new software components (fonts) are correctly integrated into the operating system.
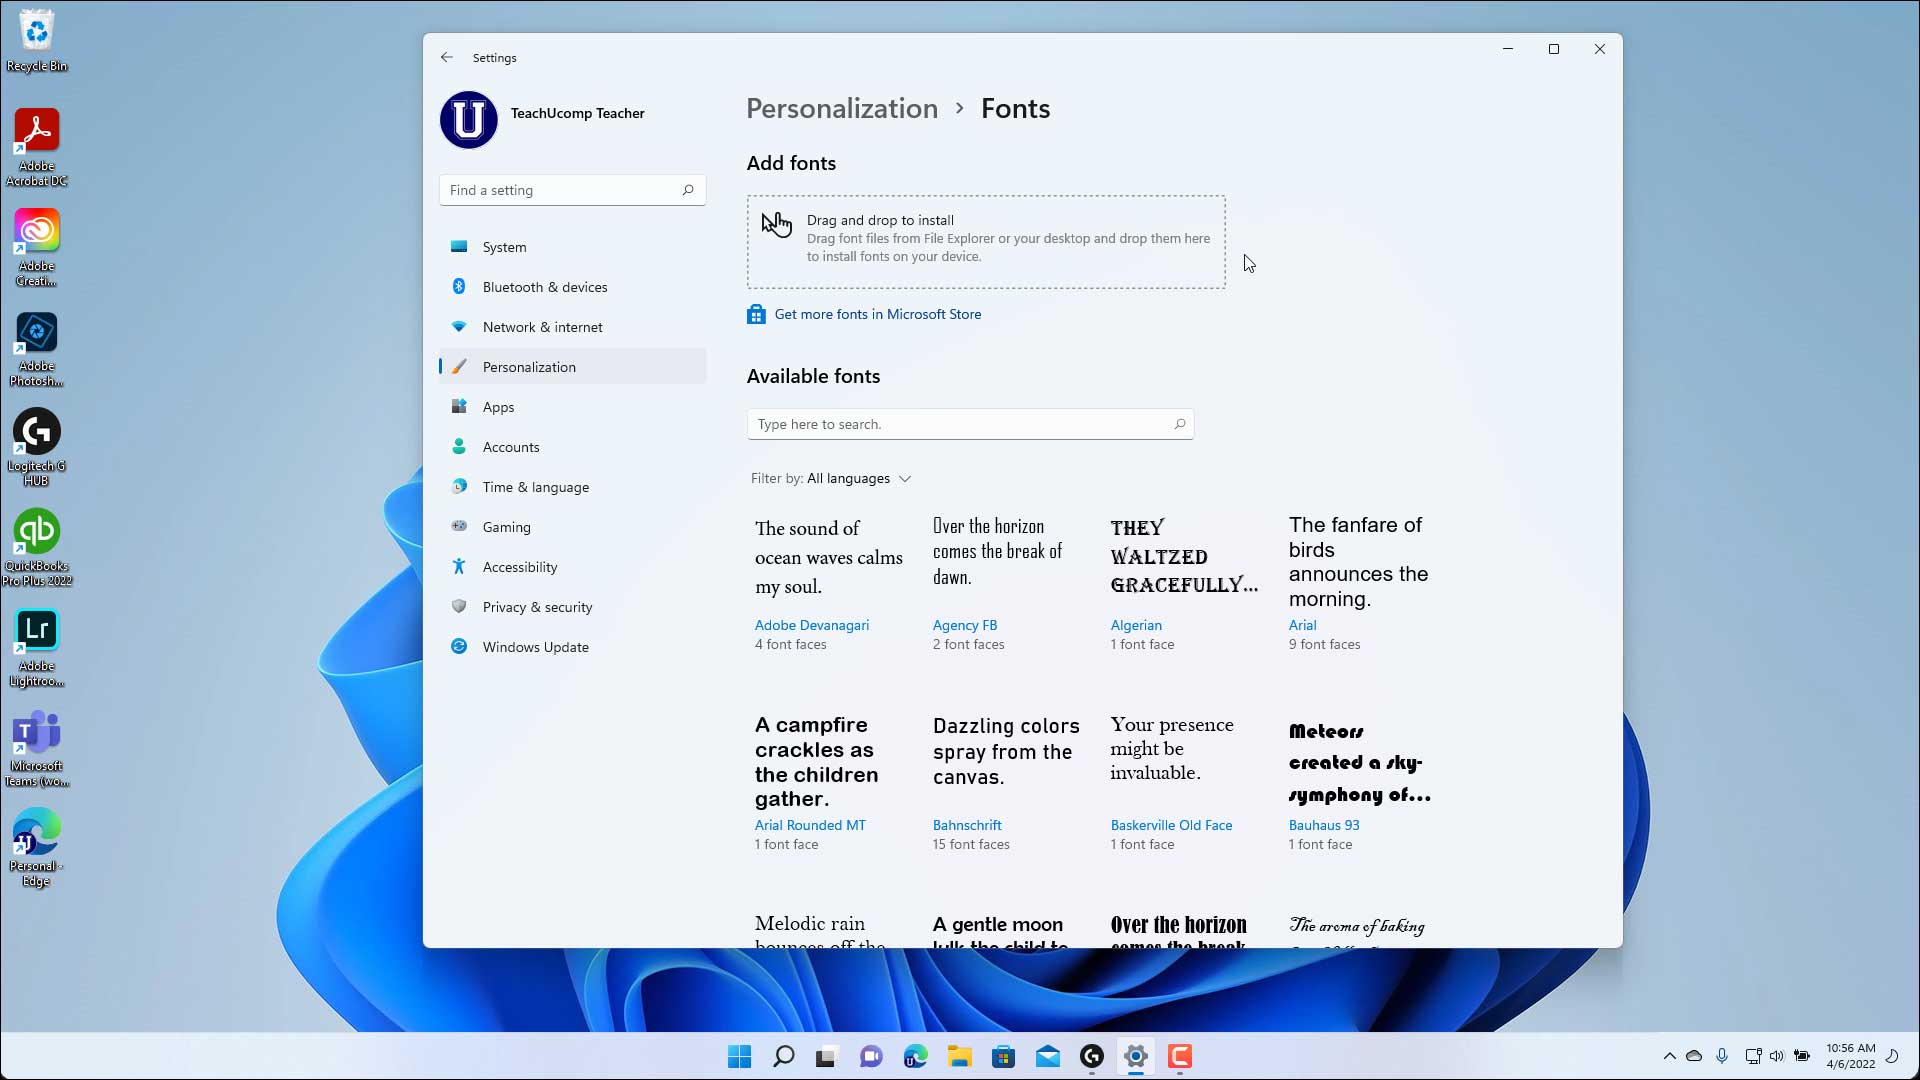
Method 2: Using the Settings App (Windows 10/11)
For a more centralized approach, or if you prefer using Windows’ built-in management tools, the Settings app provides an alternative. This method is particularly useful for managing a growing font library.
- Download and Extract: As with Method 1, download and extract your font files to an accessible location.
- Open Settings: Click the Start button, then click the gear icon to open “Settings,” or press
Windows key + I. - Navigate to Personalization: In the Settings window, click on “Personalization.”
- Go to Fonts: In the left-hand pane of the Personalization section, click on “Fonts.”
- Drag and Drop to Install: In the “Fonts” settings page, you’ll see an area at the top that says “Drag and drop to install.” Simply drag your
.ttfor.otffont files from their extracted folder into this area. - Confirmation: Windows will display a brief message confirming the installation. The font will then appear in the list of installed fonts below.
- Verify: Check your applications to confirm the font is available.
This method, leveraging the modern Windows UI, contributes to a streamlined user experience and falls under current Technology Trends in OS design.
Bulk Installation Tips for Windows
If you’re a designer or a power user accumulating a large number of fonts, installing them one by one can be tedious.
- Select All and Right-Click: After extracting multiple font files, simply select all of them (Ctrl+A), right-click, and choose “Install for all users.” This is the most efficient method for bulk installation.
- Copy to Fonts Folder: As an older, but still valid, method, you can copy font files directly into the Windows Fonts folder. Navigate to
C:WindowsFonts, then drag and drop or copy/paste your font files into this folder. Windows will automatically install them. Be cautious when directly manipulating system folders.
Efficient font management is a key aspect of Productivity for creative professionals, directly impacting project turnaround times and resource utilization.

Installing Fonts on macOS: A Creative Workflow Essential
Apple’s macOS operating system has long been celebrated for its strong emphasis on design and typography. Installing fonts on a Mac is an intuitive process, largely managed through the built-in Font Book application.
The Font Book Application Method
Font Book is macOS’s native font management tool, allowing you to install, preview, validate, and organize your fonts.
- Download Your Font: Obtain your
.ttfor.otffont files. Like Windows, they may be in a.ziparchive that needs to be uncompressed. Double-click the.zipfile to extract its contents. - Open Font Book:
- Locate the font file(s) in your Finder.
- Double-click an individual
.ttfor.otffile. This action will automatically open the Font Book application and display a font preview window. - Alternatively, you can manually open Font Book from your Applications folder (Finder > Applications > Font Book).
- Install Font:
- In the font preview window that appears, click the “Install Font” button.
- Font Book will then perform a quick validation check and install the font. It will appear in your “All Fonts” or “User” collection within Font Book.
- Install Multiple Fonts:
- Select all the font files you wish to install in Finder.
- Drag and drop the selected files directly onto the Font Book application icon in your Dock or Applications folder, or into the Font Book window itself (e.g., into the “User” section).
- Font Book will prompt you to install them and perform validation.
- Verify: Open any application that uses fonts (e.g., Pages, Keynote, Adobe Photoshop, Figma). The newly installed font should now be available in the font selection menus. You might need to restart applications for the new fonts to appear.
The seamless integration of Font Book into macOS highlights Apple’s dedication to user-friendly Tech solutions and is a boon for designers and creatives.
Manual Installation for Individual Fonts
While Font Book is the preferred method, you can also manually place fonts into specific system folders. This is less common but useful for advanced users or troubleshooting.
- User Fonts: For fonts available only to your user account, drag
.ttfor.otffiles into~/Library/Fonts(your user’s Library folder). To access your user Library, hold down theOptionkey while clicking “Go” in the Finder menu bar, then select “Library.” - System Fonts: For fonts available to all users on the Mac, drag
.ttfor.otffiles into/Library/Fonts(the main system Library folder). This usually requires administrator privileges.
Verifying and Validating Fonts on Mac
Font Book isn’t just for installation; it’s also a powerful tool for maintaining a healthy font library.
- Validate Fonts: Before or after installation, you can validate fonts to check for corruption or issues. In Font Book, select one or more fonts, then go to
File > Validate Fonts. - Resolve Duplicates: If you install a font you already have, Font Book will detect it and offer options to resolve the duplicate (e.g., keep the newer version, disable the older, or keep both). This helps prevent performance issues or conflicts in applications.
These features contribute to robust Digital Security by identifying potentially problematic files and enhance Productivity by ensuring a clean and functional font library.
Managing Your Font Library and Troubleshooting Common Issues
Installing fonts is only one part of the equation. Effective management and the ability to troubleshoot problems are crucial for maintaining a responsive system and a productive workflow. This ties into overarching themes of Productivity and Tech maintenance.
Uninstalling and Disabling Fonts
Over time, you might accumulate fonts you no longer use, or discover a problematic font causing application crashes. Removing or disabling them is essential for system hygiene.
- On Windows (Settings App):
- Go to
Settings > Personalization > Fonts. - Find the font you wish to remove in the list.
- Click on the font name to open its detail page.
- Click the “Uninstall” button.
- Go to
- On Windows (Old Method):
- Open the Control Panel (
Windows key + R, typecontrol, press Enter). - Go to
Appearance and Personalization > Fonts. - Select the font(s) you want to remove.
- Click “Delete” from the toolbar or right-click and choose “Delete.”
- Open the Control Panel (
- On macOS (Font Book):
- Open Font Book.
- Select the font(s) you wish to remove or disable.
- To Disable: Right-click the font and select “Disable [Font Name].” The font will become unavailable but remain on your system.
- To Remove: Select the font and go to
File > Remove [Font Name] Family. Confirm by clicking “Remove.” This will delete the font file from your system.
Regularly pruning your font library improves system performance and simplifies font selection in your applications, directly boosting your Productivity.
Common Issues and Quick Fixes
Even with the best intentions, font installation can sometimes hit a snag. Here are common problems and their solutions:
- Font Not Appearing in Applications:
- Restart the Application: Most applications load their font lists upon startup. A restart is often all that’s needed.
- Restart Your PC: If application restarts don’t work, a full system reboot can often resolve caching issues.
- Check Font File Integrity: Re-download the font from a reputable source. The original file might be corrupted.
- Verify Installation: Double-check that the font is listed in your Windows Font Settings or macOS Font Book.
- Corrupted Font Files: These can cause applications to crash or display garbled text.
- Validate: Use Font Book on Mac to validate fonts. On Windows, while there isn’t a direct validation tool, removing and re-installing a fresh download is the best approach.
- Delete and Re-download: If a font is suspected of being corrupted, delete it entirely and download a fresh copy from its source.
- Performance Issues (Slowdowns):
- Too Many Fonts: Having thousands of installed fonts can slow down applications, especially design software, as they need to load extensive font lists. Consider disabling or uninstalling fonts you rarely use. This directly impacts Tech performance and overall Productivity.
- Font Conflicts: Sometimes, different versions of the same font can cause conflicts. Use Font Book’s duplicate resolution features or manually identify and remove conflicting versions.
- Licensing Issues: Remember the distinction between personal and commercial use. Using a personal-use-only font in a commercial project (e.g., client work for Online Income) can lead to legal complications. Always double-check licenses before deploying a font in a professional context, a key aspect of Financial Tools and sound Business Finance practices.
Best Practices for Font Management
A well-organized font library is a creative superpower.
- Create Collections (macOS) or Folders (Windows): Group fonts by project, style, or type (e.g., “Branding Fonts,” “Web Design Fonts,” “Headline Fonts”). This keeps your font menus tidy.
- Use Font Managers: For power users and design professionals, third-party font managers (e.g., Adobe Fonts via Creative Cloud, FontBase, RightFont, Suitcase Fusion) offer advanced features like auto-activation, tagging, cloud sync, and previewing. These tools are invaluable for maintaining Productivity and streamlining workflows, especially when dealing with large client projects.
- Backup Your Fonts: Treat your font collection as a valuable digital asset. Back up your downloaded font files regularly, especially if you’ve invested in premium licenses. This safeguards your Money investment and ensures business continuity.
- Stay Updated: Occasionally check for updated versions of your favorite fonts, as designers sometimes release bug fixes or expanded character sets.
Conclusion
Installing fonts on your PC is a gateway to a world of enhanced creativity, professional polish, and personalized digital expression. Whether you’re a student personalizing your reports, an entrepreneur building a compelling Personal Branding presence, or a seasoned designer crafting intricate Corporate Identity assets, mastering font installation is a fundamental skill.
By following the simple steps outlined for both Windows and macOS, you can easily expand your typographic repertoire. Remember the importance of responsible sourcing to ensure both Digital Security and proper licensing for your projects, especially if they contribute to your Online Income or Side Hustles. A thoughtfully curated and well-managed font library is more than just a collection of files; it’s a strategic asset that empowers you to communicate more effectively, captivate your audience, and truly stand out in the crowded digital landscape. So go forth, explore the endless possibilities of typography, and let your PC reflect your unique style and professional aspirations.
aViewFromTheCave is a participant in the Amazon Services LLC Associates Program, an affiliate advertising program designed to provide a means for sites to earn advertising fees by advertising and linking to Amazon.com. Amazon, the Amazon logo, AmazonSupply, and the AmazonSupply logo are trademarks of Amazon.com, Inc. or its affiliates. As an Amazon Associate we earn affiliate commissions from qualifying purchases.