Navigating the Linux ecosystem, especially for newcomers, often involves encountering various package formats. Among the most prevalent for Debian-based distributions like Ubuntu, Mint, or Pop!_OS, is the .deb file. These files serve as the standard mechanism for distributing and installing software, updates, and system components. While official repositories offer a vast array of applications, there are countless scenarios where you might need to install software from a .deb file downloaded directly from a developer’s website, a beta release, or an application not yet available in your distribution’s official channels. Understanding how to correctly and safely install these packages is a fundamental skill for any Linux user, bridging the gap between simply using your system and truly customizing it to your needs.

This comprehensive guide will demystify the process of installing .deb files, covering both the powerful command-line tools and user-friendly graphical interfaces. We’ll delve into what these files represent, the critical role of dependencies, and provide step-by-step instructions to ensure a smooth installation process, allowing you to confidently expand your software library.
Understanding .deb Files: The Core of Debian-Based Software Distribution
Before diving into the “how,” it’s crucial to understand the “what” and “why” behind .deb files. This foundational knowledge will empower you to make informed decisions and troubleshoot potential issues more effectively.
What is a .deb File?
A .deb file is an archive file format used by Debian and its derivatives to package installable software. The .deb extension stands for “Debian package.” Much like .exe files on Windows or .dmg files on macOS, a .deb file bundles all the necessary components for a specific piece of software. This includes:
- Executable binaries: The actual programs that run.
- Libraries: Shared code modules that programs rely on.
- Configuration files: Settings specific to the application.
- Documentation: Man pages, READMEs, and other helpful information.
- Metadata: Essential information about the package itself, such as its name, version, description, and, most importantly, its dependencies.
The .deb format is a standard defined by Debian, ensuring compatibility and consistency across a vast range of Linux distributions.
Why Are .deb Files Used?
.deb files offer several significant advantages for software distribution and management in the Debian world:
- Standardization: They provide a consistent way for developers to package their software, making it easier for users to install regardless of the specific Debian-based distribution they are running.
- Integrity: Packages are often digitally signed, allowing users to verify their authenticity and ensure they haven’t been tampered with.
- Metadata: The included metadata enables package managers to understand what a package contains, what other packages it needs to function, and how to properly install and uninstall it.
- Offline Installation: Once downloaded, a
.debfile can be installed on a system without an internet connection (provided all dependencies are met or manually installed). - Access to Latest Software: For software that hasn’t made its way into official repositories, or for developers offering newer versions directly,
.debfiles are often the go-to method.
The Importance of Dependencies
Perhaps the most critical concept when dealing with .deb files is “dependencies.” Almost every complex software package relies on other software components (libraries, utilities, other applications) to function correctly. These required components are known as dependencies.
When you try to install a .deb file:
- If all dependencies are already installed on your system: The installation will likely proceed smoothly.
- If some dependencies are missing: The installation process will halt or fail, informing you about the missing packages. This is where many users encounter their first hurdle with
.debfiles.
Modern package management tools are designed to automatically identify and resolve these dependencies, fetching and installing any required packages from your system’s configured repositories. However, when you manually download a .deb file, especially from an unofficial source, you might need to give these tools a little extra help. Understanding this relationship between a package and its dependencies is key to successful and frustration-free installations.
Command-Line Methods: Power and Precision for .deb Installation
For many Linux users, the command line is the preferred method for installing software due to its efficiency, control, and ability to provide detailed feedback. Two primary command-line tools are used for .deb files: dpkg and apt.
Method 1: The dpkg Command (Basic Installation)
dpkg (Debian Package) is the fundamental low-level tool that handles Debian packages directly. It’s the backend for many other package management tools. While powerful, dpkg itself does not resolve dependencies automatically. This means if the .deb file you’re trying to install requires other packages that aren’t present on your system, dpkg will notify you of the missing dependencies and refuse to install the package until they are manually satisfied.
When to Use dpkg
- When you know all dependencies are already met.
- For advanced scenarios where you need direct control over package installation without automatic dependency fetching (e.g., troubleshooting, specific build environments).
- As a first step before letting
aptresolve any subsequent issues.
Syntax and Basic Usage
To install a .deb file using dpkg, open your terminal and navigate to the directory where the .deb file is saved. Alternatively, you can provide the full path to the file.
sudo dpkg -i package-name.deb
sudo: Executes the command with superuser privileges, which are required for system-level changes like installing software.dpkg: The Debian package manager command.-ior--install: The option to install a package.package-name.deb: The full name of your.debfile (e.g.,google-chrome-stable_current_amd64.deb).
Example:
If you downloaded my-application_1.0.0_amd64.deb to your Downloads folder:
cd ~/Downloads
sudo dpkg -i my-application_1.0.0_amd64.deb
Handling Dependencies with apt --fix-broken install
If dpkg encounters missing dependencies, it will typically output an error message similar to:
dpkg: dependency problems prevent configuration of my-application:
 my-application depends on libxyz (>= 1.2); however:
  Package libxyz is not installed.
In such cases, dpkg will install the package but leave it in an “unconfigured” or “broken” state. This is where apt comes to the rescue. The apt package manager is designed to handle dependency resolution. After dpkg has tried to install a package and failed due to dependencies, you can ask apt to fix the broken state:
sudo apt --fix-broken install
This command will:
- Scan your system for any packages left in a broken dependency state (like
my-applicationin the example above). - Identify all missing dependencies for those broken packages.
- Automatically download and install those missing dependencies from your configured repositories.
- Complete the configuration of the originally installed
.debpackage.
This two-step process (dpkg -i followed by apt --fix-broken install) is a common and effective way to manage .deb installations when using dpkg directly.
Method 2: The apt Command (Modern & Recommended Approach)
The apt command (Advanced Package Tool) is the preferred command-line utility for package management in modern Debian-based distributions. It provides a higher-level interface compared to dpkg and, crucially, handles dependency resolution automatically. When installing a local .deb file, apt combines the installation and dependency resolution steps into a single, seamless command.
Advantages of apt over dpkg for local .deb files
- Automatic Dependency Resolution: This is the primary advantage.
aptwill automatically fetch and install any required dependencies from your system’s repositories. - Simplicity: A single command often suffices where
dpkgmight require a follow-up. - Better Error Handling:
aptgenerally provides clearer and more actionable error messages.
Syntax for Local .deb Files
To install a .deb file using apt, you use the install subcommand, but you must specify the path to the local file by prefixing it with ./ if you are in the same directory, or providing the full absolute path.
sudo apt install ./package-name.deb
sudo: For superuser privileges.apt install: The command to install packages../package-name.deb: The path to your local.debfile. The./part is crucial to tellaptthat you are referring to a local file, not a package from a repository.
Example:
If my-application_1.0.0_amd64.deb is in your Downloads folder:
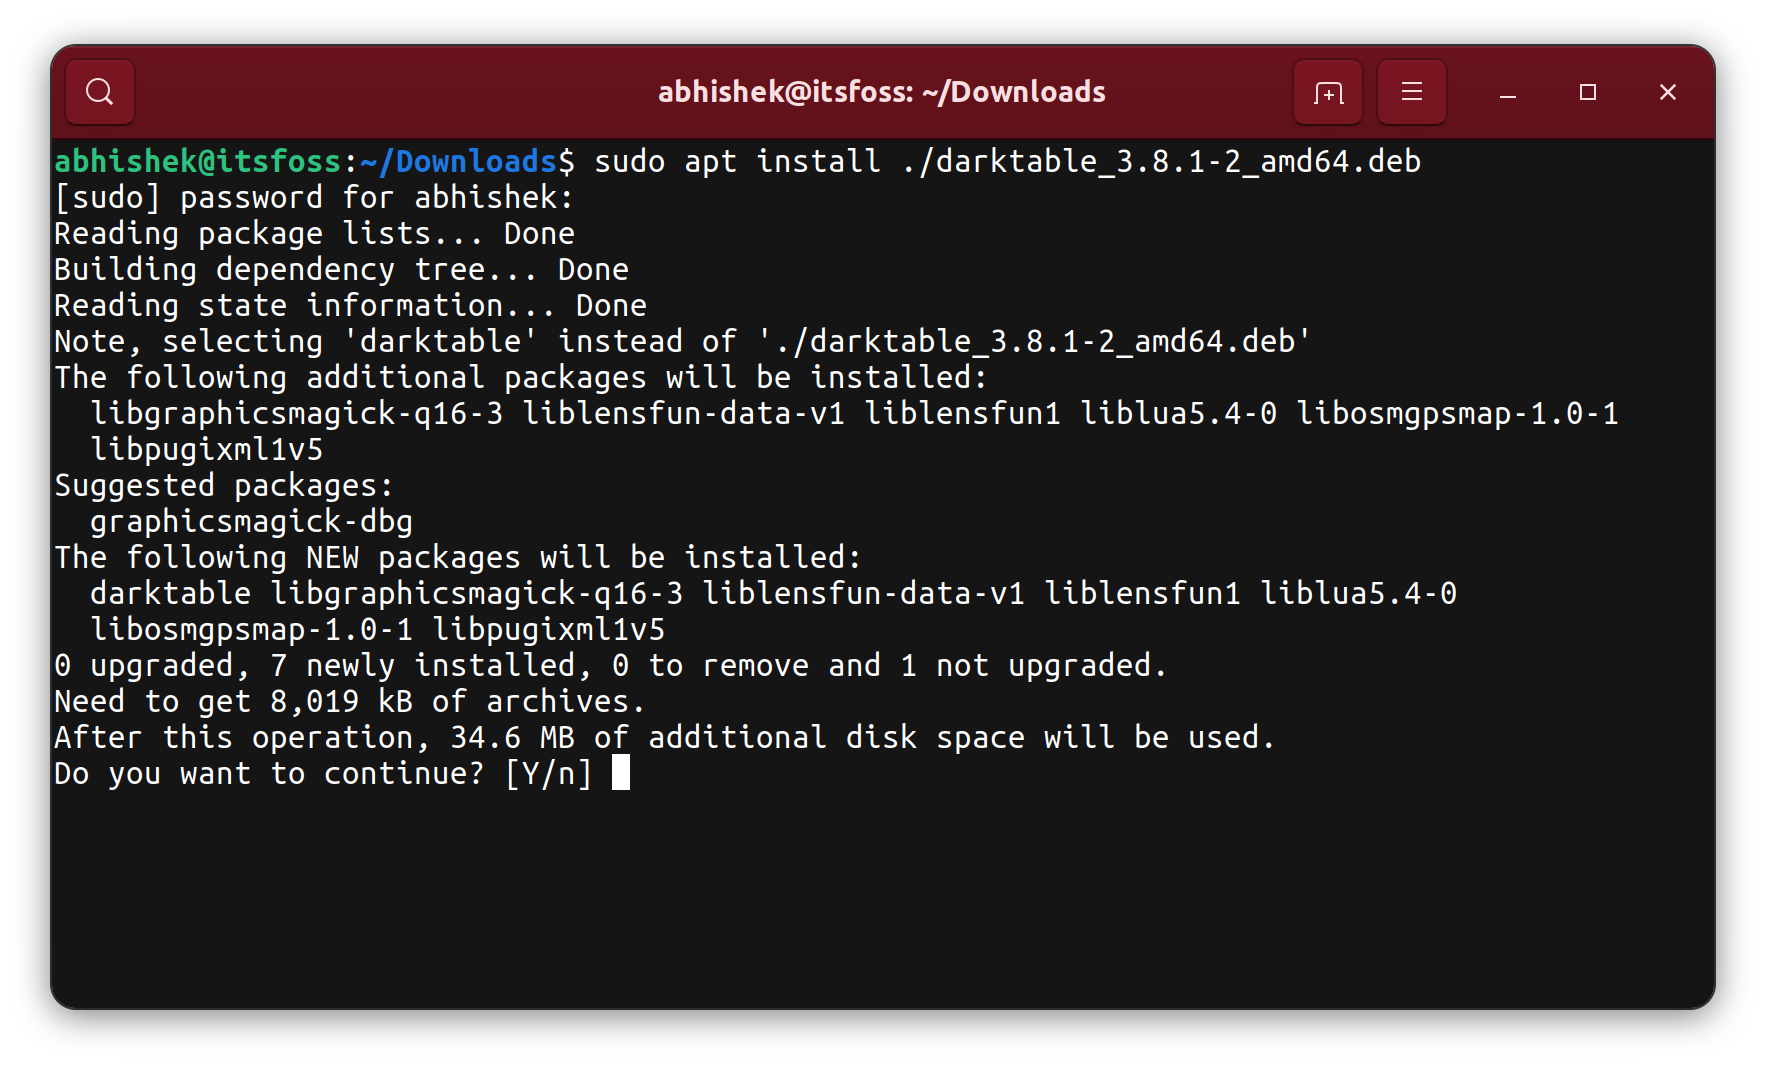
cd ~/Downloads
sudo apt install ./my-application_1.0.0_amd64.deb
When you run this command, apt will first inspect the .deb file, identify its dependencies, then download and install any missing ones, and finally install your target .deb package. You will be prompted to confirm the installation and any additional packages that need to be installed.
Recommendation: For most users and scenarios, sudo apt install ./package-name.deb is the recommended command-line method for installing local .deb files due to its efficiency and automatic dependency resolution.
Graphical User Interface (GUI) Methods: Simplicity for Every User
For users who prefer a visual approach or are new to the command line, graphical tools offer an intuitive way to install .deb packages with just a few clicks.
Method 1: Using GDebi Package Installer
GDebi is a lightweight yet powerful graphical tool specifically designed for installing local .deb files. Its main advantage is that it provides a simple interface while also intelligently handling dependencies by pulling them from your system’s repositories.
What is GDebi?
GDebi is a program that allows you to install .deb files graphically. It checks for dependencies and gives you the option to install them before proceeding with the main package. This makes it incredibly user-friendly and helps avoid the broken package issues that can sometimes arise with dpkg.
Installation of GDebi
GDebi might not be installed by default on all Debian-based distributions, especially minimalist ones. You can easily install it via the command line:
sudo apt update
sudo apt install gdebi
Once installed, GDebi integrates with your file manager, making .deb files executable through it.
How to Use GDebi to Install a .deb File
- Locate the .deb file: Open your file manager (e.g., Nautilus on GNOME, Nemo on Cinnamon, Dolphin on KDE) and navigate to the directory where you downloaded the
.debfile. - Double-click the .deb file: This should automatically open the
.debfile with GDebi. - Review Package Information: GDebi will display details about the package, including its description, version, and critically, a list of required dependencies. It will indicate whether all dependencies are satisfied or if additional packages need to be installed.
- Click “Install Package”: If all looks good and you’re ready to proceed, click the “Install Package” button.
- Enter Password: You will be prompted to enter your user password for authentication, as package installation requires administrative privileges.
- Wait for Installation: GDebi will then download and install any missing dependencies, followed by the main
.debpackage. A progress bar will show the status. - Completion: Once the installation is finished, the “Install Package” button will change to “Reinstall Package” or “Remove Package,” indicating success. You can then close GDebi.
GDebi provides a clear and safe path for installing .deb files, particularly for users who prefer not to use the terminal.
Method 2: Default Software Center or Package Manager
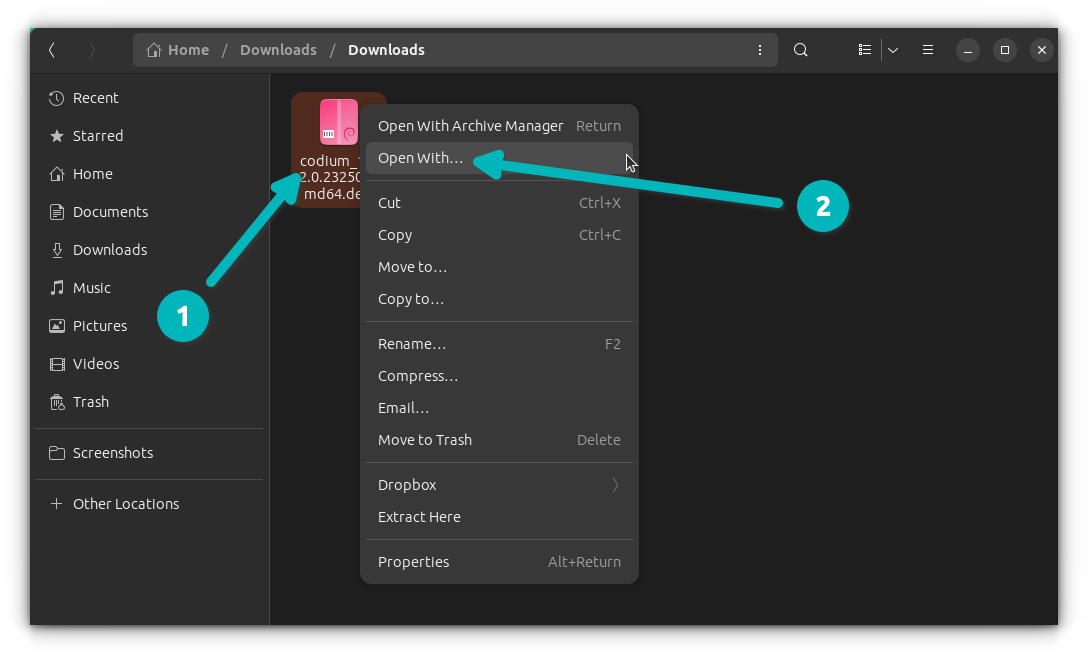
Most modern Debian-based desktop environments come with a “Software Center” or a similar graphical package manager (e.g., GNOME Software, Ubuntu Software Center, KDE Discover). These applications are designed to simplify software installation from official repositories, and often, they can also handle local .deb files.
How it Works (Double-Clicking)
- Locate the .deb file: Find your
.debfile in your file manager. - Double-click the .deb file: In many distributions, double-clicking a
.debfile will automatically open it with the default Software Center application. - Review and Install: The Software Center will typically display information about the package, similar to GDebi. It will also indicate if any dependencies need to be installed. You’ll usually see an “Install” or “Get” button.
- Enter Password: Authenticate with your user password.
- Installation: The Software Center will then proceed to install the package and its dependencies.
When This Method is Applicable
This method is often the simplest for new users. However, its effectiveness can vary:
- Integration: It relies on the desktop environment’s software center being well-integrated and configured to handle local
.debfiles. - Dependency Handling: While generally good at resolving dependencies, some older or less robust software centers might occasionally struggle or provide less clear feedback than GDebi in complex dependency scenarios.
- System Configuration: The behavior can also depend on your specific distribution and how it configures its default file associations.
If double-clicking doesn’t work, or if the Software Center doesn’t provide clear options, using GDebi (if installed) or the apt command-line method is a reliable alternative.
Advanced Considerations and Troubleshooting
While installing .deb files is generally straightforward, being prepared for potential issues and knowing how to manage your packages effectively is crucial.
Dealing with Broken Installations
The most common issue encountered during .deb installation is dependency conflicts or missing packages, leading to a “broken” installation state. Your system might warn you about unconfigured packages, or you might see errors when trying to install other software.
The Solution: The apt --fix-broken install command, as mentioned earlier, is your primary tool here.
sudo apt --fix-broken install
Running this command will instruct apt to find and install any missing dependencies for packages that are currently in a broken state, thereby repairing the installation. It’s often followed by sudo apt update and sudo apt upgrade to ensure your system’s package lists and installed software are up-to-date after the fix.
Uninstalling .deb Packages
Just as important as installing software is knowing how to remove it cleanly. You can remove packages installed via .deb files using apt or dpkg.
-
Using
apt(Recommended):
This is the preferred method as it also handles removing associated dependencies that are no longer needed by other packages.sudo apt remove package-nameReplace
package-namewith the actual name of the software package, which might be slightly different from the.debfilename (e.g.,google-chrome-stableinstead ofgoogle-chrome-stable_current_amd64.deb).To remove the package and its configuration files (a “purge”), use:
sudo apt purge package-name -
Using
dpkg(Lower Level):
You can also remove packages withdpkg, but it won’t automatically remove dependencies that were installed alongside it.sudo dpkg -r package-nameTo remove with configuration files:
sudo dpkg -P package-name
After using dpkg -r or dpkg -P, it’s a good practice to run sudo apt autoremove to clean up any orphaned dependencies that are no longer required by any installed software.
Verifying Package Authenticity (GPG Keys)
For critical software or packages from less-known sources, verifying the authenticity of a .deb file is a good security practice. Many reputable developers sign their .deb packages with GPG keys. While the simple installation methods don’t typically include automatic GPG verification for local files, you can manually check signatures if the developer provides them. This usually involves importing the developer’s public key and then verifying the package using debsig-verify or similar tools. This is a more advanced topic, but worth knowing that the capability exists for enhanced security. For most common .deb files from well-known sources (like Chrome, VS Code), trust is usually established through the source itself.
Conclusion: Empowering Your Linux Software Journey
Installing .deb files is an essential skill for anyone using a Debian-based Linux distribution. Whether you opt for the robust control of the command line with apt install ./package-name.deb (our recommended method for its balance of power and simplicity) or the user-friendly experience of a graphical tool like GDebi, you now have the knowledge and steps to confidently manage your software.
Remember the critical role of dependencies and how tools like apt are designed to handle them, saving you from potential headaches. By understanding these methods, you’re not just installing software; you’re gaining a deeper appreciation for the structured and powerful package management system that underpins much of the Linux experience. Go forth, explore new applications, and customize your Linux environment to truly make it your own!