The transition to Linux is often viewed as a rite of passage for technology enthusiasts, developers, and privacy-conscious users alike. Unlike the proprietary constraints of Windows or macOS, Linux offers an unparalleled level of transparency, customization, and efficiency. However, for those accustomed to pre-installed operating systems, the prospect of “installing Linux” can seem daunting. This guide serves as a technical roadmap, detailing every stage of the process—from selecting a distribution to post-installation optimization—to ensure a seamless migration to the world of open-source computing.
Selecting the Ideal Distribution for Your Workflow
The first step in your Linux journey is not technical, but strategic: choosing the right distribution (or “distro”). Because Linux is a kernel rather than a single monolithic product, different organizations package it with various desktop environments, package managers, and philosophies.

Beginner-Friendly Entry Points: Ubuntu and Linux Mint
For those new to the ecosystem, Ubuntu remains the industry standard. Developed by Canonical, it boasts the largest community support and the most comprehensive hardware compatibility. Its user interface is intuitive, and most third-party software providers prioritize Ubuntu-compatible packages (.deb).
Alternatively, Linux Mint is often recommended for users migrating directly from Windows. Its “Cinnamon” desktop environment mimics the traditional taskbar and start menu layout, providing a sense of familiarity while offering the performance benefits of a Linux backend. Both distros focus on “out-of-the-box” functionality, including pre-installed codecs and drivers.
Stability and Performance: Debian and Fedora
If your priority is a “clean” experience or a stable server environment, Debian is the bedrock of the Linux world. It is famous for its rigorous testing cycles, ensuring that every piece of software is rock-solid, though this often means using slightly older versions of applications.
Fedora, backed by Red Hat, sits on the opposite end of the spectrum. It is a “point-release” distro that stays on the “bleeding edge” of technology. If you want the latest Linux kernel features and the most recent versions of GNOME or KDE Plasma, Fedora is the premier choice for workstations and development machines.
The Rolling Release Path: Arch Linux and Manjaro
For users who want to understand the inner workings of their operating system, Arch Linux offers a “build-it-yourself” approach. There is no graphical installer by default; you manually partition disks and install packages via the command line. While the learning curve is steep, the Arch User Repository (AUR) provides access to almost every piece of software ever written for Linux. Manjaro provides an accessible middle ground, offering the power of Arch with a user-friendly graphical installer and pre-configured desktop environments.
Technical Preparation: Creating Your Installation Media
Once you have selected your distribution, you must prepare your hardware. Installing an operating system is a destructive process regarding disk data, so meticulous preparation is required.
Hardware Prerequisites and Data Integrity
Before proceeding, verify that your hardware meets the requirements of your chosen distro. While Linux is famous for reviving old hardware, modern desktop environments like GNOME 45+ or KDE Plasma 6 perform best with at least 4GB of RAM and a Solid State Drive (SSD).
The most critical step is the backup. Whether you are performing a “clean install” (wiping the drive) or a “dual boot” (keeping Windows alongside Linux), you must back up your essential documents, photos, and encryption keys to an external drive or cloud service. Modifying disk partitions always carries a non-zero risk of data loss.
Downloading and Verifying the ISO Image
Navigate to the official website of your chosen distribution to download the ISO file. It is vital to use official mirrors to avoid compromised images. Most distributions provide a “SHA256 checksum.” After downloading, use a checksum utility to verify that the file on your hard drive matches the one on the server. This ensures the file wasn’t corrupted during the download and hasn’t been tampered with by a third party.
Creating a Bootable USB Drive
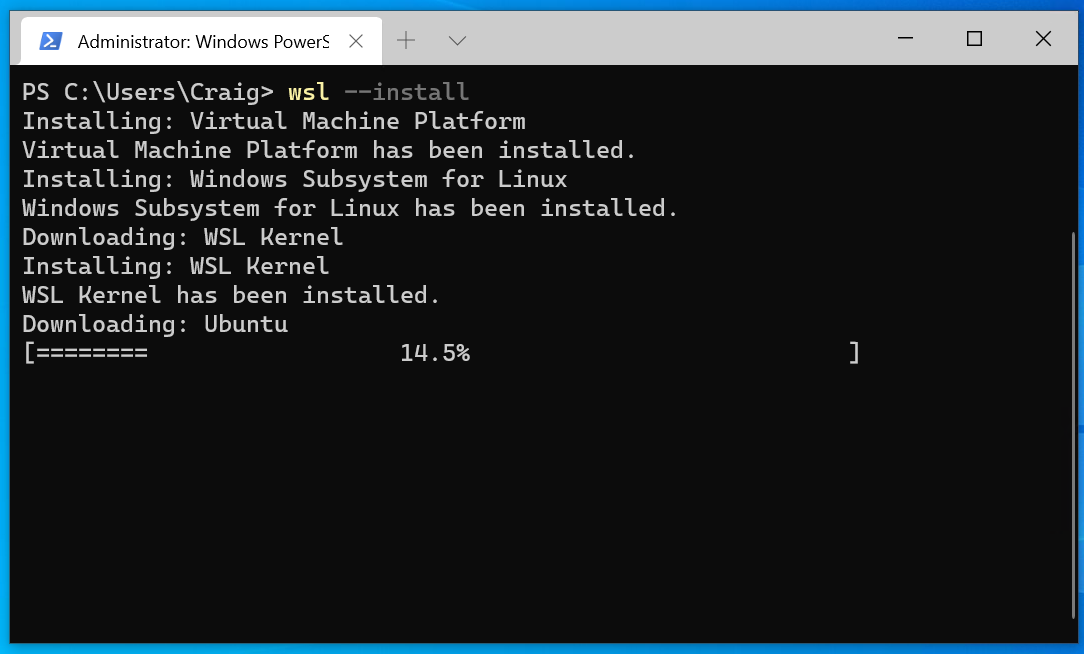
You cannot simply copy the ISO file to a thumb drive; you must “flash” it so the computer recognizes it as a bootable device. For Windows users, Rufus is the gold standard for creating bootable media, offering options for BIOS or UEFI compatibility. For macOS or cross-platform users, balenaEtcher provides a simplified, foolproof interface. Insert a USB drive (at least 8GB), select your ISO, and flash the image. Note that this will erase all data currently on the USB drive.
Navigating the Installation Environment
With your bootable USB ready, you must now instruct your computer to run the Linux installer instead of your existing operating system.
Adjusting BIOS/UEFI Settings
Restart your computer and tap the BIOS entry key (usually F2, F10, F12, or Del) during the initial splash screen. Within the firmware settings, you may need to disable “Secure Boot,” although many modern distros like Ubuntu and Fedora now support it. Ensure your “Boot Order” is set to prioritize the USB drive over the internal hard drive. If you are using a modern machine, ensure it is set to UEFI mode rather than “Legacy” or “CSM” for better security and faster boot times.
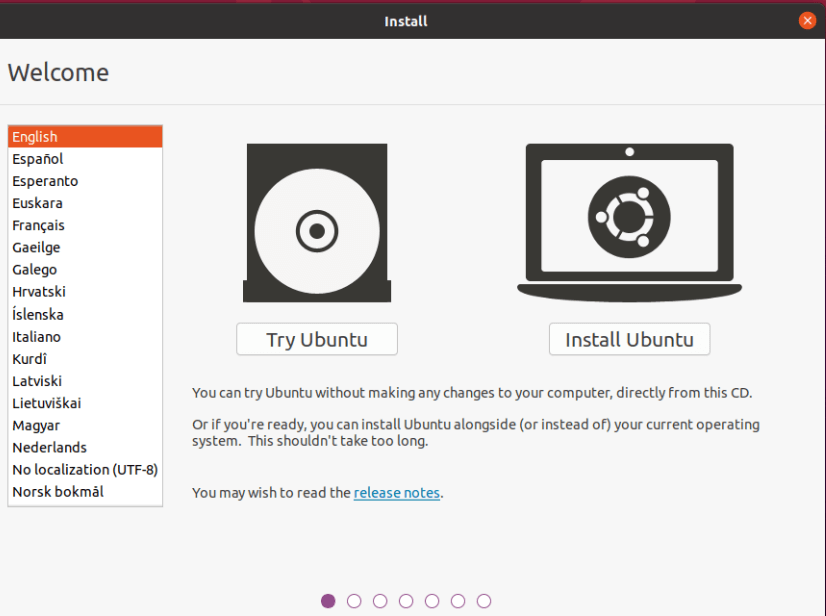
The Live Environment Experience
Most modern Linux installers boot into a “Live Environment.” This allows you to use the operating system directly from the USB drive without making any changes to your hard drive. This is an excellent opportunity to test your Wi-Fi card, Bluetooth, and audio. If everything works in the Live session, it will almost certainly work after installation. Once satisfied, click the “Install” icon on the desktop to launch the system installer.
Disk Partitioning and File Systems
This is the most technical phase of the installation. You will typically face three choices:
- Erase Disk: The simplest option. It wipes everything and sets up a standard partition layout.
- Install Alongside: The installer shrinks your existing Windows partition to create space for Linux, allowing you to choose between the two at startup (GRUB menu).
- Manual Partitioning: For advanced users. Here, you can define specific partitions for
/(root),/home(your personal files), andswap(virtual memory).
When choosing a file system, Ext4 is the reliable standard. However, Btrfs is gaining popularity in distros like Fedora and openSUSE because it supports “snapshots,” allowing you to roll back your entire system to a previous state if an update goes wrong.
Post-Installation: Configuring Your New Linux Workstation
The installation isn’t finished when the computer reboots. To turn a fresh install into a daily driver, you must perform several optimization steps.
System Updates and Driver Management
The first command any Linux user should run is a system update. Even if you just downloaded the ISO, new security patches are released daily. Open the terminal and use your package manager (e.g., sudo apt update && sudo apt upgrade for Ubuntu-based systems).
Furthermore, while Linux includes most drivers in the kernel, proprietary hardware—specifically Nvidia graphics cards and certain Broadcom Wi-Fi chips—requires “Additional Drivers.” Ubuntu and Mint have dedicated “Driver Manager” apps to handle this with a single click, ensuring you get maximum gaming and video performance.
Essential Software and Package Managers
Linux manages software differently than Windows. Instead of searching the web for .exe files, you use “Repositories.”
- GUI Stores: Most distros have a “Software Center” similar to an App Store.
- Flatpak and Snap: These are universal packaging formats. They contain all the dependencies an app needs to run, making them highly reliable across different distributions. Flathub is the premier source for Flatpaks, offering the latest versions of Discord, Spotify, and OBS Studio.
- The CLI: Learning basic terminal commands for your package manager (APT, DNF, or Pacman) is highly recommended for speed and efficiency.
Strengthening Digital Security and Privacy
One of the primary reasons for switching to Linux is security, but it is not “invincible” by default.
- Enable the Firewall: Most distros include UFW (Uncomplicated Firewall). You can enable it via the terminal with
sudo ufw enable. - Encryption: If you didn’t choose “Full Disk Encryption” during installation, ensure your sensitive folders are protected.
- Permissions: Linux uses a strict permission system. Never run GUI applications with
sudounless absolutely necessary, and be mindful of what “PPA” or third-party repositories you add to your system, as they can introduce instability or security risks.
By following this structured approach, you transform the installation of Linux from a daunting technical hurdle into a controlled, professional deployment. Whether you are looking to escape corporate telemetry, seeking a more powerful development environment, or simply curious about the philosophy of open source, a properly installed Linux system provides a robust foundation for the future of your digital life.
aViewFromTheCave is a participant in the Amazon Services LLC Associates Program, an affiliate advertising program designed to provide a means for sites to earn advertising fees by advertising and linking to Amazon.com. Amazon, the Amazon logo, AmazonSupply, and the AmazonSupply logo are trademarks of Amazon.com, Inc. or its affiliates. As an Amazon Associate we earn affiliate commissions from qualifying purchases.