
The humble bolt, a cornerstone of countless mechanical assemblies, relies on precise engineering and execution to perform its function. For anyone working with metal, wood, or advanced composite materials, understanding the correct drill bit size for a specific fastener like a 1/4-20 bolt is not merely a practical skill but a fundamental aspect of sound technical practice. This guide delves into the precision required, explaining the nuances of thread types, pilot holes, and clearance diameters, all critical for ensuring structural integrity and optimal performance in any engineering application.
Understanding the 1/4-20 Bolt: An Engineering Standard
Before selecting a drill bit, it’s essential to decode the “1/4-20” designation. This is not arbitrary but a standardized technical specification for unified screw threads, widely adopted in North America.
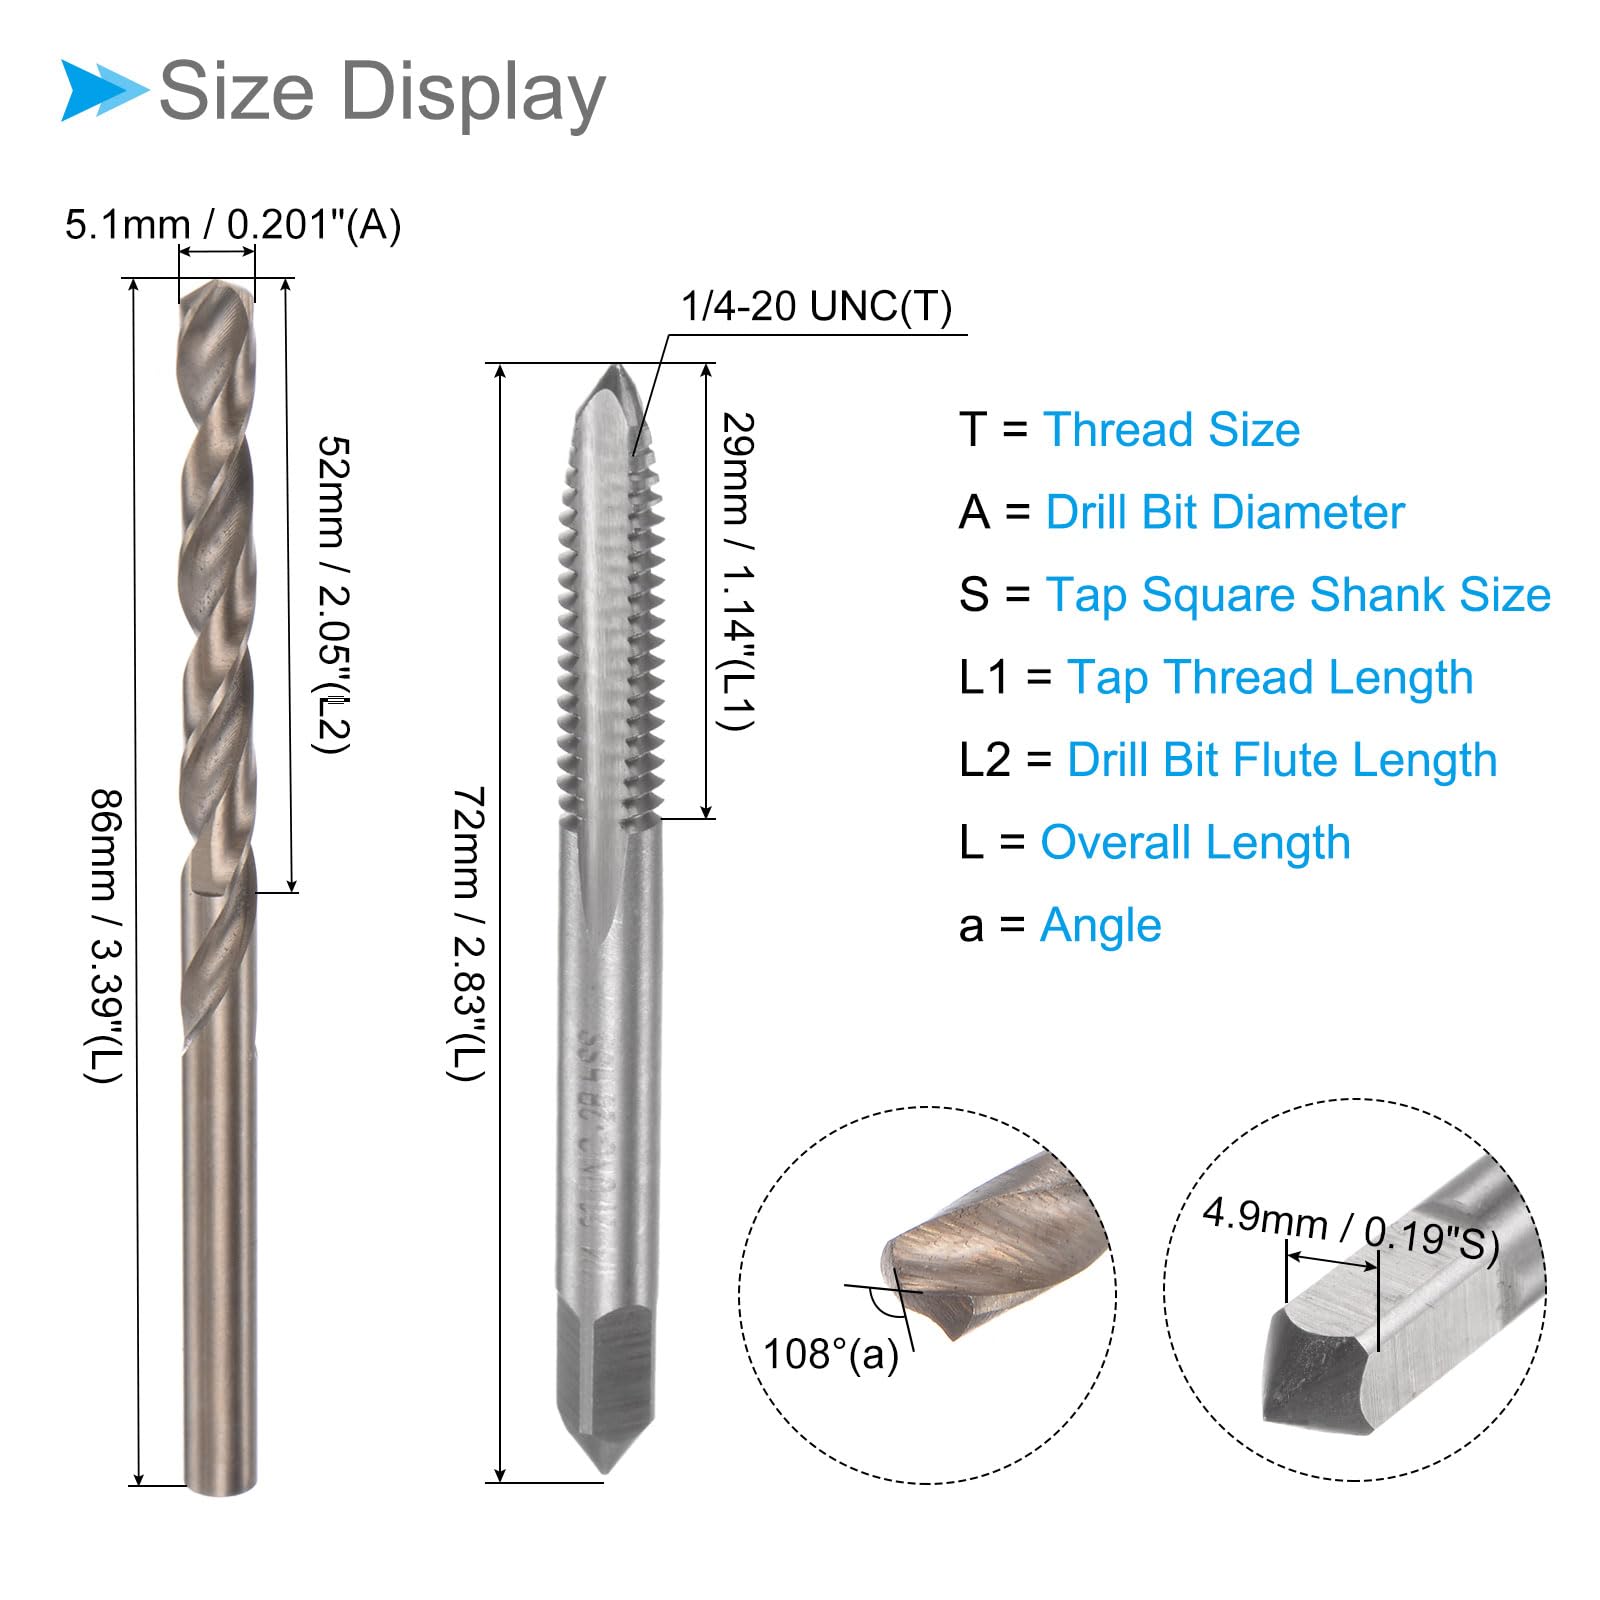
- 1/4: This indicates the nominal diameter of the bolt in inches. Specifically, it refers to the major diameter of the external thread. In metric terms, 1/4 inch is approximately 6.35 mm.
- 20: This number denotes the threads per inch (TPI). For every inch of the bolt’s threaded length, there are 20 individual thread peaks. This determines the pitch of the thread, which is the distance between adjacent threads (1/20 inch or 0.050 inches).
Together, “1/4-20” specifies a coarse-thread bolt (UNC – Unified National Coarse) with a nominal major diameter of one-quarter inch and 20 threads per inch. Coarse threads are generally preferred for general-purpose applications due to their greater resistance to stripping, ease of assembly, and suitability for brittle materials. Understanding this designation is the first step in applying the correct technical solution for drilling and tapping.
Drilling for Tapping: The Essential Pilot Hole
The most critical application for drilling for a 1/4-20 bolt is creating a hole that will subsequently be tapped. Tapping is the process of cutting internal threads into a pre-drilled hole, allowing the bolt to thread directly into the material. The size of this pre-drilled hole, known as the tap drill size, is paramount. If the hole is too small, the tap will bind or break; if it’s too large, the threads cut will be weak or insufficient.
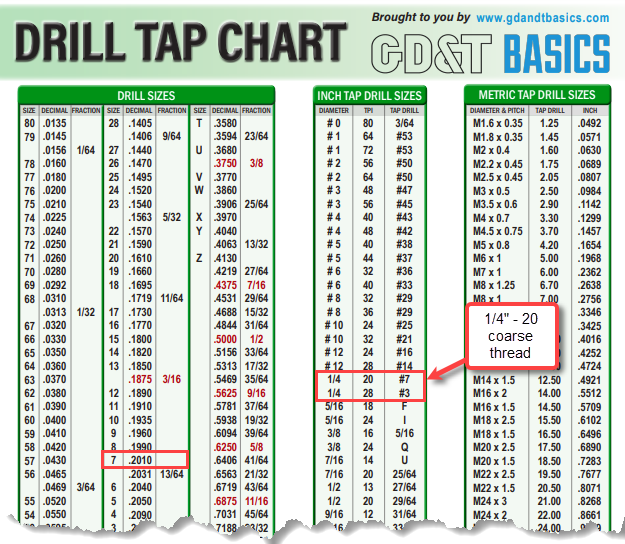
For a 1/4-20 UNC thread, the standard tap drill size is #7 (number 7) drill bit.
- A #7 drill bit has a diameter of 0.201 inches.
Alternatively, a 13/64″ drill bit can also be used as a close approximation:
- A 13/64″ drill bit has a diameter of 0.203125 inches.
While 13/64″ is slightly larger than #7, both are commonly accepted and provide sufficient thread engagement for most general-purpose applications. The slight variation affects the percentage of thread engagement, a key technical consideration:
- Thread Engagement Percentage: Tapping into a hole sized precisely for 100% thread engagement is rarely practical or necessary. It results in excessive friction and tap breakage. Standard practice aims for approximately 75% thread engagement, which offers maximum strength without over-stressing the tap. A 75% thread engagement is typically achieved with the #7 drill bit for a 1/4-20 UNC thread. This balance ensures the strength of the threaded connection while optimizing the tapping process itself, preventing issues such as torn threads or excessive torque requirements. The minor difference between #7 and 13/64″ results in a negligible difference in practical strength for most materials, but for high-precision or critical applications, adhering strictly to the #7 is recommended.
When selecting between #7 and 13/64″, consider the material being tapped. Softer materials might benefit from the slightly larger 13/64″ to reduce tap stress, while harder materials often require the precise #7 to ensure maximum thread contact for strength. Always refer to a reliable tap and drill chart for confirmation, as material properties can sometimes necessitate slight deviations from general guidelines.
Through-Hole vs. Tap-Drill: Critical Distinctions
It’s vital to differentiate between a tap drill size and a clearance hole size. These serve entirely different purposes in mechanical design and assembly.
Tap Drill Hole (for Tapping)
As discussed, this is the hole into which internal threads will be cut with a tap. Its diameter must be smaller than the major diameter of the bolt to allow the tap to cut threads that interlock with the bolt’s threads. The objective is to achieve a strong, engaged thread connection. For a 1/4-20 bolt, this is the #7 (0.201″) or 13/64″ (0.203″) drill bit.
Clearance Hole (for Through-Passage)
A clearance hole is designed to allow the bolt to pass through without engaging threads. This is used when fastening two or more components together, where only one component (or none, if using a nut) needs to be threaded. The hole must be large enough to accommodate the bolt’s major diameter comfortably, preventing binding but not so large as to compromise the assembly’s integrity unnecessarily.
For a 1/4-20 bolt, standard clearance holes typically fall into two categories:
- Close Fit (Precision Applications): For applications requiring minimal play or precise alignment.
- Recommended Drill Bit: 1/4″ (0.250″) or F drill bit (0.252″).
- This provides a snug fit, ensuring alignment but may require light tapping with a mallet to insert the bolt.
- Normal Fit (General Purpose): For most common applications where a comfortable fit is desired.
- Recommended Drill Bit: 17/64″ (0.2656″).
- This provides enough clearance for easy bolt insertion without excessive slop. It’s the most common choice for general fabrication.
- Loose Fit (Oversized, for Adjustment or Imperfections): For situations where alignment might be difficult, or some adjustability is desired.
- Recommended Drill Bit: 9/32″ (0.2812″) or larger.
- This offers significant clearance, allowing for larger misalignments or potential deformation during assembly.
Choosing the correct clearance hole depends entirely on the design’s functional requirements. A close fit ensures maximum shear strength in the joint, while a loose fit offers assembly convenience. Engineering specifications or design drawings will typically dictate the required fit.
Precision in Practice: Tools and Techniques for Optimal Results
Achieving the correct hole size is only half the battle; proper drilling technique is crucial for a clean, accurate hole, especially when preparing for tapping.
Tools for Precision
- Drill Press: For maximum accuracy, especially with tap drill sizes, a drill press is indispensable. It ensures the hole is perfectly perpendicular to the material surface, preventing angled threads that can weaken the joint or cause tap breakage. The consistent downward pressure and controlled speed are also critical.
- High-Quality Drill Bits: Invest in sharp, high-speed steel (HSS) or cobalt drill bits. Dull bits generate excessive heat, wander, and produce oversized or rough holes, compromising thread quality. Titanium nitride (TiN) coated bits offer enhanced durability and reduced friction.
- Cutting Fluid: For drilling and tapping most metals, especially steel and aluminum, using an appropriate cutting fluid is essential. It reduces friction and heat, prolongs tool life, aids in chip evacuation, and results in a smoother, more accurate hole. For harder materials, specific cutting oils are necessary.
- Center Punch: Before drilling, always use a center punch to create a divot at the exact drilling location. This prevents the drill bit from “walking” across the surface, ensuring the hole starts precisely where intended.
Drilling Techniques
- Secure the Workpiece: Use a vise, clamps, or a drill press table to firmly secure the material. Any movement during drilling can lead to inaccurate hole placement or an elliptical hole.
- Start Slow and Steady: Begin drilling at a low speed, especially with larger bits, to create a pilot point. Gradually increase speed as the bit engages the material.
- Consistent Pressure: Apply steady, even pressure. Too little pressure causes the bit to rub and overheat; too much can overload the motor or break the bit.
- Clear Chips: For deeper holes, periodically retract the drill bit to clear chips (swarf) from the flutes. This prevents chip buildup, reduces heat, and allows the cutting fluid to reach the cutting edges.
- Peck Drilling (for Deep Holes): For holes deeper than three times the drill bit diameter, use a peck drilling technique: drill a short distance, retract, clear chips, and repeat.
- Deburr: After drilling, use a countersink bit or a larger drill bit to lightly chamfer the edges of the hole. This removes sharp burrs, which can interfere with the tap or the mating surface of components.
Beyond the Basics: Advanced Considerations for Material and Application
The choice of drill bit size, and the subsequent tapping or clearance operation, is significantly influenced by the material and the specific application’s demands.
Material Properties
- Soft Metals (Aluminum, Brass): These are generally easier to drill and tap. The #7 or 13/64″ tap drill is effective, and taps can cut threads with less resistance. However, softer materials are more prone to thread stripping if over-torqued.
- Hard Metals (Stainless Steel, High-Carbon Steel): Require slower drill speeds, more aggressive cutting fluids, and often cobalt drill bits for durability. Tapping these materials requires specific taps (e.g., spiral point or spiral flute taps) and careful technique to prevent tap breakage. The #7 drill bit becomes even more critical for strong thread engagement.
- Plastics (Acrylic, Nylon, PVC): Different plastics behave uniquely. Some require specific drill bit geometries (e.g., zero-rake angle bits for plastics) to prevent cracking or melting. Tapping plastics often uses standard taps, but consideration for lower thread engagement percentages may be given to prevent cracking, or self-tapping screws designed for plastics may be preferred.
- Wood: For wood, tapping is generally not performed with machine screw taps due to wood’s fibrous nature. Instead, wood screws, which create their own threads, are used. For through holes, the 17/64″ clearance hole is suitable, but often a slightly larger hole is preferred if a washer is used to prevent splitting.

Application-Specific Demands
- Structural Integrity: In load-bearing applications, the highest possible thread engagement (achieved with the #7 drill bit for tapping) and precise clearance holes are paramount to ensure the joint can withstand designed stresses.
- Vibration Resistance: For assemblies subjected to vibration, strong thread engagement is crucial. Loctite or other thread-locking compounds may also be used in conjunction with properly sized holes.
- Sealing: When a threaded hole needs to be sealed against fluid or gas leakage, the precision of the tap drill hole (and the resulting threads) is vital to ensure an effective seal with an appropriate sealant or O-ring.
- Aesthetics: For visible components, clean, burr-free holes and well-formed threads contribute to the overall quality and professional appearance of the finished product.
Mastering the selection and application of drill bits for a 1/4-20 bolt, whether for tapping or clearance, is a foundational skill. It directly impacts the strength, durability, and reliability of mechanical systems, making it a vital piece of technical knowledge for engineers, machinists, and DIY enthusiasts alike. Adhering to these principles ensures that every fastened joint performs as intended, a testament to thoughtful design and meticulous execution.
aViewFromTheCave is a participant in the Amazon Services LLC Associates Program, an affiliate advertising program designed to provide a means for sites to earn advertising fees by advertising and linking to Amazon.com. Amazon, the Amazon logo, AmazonSupply, and the AmazonSupply logo are trademarks of Amazon.com, Inc. or its affiliates. As an Amazon Associate we earn affiliate commissions from qualifying purchases.