
The precision required for successful thread cutting is paramount in any technical application, whether in fabrication, repair, or advanced manufacturing. One of the most common questions encountered in metalworking and mechanical assembly pertains to selecting the correct drill bit for a given tap size. For the widely used 5/16-18 tap, understanding the underlying principles and adhering to best practices ensures strong, reliable threads. This guide delves into the specifics of determining the optimal drill bit, emphasizing the technical rationale and practical considerations for achieving superior results.
Understanding the 5/16-18 Tap Standard
The designation “5/16-18 tap” is a standard notation in the Unified Thread Standard (UTS), predominantly used in the United States and Canada. This specific nomenclature provides critical information for engineers, machinists, and technicians. Deciphering it is the first step toward accurate tool selection and successful thread cutting.

UNC vs. UNF Threads
The UTS encompasses two primary series for general applications: Unified National Coarse (UNC) and Unified National Fine (UNF). The “18” in “5/16-18” denotes 18 threads per inch (TPI), classifying this as a Unified National Coarse (UNC) thread. Coarse threads are characterized by larger thread pitches (fewer threads per inch) compared to fine threads of the same diameter. This makes them generally stronger, more resistant to stripping, and easier to assemble quickly. They are also less prone to cross-threading and are more forgiving in situations where thread damage might occur or where frequent assembly and disassembly are anticipated. Fine threads, conversely, offer greater resistance to loosening from vibration and allow for finer adjustments, often found in precision applications. For the 5/16-18 UNC, its robustness makes it a staple in general fastening applications.
Major Diameter, Pitch, and Tap Drill Size
The “5/16” in the standard refers to the nominal major diameter of the thread, which is 5/16 of an inch, or 0.3125 inches. The “18” refers to the thread pitch, meaning there are 18 threads within every inch of length. These two parameters are fundamental in calculating the correct tap drill size. The purpose of the tap drill is to create a pilot hole that is precisely sized to allow the tap to cut the thread’s crests, while leaving enough material for the tap to form the roots and flanks of the thread. An undersized hole can lead to excessive tap breakage, while an oversized hole results in shallow, weak threads with reduced engagement. The aim is to achieve an optimal “thread percentage,” typically between 70% and 80%, which provides maximum strength without excessive tapping torque.
The Science Behind Tap Drill Sizing
Selecting the correct tap drill size is not arbitrary; it’s based on engineering principles designed to balance thread strength with the practicalities of the tapping process. Several factors influence this selection, primarily centering around the desired thread percentage and the material being tapped.
Thread Percentage and Its Importance
Thread percentage refers to the actual amount of thread engagement achieved relative to a theoretically perfect 100% thread. While 100% thread engagement sounds ideal, it’s rarely achieved or desired in practice. A 100% thread requires a very small tap drill, which drastically increases the torque needed to cut the thread, leading to higher tap breakage rates and significantly harder work, especially in tougher materials. Studies and practical experience have shown that a thread engagement between 70% and 80% provides nearly 90-95% of the full theoretical thread strength, while significantly reducing tapping torque and the risk of tap breakage. For the 5/16-18 tap, standard drill charts are optimized for this range, striking a balance between strength and machinability. Going above 80% offers diminishing returns in strength but dramatically increases the risk of tap failure. Below 70%, the threads may not provide sufficient strength for critical applications.
Material Considerations
The material into which you are tapping plays a crucial role in drill bit selection and the overall tapping process. Different materials exhibit varying degrees of hardness, ductility, and abrasiveness, which impact chip formation and tap wear.
- Soft Materials (e.g., Aluminum, Brass, Mild Steel): These materials are generally easier to tap. Standard tap drill sizes, usually optimized for 75% thread engagement, work very well. The chips formed are often continuous, requiring good lubrication and chip evacuation.
- Hard Materials (e.g., Stainless Steel, Tool Steel, Titanium): These present significant challenges. They are tougher to cut, generate more heat, and are prone to work hardening. For such materials, it’s often advisable to use a slightly larger tap drill (aiming for 65-70% thread engagement) to reduce tapping torque and prevent tap breakage. This minor reduction in thread percentage is often an acceptable trade-off for successful tapping and prolonged tap life in demanding materials.
- Abrasive Materials (e.g., Cast Iron): These materials produce small, brittle chips but can be very abrasive, leading to increased tap wear. Proper lubrication and chip evacuation are critical.
Choosing the correct drill bit for the material ensures a smoother process and maximizes the life of your tap.
Types of Taps and Their Requirements
While the drill bit size is primarily determined by the desired thread percentage, the type of tap used can subtly influence the process.
- Hand Taps (Taper, Plug, Bottoming): These are the most common and are designed for general-purpose use. The standard tap drill charts are typically based on these taps.
- Machine Taps (Spiral Flute, Spiral Point): These are designed for machine tapping operations and offer enhanced chip evacuation. Spiral point taps (or “gun taps”) push chips forward, ideal for through-holes. Spiral flute taps lift chips out, beneficial for blind holes. While the tap drill size remains largely consistent, the efficiency of chip removal with these taps can make the tapping process smoother.
- Forming Taps (Thread Rolling Taps): These taps do not cut material; instead, they plastically deform the material to create threads. They require a larger tap drill than cutting taps because they displace material rather than removing it. The exact drill size for forming taps is critical and is specific to the tap and material, usually requiring a very precise reamer-sized hole to achieve optimal thread formation and strength. This is a crucial distinction and requires consulting specific manufacturer recommendations. For a 5/16-18 forming tap, the drill size would be different from a cutting tap. However, for a cutting 5/16-18 tap, the standard recommendations apply.
Selecting the Correct Drill Bit for 5/16-18 Tap
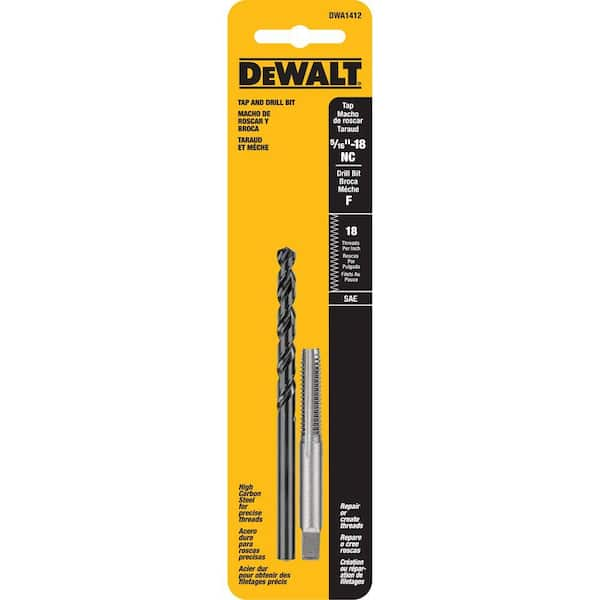
For a standard 5/16-18 UNC cutting tap, the industry-standard recommendation for the tap drill size is consistently provided in thread reference charts. This recommendation aims for the optimal balance of thread strength and ease of tapping.
The Standard Chart Recommendation
Based on the Unified Thread Standard, the recommended tap drill for a 5/16-18 UNC tap is a letter “F” drill bit.
- A letter “F” drill bit has a diameter of 0.2570 inches.
- This size typically provides approximately 75% thread engagement, which is ideal for most materials and applications, balancing thread strength with minimal tapping torque and reduced risk of tap breakage.
It is imperative to use a high-quality drill bit, sharp and appropriately ground for the material, to ensure a clean, accurately sized hole. A dull drill bit can lead to an oversized or out-of-round hole, compromising thread quality.
Metric Equivalents and Conversions
While the primary recommendation is a letter “F” drill, it’s useful to know metric equivalents for situations where metric tooling might be more readily available or preferred.
- 0.2570 inches converts to approximately 6.528 mm.
- In situations where an “F” drill might not be available, a close metric equivalent could be a 6.5 mm drill bit. However, using a 6.5 mm drill (0.2559 inches) would result in a slightly smaller hole than the “F” drill, leading to a slightly higher thread percentage (closer to 77-78%) and increased tapping torque. While often acceptable, it’s generally best to stick to the exact recommended drill size when possible for optimal results, especially in harder materials or critical applications. Always cross-reference with a reliable tap and drill chart.
Considerations for Through-Holes vs. Blind Holes
The type of hole—whether it penetrates completely through the material (through-hole) or stops at a certain depth (blind hole)—also influences the tapping process, though less so the initial drill bit selection.
- Through-holes: Offer the advantage of allowing chips to exit from the bottom of the hole. This is where spiral point taps excel.
- Blind holes: Require more careful chip management as chips must be extracted back up and out of the hole. Spiral flute taps are designed for this, lifting chips out. For blind holes, it’s crucial to drill deep enough to accommodate the tap’s lead chamfer and any chips that accumulate, ensuring the full thread depth is achieved without the tap bottoming out on chips or the tap’s unthreaded portion. While the drill bit diameter remains “F,” the drilled depth must be greater than the desired thread depth to allow for this.
Best Practices for Tapping Success
Beyond selecting the correct drill bit, several best practices are critical to successfully cutting high-quality threads with a 5/16-18 tap. Adhering to these techniques minimizes errors, extends tool life, and ensures the integrity of the fastener joint.
Proper Drilling Technique
Starting with an accurately drilled hole is fundamental.
- Center Punch: Always center punch the drill location to prevent the drill bit from wandering at the start.
- Pilot Hole (Optional): For larger diameter holes or hard materials, drilling a smaller pilot hole before the final “F” drill can improve accuracy and reduce strain on the larger drill bit.
- Drill Press: Whenever possible, use a drill press to ensure the hole is drilled perfectly perpendicular to the material surface. A hand drill can lead to angled holes, making tapping difficult and potentially creating weak, off-axis threads.
- Speed and Feed: Use appropriate drill speeds and feed rates for the material. Too fast can overheat the drill and material; too slow can cause excessive friction.
- Coolant/Lubricant: Use suitable cutting fluid during drilling to reduce friction, dissipate heat, and aid chip evacuation.
Lubrication and Chip Management
Tapping is a cutting operation that generates heat and chips. Proper lubrication and chip management are vital.
- Tapping Fluid: Always use a high-quality tapping fluid or cutting oil specifically formulated for the material being tapped. Lubrication reduces friction between the tap and the workpiece, dissipates heat, and flushes away chips.
- Chip Evacuation: For hand tapping, especially in blind holes, regularly back the tap out a half-turn or full turn after every 1-2 full turns forward. This action breaks chips and allows cutting fluid to enter the cutting zone, preventing chip buildup that can bind the tap and lead to breakage. For machine tapping, select taps designed for efficient chip evacuation (spiral point for through-holes, spiral flute for blind holes).
- Cleanliness: Keep the work area and tools clean to prevent contamination that can affect cutting performance or thread quality.
Deburring and Chamfering
Before tapping, it’s crucial to prepare the hole.
- Deburring: After drilling, the edge of the hole often has a burr. This should be removed using a deburring tool or a larger drill bit by hand. Burrs can interfere with the tap’s entry, damage the tap, or create an uneven start to the thread.
- Chamfering: A slight chamfer (e.g., 90-degree countersink) on the top edge of the drilled hole is highly recommended. This guides the tap accurately into the hole, facilitates easier thread starting, and helps prevent the first thread from being damaged. For a 5/16-18 tap, a chamfer slightly larger than 5/16 inch (e.g., 0.350-0.375 inch diameter) is appropriate.

Verifying Thread Quality
Once tapping is complete, always verify the quality of the cut threads.
- Thread Gages: For critical applications, use a “Go/No-Go” thread gage to ensure the threads are within tolerance. The “Go” end should freely enter the hole, and the “No-Go” end should not.
- Visual Inspection: Visually inspect the threads for consistency, completeness, and any signs of damage or tearing.
- Trial Fit: For less critical applications, a trial fit with a matching bolt or screw can confirm proper thread formation. The bolt should thread smoothly and without excessive force.
By meticulously following these guidelines, from precise drill bit selection to careful tapping technique, you can consistently produce high-quality, reliable threads with your 5/16-18 tap, ensuring robust and lasting mechanical assemblies.
aViewFromTheCave is a participant in the Amazon Services LLC Associates Program, an affiliate advertising program designed to provide a means for sites to earn advertising fees by advertising and linking to Amazon.com. Amazon, the Amazon logo, AmazonSupply, and the AmazonSupply logo are trademarks of Amazon.com, Inc. or its affiliates. As an Amazon Associate we earn affiliate commissions from qualifying purchases.