
Understanding the precise drill size required for a tap is a foundational skill in any hardware-centric endeavor, from custom gadget fabrication to robust industrial prototyping. The 1/4-20 tap, a common threading standard, refers to a tap that will create threads for a 1/4-inch diameter bolt with 20 threads per inch (TPI). Achieving a strong, reliable thread depends critically on boring a pilot hole of the correct diameter. Too small, and the tap will bind or break; too large, and the threads will be weak or strip easily.
The Engineering Behind Tap and Drill Sizing
Tapping is the process of cutting a screw thread into the inside surface of a pre-drilled hole. This seemingly straightforward operation relies on a precise relationship between the tap’s design and the pilot hole’s diameter. The objective is to remove enough material to allow the tap to cut clean threads, yet leave sufficient material for the threads to achieve the necessary strength.
The Anatomy of a Tap
A tap itself is a cutting tool with hardened, sharp teeth arranged in a spiral or straight flute pattern. It features a tapered lead section to help it start cutting and a full-form section that completes the thread profile. The major diameter of the tap corresponds to the desired outer diameter of the thread, while the pitch diameter is the theoretical diameter at which the thread and groove widths are equal. The tap drill size primarily dictates the minor diameter of the resulting internal thread.
How Taps Create Threads
When a tap is turned into a pilot hole, its cutting edges shave away material, progressively forming the helix of the internal thread. The flutes on the tap serve to remove chips and allow cutting fluid to reach the cutting edges. The precision of this process directly correlates with the amount of material the tap is asked to remove. An undersized hole forces the tap to remove too much material, increasing torque and the risk of breakage. An oversized hole, conversely, means the tap removes too little material, resulting in a thread with a reduced percentage of engagement and diminished strength.
Why Drill Size Matters: A Perfect Fit
The concept of “percentage of thread” is central to understanding tap drill sizing. A 100% thread engagement means the internal thread is a perfect match for the external thread, theoretically providing maximum strength. However, achieving 100% thread engagement is impractical and often undesirable in practice. It requires an extremely tight fit, making assembly difficult and increasing the risk of tap breakage. Industry standards and practical experience have shown that a 75% thread engagement provides an optimal balance: it offers approximately 95% of the strength of a 100% thread but reduces the tapping torque by as much as 50%. This makes the tapping process significantly easier and safer, particularly for tougher materials. The drill size for a tap is calculated to achieve this optimal percentage of thread engagement.
The Specifics: 1/4-20 Tap Drill Size
For a 1/4-20 tap, the precise drill size is critical. Deviations, even slight ones, can compromise the integrity of your threaded connection, a risk no serious hardware developer or hobbyist should take.
Standard Recommendations
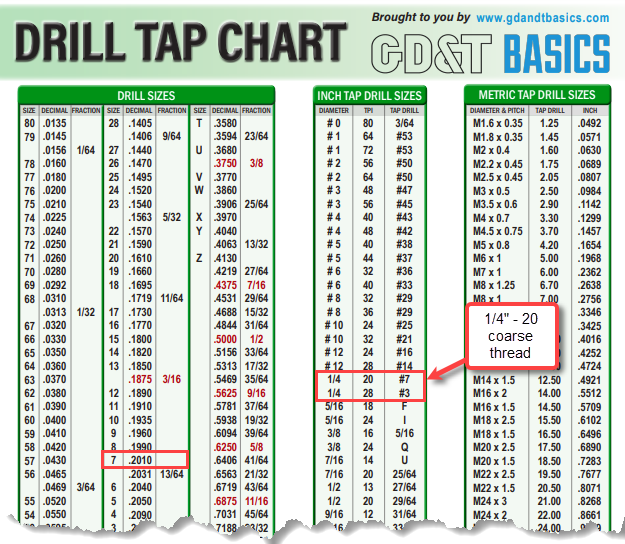
The standard recommended drill size for a 1/4-20 UNC (Unified National Coarse) tap is a #7 drill bit.
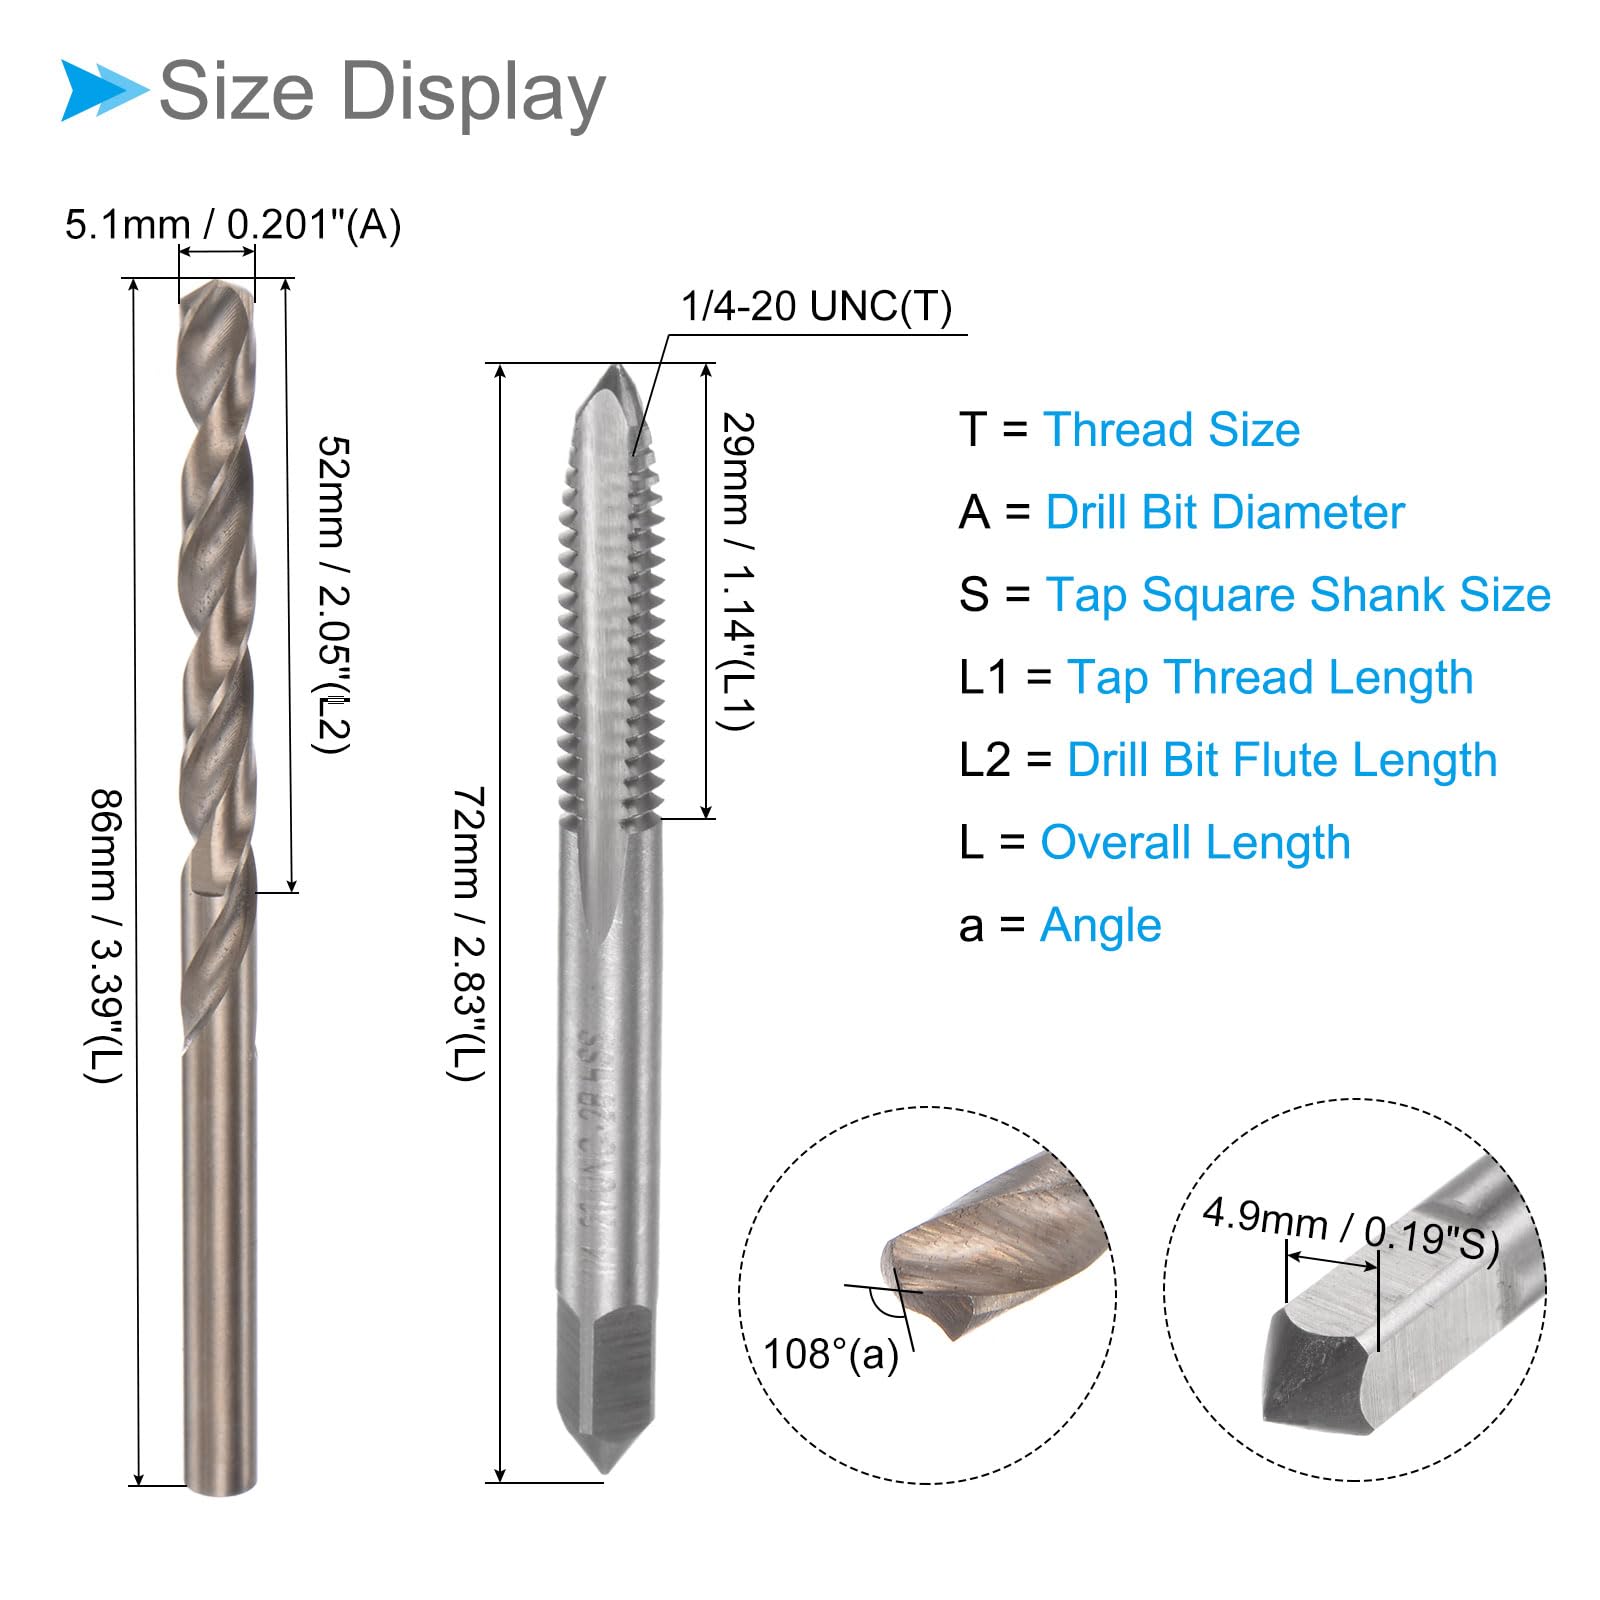
A #7 drill bit has a diameter of 0.201 inches (5.11 mm).
This size is engineered to leave just enough material for the 1/4-20 tap to cut robust threads, typically resulting in a thread engagement percentage around 75%. This balance provides excellent strength while minimizing the risk of tap breakage and facilitating a smoother tapping process.
Imperial vs. Metric Drill Bits
In regions predominantly using the imperial system (like the U.S.), drill bits are commonly sized using a numbering system (#1 to #80), letter system (A to Z), or fractional inches (e.g., 1/8″, 7/32″). For the 1/4-20 tap, the #7 drill bit is the specific imperial designation.
While metric drills (sized in millimeters) are also available globally, direct equivalents are rare, and approximations can lead to suboptimal results. If a #7 drill bit is unavailable and a metric alternative must be used, the closest available size would be 5.1 mm. However, always verify the exact diameter against the tap drill chart and consider the material being tapped, as even small differences can have an impact.
Factors Influencing Drill Size Choice
While the #7 drill bit is the standard, several factors can influence a slight adjustment:
- Material Hardness:
- Softer Materials (e.g., Aluminum, Brass): For very soft, ductile materials, you might be able to use a slightly larger drill (e.g., 0.203″ or 5.16 mm, if available) to reduce tapping torque and prevent galling, without significantly compromising thread strength. The material tends to flow and fill the threads more readily.
- Harder Materials (e.g., Stainless Steel, Tool Steel): With harder materials, the tap experiences more resistance. Using a drill that is marginally larger (e.g., 0.203″) can reduce the tapping force required and decrease the chance of tap breakage. However, this comes at the cost of slightly reduced thread strength. For critical applications, maintaining the #7 drill is paramount, but extra care in lubrication and technique is needed.
- Thread Depth: For very shallow holes, a slightly smaller drill might be chosen to maximize thread engagement. Conversely, for very deep holes, a slightly larger drill can alleviate friction and heat buildup.
- Lubrication: Proper cutting fluid significantly reduces friction and heat, allowing the tap to cut more cleanly and effectively, which in turn means you can stick closer to the standard drill size, even in challenging materials. Lack of lubrication can mimic the effects of an undersized hole, leading to increased torque and tap breakage.
- Tapping Method (Hand vs. Machine): Machine tapping often allows for more consistent forces and speeds, potentially making it safer to stick to the standard drill size in harder materials than with hand tapping, where inconsistent force can lead to issues.
Executing the Drilling and Tapping Process Flawlessly
Successful tapping is as much about technique as it is about selecting the correct drill bit. A methodical approach ensures clean threads, enhances durability, and minimizes tool breakage.
Preparing Your Workpiece
Before drilling, secure your workpiece firmly in a vise or clamp. Movement during drilling can lead to oversized, angled, or off-center holes, all of which compromise the tapping process. Mark the center of your desired hole precisely using a center punch. This creates a small indentation that guides the drill bit, preventing it from “walking” across the surface. Ensure the surface is clean and free of debris.
Precision Drilling Techniques
- Select the Correct Drill Bit: As established, for a 1/4-20 tap, use a #7 drill bit (0.201 inches / 5.11 mm). Ensure the drill bit is sharp; a dull bit will generate excessive heat, wander, and produce a rough hole.
- Use a Drill Press: Whenever possible, use a drill press. This ensures the hole is drilled perfectly perpendicular to the surface, which is critical for straight threads. If hand-drilling, use a drill guide or an angle finder to maintain perpendicularity.
- Optimal Speed and Feed:
- Speed (RPM): Slower speeds are generally better for harder materials and larger drill bits to prevent overheating and premature wear. For a #7 drill in most common metals, a moderate speed is appropriate. Consult drill speed charts for specific material recommendations.
- Feed (Pressure): Apply steady, consistent pressure. Too little pressure will cause the drill to rub and heat up; too much can overload the drill and cause breakage.
- Lubrication and Chip Clearing: Use an appropriate cutting fluid for the material being drilled. This reduces friction, dissipates heat, and flushes away chips. For deeper holes, use a “pecking” technique: drill a short distance, retract the drill to clear chips, apply more lubricant, and repeat. This prevents chip buildup and overheating.
- Deburr the Hole: After drilling, use a larger drill bit, a countersink, or a deburring tool to remove any burrs from the entrance of the hole. Burrs can interfere with the tap’s entry, damage its cutting edges, or create an uneven start to the thread.
The Art of Tapping
- Secure the Tap in a Tap Wrench: Choose a tap wrench that securely holds the square drive of the tap. A T-handle wrench is often preferred for smaller taps as it provides better control.
- Start Straight: Crucially, ensure the tap enters the hole perfectly perpendicular. This is the most critical step for straight threads. Use a tap guide (if available), a square, or even your eye to verify alignment from multiple angles. For drill press users, the drill chuck can often be used as a temporary tap guide by lowering it until it just touches the top of the tap (without clamping it) to maintain vertical alignment as you begin to turn the tap wrench by hand.
- Apply Consistent Pressure and Rotation: Apply slight downward pressure to get the tap started, then rotate the tap wrench clockwise (for right-hand threads). Once the tap “catches” and begins to cut, the downward pressure is no longer needed.
- “Two Turns Forward, Half a Turn Back”: This is a golden rule for hand tapping. Rotate the tap forward approximately two full turns, then reverse it about half a turn. This action breaks off the chips, prevents them from binding in the flutes, and allows cutting fluid to enter the cutting zone. Repeat this cycle until the desired thread depth is reached.
- Lubricate Generously: Continuously apply appropriate cutting fluid. This is vital for reducing friction, preventing galling (especially in materials like aluminum and stainless steel), and extending tap life.
Post-Tapping Verification and Best Practices
After tapping, clear any remaining chips from the hole. Test the threads with a corresponding bolt or screw to ensure proper fit and engagement. If threads feel rough or tight, an appropriate thread chaser or die can sometimes clean them up, though ideally, proper drilling and tapping technique should prevent this. Store taps cleanly and protect their cutting edges.
Common Pitfalls and Troubleshooting
Even experienced technicians encounter issues during drilling and tapping. Recognizing and addressing these problems is crucial for successful outcomes.
Overtapping and Stripped Threads
Overtapping refers to cutting threads too deep or with excessive force, particularly in softer materials, which can weaken the thread profile. Stripped threads occur when the internal threads are damaged beyond repair, often due to an oversized pilot hole, insufficient material strength, or excessive torque during bolt insertion. Prevention involves using the correct drill size, monitoring tapping torque, and choosing appropriate materials for the application’s load requirements. For existing stripped threads, remedies include using thread repair inserts (like Helicoil or similar systems) or drilling out the hole and tapping for a larger size.
Broken Taps and Prevention
A broken tap is one of the most frustrating occurrences. It typically happens when the tap binds due to:
- An undersized drill hole forcing the tap to remove too much material.
- Insufficient lubrication leading to excessive friction.
- Accumulated chips jamming the flutes (failure to back out and clear chips).
- Misalignment or uneven pressure on the tap wrench.
- Tapping too aggressively in hard materials.
To prevent breakage, always use the recommended drill size, apply generous lubrication, follow the “two turns forward, half a turn back” rule, maintain perfect alignment, and be mindful of the material’s resistance. Extracting a broken tap can be a difficult and time-consuming process, often requiring specialized tap extractors or even EDM (electrical discharge machining) for hardened taps.
Material Considerations for Successful Tapping
Different materials behave uniquely during drilling and tapping:
- Aluminum and Brass: These are generally easy to tap but can be prone to galling (material seizing to the tap) without proper lubrication. Use tapping fluid specifically designed for non-ferrous metals.
- Mild Steel: Taps well with general-purpose tapping fluid. Ensure proper chip evacuation.
- Stainless Steel: Known for its work-hardening properties, stainless steel is challenging. Use slow speeds, strong, sharp taps (often cobalt or high-speed steel), and heavy-duty cutting fluid. Frequent chip breaking is essential.
- Plastics: Some plastics can be tapped, but care must be taken to prevent cracking or melting. Use slower speeds, and consider specific plastic taps designed to avoid stress concentration. For very soft plastics, sometimes a slightly smaller drill can improve thread engagement, but proceed with caution.
Beyond the Basics: Advanced Tapping Techniques
While the fundamentals of tapping remain constant, specialized applications and tooling offer enhanced capabilities for specific needs.
Through-Hole vs. Blind-Hole Tapping
- Through-Hole: A hole that passes entirely through the workpiece. Tapping a through-hole is generally easier as chips can fall out the bottom, and there’s no risk of the tap bottoming out.
- Blind-Hole: A hole that does not pass through the workpiece. Tapping a blind hole requires more attention to chip management, as chips accumulate at the bottom. Taps designed for blind holes often have different flute geometries (e.g., spiral flutes pull chips up and out of the hole) or are bottoming taps with minimal lead chamfer, allowing threads to be cut almost to the very bottom of the hole. It’s crucial to drill the pilot hole deeper than the required thread depth to accommodate the tap’s lead and chip accumulation.
Machine Tapping vs. Hand Tapping
- Hand Tapping: Performed with a tap wrench, suitable for low-volume work, larger holes, or when a drill press/milling machine is unavailable. Offers a high degree of “feel” for the cutting process.
- Machine Tapping: Utilizes a drill press, milling machine, or dedicated tapping machine. Provides superior accuracy, consistency, and speed, especially for repetitive tasks. Machine tapping often uses specific machine taps designed for higher speeds and efficient chip evacuation. Proper alignment of the machine spindle with the workpiece is paramount to prevent tap breakage.

Specialized Taps and Their Applications
Beyond the standard plug and taper taps, several specialized taps exist:
- Bottoming Taps: Feature almost no taper at the tip, allowing threads to be cut to the very bottom of a blind hole.
- Spiral Flute Taps: Designed with flutes that spiral up the tap, effectively pulling chips out of a blind hole. Ideal for sticky materials like aluminum and for blind holes.
- Spiral Point Taps (Gun Taps): Have a “point” that pushes chips forward through the hole. Excellent for through-holes where chips can be expelled. They reduce chip packing in the flutes and lower tapping torque.
- Forming Taps (Thread Rolling Taps): Instead of cutting material, these taps cold-form the threads by displacing material. They produce stronger threads, no chips, and are ideal for ductile materials. However, they require a slightly different drill size calculation (usually larger) and more torque to operate.
Mastering the art of drilling and tapping, starting with correctly identifying the #7 drill bit for a 1/4-20 tap, is a fundamental step toward producing high-quality, reliable hardware for any technological application. Precision, technique, and an understanding of material properties are your best allies in this critical process.
aViewFromTheCave is a participant in the Amazon Services LLC Associates Program, an affiliate advertising program designed to provide a means for sites to earn advertising fees by advertising and linking to Amazon.com. Amazon, the Amazon logo, AmazonSupply, and the AmazonSupply logo are trademarks of Amazon.com, Inc. or its affiliates. As an Amazon Associate we earn affiliate commissions from qualifying purchases.