
Understanding Tap & Drill Bit Sizing Fundamentals
The precise act of creating internal threads in a material is a cornerstone of mechanical assembly and fabrication. Whether you’re working on a sophisticated electronics enclosure, a custom robot chassis, or simply repairing a stripped screw hole, selecting the correct drill bit for a tap is critical to success. An incorrect drill size can lead to weak threads, damaged fasteners, or even broken taps, turning a simple task into a frustrating ordeal.
The Anatomy of a Tap
A tap is a hardened steel tool designed to cut or form a female thread. It consists of a threaded body with cutting edges (flutes) that remove material, a shank for gripping, and a square drive for a tap wrench. Taps are categorized by their thread type (e.g., Unified National Coarse – UNC, Unified National Fine – UNF, Metric), size, and pitch (threads per inch or mm). For example, an “8-32 tap” indicates a screw size of #8 and 32 threads per inch (TPI) with a Unified National Coarse (UNC) thread form.

How Taps Create Threads
When a tap is rotated into a pre-drilled pilot hole, its cutting edges shave away material, gradually forming the internal helical grooves that comprise a thread. The precision of this operation relies heavily on the initial pilot hole being the correct size. Too small, and the tap will encounter excessive resistance, risking breakage and poor thread quality. Too large, and the tap won’t cut enough material, resulting in shallow, weak, or non-existent threads that cannot properly engage with a screw.
The Role of the Tap Drill
The “tap drill” is the specific drill bit used to create the pilot hole before tapping. Its size is meticulously calculated to ensure that when the tap is used, it will create threads with the optimal percentage of engagement. Thread engagement refers to the amount of contact between the external threads of a screw and the internal threads of the tapped hole. Standard tap drill charts aim for approximately 75% thread engagement, which provides a strong, durable connection without requiring excessive tapping force. This percentage offers a balance between thread strength and ease of tapping; going for 100% engagement makes tapping incredibly difficult and unnecessary in most applications, while less than 60% can lead to premature stripping.
The 8-32 Tap: Specifications and Standard Practices
The 8-32 tap is a common small-diameter tap used in a wide range of applications, particularly in electronics, small machinery, and general prototyping. Understanding its specific requirements is key to successful thread creation.
Decoding “8-32”
The designation “8-32” breaks down as follows:
- 8: This is the nominal major diameter of the thread, represented by a number system for smaller screws. For #8 screws, the nominal major diameter is approximately 0.164 inches (or 4.166 mm).
- 32: This indicates the thread pitch, meaning there are 32 threads per inch (TPI). This is a relatively fine pitch for its diameter, classifying it as a UNC (Unified National Coarse) thread, even though it’s technically on the finer side for a #8 screw (a #8-36 UNF also exists).
This common standard thread is used for connecting components where a small, relatively strong fastener is needed. Examples include mounting circuit boards, attaching small brackets, or securing covers on electronic enclosures.
Standard Drill Bit Recommendation for 8-32
For an 8-32 UNC tap, the universally recommended and industry-standard tap drill size for approximately 75% thread engagement is a #29 drill bit.
- #29 Drill Bit: This drill bit has a diameter of 0.136 inches (or 3.454 mm).
While this is the standard, it’s worth noting that some older charts or specific application requirements might occasionally suggest alternatives, but the #29 remains the most common and reliable choice for general purpose tapping of 8-32 threads in most materials. Always consult a reputable tap and drill chart if in doubt, or if working with exotic materials.
Why a Specific Size? (Thread Engagement)
The #29 drill bit is chosen specifically to achieve that ideal 75% thread engagement. Let’s look at the math simplified:
- The major diameter of an 8-32 screw is 0.164 inches.
- The pitch (1/32 TPI) dictates the depth of each thread.
- The minor diameter (the diameter at the bottom of the threads) for an 8-32 screw is approximately 0.130 inches.
If you drilled a hole exactly to the minor diameter (0.130″), you would technically get 100% thread engagement, but tapping would be extremely difficult, create enormous stress on the tap, and likely lead to tap breakage. By using a #29 drill (0.136″), you leave just enough material for the tap to cut strong, robust threads while reducing the torque required for tapping. This slight increase in hole diameter above the minor diameter significantly eases the tapping process and extends tap life, without compromising the practical strength of the threaded connection.
Precision and Best Practices for Tapping
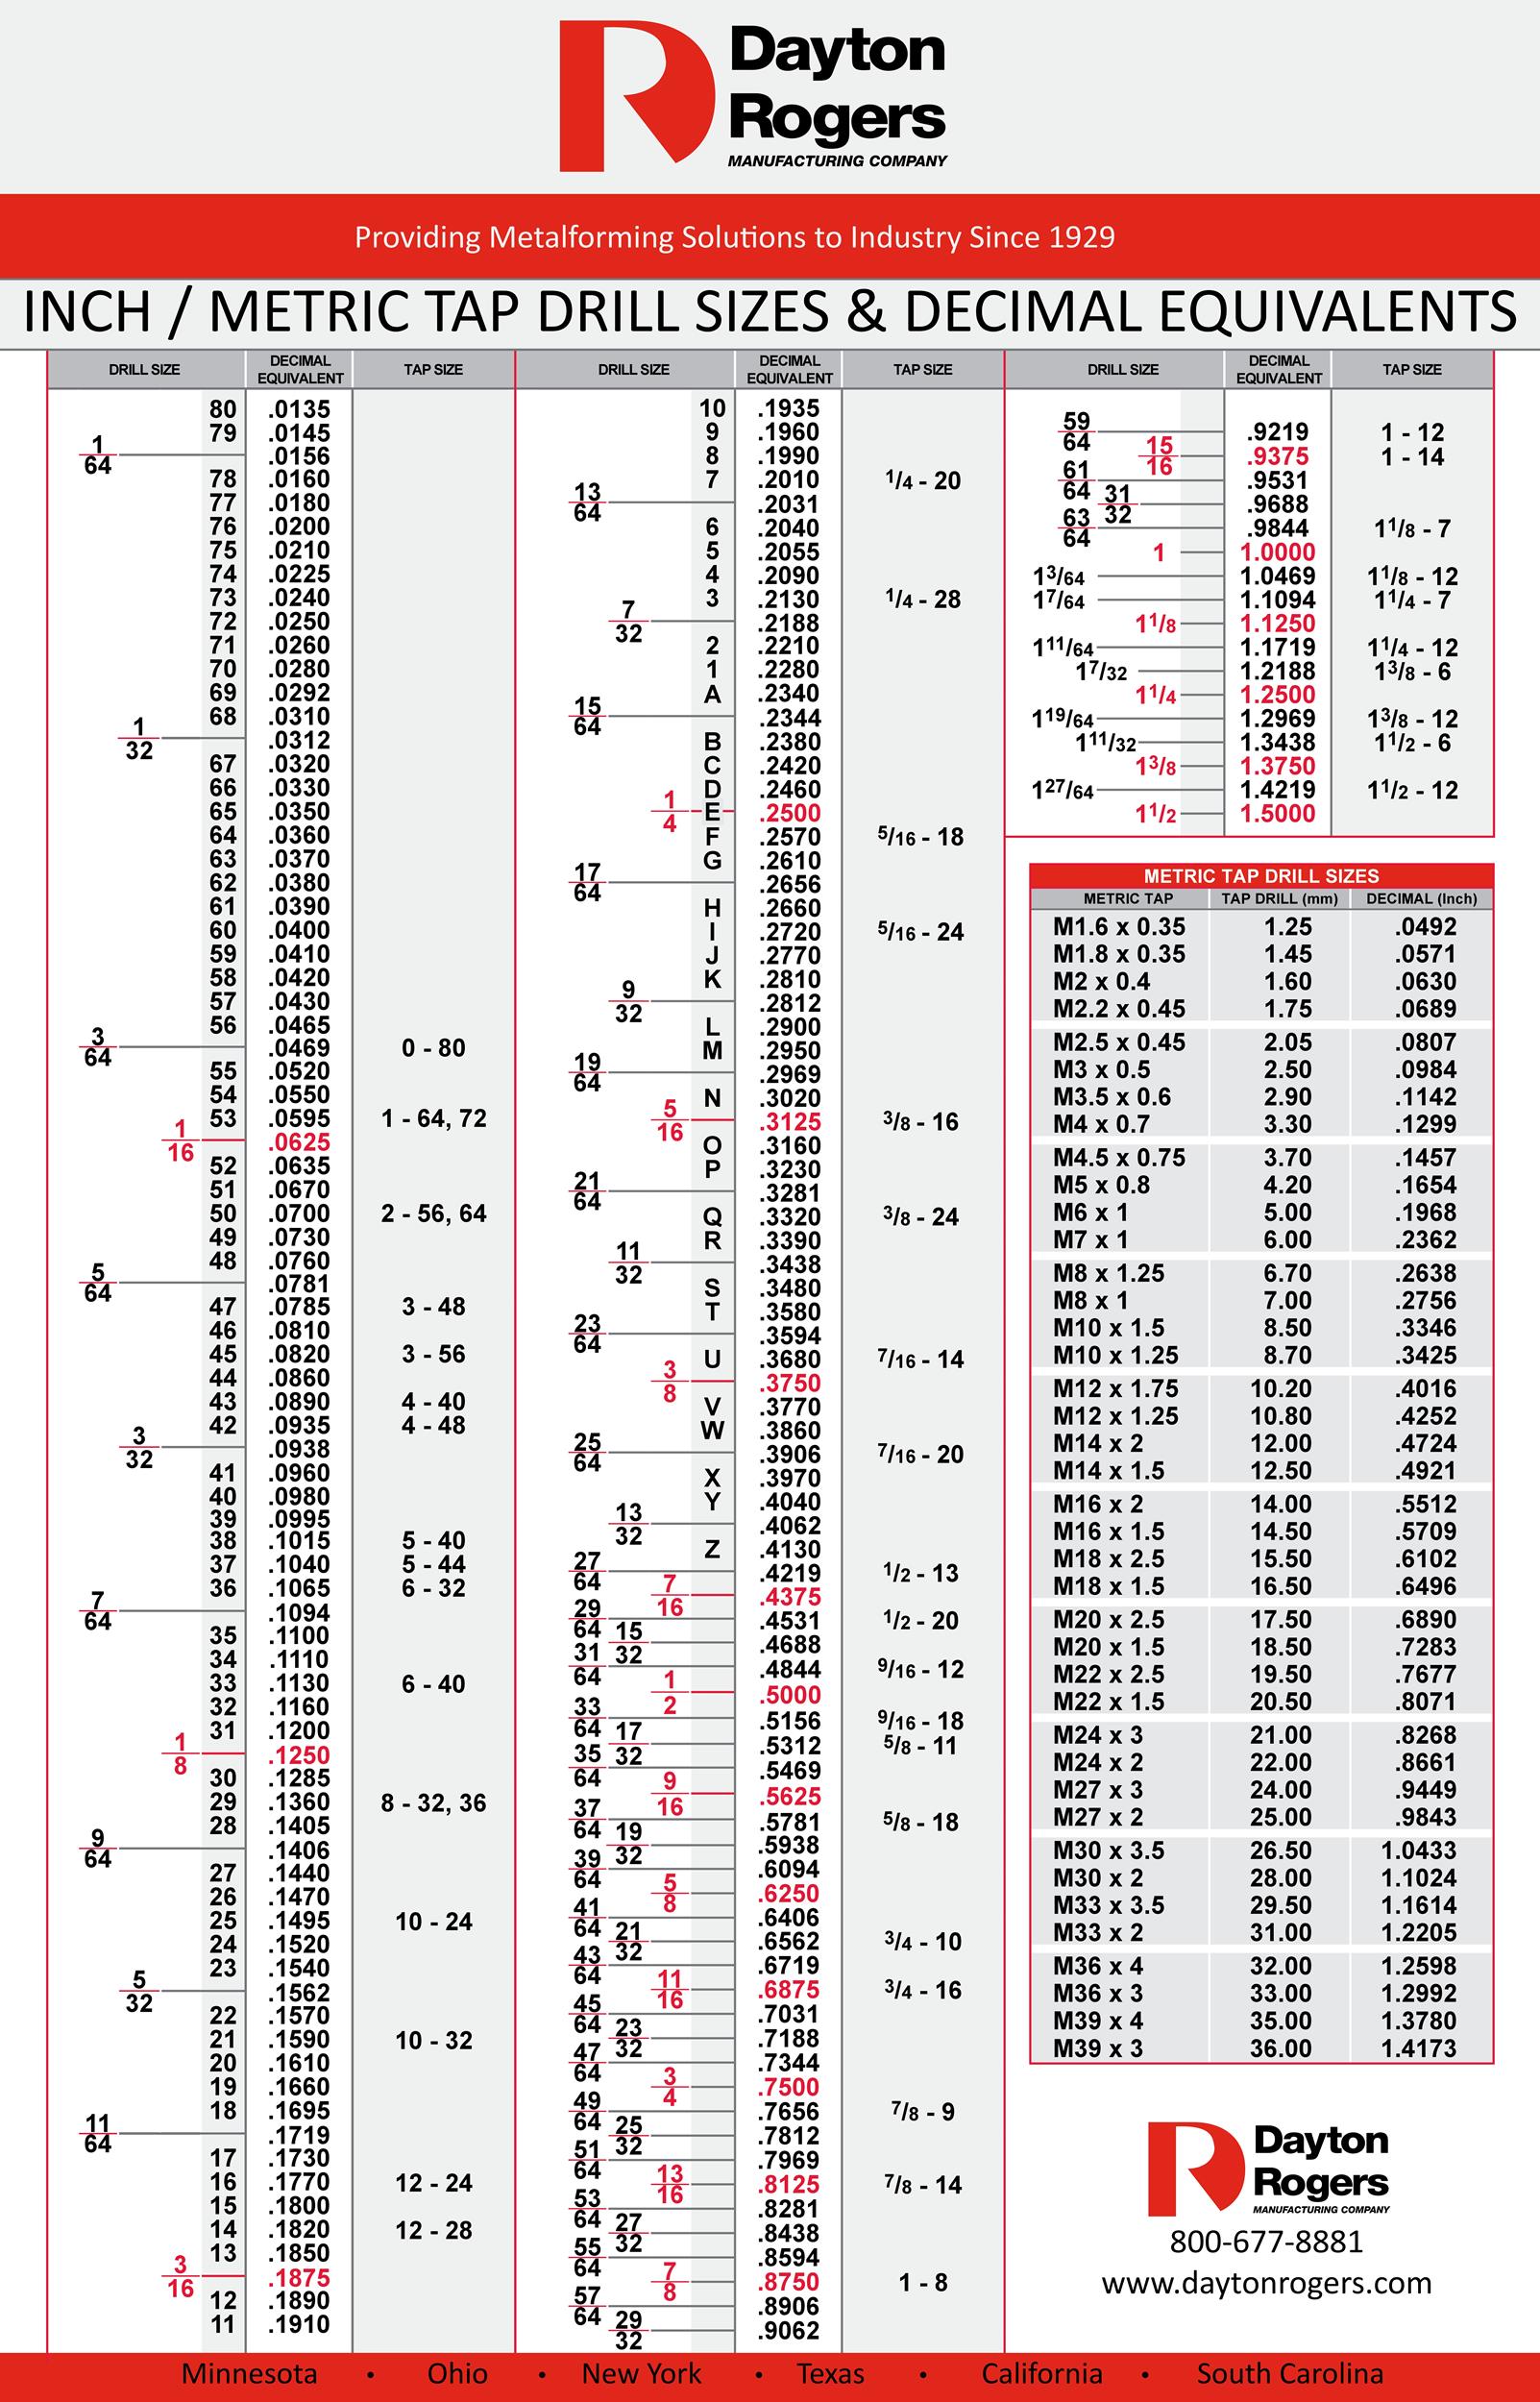
Achieving strong, accurate threads with an 8-32 tap goes beyond just picking the right drill bit. Technique, material understanding, and proper tools play equally vital roles.
Material Considerations
The type of material being tapped significantly influences the tapping process.
- Soft Metals (Aluminum, Brass): These are generally easier to tap but require good lubrication to prevent galling (material sticking to the tap). Threads in soft metals might strip more easily if over-torqued.
- Mild Steel: Common and taps well with proper lubrication and intermittent clearing of chips.
- Hardened Steel, Stainless Steel, Titanium: These materials are much more challenging. They require high-quality taps (e.g., cobalt or carbide), specialized cutting fluids, slower tapping speeds, and meticulous chip clearance. Breakage is more likely.
- Plastics: Many plastics can be tapped, but some soft plastics might deform rather than cut cleanly, leading to weak threads. Using a tap designed for plastics (often with fewer, wider flutes) or forming taps can yield better results.
Pilot Hole Accuracy
The quality of the pilot hole is paramount.
- Centering: Always use a center punch to mark the exact location for drilling. This prevents the drill bit from “walking” or drifting off-center.
- Perpendicularity: Drill the hole as perpendicular (90 degrees) to the material surface as possible. A drill press is ideal for this, but if drilling by hand, use a square or a drilling guide. An angled pilot hole will result in crooked threads, making proper fastener engagement difficult.
- Deburring: After drilling, use a larger drill bit or a deburring tool to remove any burrs from the top of the hole. Burrs can interfere with tap entry and lead to chip binding.
Lubrication and Chip Clearance
- Cutting Fluid: Always use an appropriate cutting fluid or tapping oil for the material being worked. Lubricants reduce friction and heat, prevent material from welding to the tap (galling), and help flush chips. For aluminum, kerosene or specific aluminum cutting fluids work well. For steel, sulfurized cutting oils are common. For plastics, sometimes simply using water or no lubricant is best, depending on the type.
- Chip Clearance (Pecking): Taps generate chips that need to be cleared to prevent binding and tap breakage. When tapping, especially in blind holes (holes that don’t go all the way through the material), advance the tap a quarter to half a turn, then back it off slightly (a quarter turn) to break off and clear chips. Repeat this “two steps forward, one step back” motion until the desired depth is reached. For through holes, chips can often fall through, but still, use the pecking motion for tough materials.
Tap Wrenches and Technique
- Tap Wrenches: Use a high-quality tap wrench that securely grips the square drive of the tap. Hand tapping provides the best feel for resistance and chip buildup. For smaller taps like 8-32, a T-handle tap wrench offers good control.
- Starting the Tap: Place the tap into the pilot hole and apply gentle, even downward pressure while slowly turning the tap wrench clockwise (for right-hand threads). Ensure the tap starts straight. Once a few threads are engaged, the tap will self-align, and downward pressure can be eased.
- Consistent Pressure and Rotation: Maintain consistent, firm rotation. Avoid jerky movements. If resistance increases significantly, back the tap out to clear chips and re-lubricate.
- Bottoming Taps: If tapping a blind hole, you may need a “bottoming tap” after using a “taper” or “plug” tap. Taper taps have a long, gradual chamfer for easy starting. Plug taps have a shorter chamfer for tapping deeper. Bottoming taps have almost no chamfer, allowing them to cut threads very close to the bottom of a blind hole.
Through Holes vs. Blind Holes
- Through Holes: These pass all the way through the material. Tapping is generally easier as chips fall through the hole, and there’s no risk of the tap bottoming out.
- Blind Holes: These do not pass all the way through. They require more careful attention to chip clearance and depth. You must know the exact depth of the hole and the tap’s cutting length to avoid bottoming out the tap, which can cause breakage. Use a depth stop on your drill bit when drilling the pilot hole, and measure frequently when tapping.
Common Pitfalls and Troubleshooting
Even with the correct drill bit and best practices, challenges can arise. Knowing how to identify and address common issues can save time and material.
Tap Breakage
This is arguably the most frustrating tapping problem, especially with smaller taps like 8-32.
- Causes: Excessive force, chips jamming in the flutes, incorrect pilot hole size (too small), dull tap, lack of lubrication, material too hard for the tap, misaligned tapping.
- Prevention: Use the #29 drill bit, plenty of lubrication, “two steps forward, one step back” technique, maintain alignment, and use sharp, high-quality taps.
- Remedy: Removing a broken tap can be difficult. Specialized tap extractors are available, but they don’t always work, especially with small taps. Sometimes, the only option is to drill it out (using carbide bits) or use electrical discharge machining (EDM) if access and equipment permit. Prevention is truly the best cure.
Stripped Threads
Threads can become stripped either during the tapping process or later when a fastener is inserted.
- Causes: Pilot hole too large (leading to insufficient thread engagement), using the wrong tap for the screw, over-torquing the screw, tapping very soft materials without enough material support.
- Prevention: Always use the #29 drill bit for 8-32, ensure the tap is sharp and cuts cleanly, and use appropriate torque when tightening fasteners.
- Remedy: For stripped threads, repair options include using a larger tap and screw, or more commonly, installing a thread repair insert like a Helicoil or a time-sert, which requires drilling out the old threads and tapping a new, larger hole for the insert.
Misaligned Taps
Threads that are not perpendicular to the material surface are functionally compromised.
- Causes: Pilot hole drilled at an angle, starting the tap off-center or at an angle, freehand tapping without a guide or fixture.
- Prevention: Use a drill press for pilot holes whenever possible. When hand tapping, ensure the tap starts straight by visually aligning it or using a tap guide block. Begin with light pressure and let the tap self-align once a few threads are started.
- Remedy: If caught early, sometimes you can back out the tap and restart it carefully. If threads are already cut at an angle, the only effective remedy is to drill out the hole, plug it (e.g., with weld or epoxy), and re-drill and re-tap correctly.
Dealing with Different Materials
While the #29 drill bit is standard for 8-32, the process changes with material.
- Very Hard Metals: Consider using form taps (roll taps) which don’t cut material but rather plastically deform it. This makes them less prone to breakage, but they require a slightly larger tap drill (check manufacturer specifications) and more robust equipment to handle the higher torque.
- Thin Materials: Tapping very thin sheet metal may result in weak threads due to insufficient material for full thread engagement. Consider using threaded inserts, rivet nuts, or welding a boss to the material.
- Plastic: Some plastics are brittle and can crack if tapped aggressively. Others are soft and deform. Experiment on scrap material. Often, tapping slower, with less aggressive taps, or using forming taps is beneficial.
By adhering to these principles and understanding the specifics of the 8-32 tap with a #29 drill bit, you can consistently achieve precise, strong, and reliable threaded connections in your projects.
aViewFromTheCave is a participant in the Amazon Services LLC Associates Program, an affiliate advertising program designed to provide a means for sites to earn advertising fees by advertising and linking to Amazon.com. Amazon, the Amazon logo, AmazonSupply, and the AmazonSupply logo are trademarks of Amazon.com, Inc. or its affiliates. As an Amazon Associate we earn affiliate commissions from qualifying purchases.