Understanding the precise drill size required for a tap is a fundamental aspect of machining and fabrication, directly impacting the integrity and strength of threaded connections. For a 1/4-20 tap, a specific pre-drilled hole size ensures that the tap can cut a thread with the optimal amount of material, leading to a robust and reliable fastening point. Deviating from the correct size can result in stripped threads, weak connections, or even broken taps, underscoring the importance of this technical detail.
Fundamentals of Tapping and Thread Creation
Tapping is the process of cutting internal threads into a pre-drilled hole, allowing a bolt or screw to be securely fastened. This seemingly straightforward operation relies on precise tooling and an understanding of thread specifications to achieve functional and durable results.

The Anatomy of a Tap
A tap is a hardened steel tool with cutting edges designed to carve threads into a material. Taps come in various forms, but hand taps, commonly used for general purposes, typically have three styles: taper, plug, and bottoming. The taper tap has a more gradual taper over several threads, making it easier to start. The plug tap has a shorter taper and is the most common for through-holes. The bottoming tap has no taper and is used to cut threads to the very bottom of a blind hole. Regardless of the type, the tap’s critical function is to remove material precisely to form the helical ridges that constitute a thread.
Why Predrill is Crucial
Before a tap can create threads, a hole must be drilled. This pre-drilled hole, known as the tap drill hole, serves two primary purposes:
- Material Removal: It removes the bulk of the material, leaving just enough for the tap to cut the thread. If the hole is too small, the tap has to remove too much material, increasing torque requirements, risking tap breakage, and creating an overly tight thread that can lead to galling or stripping.
- Thread Percentage: The size of the tap drill directly determines the “thread percentage.” A 100% thread engages the fastener fully but is difficult to tap and prone to breakage. A 75% thread is generally considered the optimal balance, providing sufficient strength for most applications while minimizing the risk of tap breakage and making the tapping process easier. A smaller drill size results in a higher thread percentage, while a larger drill size results in a lower thread percentage.
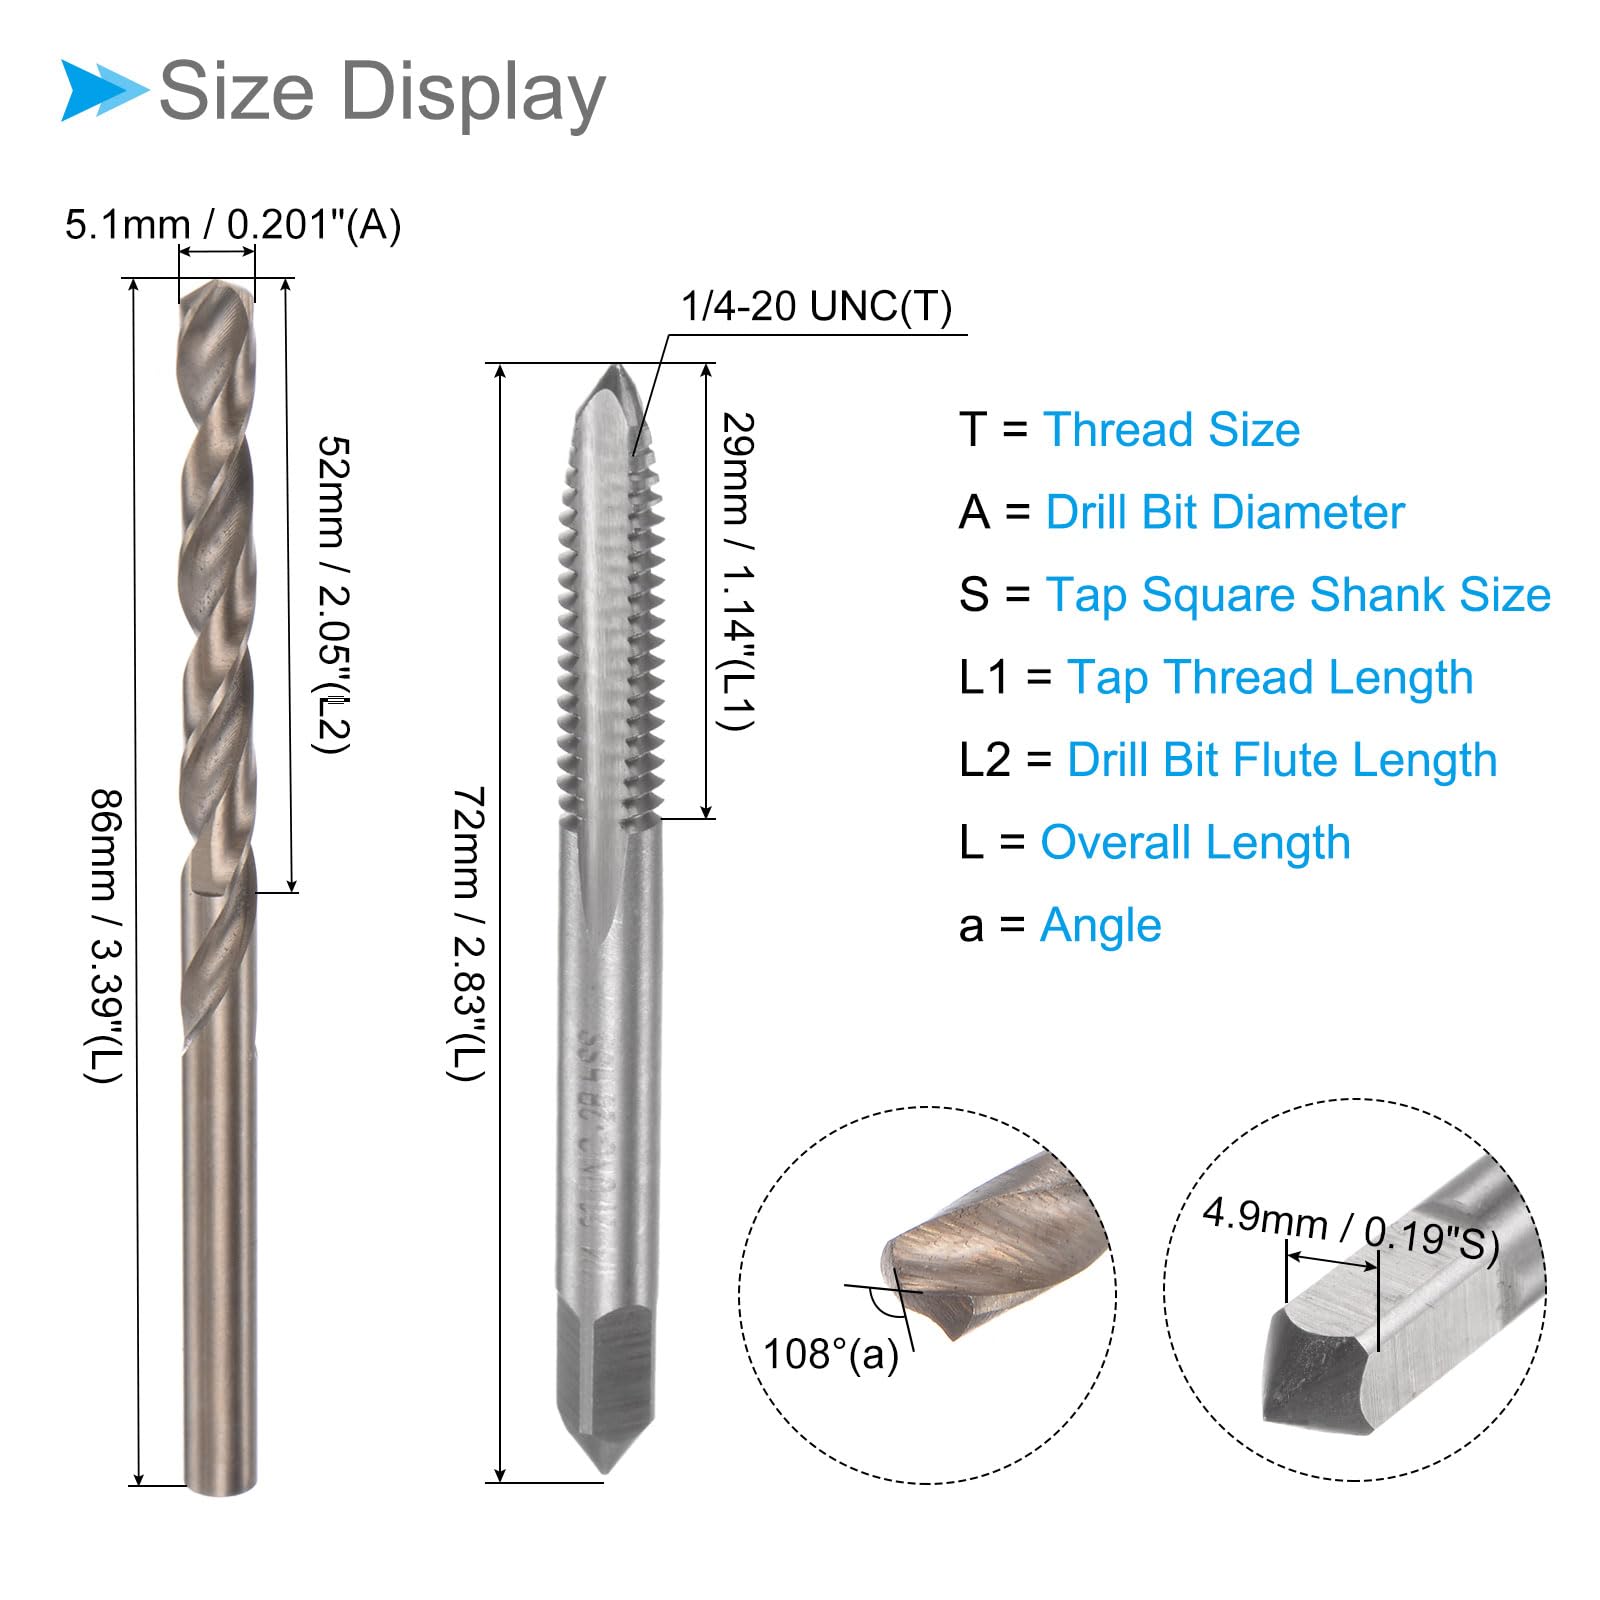
Thread Terminology: 1/4-20 UNC Explained
The specification “1/4-20 UNC” provides critical information about the thread:
- 1/4: This indicates the nominal diameter of the thread, which is 1/4 inch. This is the major diameter of the external thread (a bolt) or the internal thread (a tapped hole).
- 20: This refers to the number of threads per inch (TPI). In this case, there are 20 threads for every inch of length.
- UNC: This designates the thread series, standing for Unified National Coarse. UNC threads are common for general-purpose fastening, offering good resistance to stripping and ease of assembly. Other common series include UNF (Unified National Fine) and UNEF (Unified National Extra Fine), each suited for different applications requiring specific strengths or resistance to loosening.
For a 1/4-20 UNC tap, the goal is to create an internal thread that perfectly accommodates a standard 1/4-20 UNC bolt.
Determining the Correct Drill Size for 1/4-20 UNC
The most critical step in successful tapping is selecting the correct tap drill size. For the 1/4-20 UNC thread, there is a widely accepted standard that balances thread strength with tapping ease.
The Standard Recommendation: #7 Drill Bit
For a 1/4-20 UNC tap, the industry-standard tap drill size is a #7 drill bit.
- A #7 drill bit has a diameter of 0.201 inches (or 5.105 mm).
- This size typically yields approximately 75% thread engagement, which is considered ideal for most applications. A 75% thread offers excellent strength—often close to the shear strength of the bolt itself—while being significantly easier to tap than a 100% thread. It also reduces the risk of tap breakage, especially in harder materials.
While 75% is the standard, variations exist. For extremely hard materials or very deep blind holes where tap breakage is a significant concern, one might opt for a slightly larger drill size (e.g., a 0.203-inch drill) to achieve a lower thread percentage (around 70%). Conversely, for applications demanding maximum thread strength and where the material is easy to machine, a slightly smaller drill (e.g., a 0.199-inch drill) might be used for a higher thread percentage (around 80%), though this increases the risk of tap damage. However, for the vast majority of tasks, the #7 drill bit remains the go-to choice.
Imperial vs. Metric Considerations
It’s important to note the distinction between imperial (inch-based) and metric drill sizes. The 1/4-20 UNC specification is inherently imperial. While a metric equivalent might be close to the required diameter, using a direct metric conversion can lead to an incorrect thread percentage. For instance, a 5.1mm drill is 0.2008 inches, which is very close to a #7, but relying on exact metric-to-imperial conversions without cross-referencing a tap drill chart can introduce errors. Always refer to a tap drill chart specific to UNC threads or use drill bits labeled with their fractional or number designations for imperial threads.
A Note on Pilot Holes and Clearance Holes
It’s crucial not to confuse tap drill holes with pilot holes or clearance holes:
- Pilot Hole: A small initial hole drilled to guide a larger drill bit accurately. While sometimes used before the tap drill, it is not the final tap drill size.
- Clearance Hole: A hole drilled specifically to allow a bolt to pass through without engaging threads. For a 1/4-20 bolt, a clearance hole would be larger than 1/4 inch (e.g., 17/64″ or 0.2656″), ensuring the bolt can slide freely. This is distinct from the tap drill hole which prepares for threads.
Precision Tapping Techniques for Optimal Results
Knowing the correct drill size is only half the battle; proper tapping technique is equally vital for creating high-quality, durable threads.
Material Considerations and Lubrication
The material being tapped significantly influences the tapping process. Softer materials like aluminum or brass are easier to tap but can sometimes lead to galling or built-up edge if not properly lubricated. Harder materials like stainless steel or high-carbon steel require more force, slower speeds, and robust lubrication to prevent tap breakage and ensure clean threads.
Cutting fluid (lubrication) is almost always necessary during tapping. It serves several purposes:
- Reduces Friction: Minimizes heat generation and resistance, making tapping easier.
- Extends Tap Life: Lubrication reduces wear on the tap’s cutting edges.
- Flushes Chips: Helps to clear chips from the flutes, preventing them from jamming and breaking the tap.
- Improves Finish: Leads to cleaner, smoother threads.
The type of lubricant varies by material. For aluminum, kerosene or specific aluminum cutting fluids work well. For steel, dark cutting oils are preferred. For cast iron, tapping is often done dry as the material produces granular chips that don’t typically foul the tap.
Starting the Tap Correctly
Starting the tap straight and accurately is paramount. Any misalignment can lead to crooked threads, which will bind fasteners and create weak points.
- Use a Tap Wrench: A quality tap wrench provides even pressure and leverage.
- Machine Guidance (Recommended): For critical applications, using a drill press or milling machine to start the tap is highly recommended. The machine’s quill can guide the tap perfectly perpendicular to the workpiece. Engage the tap wrench by hand, apply light downward pressure with the quill, and rotate the tap. Once a few threads are cut, the tap will self-feed, and the machine guidance can be removed.
- By Hand: If tapping by hand, ensure the workpiece is securely clamped. Place the tap squarely in the hole, apply firm, even downward pressure, and slowly rotate the tap wrench. Periodically check for squareness from multiple angles using a small square.
The ‘Two Steps Forward, One Step Back’ Method
This technique is fundamental for successful hand tapping, especially in tougher materials or for deeper holes:
- Advance the Tap: Rotate the tap wrench clockwise (for right-hand threads) approximately half to one full turn, cutting into the material.
- Break the Chip: Rotate the tap wrench counter-clockwise about a quarter to half a turn. This action breaks off the chips that have accumulated in the tap’s flutes, preventing them from binding and potentially breaking the tap.
- Clear the Chips: This reverse motion also allows cutting fluid to reach the cutting edges and helps eject chips from the hole, especially in blind holes.
Repeat this process until the desired thread depth is achieved.
Avoiding Common Tapping Mistakes
- Forcing the Tap: Never force a tap. If excessive resistance is felt, back out the tap, clean the flutes, apply more lubrication, and check for chip build-up. Forcing is the primary cause of tap breakage.
- Insufficient Lubrication: Dry tapping (unless for specific materials like cast iron) significantly increases friction, heat, and the risk of tap breakage.
- Incorrect Tap Drill Size: As discussed, this leads to weak threads or broken taps.
- Misalignment: Crooked threads are functionally useless and can damage fasteners.
- Not Clearing Chips: Allowing chips to pack in the flutes is a recipe for a broken tap.
Tools and Safety for Successful Tapping
Having the right tools and adhering to safety protocols are essential for any machining operation, including tapping.
Essential Tapping Equipment
- Tap Drill Bit: The #7 drill bit for 1/4-20 UNC. Ensure it’s sharp and of good quality.
- Taps: A set of 1/4-20 UNC taps (taper, plug, bottoming) is ideal, though a plug tap is often sufficient for through-holes.
- Tap Wrench: A suitable wrench that securely holds the tap.
- Cutting Fluid: Appropriate lubricant for the material being tapped.
- Deburring Tool: To remove sharp edges from the drilled hole before tapping.
- Work Holding Device: A vise or clamps to secure the workpiece firmly.
- Thread Gauge (Optional but Recommended): To verify the accuracy and quality of the tapped threads.
Safety Best Practices
- Eye Protection: Always wear safety glasses to protect against flying chips and debris.
- Gloves: Consider wearing gloves, especially when handling cutting fluids, but be mindful that gloves can sometimes get caught in rotating machinery if not careful. For hand tapping, they can provide a better grip and protect hands.
- Secure Workpiece: Ensure the workpiece is securely clamped. A loose part can shift unexpectedly, causing injury or damage.
- Clear Work Area: Keep the work area tidy and free of obstructions.
- Proper Ventilation: If using strong cutting fluids, ensure adequate ventilation to avoid inhaling fumes.
- Handle Taps Carefully: Taps are sharp and brittle. Handle them with care to avoid cuts and prevent breakage.
Verifying Tap Quality and Thread Integrity
After the tapping process is complete, it’s good practice to verify the quality of the newly created threads. This ensures that the effort put into drilling and tapping has yielded a functional and reliable result.
Using Thread Gauges
For critical applications, a go/no-go thread gauge is the definitive tool for checking internal threads.
- Go Gauge: This end of the gauge should thread smoothly into the tapped hole. If it doesn’t, the threads are too small, potentially due to an undersized drill, material deformation, or debris.
- No-Go Gauge: This end should only engage for one to three turns and then stop. If it threads fully, the threads are oversized, indicating too large a drill, tap wear, or excessive material removal.
Using a thread gauge provides an objective measure of thread accuracy and adherence to specifications.

Visual Inspection and Fastener Fit
For less critical applications, a visual inspection combined with a test fit of the intended fastener (bolt or screw) can suffice.
- Visual Inspection: Examine the threads for cleanliness, consistency, and any signs of stripping, galling, or incomplete threads. The threads should appear sharp and uniform throughout the depth of the hole.
- Fastener Fit: Thread a standard 1/4-20 bolt or screw into the newly tapped hole by hand. It should turn smoothly with light resistance, without binding or feeling excessively loose. If it binds, the threads might be too tight or misaligned. If it feels too loose, the thread engagement might be insufficient, indicating an oversized tap drill or a worn tap.
By meticulously following these steps, from selecting the correct #7 drill bit for a 1/4-20 tap to employing proper tapping techniques and verifying the results, you can consistently produce strong, reliable threaded holes essential for robust assemblies and successful mechanical projects.
aViewFromTheCave is a participant in the Amazon Services LLC Associates Program, an affiliate advertising program designed to provide a means for sites to earn advertising fees by advertising and linking to Amazon.com. Amazon, the Amazon logo, AmazonSupply, and the AmazonSupply logo are trademarks of Amazon.com, Inc. or its affiliates. As an Amazon Associate we earn affiliate commissions from qualifying purchases.