In the rapidly evolving landscape of digital commerce, establishing an online presence is no longer a luxury but a necessity for businesses aiming for growth and market reach. Among the myriad e-commerce platforms available, Shopify stands out as a robust, user-friendly, and scalable solution, empowering entrepreneurs of all sizes to build and manage their online stores with remarkable efficiency. Its intuitive interface belies a powerful technical infrastructure designed to handle everything from product listings to secure payment processing.
This guide is engineered to provide a meticulous, step-by-step technical walkthrough for setting up your Shopify store. We will delve into the core functionalities and configurations necessary to transform your entrepreneurial vision into a fully operational digital storefront, focusing exclusively on the technical aspects that bring your store to life.
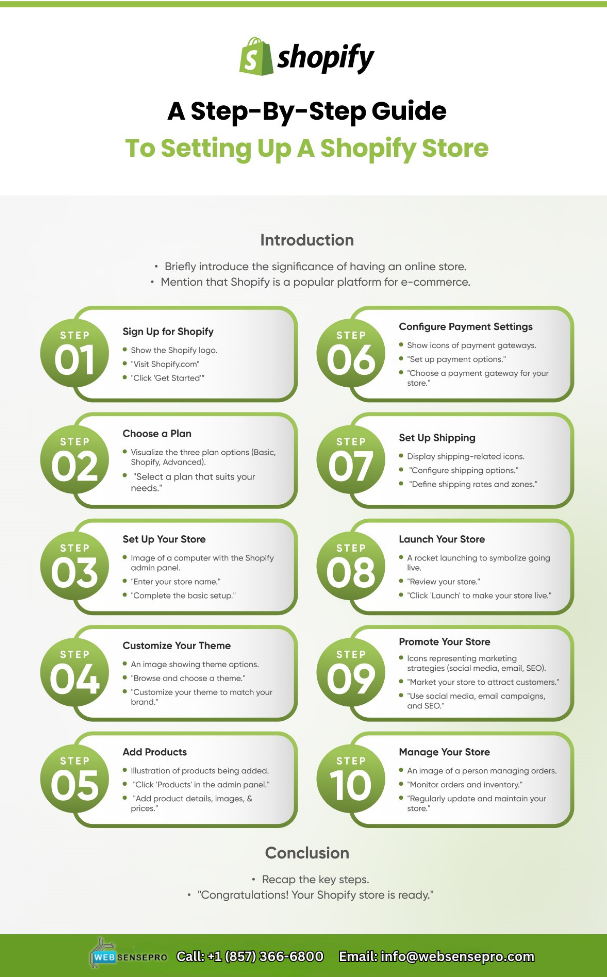
Getting Started: Your Shopify Account and Basic Configuration
The journey to launching your Shopify store begins with establishing your foundational account and configuring the essential technical settings that dictate your store’s operational parameters. This initial phase is crucial for laying a solid groundwork.
Creating Your Shopify Account
Your first step involves navigating to the Shopify website and initiating the sign-up process. Shopify typically offers a free trial period, allowing you to explore its features before committing to a paid plan. During registration, you’ll be prompted to provide basic information about your business, such as your store name, industry, and whether you’re already selling products. The store name you choose here will initially form your default Shopify URL (e.g., yourstorename.myshopify.com). While this can be changed later to a custom domain, select something representative for now. This stage is entirely technical: inputting data into form fields, creating credentials, and initiating your backend environment.
Navigating the Shopify Admin Dashboard
Upon successful registration, you’ll be directed to your Shopify Admin Dashboard – the command center for your entire online operation. Familiarity with this interface is paramount. The dashboard is logically structured with a left-hand navigation menu featuring key sections such as:
- Home: A quick overview of your store’s performance and recent activity.
- Orders: Manage all customer purchases, fulfillment, and returns.
- Products: Add, edit, and organize all items for sale.
- Customers: Access and manage customer profiles.
- Analytics: Dive into sales data, visitor statistics, and other performance metrics.
- Online Store: Control your theme, navigation, pages, and blog posts.
- Apps: Discover and integrate third-party applications to extend your store’s functionality.
- Settings: Configure all core technical and operational parameters of your store.
Understanding where each function resides will streamline your setup process, allowing for efficient navigation through the various configuration steps.
Essential Initial Settings
Before populating your store with products, several fundamental technical settings require your attention. These configurations define how your store operates and interacts with customers.
- General Settings: Here, you define your store’s legal name, primary email address, currency (which cannot be changed after your first sale), time zone, and physical business address. This data is critical for accurate reporting and customer communication.
- Payments: This is a crucial technical setup. Activating Shopify Payments, Shopify’s integrated payment gateway, is often the simplest option, allowing you to accept major credit cards directly. You’ll need to provide business banking details for payouts. Additionally, you can integrate other payment providers like PayPal, Google Pay, or third-party gateways. The technical process involves connecting your accounts and configuring their settings.
- Shipping and Delivery: Defining your shipping strategy is a key technical configuration. You’ll set up shipping zones (e.g., domestic, international) and then define shipping rates within those zones (flat rates, calculated rates based on weight or price, or free shipping). This section also covers package dimensions and weight, which can impact calculated shipping costs, and options for local pickup or delivery.
- Taxes: Shopify offers robust tax configuration tools. For many regions, it can automatically calculate sales tax based on your store’s location and customer’s shipping address. You’ll need to specify your tax-exempt products or regions, and ensure your tax settings comply with local regulations.
- Legal: While the content of policy pages (Privacy Policy, Refund Policy, Terms of Service, Shipping Policy) is legal, the technical act of creating and linking these pages within your Shopify admin is vital for compliance and customer trust. Shopify provides templates to get you started, which you can then customize.
Populating Your Store: Products and Collections
With the foundational settings in place, the next technical phase involves bringing your products into the digital realm. This is where your inventory transforms into shoppable items on your platform.
Adding Your First Products
The “Products” section of your admin dashboard is where you meticulously detail each item you wish to sell. This process is highly technical, involving precise data input to ensure product discoverability, accurate pricing, and efficient inventory management.
- Product Title and Description: Enter a clear, concise title and a detailed description. While content-focused, the technical input requires proper formatting using the rich text editor.
- Media: Upload high-quality images and videos of your products. Shopify automatically optimizes these for web display, but ensuring they meet recommended resolution and aspect ratios is part of the technical best practice. Alt text for images is a crucial SEO and accessibility technical requirement.
- Pricing: Define the standard price and, optionally, a “Compare at price” to show a discount. You’ll also specify the cost per item for profit margin tracking.
- Inventory: Assign a Stock Keeping Unit (SKU) and optionally a barcode (ISBN, UPC, GTIN). Crucially, you’ll input the available quantity and decide whether to track inventory, allow overselling, or require a physical quantity.
- Shipping Information: Input the product’s weight, which is essential for accurate shipping rate calculations. For international shipping, you’ll specify country of origin and harmonized system (HS) codes.
- Variants: If your product comes in different sizes, colors, or materials, you’ll use the “Variants” section. This technical feature allows you to manage unique SKUs, prices, inventory, and images for each variant combination, preventing the need to create separate product listings for similar items.
Organizing Products with Collections
Collections are how you categorize and display your products, making your store navigable and user-friendly. Technically, collections function as filters or groupings.
- Manual vs. Automated Collections: You can create manual collections where you individually add products. More powerfully, you can create automated collections that use conditions (e.g., product type equals “T-Shirt”, product tag is “summer”, price is greater than $50). As products are added or updated, they will automatically be included or removed from these collections based on your defined technical criteria.
- Importance for Navigation: Collections are foundational for building your store’s menu structure, guiding customers through your product offerings and improving the overall user experience.
Designing Your Digital Storefront: Theme and Customization
Your store’s appearance is its first impression. Shopify provides extensive tools to customize the visual and functional aspects of your storefront without requiring deep coding knowledge. This involves selecting and configuring a theme, which is essentially the software template for your store’s design.
Choosing and Installing a Theme
The Shopify Theme Store offers a wide array of free and paid themes, each with unique layouts, features, and aesthetic appeals.
- Free vs. Paid Themes: Free themes provide excellent core functionality and are a great starting point. Paid themes often offer more advanced design options, specialized features, and dedicated support.
- Theme Selection Criteria: Consider themes that align with your industry, offer features you need (e.g., quick view, product filtering), and are mobile-responsive (a critical technical requirement for today’s diverse user base).
- Installation Process: Once selected, installing a theme is a straightforward technical process – a few clicks and it’s added to your theme library, ready for customization.
Customizing Your Theme
The Shopify Theme Editor is a powerful drag-and-drop tool that allows you to tailor your store’s appearance extensively. This is where you technically manipulate the front-end components.
- Sections and Theme Settings: The editor is divided into “Sections” (e.g., header, footer, image banner, featured products) and “Theme Settings” (global styles like colors, typography, social media links). You can add, remove, and reorder sections on your homepage.
- Header and Footer: Customize your header with your logo, and configure your main navigation menu. The footer typically houses important links (policies, contact info) and social media icons, which you link technically.
- Homepage Sections: Populate your homepage with various content blocks. This involves uploading images for banners and slideshows, writing descriptive text, and linking to specific products or collections.
- Color Schemes and Typography: Adjust your brand’s specific color palette and choose fonts that match your aesthetic, all through simple technical selections within the theme settings.
- Mobile Optimization: As you customize, continuously preview your store on mobile devices. Shopify themes are designed to be responsive, but manual adjustments might be needed to ensure optimal display across all screen sizes.
Setting Up Core Pages and Navigation
Beyond product pages, your store needs static content pages and a logical menu structure.
- Creating Static Pages: Use the “Pages” section to create essential pages like “About Us,” “Contact Us,” “FAQ,” and your legal policies. This is a technical act of creating new content containers.
- Building Menus: Under “Navigation,” you define your store’s menus (e.g., Main Menu, Footer Menu). Here, you link your newly created pages, collections, products, and even external URLs. This technical arrangement ensures customers can easily find critical information.
Launch Preparations: Domain, Payments, and Testing
The final phase before going live involves critical technical checks and configurations that ensure your store is fully operational and secure.
Connecting Your Domain Name
A professional store requires a custom domain name (e.g., yourbusiness.com).
- Buying a New Domain: You can purchase a new domain directly through Shopify, which simplifies the technical setup as it’s automatically connected.
- Connecting an Existing Domain: If you own a domain from another registrar (e.g., GoDaddy, Namecheap), you’ll need to technically point it to Shopify. This involves updating your domain’s DNS records: changing the ‘A’ record to Shopify’s IP address and the ‘CNAME’ record to
shops.myshopify.com. Shopify automatically provides an SSL certificate for your custom domain, ensuring secure connections (HTTPS), which is a crucial technical security feature.
Configuring Payment Gateways and Shipping
Before launch, it’s vital to re-verify your payment and shipping settings.
- Finalizing Payment Methods: Ensure all desired payment gateways (Shopify Payments, PayPal, etc.) are correctly activated and linked to your business accounts.
- Testing Payment Gateways: Shopify provides a “test mode” for Shopify Payments, allowing you to simulate transactions without real money. This is a critical technical test to ensure your checkout process functions flawlessly.
- Double-Checking Shipping: Confirm that all shipping zones, rates, and carrier integrations are accurately configured. Test various scenarios (different products, destinations) to prevent surprises post-launch.
Pre-Launch Checklist and Testing
A rigorous pre-launch review is paramount to catch any technical glitches.
- Content Review: Review all product descriptions, images, and static page content for accuracy and completeness.
- End-to-End Checkout Test: Perform a complete test purchase, from adding an item to the cart, proceeding through checkout, entering payment details (using test mode), and verifying order confirmation emails. This confirms the entire technical flow.
- Mobile Responsiveness: View your entire store on various mobile devices and browsers to ensure a consistent and responsive user experience. Check for broken layouts, overlapping elements, or slow loading times.
- Link Verification: Click every link on your store – internal and external – to ensure they direct to the correct destinations and no broken links exist.
- Removing Storefront Password: Once you’re fully satisfied, disable the storefront password (under “Online Store” > “Preferences”) to make your store publicly accessible.
Beyond Launch: Essential Tech Integrations and Maintenance
Launching is just the beginning. Ongoing technical integration and maintenance are crucial for sustained growth and security.
Exploring the Shopify App Store
The Shopify App Store is a vast marketplace of applications that extend your store’s capabilities, often integrating seamlessly with the platform’s core code.
- Types of Apps: Explore apps for marketing (SEO, email, social media), inventory management, customer service (live chat, FAQs), dropshipping, analytics, and more. Each app serves a specific technical function.
- Installation and Integration: Installing apps is typically a few clicks, granting them necessary permissions to interact with your store’s data and functionality. Always review app permissions to understand their technical scope.
- Examples: Integrate an SEO app to optimize product listings, a review app to collect customer feedback, or a fulfillment app to automate order processing with third-party logistics.
Analytics and Performance Monitoring
Monitoring your store’s performance technically involves leveraging data to make informed decisions.
- Shopify’s Built-in Analytics: The “Analytics” section in your dashboard provides real-time data on sales, visitors, popular products, and traffic sources. This is your primary technical feedback loop.
- Google Analytics and Search Console: Integrate Google Analytics for more in-depth visitor behavior tracking and Google Search Console to monitor your store’s organic search performance and identify technical SEO issues. These require embedding code snippets into your theme.
- Site Speed: Regularly monitor your store’s loading speed using tools like Google PageSpeed Insights. Optimizing images, leveraging browser caching, and minimizing app dependencies are technical ways to improve performance.
Regular Updates and Security
Maintaining a secure and up-to-date store is a continuous technical responsibility.
- Platform Updates: Shopify handles core platform updates automatically, ensuring you always have access to the latest features and security patches without manual intervention.
- Theme and App Updates: While core Shopify updates are automatic, you are responsible for updating your installed themes and apps. Regularly check for updates from developers to ensure compatibility, security, and access to new features.
- Security Best Practices: Implement strong, unique passwords for all accounts associated with your store, and enable two-factor authentication (2FA) wherever possible. While Shopify manages server security, your credentials are your first line of defense.
- Data Backups: While Shopify maintains robust backend data backups, consider periodically backing up your theme customizations or specific data through apps, offering an additional layer of technical resilience.
Conclusion
Setting up a Shopify store is a journey of technical configuration, design implementation, and strategic planning. By meticulously following the steps outlined in this comprehensive guide, from initial account creation and fundamental settings to populating products, customizing your storefront, and executing critical pre-launch checks, you empower yourself to build a professional and fully functional e-commerce presence.
Shopify’s architecture is designed to abstract away much of the underlying technical complexity, allowing you to focus on your business vision. However, a thorough understanding of its technical capabilities and configuration options will ensure your store is not only operational but optimized for performance, security, and scalability. The digital marketplace is dynamic, and with a well-configured Shopify store, you are technically equipped to adapt, grow, and thrive in the competitive world of online commerce. Embrace the continuous learning that comes with managing a digital platform, and your Shopify store will serve as a robust foundation for your entrepreneurial success.
aViewFromTheCave is a participant in the Amazon Services LLC Associates Program, an affiliate advertising program designed to provide a means for sites to earn advertising fees by advertising and linking to Amazon.com. Amazon, the Amazon logo, AmazonSupply, and the AmazonSupply logo are trademarks of Amazon.com, Inc. or its affiliates. As an Amazon Associate we earn affiliate commissions from qualifying purchases.