In the intricate ecosystem of modern computing, the graphics driver stands as a crucial linchpin, bridging the gap between your operating system, applications, and the raw power of your Graphics Processing Unit (GPU). Often overlooked until problems arise, a stable and up-to-date graphics driver is essential for everything from smooth video playback and responsive user interfaces to immersive gaming and professional content creation. When issues like visual artifacts, unexpected crashes, performance degradation, or even a complete lack of display occur, a clean reinstallation of your graphics driver often emerges as the most effective solution.
This comprehensive guide will walk you through the process of reinstalling your graphics driver, ensuring a clean slate for optimal performance and stability. We’ll delve into understanding what these drivers are, why they’re so vital, the preparatory steps needed for a successful reinstallation, a detailed step-by-step guide, and common troubleshooting tips to navigate any bumps along the way. Whether you’re a seasoned PC enthusiast or a casual user experiencing a sudden display hiccup, mastering the art of driver reinstallation is a valuable skill for maintaining the health and efficiency of your system.
Understanding Graphics Drivers and Their Importance
Before diving into the mechanics of reinstallation, it’s crucial to grasp what a graphics driver is and the profound impact it has on your computing experience. Far from being a mere background component, it’s the interpreter that allows your software and hardware to communicate effectively.
What is a Graphics Driver?
At its core, a graphics driver is a piece of software that enables your operating system (like Windows, macOS, or Linux) and various applications (games, video editors, web browsers) to interact with your graphics card. Think of it as a translator: without it, your OS wouldn’t understand how to send commands to the GPU, and the GPU wouldn’t know how to render the visuals you see on your screen. These drivers are specific to both the manufacturer of the graphics card (e.g., NVIDIA, AMD, Intel) and the operating system you are using, often tailored even to specific models within a product line. They contain instructions that tell the GPU how to process visual data, manage memory, and utilize its various features efficiently.
Why Graphics Drivers Matter
The performance and stability of your system are inextricably linked to the state of your graphics driver. An outdated, corrupted, or incompatible driver can lead to a litany of problems that range from minor annoyances to system-crippling issues.
- Performance: The right driver optimizes the GPU’s processing power, leading to higher frame rates in games, faster rendering in creative applications, and smoother overall system responsiveness. Updates often include performance enhancements for new games or software.
- Stability: A stable driver prevents crashes, freezes, and blue screens of death (BSODs) that are often directly attributable to driver conflicts or corruption. It ensures that your graphics card operates reliably under various workloads.
- Feature Access: Modern graphics cards come packed with advanced features like ray tracing, DLSS (NVIDIA), FSR (AMD), and various display technologies. The driver is what unlocks and enables these capabilities for your applications to utilize.
- Compatibility: New software, games, and even operating system updates often require updated drivers to ensure full compatibility and exploit new APIs (Application Programming Interfaces).
Common Issues Indicating Driver Problems
Recognizing the symptoms of a problematic graphics driver is the first step towards resolving the issue. If you encounter any of the following, a driver reinstallation might be in order:
- Game Crashes or Freezes: Applications, especially demanding games, frequently crashing to the desktop or freezing mid-session.
- Visual Artifacts: Distorted images, strange colors, flickering textures, or pixelation appearing on your screen.
- Low Frame Rates (FPS): A sudden and significant drop in performance in games or graphically intensive applications, even on hardware that previously performed well.
- Black Screen on Boot or During Use: The display goes black, or the system boots to a black screen after the Windows logo.
- Driver Failing to Start: Error messages in Device Manager indicating that the graphics driver has stopped working or failed to initialize.
- Display Resolution Issues: Inability to set the correct resolution for your monitor, or the resolution is stuck at a very low setting.
Preparing for the Reinstallation Process
A successful graphics driver reinstallation isn’t just about clicking “install.” It requires careful preparation to ensure you download the correct software and remove any remnants of the old driver that could cause future conflicts.
Identifying Your Graphics Card
The first and most critical step is to accurately identify your graphics card model. Installing the wrong driver can lead to further complications or simply fail to install.
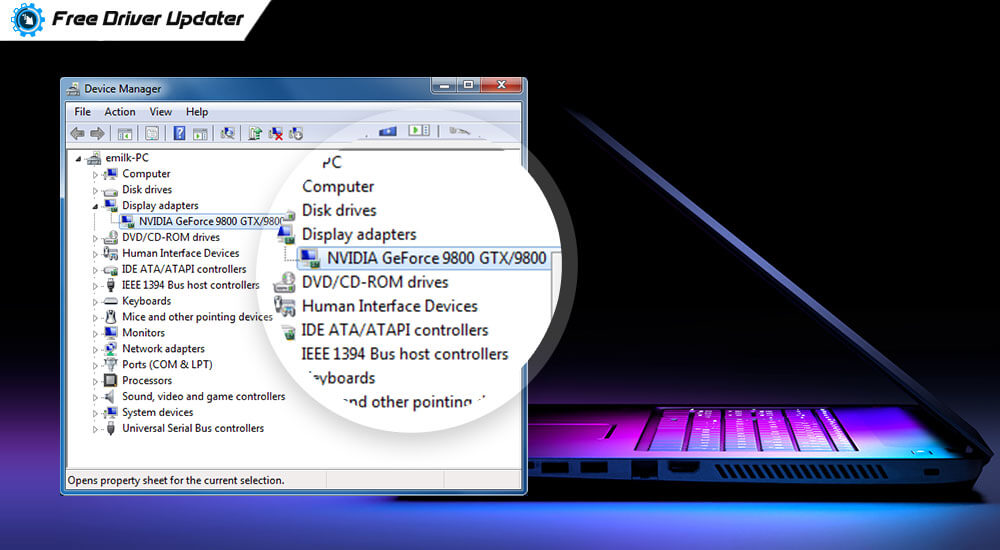
- Device Manager: The easiest method for Windows users. Right-click the Start button, select “Device Manager,” expand “Display adapters,” and note down the name of your graphics card (e.g., NVIDIA GeForce RTX 3070, AMD Radeon RX 6700 XT, Intel Iris Xe Graphics).
- System Information Tools: Built-in tools like “System Information” (type
msinfo32in Run dialog) or third-party utilities like GPU-Z can provide detailed information about your GPU, including its manufacturer and specific model number.
Downloading the Correct Driver
Once you know your GPU, you need to download the latest stable driver directly from the manufacturer’s official website. Avoid third-party driver download sites, as they may offer outdated, incorrect, or even malicious software.
- NVIDIA: Go to
nvidia.com/drivers. Select your product type, series, product, and operating system. - AMD: Visit
amd.com/en/support. Use the auto-detect tool or manually select your product from the lists. - Intel: Navigate to
intel.com/content/www/us/en/support/products/graphics.html. Use their driver assistant or manually find your graphics product.
Always download the recommended “WHQL” (Windows Hardware Quality Labs) certified drivers if available, as these have undergone rigorous testing by Microsoft. Store the downloaded installer in an easily accessible location, like your desktop.
Essential Pre-Reinstallation Steps
To ensure a clean and smooth reinstallation, a few preparatory steps are highly recommended.
- Backup Important Data: While driver reinstallation is generally safe, it’s good practice to back up any critical files before performing significant system changes.
- Create a System Restore Point: This allows you to revert your system to a previous state if something goes wrong. Search for “Create a restore point” in Windows Search and follow the prompts.
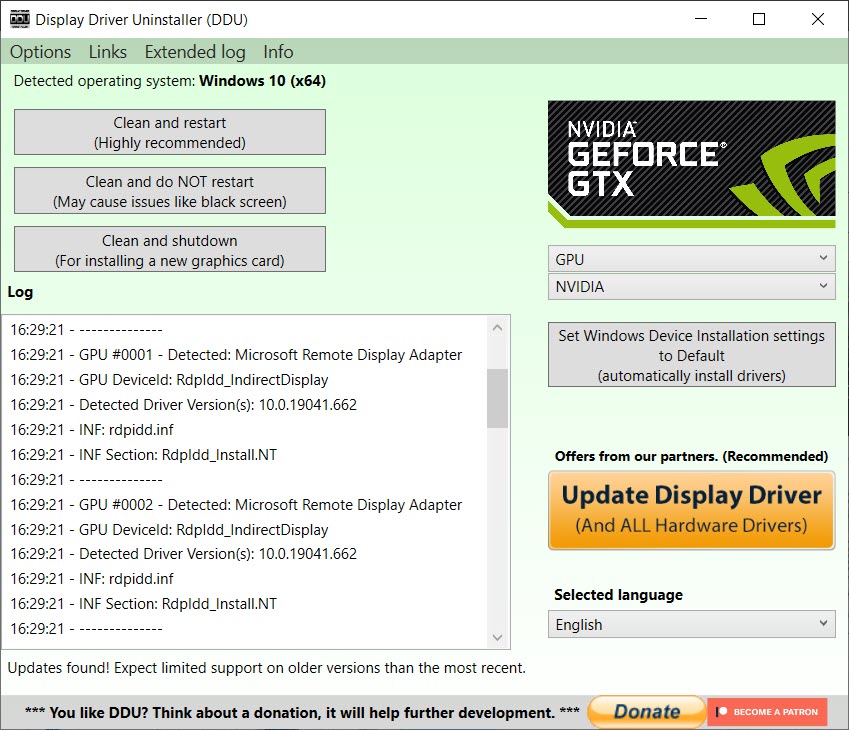
- Download Display Driver Uninstaller (DDU): This is perhaps the most crucial tool for a clean reinstallation. DDU is a free, open-source utility designed to thoroughly remove all traces of graphics card drivers from your system. Download it from reputable sites like
guru3d.com. - Disconnect from the Internet (Optional but Recommended): After downloading your new driver and DDU, it’s often wise to disconnect your PC from the internet. This prevents Windows Update from automatically downloading and installing an older or generic driver once you uninstall your current one, which could interfere with the clean installation process.
The Step-by-Step Reinstallation Guide
With your preparations complete, you’re ready to embark on the actual reinstallation process. The key here is to first completely eradicate the old driver before introducing the new one.
Uninstalling the Old Driver with DDU
Using DDU is the most effective way to ensure a truly clean uninstall, removing all remnants that might otherwise cause conflicts.
- Boot into Safe Mode: This is critical. Running DDU in Safe Mode prevents Windows from loading any graphics drivers, allowing DDU to perform a thorough cleaning without interference.
- Windows 10/11: Go to
Settings > System > Recovery > Advanced startupand click “Restart now.” On the next screen, chooseTroubleshoot > Advanced options > Startup Settings > Restart. After restarting, select option 4 or F4 for “Enable Safe Mode.”
- Windows 10/11: Go to
- Run DDU: Once in Safe Mode, navigate to the folder where you extracted DDU.
- Launch
Display Driver Uninstaller.exe. - In the DDU interface, select “GPU” for “Select device type.”
- Choose your graphics card manufacturer (NVIDIA, AMD, or INTEL) from the dropdown.
- Click “Clean and restart.” DDU will meticulously remove all driver files, registries, and folders associated with the selected GPU, then automatically restart your computer into normal mode.
- Note: Your display resolution will likely be very low and generic after this step, which is normal as no specific graphics driver is currently installed.
- Launch
Installing the New Driver
After DDU has done its work and your system has restarted, it’s time to install the fresh driver package you downloaded earlier.
- Locate the Installer: Find the graphics driver installer you downloaded (e.g.,
NVIDIA-Game-Ready-Driver.exe,AMD-Software-Adrenalin.exe). - Run as Administrator: Right-click the installer executable and select “Run as administrator.” This ensures the installer has the necessary permissions.
- Follow On-Screen Prompts:
- Extraction: The installer will first extract its files.
- License Agreement: Accept the terms and conditions.
- Installation Options:
- NVIDIA: Choose “Custom (Advanced)” instead of “Express Installation.” On the next screen, tick the “Perform a clean installation” checkbox. This is a crucial step, even though DDU has already performed a clean sweep, it’s good to reconfirm.
- AMD: AMD’s Adrenalin Software usually provides a “Factory Reset” option during installation or a clean install option. If you used DDU, you can generally proceed with the standard installation, but ensure you deselect any unnecessary bundled software you don’t want.
- Intel: Intel drivers are generally straightforward; follow the express installation unless you have specific needs.
- Installation Progress: Allow the installation to complete. Your screen might flicker or go black multiple times during this process; this is normal as the display driver is being initialized.
- Restart Your PC: Once the installation finishes, the installer will usually prompt you to restart. Do so immediately to ensure all changes are fully applied.
Post-Installation Checks
After restarting, your system should now be running on the newly installed graphics driver. Perform these checks to verify everything is in order:
- Check Device Manager: Go back to Device Manager (
Win + X > Device Manager), expand “Display adapters,” and ensure your graphics card is listed correctly without any yellow exclamation marks or error codes. - Check GPU Utility Software: Launch your GPU’s control panel (NVIDIA Control Panel, AMD Adrenalin Software, Intel Graphics Command Center). Verify that it opens correctly and displays all relevant information about your graphics card and driver version.
- Test with Demanding Applications: Run a demanding game, a video editing application, or a GPU benchmark. Monitor for stability, performance, and the absence of any visual artifacts or crashes. Ensure your desired display resolution and refresh rate are correctly applied.
Troubleshooting Common Reinstallation Problems
Despite careful planning, issues can sometimes arise during or after a graphics driver reinstallation. Here are some common problems and their solutions.
Driver Not Installing
If the new driver fails to install, or the installer crashes:
- Corrupted Download: The driver file might be corrupted. Delete the downloaded file and re-download it from the manufacturer’s website.
- Incompatible Driver: Double-check that you downloaded the correct driver for your exact GPU model and operating system (32-bit vs. 64-bit).
- Antivirus/Firewall Interference: Temporarily disable your antivirus software and firewall during the installation process. Remember to re-enable them afterward.
- Windows Security: Ensure Windows Defender or other security features aren’t blocking the installer.
- Incomplete DDU Clean: If DDU failed to fully remove the old driver, try running it again in Safe Mode.
Display Issues After Installation
Experiencing problems like a black screen, incorrect resolution, or artifacts after installing the new driver:
- Black Screen: If you boot to a black screen, try booting into Safe Mode. If you can access Safe Mode, you might need to use DDU again to uninstall the problematic driver and try an older, more stable driver version. Alternatively, use Windows’s built-in “Roll Back Driver” option in Device Manager.
- Incorrect Resolution/Refresh Rate: Go to
Display Settingsin Windows or your GPU’s control panel and manually set the correct resolution and refresh rate for your monitor. - Visual Artifacts: This could indicate a driver issue or, more seriously, a hardware problem with your graphics card. Try rolling back to the previous driver or installing a different driver version. If artifacts persist, consider testing your GPU in another system if possible.
Performance Issues Persist
If your system still suffers from low FPS or instability even after a clean driver reinstallation:
- Hardware Failure: Unfortunately, persistent performance issues, especially accompanied by artifacts or crashes, can sometimes indicate a failing graphics card.
- Other Software Conflicts: Another program or background service might be interfering with your GPU. Try performing a clean boot (disabling all non-Microsoft startup items and services) to identify potential conflicts.
- Outdated BIOS/Chipset Drivers: Ensure your motherboard’s BIOS/UEFI and chipset drivers are up to date. These low-level drivers can also impact GPU communication and performance.
- Power Supply Issues: An insufficient or failing power supply unit (PSU) can lead to instability and performance throttling under load.
Conclusion
The graphics driver, though often a silent workhorse, is fundamental to the smooth operation and visual fidelity of your computer. Understanding its role, diligently performing a clean reinstallation when necessary, and proactively troubleshooting common issues are invaluable skills for any PC user. By following the steps outlined in this guide, you equip yourself with the knowledge to resolve a wide array of display and performance problems, ensuring your graphics hardware can perform at its peak.
Remember, technology evolves rapidly, and keeping your drivers updated (but also stable) is an ongoing task. A clean reinstallation is not just a fix for problems but also a powerful tool for maintaining optimal system health and extracting the best possible experience from your graphics card. Armed with this comprehensive tutorial, you can confidently tackle driver-related challenges, ensuring your digital world remains crisp, responsive, and free from visual woes.
aViewFromTheCave is a participant in the Amazon Services LLC Associates Program, an affiliate advertising program designed to provide a means for sites to earn advertising fees by advertising and linking to Amazon.com. Amazon, the Amazon logo, AmazonSupply, and the AmazonSupply logo are trademarks of Amazon.com, Inc. or its affiliates. As an Amazon Associate we earn affiliate commissions from qualifying purchases.