
In the intricate ecosystem of modern computing, graphics drivers serve as the unsung heroes, facilitating seamless communication between your operating system and your graphics processing unit (GPU). Whether you’re a hardcore gamer chasing the highest frame rates, a digital artist rendering complex visuals, or simply a daily user seeking stable and responsive display performance, the health and currency of your graphics driver are paramount. Reinstalling a graphics driver might seem like a daunting task, often associated with troubleshooting exasperating issues, but it’s a fundamental skill for any discerning computer user. This comprehensive guide will demystify the process, offering a professional, insightful, and engaging walkthrough to ensure your visual experience remains uncompromised.
Understanding Graphics Drivers and Their Importance
Before diving into the mechanics of reinstallation, it’s crucial to grasp what graphics drivers are and why they hold such significance in your computer’s operation. A clear understanding will not only empower you to perform the reinstallation confidently but also help you troubleshoot future graphics-related issues more effectively.
What is a Graphics Driver?
At its core, a graphics driver is a piece of software that enables your operating system (like Windows, macOS, or Linux) to interact correctly with your graphics card (GPU). Think of it as a translator: your OS speaks one language, your GPU another. The driver translates commands from the OS into instructions the GPU can understand, allowing it to render images, videos, and 3D graphics on your display. Without a proper driver, your graphics card would be little more than a piece of inert hardware, unable to perform its designated functions, leading to generic display outputs or even a complete lack of visual interface.
Why Graphics Drivers Are Crucial for Performance
The impact of graphics drivers extends far beyond mere display output. They are critical for:
- Optimal Performance: Up-to-date drivers often include performance optimizations, bug fixes, and support for new technologies, leading to smoother gameplay, faster rendering times, and a more responsive desktop experience.
- Feature Enablement: Modern GPUs come with a plethora of features, from advanced anti-aliasing techniques to real-time ray tracing. Drivers unlock and enable these capabilities, ensuring you can harness the full potential of your hardware.
- Stability and Compatibility: Properly installed drivers prevent crashes, freezes, and compatibility issues that can arise when the OS and GPU aren’t communicating effectively. They ensure applications and games run as intended without unexpected errors.
- Security Updates: Like all software, drivers can have vulnerabilities. Manufacturers regularly release updates that patch these security holes, protecting your system from potential exploits.
Common Scenarios Requiring a Reinstallation
There are several compelling reasons why you might need to reinstall your graphics driver. Recognizing these scenarios can help you diagnose problems and decide when a fresh installation is the appropriate course of action:
- Troubleshooting Display Issues: Flickering screens, distorted graphics, black screens, or resolution problems are often indicators of a corrupt or faulty driver.
- Performance Degradation: If your games or applications that previously ran smoothly suddenly experience stuttering, low frame rates, or crashes, a driver issue could be the culprit.
- Upgrading Your Graphics Card: When you install a new GPU, it’s almost always recommended to perform a clean reinstallation of drivers to avoid conflicts with remnants of older drivers.
- Post-OS Update Problems: Major operating system updates can sometimes introduce incompatibilities with existing drivers, necessitating a fresh installation.
- Unsuccessful Driver Updates: Sometimes, an automatic or manual driver update might fail or install incorrectly, leading to instability. A clean reinstallation can rectify this.
- Preparing for a New Game/Application: Certain demanding games or professional applications might recommend specific driver versions or a clean install for optimal compatibility and performance.
Essential Preparatory Steps Before Reinstallation
Before you embark on the reinstallation journey, a few critical preparatory steps can save you considerable headaches down the line. These actions ensure a smooth process and provide a safety net should anything unexpected occur.
Backing Up Your System (Optional but Recommended)
While reinstallation is generally safe, creating a system restore point or a full system backup is always a prudent measure. This allows you to revert your system to a previous stable state if any unforeseen issues arise during or after the driver installation. Windows users can easily create a system restore point, which is a quick way to safeguard against minor configuration changes. For more critical systems, a full disk image backup is advisable.
Identifying Your Current Graphics Card and Driver Version
Knowing your exact graphics card model and the currently installed driver version is crucial. This information helps you download the correct drivers and provides a baseline for troubleshooting.
- For Windows:
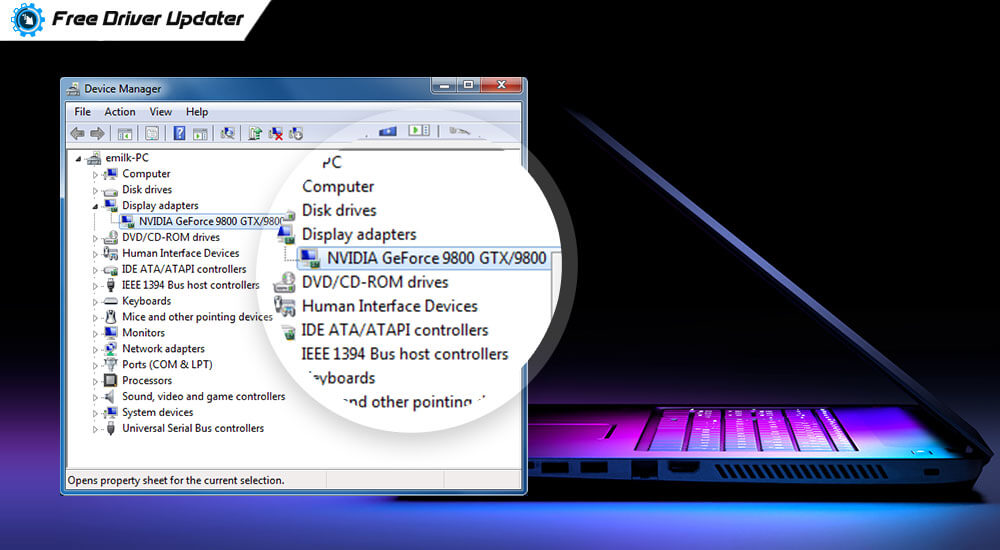
- Right-click on the Start button and select “Device Manager.”
- Expand “Display adapters.” Your graphics card(s) will be listed there (e.g., NVIDIA GeForce RTX 3080, AMD Radeon RX 6700 XT, Intel Iris Xe Graphics).
- Double-click on your graphics card, go to the “Driver” tab, and note down the “Driver Version” and “Driver Date.”
- For macOS: Graphics drivers are integrated into the OS updates, so direct identification for third-party drivers isn’t typically necessary for reinstallation in the same way.
- For Linux: Use commands like
lspci -k | grep -EA3 'VGA|3D|Display'or check system information utilities.
Downloading the Latest Drivers
Once you know your graphics card model, visit the official website of the GPU manufacturer to download the latest stable drivers. Avoid third-party driver download sites, as they can sometimes bundle malware or offer outdated/incorrect drivers.
- NVIDIA: www.nvidia.com/drivers
- AMD: www.amd.com/en/support
- Intel: www.intel.com/content/www/us/en/support/detect.html
Make sure to select your specific operating system (e.g., Windows 10 64-bit) and the correct driver type (e.g., Game Ready Driver for NVIDIA, Adrenalin Software for AMD). Download the executable file to an easily accessible location, like your Downloads folder or desktop.
Disconnecting from the Internet (For a Clean Install)
Before proceeding with the uninstallation, it’s highly recommended to disconnect your computer from the internet. This prevents Windows (or other OS) from automatically downloading and installing a generic or older driver version as soon as you remove the current one, which could interfere with your clean installation process. You can disable Wi-Fi, unplug your Ethernet cable, or temporarily disable your network adapter in Device Manager.
The Step-by-Step Reinstallation Process
With all preparations complete, you are now ready to execute the reinstallation. The key to a truly clean installation lies in thoroughly removing the old driver before introducing the new one.

Uninstalling the Old Driver (Using DDU for Best Results)
While you can uninstall drivers through Device Manager or Control Panel, a more thorough approach is recommended, especially when troubleshooting persistent issues. The Display Driver Uninstaller (DDU) is a free, popular, and highly effective utility for this purpose.
- Download DDU: Obtain DDU from a reputable source like Wagnardsoft’s Guru3D page.
- Boot into Safe Mode: This is crucial. DDU works best and is safest when run in Windows Safe Mode, as it prevents other processes from interfering with driver removal.
- For Windows 10/11: Go to Settings > System > Recovery > Advanced startup > Restart now. Then, troubleshoot > Advanced options > Startup Settings > Restart. Press 4 or F4 for Safe Mode.
- Run DDU:
- Once in Safe Mode, launch DDU.
- Select “GPU” as the device type and then choose your GPU manufacturer (NVIDIA, AMD, or Intel).
- Click “Clean and restart (Highly recommended).” DDU will meticulously remove all traces of the old driver, including registry keys, folders, and files. Your screen might go black or switch to a very low resolution temporarily – this is normal.
- Wait for Restart: DDU will automatically restart your computer into normal mode after the uninstallation is complete.
Self-note: If DDU isn’t used, uninstall via Control Panel (Programs and Features) and then Device Manager, ensuring to delete driver software when prompted. However, DDU is vastly superior for cleanliness.
Installing the New Driver
After a clean slate, you can now install the fresh drivers you downloaded earlier.
- Locate the Downloaded Driver: Navigate to the folder where you saved the driver executable.
- Run as Administrator: Right-click the driver executable and select “Run as administrator” to prevent permission-related issues.
- Follow On-Screen Prompts:
- The installer will guide you through the process. Accept the license agreement.
- When given the option, choose “Custom” or “Advanced” installation. This allows you to perform a “Clean Installation” (NVIDIA) or “Factory Reset” (AMD), which is a secondary clean sweep performed by the installer itself, even if DDU was used. This is a good double-check.
- Deselect any unnecessary components (like GeForce Experience if you don’t use it, or certain bundled software if you prefer a leaner install), though generally, the core driver and PhysX/audio drivers are recommended.
- Proceed with the installation. Your screen might flicker or go black multiple times during this phase – this is normal as the new driver takes control of the display.
- Reboot: Once the installation is complete, the installer will usually prompt you to restart your computer. Do so immediately to finalize the installation and ensure all components are loaded correctly.
Verifying the Installation
After rebooting, it’s essential to confirm that the new graphics driver has been successfully installed and is functioning correctly.
- Check Device Manager: Go back to Device Manager (right-click Start, select “Device Manager”) and expand “Display adapters.” Verify that your graphics card is listed without any yellow exclamation marks or error symbols. Double-click it, go to the “Driver” tab, and confirm the new driver version and date match what you expected.
- Check Manufacturer’s Control Panel: NVIDIA Control Panel, AMD Adrenalin Software, or Intel Graphics Command Center should now be accessible and display the correct driver version and hardware information.
- Test Graphics-Intensive Applications: Launch a game, a video editing suite, or a demanding benchmark tool to see if the performance issues are resolved and if the system is stable.
Troubleshooting Common Issues
Even with careful execution, problems can sometimes arise. Knowing how to troubleshoot common reinstallation issues can save you significant frustration.
Display Problems After Reinstallation
- No Display/Black Screen: If your screen remains black after a restart, try booting into Safe Mode again. If you can access Safe Mode, you might need to try a different driver version (perhaps an older, known stable one) or redo the DDU process and reattempt installation.
- Incorrect Resolution/Aspect Ratio: This usually indicates a generic driver is in place. Verify the official driver is installed via Device Manager. If it is, check your display settings in Windows (Settings > System > Display) or your GPU control panel to set the correct resolution and refresh rate.
- Flickering/Artifacts: This could signal an unstable driver or, in rare cases, a hardware issue. Try rolling back to a previous stable driver version.
Driver Installation Failures
- “Driver Not Found” or “Installation Failed” Errors:
- Ensure you downloaded the correct driver for your specific GPU model and operating system version (32-bit vs. 64-bit).
- Temporarily disable antivirus software, which can sometimes interfere with installation.
- Ensure you have sufficient administrative privileges.
- Try re-downloading the driver, as the file might have been corrupted during the initial download.
- Endless Reboot Loops: This is a severe issue often caused by driver corruption. Boot into Safe Mode, run DDU again, and try installing an older, known stable driver version. If that fails, consider using your system restore point.
Performance Not Improving
- Still Experiencing Low FPS/Stuttering:
- Check other components: Graphics drivers are just one piece of the puzzle. Ensure your CPU, RAM, and storage are not bottlenecks.
- Verify in-game settings: Make sure games aren’t running at excessively high settings for your hardware.
- Monitor temperatures: Overheating GPU or CPU can throttle performance. Use monitoring software (e.g., HWMonitor, MSI Afterburner).
- Windows Power Plan: Ensure your power plan is set to “High Performance” (or equivalent in power settings) rather than “Power Saver.”
- NVIDIA/AMD Control Panel settings: Review the global and per-application settings in your GPU’s control panel to ensure optimal performance settings are enabled.
Best Practices for Driver Management
Maintaining healthy graphics drivers is an ongoing process. Adopting best practices can prevent future issues and ensure your system continues to perform at its peak.
Regular Driver Updates
While not every new driver version brings revolutionary changes, keeping your drivers reasonably up-to-date is beneficial. Manufacturers regularly release updates that include performance optimizations for new games, bug fixes, and support for emerging technologies. However, avoid updating immediately upon release; wait a few days to see if early adopters report widespread issues. A stable driver is often better than the very latest one with potential unknown bugs.
Automatic Driver Management Tools (Use with Caution)
Many GPU manufacturers offer companion software (e.g., NVIDIA GeForce Experience, AMD Adrenalin Software) that can automatically detect, download, and install driver updates. While convenient, always review the updates before installation and consider running a “Custom” or “Factory Reset” installation through these tools to ensure cleanliness. Be wary of generic third-party driver update tools, as they can sometimes install incorrect drivers or bloatware.
Maintaining System Health
Beyond graphics drivers, overall system health plays a significant role in graphical performance.
- Keep your OS updated: Windows updates often include security patches and compatibility improvements that can indirectly affect driver performance.
- Clean your system: Regularly clear temporary files, run disk cleanup, and ensure your storage drives have ample free space.
- Monitor temperatures: Keep an eye on your GPU and CPU temperatures. Excessive heat can lead to thermal throttling and reduced performance. Ensure good airflow within your PC case.
- Clean your GPU physically: Dust accumulation on GPU fans and heatsinks can severely impact cooling efficiency. Periodically clean your graphics card with compressed air.
Reinstalling a graphics driver is a vital maintenance procedure that can resolve a multitude of display and performance issues. By understanding the underlying principles, diligently following the preparatory steps, and meticulously executing the reinstallation process, you equip yourself with the knowledge to ensure your system’s visual output remains pristine and performant. This process, while seemingly complex at first, becomes a straightforward task with practice, reinforcing your control over your computing experience and allowing you to unlock the full potential of your hardware.
aViewFromTheCave is a participant in the Amazon Services LLC Associates Program, an affiliate advertising program designed to provide a means for sites to earn advertising fees by advertising and linking to Amazon.com. Amazon, the Amazon logo, AmazonSupply, and the AmazonSupply logo are trademarks of Amazon.com, Inc. or its affiliates. As an Amazon Associate we earn affiliate commissions from qualifying purchases.