
In an increasingly digital financial landscape, tools like Cash App have revolutionized the way millions manage their money. Offering a blend of peer-to-peer payments, investing capabilities, and a convenient debit card, Cash App has become a staple for personal finance. However, for many users, particularly those new to the platform, a fundamental question often arises: “How can I add money to my Cash App card?” This question is at the heart of unlocking Cash App’s full potential, transforming it from a simple money transfer service into a robust financial instrument for everyday spending, budgeting, and even saving.
This comprehensive guide delves into the various methods available to fund your Cash App card, examining each process in detail, highlighting important considerations, and offering insights into optimizing your digital money management. By understanding these mechanisms, you can ensure your Cash App card is always ready for use, seamlessly integrating into your personal financial ecosystem.
Understanding Your Cash App Card and Funding Essentials
Before diving into the “how-to,” it’s crucial to grasp what the Cash App Card is and the foundational elements necessary for its effective use. This understanding forms the bedrock of secure and efficient money management within the Cash App ecosystem.
What is the Cash App Card and Why Fund It?
The Cash App Card, officially known as the Cash Card, is a free, customizable debit card issued by Sutton Bank and powered by Visa. It’s directly linked to your Cash App balance, meaning any funds you hold in your Cash App account are immediately available for spending using this card. Unlike a credit card, it draws directly from your existing balance, making it an excellent tool for budgeting and avoiding debt.
Funding your Cash App Card allows you to:
- Make everyday purchases: Use it at any merchant that accepts Visa, both online and in physical stores.
- Withdraw cash: Access your funds at ATMs (though fees may apply).
- Track spending: Keep a clear record of your transactions directly within the app, aiding in personal budgeting.
- Utilize Boosts: Take advantage of instant discounts at select retailers directly through the card.
Essentially, by funding your Cash App Card, you transform your digital balance into a tangible, universally accepted payment method, bridging the gap between your digital wallet and the physical world of commerce.
Prerequisites for Adding Funds
To ensure a smooth funding process, there are a few essential prerequisites and considerations:
- Verified Account: For most funding methods, especially those involving bank transfers or higher limits, your Cash App account must be verified. This typically involves providing your full name, date of birth, and the last four digits of your Social Security Number (SSN). Full verification often requires your complete SSN. This step is crucial for financial security and compliance.
- Linked Bank Account: While not strictly necessary for all funding methods, linking an external bank account (checking or savings) is the most common and often the most convenient way to add substantial funds. This involves connecting your bank account to Cash App using your login credentials or account and routing numbers.
- Understanding Limits: Cash App imposes daily and weekly limits on how much money you can add, send, and withdraw. These limits can vary based on your verification status. Being aware of these limits prevents unexpected transaction failures and helps in planning your financial activities.
Primary Methods for Adding Funds to Your Cash App Card
With the foundational understanding established, let’s explore the most direct and common ways to add money to your Cash App Card. Each method caters to different needs and preferences, offering flexibility in how you manage your funds.
Linking a Bank Account and Initiating Transfers
This is arguably the most straightforward and frequently used method for funding your Cash App balance.
- Link Your Bank Account:
- Open Cash App and tap the “Banking” tab (the house icon) on the bottom left.
- Tap “Link Bank.”
- Follow the prompts to connect your bank account. You’ll typically use Plaid, a secure third-party service, to log into your bank account directly from within Cash App. Alternatively, you can manually enter your bank’s routing and account numbers.
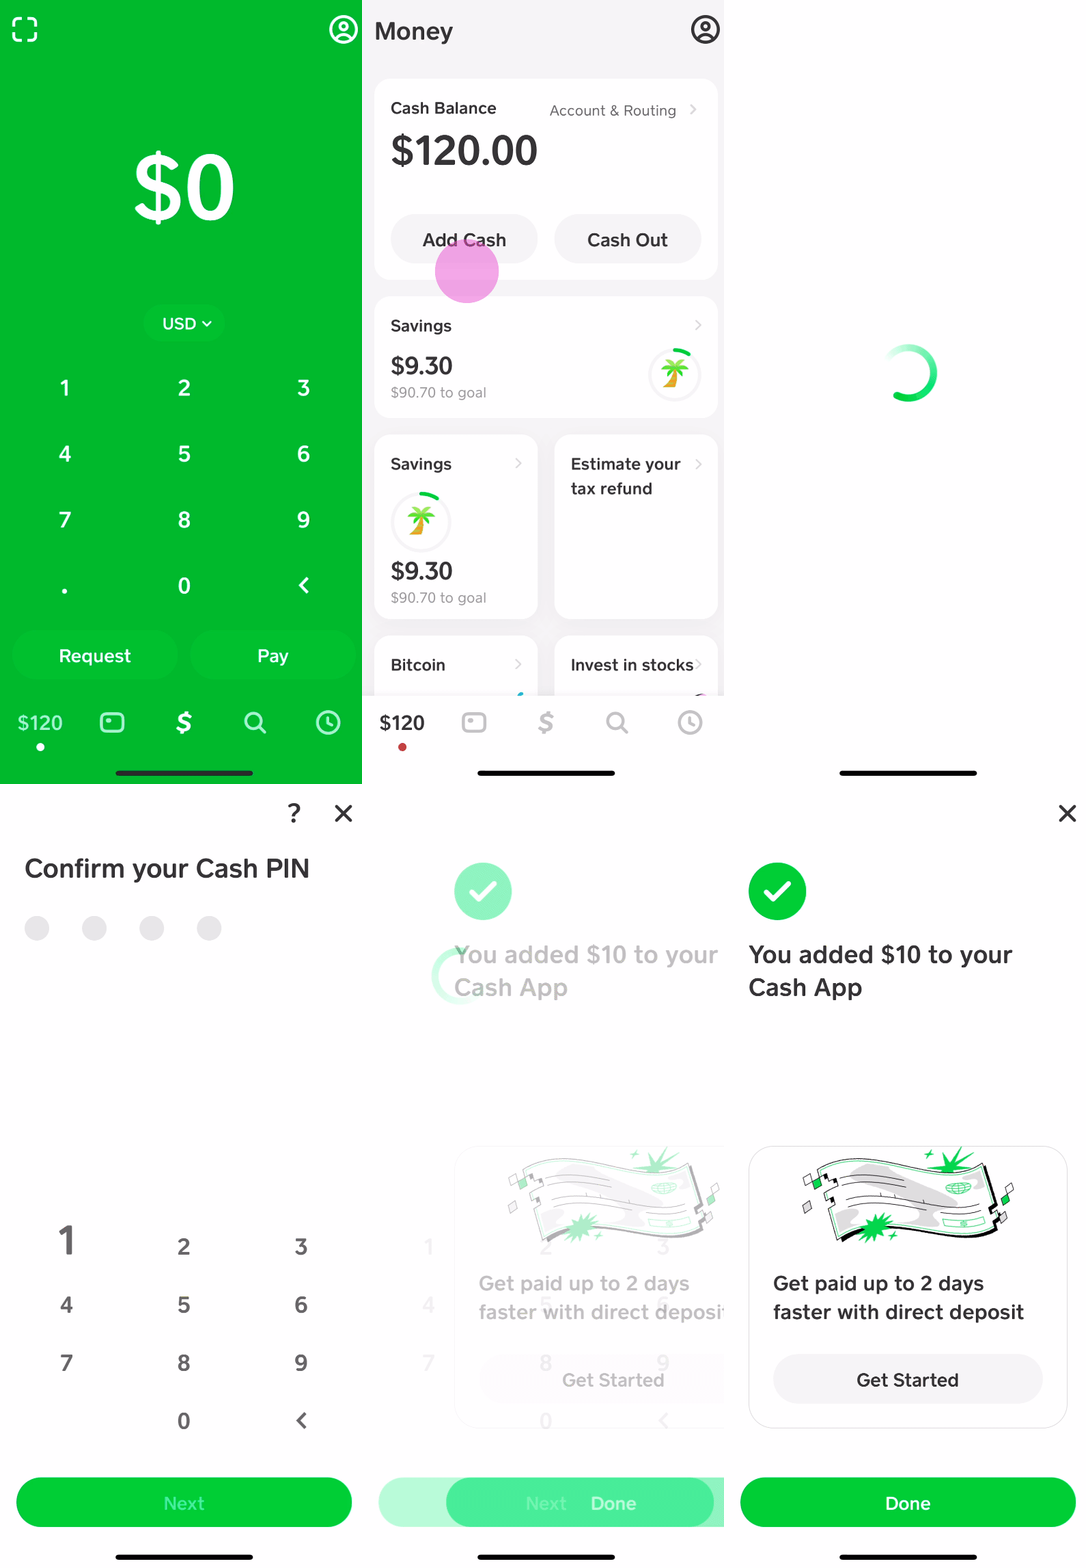
- Add Cash to Cash App:
- Once your bank is linked, return to the “Banking” tab.
- Tap “Add Cash.”
- Enter the desired amount you wish to transfer from your linked bank account to your Cash App balance.
- Tap “Add.”
- Confirm the transfer using your PIN or Touch ID/Face ID.
Transfers from a linked bank account typically take 1-3 business days to clear and become available in your Cash App balance for free. Cash App also offers an “Instant Deposit” option, which, for a small fee (usually 0.5% – 1.75%), makes the funds available immediately. This option is particularly useful when you need quick access to your money.
Depositing Cash at Retail Stores
For those who primarily deal in physical cash, Cash App provides a convenient way to convert paper money into digital funds that are instantly available on your Cash App Card.
- Locate Participating Retailers:
- Open Cash App and tap the “Banking” tab.
- Tap “Add Cash.”
- Scroll down and tap “Deposit Paper Money.”
- Cash App will display a map showing nearby stores that support cash deposits (e.g., Walmart, 7-Eleven, Walgreens, Dollar General).
- Generate Deposit Barcode:
- Select your chosen store.
- Cash App will generate a unique barcode.
- Complete Deposit at Checkout:
- Go to the cashier at the selected store and tell them you want to add money to your Cash App account.
- Present the barcode to the cashier for scanning.
- Hand over the cash you wish to deposit.
- The cashier will complete the transaction. The funds are usually instantly available in your Cash App balance, ready for use with your Cash App Card.
It’s important to note that most retailers charge a small fee for this service (e.g., $1-$4), and there are typically daily and weekly limits on cash deposits.
Receiving Money from Others (Peer-to-Peer Transfers)
While not a direct “add money” function in the traditional sense, receiving funds from other Cash App users is a fundamental way to populate your balance, which then becomes accessible via your Cash App Card.
- Share Your Cashtag or Contact Info: Provide your unique $Cashtag (e.g., $YourName), phone number, or email address associated with your Cash App account to the sender.
- Sender Initiates Transfer: The sender opens their Cash App, taps “Pay,” enters your $Cashtag/contact, the amount, and a memo, then taps “Pay.”
- Funds Received: Once the sender confirms, the money is instantly credited to your Cash App balance.
This method is entirely free for standard transfers and is widely used for splitting bills, receiving payments from friends/family, or even for small business transactions. These received funds are immediately available on your Cash App Card.
Advanced Strategies and Considerations for Managing Your Cash App Funds
Beyond the basic funding methods, Cash App offers advanced features and important considerations that can further enhance your financial management experience.
Direct Deposit for Paychecks and Government Benefits
Cash App can serve as a primary bank account for many, offering the convenience of direct deposit. This allows you to receive your paychecks, government benefits (like tax refunds or unemployment), or other regular income directly into your Cash App balance.
- Find Your Account and Routing Numbers:
- In Cash App, tap the “Banking” tab.
- Scroll down to find your unique account and routing numbers. These are provided for your Cash App account, similar to a traditional bank account.
- Provide to Payer: Share these details with your employer’s payroll department, government agency, or any entity that provides direct deposits.
- Receive Funds: Once set up, your funds will be directly deposited into your Cash App account, often up to two days earlier than many traditional banks, depending on your employer’s payroll provider. This streamlines income management and ensures your Cash App Card is consistently funded.
Using a Debit Card (Not Linked for Bank Transfers) to Add Funds
While linking a bank account directly for transfers is common, you can also use a standalone debit card to add money to your Cash App. This is useful if you want to fund your Cash App without giving full access to your bank account or if you’re using a debit card from an account you don’t typically link.
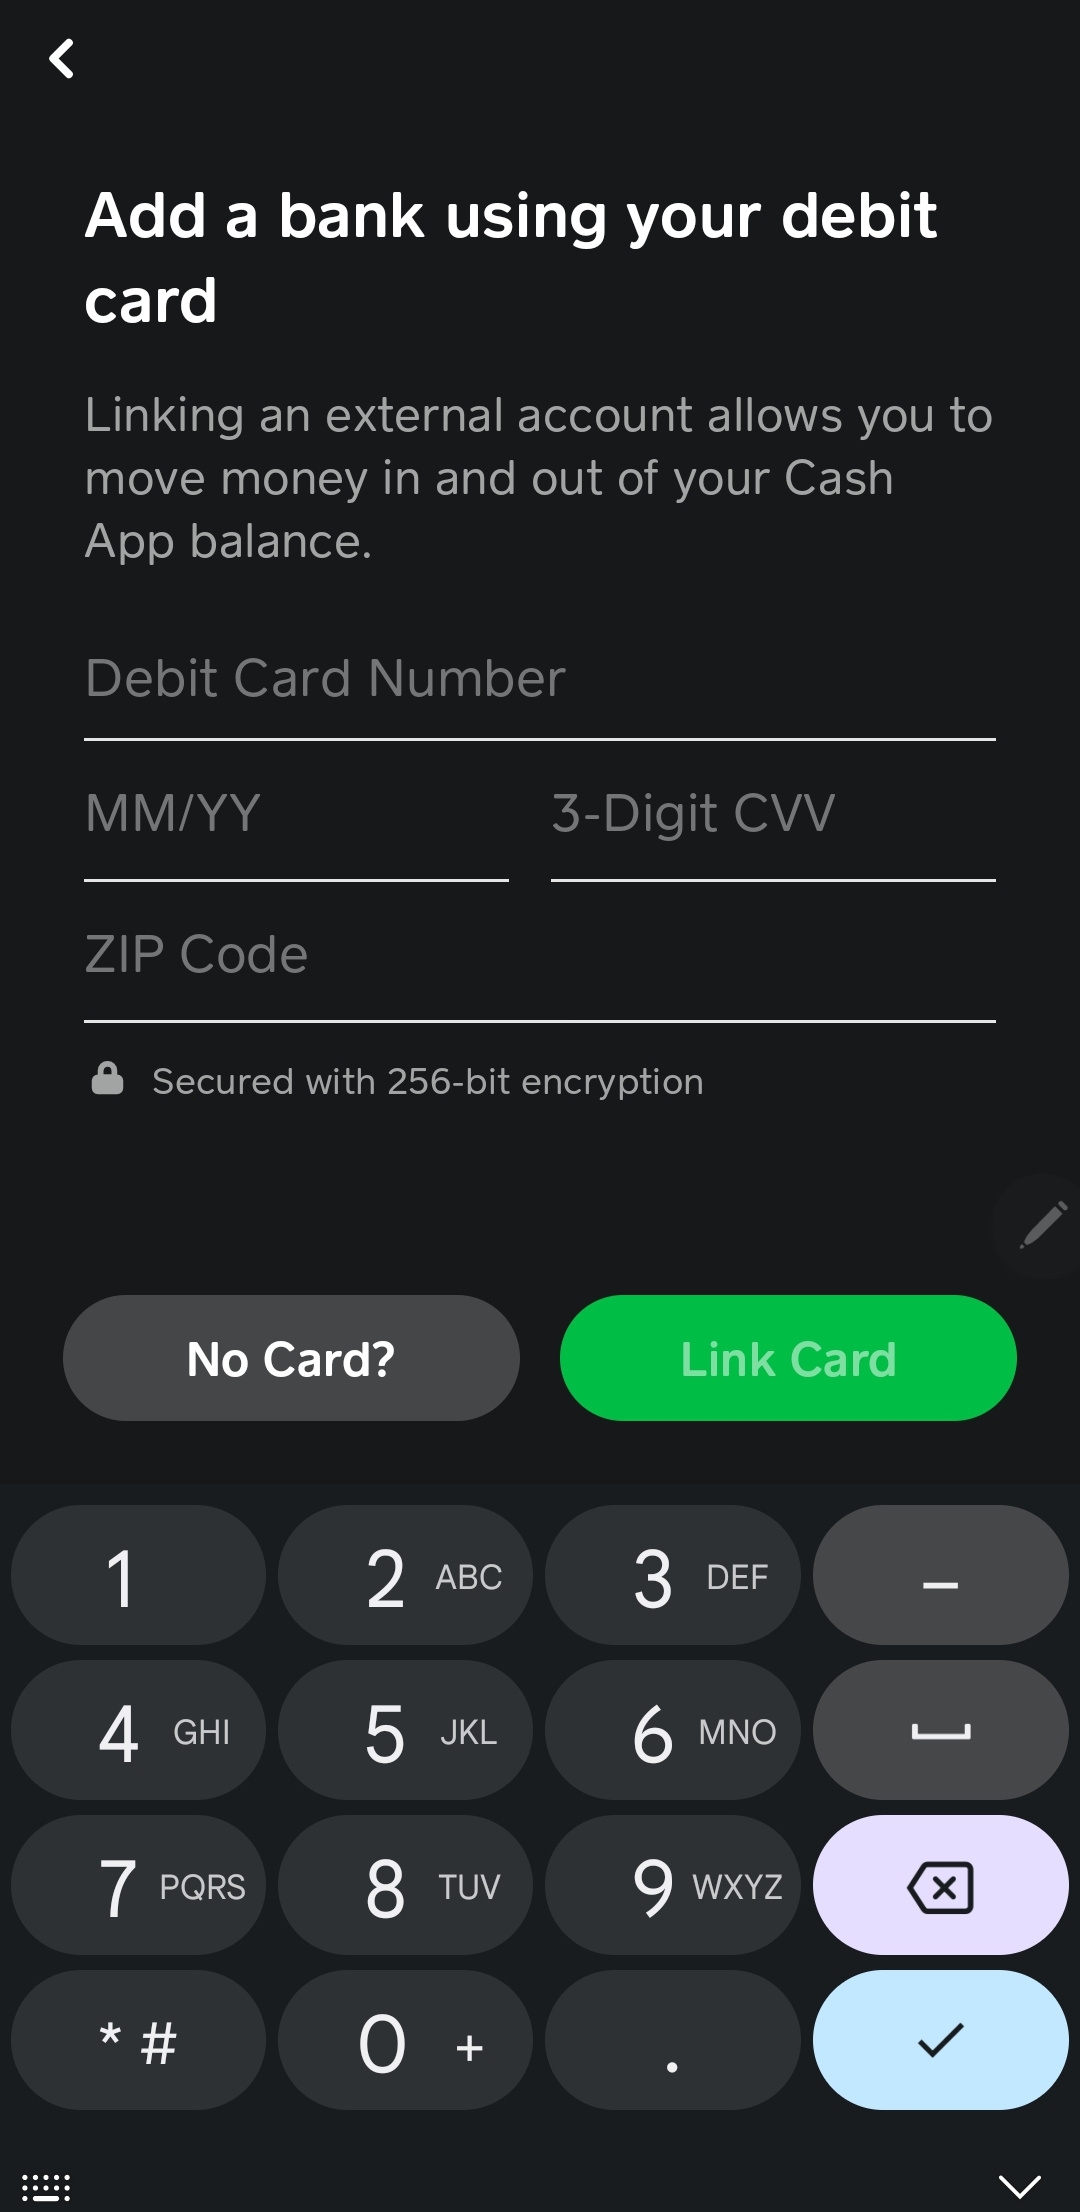
- Link Debit Card:
- Tap the “Banking” tab.
- Tap “Link Bank” (even though it’s a debit card, this is where you link cards).
- Tap “Link Debit Card” and enter your card details.
- Add Cash:
- Once linked, go back to the “Banking” tab.
- Tap “Add Cash.”
- Enter the amount.
- The funds will be drawn from your linked debit card and instantly added to your Cash App balance, usually for a fee similar to instant bank transfers (0.5% – 1.75%).
This method offers instant availability but generally incurs a fee.
Understanding Fees and Limits
A critical aspect of responsible financial management with Cash App is a clear understanding of its fee structure and transaction limits.
- Instant Deposit Fees: As mentioned, transferring money from your linked bank account instantly to Cash App typically incurs a fee (0.5% – 1.75%). Standard transfers are free.
- Cash Deposit Fees: Depositing physical cash at retail stores usually comes with a small fee charged by the retailer.
- ATM Withdrawal Fees: While Cash App allows ATM withdrawals with your Cash Card, Cash App charges a $2 fee per withdrawal if you don’t have $300 or more in direct deposits each month. The ATM operator may also charge their own fees.
- Sending/Receiving Money: Sending and receiving money from other Cash App users is generally free, unless using a linked credit card to send money, which incurs a 3% fee.
- Transaction Limits: Unverified accounts have lower limits for sending, receiving, and adding funds. Full verification significantly increases these limits, allowing for greater financial flexibility. Always check your specific limits within the app under your profile settings.
Optimizing Your Cash App Experience for Financial Management
Beyond simply funding your card, Cash App offers features and best practices that can help you manage your money more effectively and securely.
Budgeting and Tracking Spending with Cash App
Cash App provides a clear transaction history within the app, which can be a valuable tool for personal budgeting:
- Real-time Tracking: Every transaction made with your Cash App Card, or money sent/received, is immediately recorded.
- Categorization (Manual): While Cash App doesn’t auto-categorize spending like some budgeting apps, regularly reviewing your transaction history allows you to manually categorize and understand where your money is going.
- Setting Goals: By knowing your incoming funds (especially via direct deposit) and outgoing expenses, you can better manage your Cash App balance to align with specific financial goals, whether it’s saving for a purchase or managing daily spending.
Security Best Practices for Your Cash App Card
Protecting your funds is paramount. Implement these security measures:
- Enable Security Lock: Use a PIN, Touch ID, or Face ID to authorize payments and access your Cash App account.
- Enable Notifications: Turn on push notifications for all transactions to detect unauthorized activity immediately.
- Monitor Activity: Regularly review your transaction history for any unfamiliar charges.
- Protect Your Information: Never share your PIN, password, or full Cash App login details with anyone. Be wary of phishing attempts.
- Report Lost/Stolen Card: If your Cash App Card is lost or stolen, immediately disable it within the app or contact Cash App support to prevent unauthorized use.
Troubleshooting Common Funding Issues
Occasionally, you might encounter issues when trying to add money. Here are some common problems and solutions:
- Failed Bank Transfer:
- Check Bank Link: Ensure your bank account is correctly linked and verified.
- Insufficient Funds: Verify that you have enough money in your linked bank account to cover the transfer.
- Bank Restrictions: Some banks might temporarily block transfers to services like Cash App as a security measure. Contact your bank to confirm.
- Cash Deposit Refused:
- Incorrect Store: Double-check that you are at a participating retailer shown in the app.
- Expired Barcode: Barcodes can expire. Regenerate a new one if necessary.
- Exceeded Limits: Ensure you haven’t exceeded daily/weekly cash deposit limits.
- Card Declined (when adding with debit card):
- Incorrect Details: Verify the debit card number, expiry date, and CVV.
- Insufficient Funds: Ensure there are enough funds on the debit card.
- Bank Block: Your bank may be blocking the transaction. Contact them.
- Account Verification Issues: If you’re consistently running into limits, make sure your Cash App account is fully verified. Provide all requested information accurately.
When in doubt, reaching out to Cash App support directly through the app or their official website is always the best course of action.

Conclusion
The ability to add money to your Cash App Card is the gateway to leveraging the platform as a powerful and versatile financial tool. Whether you prefer the convenience of linking your bank account, the flexibility of cash deposits at retail stores, or the ease of receiving peer-to-peer payments and direct deposits, Cash App offers multiple avenues to fund your digital wallet.
By understanding each method, being mindful of associated fees and limits, and adopting robust security practices, you can seamlessly integrate Cash App into your personal finance strategy. No longer just a simple payment app, your Cash App Card can become a central component of your daily spending, budgeting, and overall money management, empowering you with greater control and access to your funds in the digital age.
aViewFromTheCave is a participant in the Amazon Services LLC Associates Program, an affiliate advertising program designed to provide a means for sites to earn advertising fees by advertising and linking to Amazon.com. Amazon, the Amazon logo, AmazonSupply, and the AmazonSupply logo are trademarks of Amazon.com, Inc. or its affiliates. As an Amazon Associate we earn affiliate commissions from qualifying purchases.