In the ever-evolving world of technology, staying updated with the latest software and tools is paramount. For macOS users, managing installations, updates, and dependencies can often feel like navigating a complex maze. This is where Homebrew, often affectionately called “the missing package manager for macOS,” steps in. It simplifies the process of installing and managing software, transforming a potentially tedious task into a streamlined experience. Whether you’re a seasoned developer, a tech enthusiast, or simply someone looking to expand their macOS toolkit, understanding how to install and utilize Homebrew is an investment that pays significant dividends in productivity and efficiency.
This guide will walk you through the straightforward process of installing Homebrew on your Mac, demystifying its purpose, and highlighting its crucial role within the broader tech ecosystem. We’ll explore why Homebrew is an indispensable tool for anyone serious about maximizing their macOS experience, touching upon how it integrates with various aspects of technology, from software development to AI tools and beyond.
The Power of a Package Manager: Why Homebrew Matters
Before diving into the installation itself, it’s beneficial to understand why Homebrew is so highly regarded within the macOS community. At its core, Homebrew is a free and open-source package manager that automates the installation and management of software that Apple (and by extension, macOS) does not provide.
Think of it like this: macOS comes pre-loaded with a fantastic array of applications and utilities. However, for many specialized tools, development environments, or command-line utilities, you’d traditionally have to download installers from individual websites, often manually resolve dependencies, and keep track of multiple update processes. This can become cumbersome, especially when working on projects that require a variety of software.
Homebrew elegantly solves this problem. It maintains a vast repository of software formulas, which are essentially scripts that tell Homebrew how to download, compile (if necessary), and install a piece of software. When you want to install something, you simply tell Homebrew the name of the package, and it handles the rest – including any other software your desired package depends on.
Beyond Basic Installation: Benefits of Using Homebrew
The advantages of using Homebrew extend far beyond just simplifying the initial installation:
- Simplified Software Management: Installing, updating, and removing software becomes a matter of typing a single command. This consistency saves time and reduces the likelihood of errors.
- Access to a Vast Software Library: Homebrew offers access to thousands of command-line tools, programming languages, applications, and development libraries that are not natively available on macOS. This is particularly crucial for developers who need specific tools for building, testing, and deploying software.
- Dependency Resolution: One of Homebrew’s most significant strengths is its ability to automatically identify and install any required dependencies for a given package. This eliminates the frustrating “missing dependency” errors that often plague manual installations.
- Keeping Software Up-to-Date: Updating all your Homebrew-installed packages is as simple as running
brew upgrade. This ensures you’re always working with the latest, most secure versions of your tools. - Clean Uninstallation: Removing software is just as easy as installing it. Homebrew ensures that associated files and configurations are cleanly removed, preventing clutter and potential conflicts.
- Integration with Tech Trends: As new AI tools, development frameworks, and specialized software emerge, Homebrew is often one of the quickest ways to get them installed and running on your macOS machine. This makes it an indispensable tool for staying at the forefront of technological advancements.
- Enhancing Productivity: By streamlining software management, Homebrew frees up your time and mental energy to focus on more critical tasks, whether that’s coding, analyzing data, or designing.
Prerequisites for Homebrew Installation
Before you can embark on the journey of installing Homebrew, there are a couple of essential prerequisites you need to ensure are met. These are not overly technical but are important for a smooth installation process.
1. macOS Operating System
As mentioned, Homebrew is specifically designed for macOS. Ensure your Mac is running a recent version of macOS. While Homebrew generally supports older versions, sticking to current releases ensures compatibility and access to the latest features.
2. Command Line Tools (CLT) for Xcode
Homebrew relies on a set of developer tools that are part of Apple’s Command Line Tools package. These tools include compilers, Git, and other essential utilities needed for compiling software from source.
How to install or check for Command Line Tools:
The easiest way to check if you have these installed is to open your Terminal application (you can find it in Applications/Utilities or by searching with Spotlight). Once Terminal is open, type the following command and press Enter:
xcode-select --install
If the Command Line Tools are already installed, you’ll likely see a message indicating this. If they are not installed, a dialog box will appear, prompting you to install them. Click “Install” and follow the on-screen instructions. This process might take a few minutes as it downloads and installs the necessary components.
Note: You do not need to install the full Xcode application from the App Store unless you are a developer planning to create iOS or macOS applications. The Command Line Tools package is sufficient for Homebrew’s needs.
3. Internet Connection
Homebrew downloads software and its dependencies from the internet. Therefore, a stable internet connection is crucial throughout the installation and subsequent usage.
Installing Homebrew: A Step-by-Step Guide
With the prerequisites in place, installing Homebrew is remarkably simple. The process involves running a single command in your Terminal.
Step 1: Open Terminal
Locate and open the Terminal application on your Mac.
Step 2: Copy and Paste the Installation Command
Visit the official Homebrew website (https://brew.sh/). You will find the latest installation command prominently displayed on the homepage. It will look something like this (this command is subject to change, so always verify on the official site):
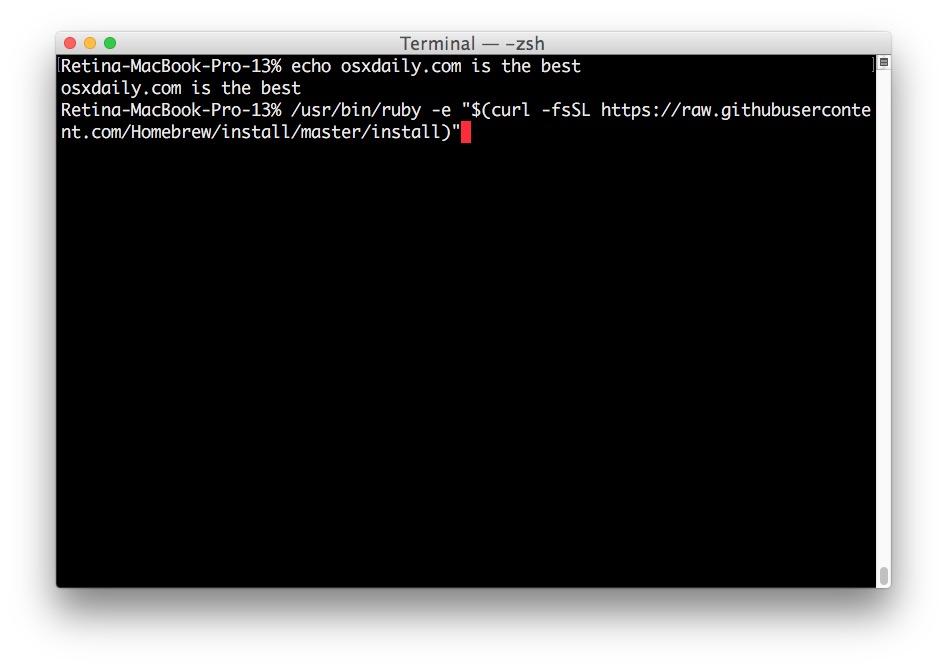
/bin/bash -c "$(curl -fsSL https://raw.githubusercontent.com/Homebrew/install/HEAD/install.sh)"
Understanding the Command:
/bin/bash -c: This part executes the following script using the Bash shell.$(curl -fsSL https://raw.githubusercontent.com/Homebrew/install/HEAD/install.sh): This is where the magic happens.curl: A command-line tool for transferring data with URLs.-fsSL: These are options forcurl:f: Fail silently (no output on HTTP errors).s: Silent mode (don’t show progress meter or error messages).S: Show error messages even in silent mode.L: Follow redirects.
https://raw.githubusercontent.com/Homebrew/install/HEAD/install.sh: This is the URL of the official Homebrew installation script hosted on GitHub.
Carefully copy the entire command from the Homebrew website.
Step 3: Execute the Command in Terminal
Paste the copied command into your Terminal window and press Enter.
Step 4: Follow the On-Screen Prompts
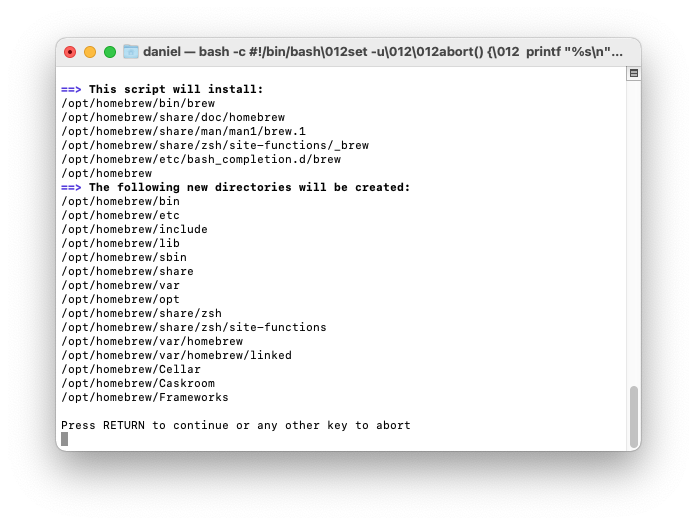
The installation script is interactive and will guide you through the process. Here’s what you can expect:
- Welcome Message and Information: The script will display information about what it’s about to do, including where Homebrew will be installed (typically
/usr/local/Homebrewon Intel Macs or/opt/homebrewon Apple Silicon Macs) and what files it might modify. - Xcode Command Line Tools Check: It will verify that you have the necessary Command Line Tools installed. If not, it will prompt you to install them again.
- Password Prompt: For security reasons, the script will likely ask for your macOS user password. Type your password (you won’t see characters appear as you type) and press Enter.
- Confirmation Prompt: The script will often ask for confirmation before proceeding with the installation. Type
yand press Enter to proceed. - Installation Process: Homebrew will now download and install itself, along with its initial dependencies. This can take a few minutes depending on your internet speed. You’ll see a lot of output in the Terminal as it progresses.
Step 5: Post-Installation Instructions
Once the installation is complete, the script will provide some important post-installation instructions. Pay close attention to these!
-
Adding Homebrew to your PATH: On newer macOS versions, or if you’re on an Apple Silicon Mac, Homebrew might install in a location that isn’t automatically added to your system’s
PATHenvironment variable. The terminal will usually provide specific commands to add it. It might look something like this (again, check your Terminal output for the exact commands):echo 'eval "$(/opt/homebrew/bin/brew shellenv)"' >> ~/.zprofile eval "$(/opt/homebrew/bin/brew shellenv)"- The first command adds a line to your shell configuration file (
~/.zprofilefor Zsh, which is the default on modern macOS) that will automatically set up Homebrew’s environment variables every time you open a new Terminal window. - The second command executes these environment variables immediately in your current Terminal session.
- The first command adds a line to your shell configuration file (
-
Verifying the Installation: The script will usually suggest a command to verify that Homebrew is installed and working correctly. This is typically:
brew doctorThis command checks your Homebrew installation for any potential issues and suggests fixes if necessary. If it reports that everything looks good, congratulations – Homebrew is successfully installed!
Using Homebrew: Your Gateway to New Software
Now that Homebrew is installed, you can start harnessing its power. The basic commands are intuitive and follow a consistent pattern.
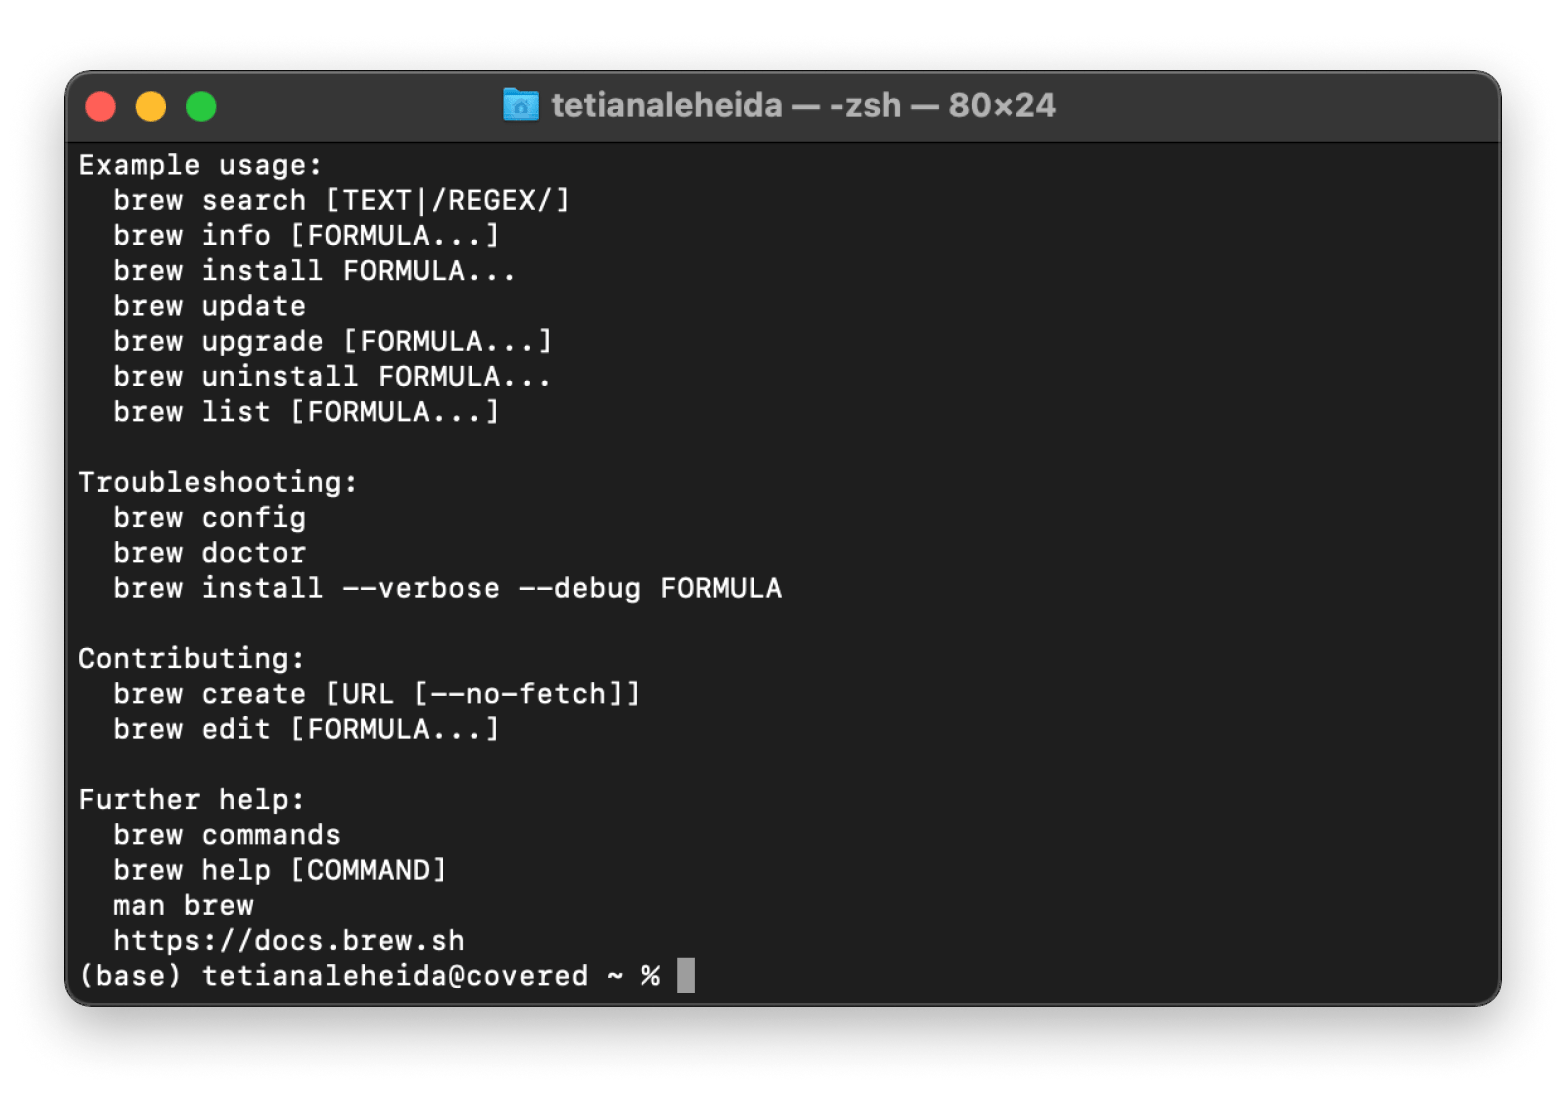
Essential Homebrew Commands
-
Searching for Packages:
To find out if a particular software package is available through Homebrew, use thesearchcommand:brew search <package_name>For example, to search for the popular text editor
nano:brew search nano -
Installing Packages:
To install a package, use theinstallcommand followed by the package name:brew install <package_name>For instance, to install
nano:brew install nanoHomebrew will download the necessary files, compile them if needed, and place them in the appropriate directories.
-
Updating Homebrew Itself:
It’s good practice to keep Homebrew’s package list up-to-date. This ensures you have access to the latest software versions and formulas.brew updateThis command fetches the latest updates to Homebrew’s core and its list of available formulas.
-
Upgrading Installed Packages:
To upgrade all your installed Homebrew packages to their latest versions:brew upgradeIf you only want to upgrade a specific package:
brew upgrade <package_name> -
Listing Installed Packages:
To see a list of all the software you’ve installed using Homebrew:brew list -
Uninstalling Packages:
To remove a package installed via Homebrew:brew uninstall <package_name> -
Cleaning Up Old Versions:
Over time, Homebrew keeps older versions of installed packages as a fallback. You can clean these up to save disk space:
bash

brew cleanup
Homebrew in Action: Examples
- Installing Python: If you need a different version of Python than what comes with macOS, or want to manage multiple Python versions:
bash

brew install python
- Installing Git: While macOS often comes with Git, Homebrew can provide a more recent version:
bash

brew install git
- Installing a Command-Line Utility: For example, to install
wgetfor more advanced file downloading:
bash

brew install wget
Conclusion: Empowering Your macOS Experience
Installing Homebrew is a fundamental step for anyone who wants to leverage the full potential of their macOS system. It democratizes access to a vast universe of software, from essential development tools and programming languages to innovative AI utilities and productivity apps. By providing a robust and user-friendly way to manage these installations, Homebrew significantly enhances efficiency and reduces the friction often associated with software management.
Whether you’re a developer looking to set up a complex development environment, a data scientist exploring new AI tools, or a power user eager to customize your system, Homebrew is an indispensable ally. Its simple commands and powerful capabilities empower you to stay current, experiment freely, and ultimately, achieve more with your Mac. The initial installation is a minor hurdle, but the ongoing benefits of a well-managed software ecosystem are immense, making the effort well worth it for anyone serious about technology and productivity.
aViewFromTheCave is a participant in the Amazon Services LLC Associates Program, an affiliate advertising program designed to provide a means for sites to earn advertising fees by advertising and linking to Amazon.com. Amazon, the Amazon logo, AmazonSupply, and the AmazonSupply logo are trademarks of Amazon.com, Inc. or its affiliates. As an Amazon Associate we earn affiliate commissions from qualifying purchases.