Minecraft, at its core, is a game of limitless possibilities. Yet, even the most expansive block-building universe can be further enriched and transformed through the power of mods. These community-developed modifications can introduce new biomes, creatures, items, game mechanics, and even entirely new dimensions, fundamentally altering your gameplay experience. However, to harness this incredible potential, you first need a robust foundation: Minecraft Forge.
Forge acts as the essential bridge between the vanilla Minecraft game and the vast ecosystem of mods. It’s an open-source modification loader that provides a framework for mod developers to create compatible content and for players to seamlessly integrate numerous mods into their game client. Without Forge, running more than a handful of complex mods concurrently would be a developer’s nightmare and a player’s impossible dream.

This comprehensive guide will walk you through everything you need to know about installing Minecraft Forge, from understanding its purpose and preparing your system to downloading, installing, and even troubleshooting common issues. By the end, you’ll be well-equipped to unlock a whole new dimension of Minecraft adventures, transforming your blocky world into something truly unique and tailored to your imagination.
Understanding Minecraft Forge: Your Gateway to Modding
Before diving into the installation process, it’s crucial to grasp what Minecraft Forge is and why it’s so indispensable for the modding community. Understanding its role will make the subsequent steps more logical and help you appreciate the ingenuity behind this foundational tool.
What is Minecraft Forge?
At its heart, Minecraft Forge is a modding API (Application Programming Interface) for Minecraft: Java Edition. In simpler terms, it’s a software layer that allows independently developed mods to interact with the game in a standardized and compatible way. Think of it as a universal translator and organizer for all your Minecraft modifications.
When mod developers create new content, they don’t directly alter Minecraft’s core code (which would be incredibly complex and prone to conflicts). Instead, they write their mods to work with Forge. Forge then steps in, intercepts Minecraft’s processes, and injects the modded content and functionalities as the game runs. This approach significantly simplifies mod development, reduces compatibility issues between different mods, and makes it much easier for players to install and manage them.
Key functions of Minecraft Forge include:
- Mod Loading: It scans your designated
modsfolder and loads all compatible mod files when Minecraft starts. - Event Handling: It provides a system for mods to respond to specific game events (e.g., a block being placed, a player taking damage) without directly modifying core game files.
- Resource Management: It helps mods integrate new textures, sounds, models, and other assets into the game.
- Conflict Resolution: While not perfect, Forge does its best to manage potential conflicts between mods, allowing a greater number of them to run together smoothly.
- Performance Enhancements: Some of Forge’s underlying optimizations can even contribute to better game performance, especially when dealing with complex mod setups.
Why Do You Need Forge?
The answer is straightforward: if you want to experience the vast majority of Minecraft mods available today, you need Forge. While there are alternative mod loaders like Fabric (which caters to a different set of mods, often focusing on performance and lightweight additions), Forge remains the most established and widely supported platform for a massive library of content.
Here are the primary reasons why Forge is essential for any aspiring Minecraft modder:
- Access to a Massive Mod Library: Thousands upon thousands of mods, ranging from quality-of-life improvements and new items to complete game overhauls, have been developed specifically for Forge. Without it, you’d miss out on a significant portion of the modding community’s creations.
- Simplified Mod Installation: Forge streamlines the process of adding mods. Once Forge is installed, adding new mods is usually as simple as dragging and dropping
.jarfiles into a specific folder. - Enhanced Stability: By providing a structured environment, Forge helps manage mod interactions, leading to a more stable game experience even with multiple mods running. It reduces the likelihood of crashes that often plague unsupported, direct modifications.
- Community and Support: Forge has a massive and active community. This means abundant tutorials, troubleshooting guides, and forums where you can find help if you encounter issues. Mod developers also often provide better support for their Forge-compatible versions.
- Customized Gameplay: Ultimately, Forge empowers you to craft a personalized Minecraft experience that goes far beyond the vanilla game. Whether you want to automate farming, explore magical dimensions, delve into advanced technology, or simply add new decorative blocks, Forge makes it possible.
In essence, Forge transforms Minecraft from a standalone game into a highly customizable platform, opening up endless avenues for creativity and replayability.
Prerequisites for a Smooth Forge Installation
Before you embark on the Forge installation journey, it’s crucial to ensure your system is properly prepared. Skipping these preliminary steps can lead to frustrating errors and unnecessary troubleshooting down the line. A little preparation goes a long way in ensuring a seamless setup.
Java Installation and Verification
Minecraft: Java Edition, and by extension, Minecraft Forge, relies heavily on the Java Runtime Environment (JRE). If you don’t have the correct version installed or it’s outdated, the Forge installer won’t run, or Minecraft might fail to launch with Forge enabled.
- Check Your Java Version:
- Windows: Open the Command Prompt (search for
cmdin the Start Menu). Typejava -versionand press Enter. - macOS/Linux: Open Terminal. Type
java -versionand press Enter. - The output will show your current Java version. For most modern Minecraft versions (1.17 and newer), you’ll need Java 17 or higher. For older Minecraft versions (1.16.5 and below), Java 8 is typically required.
- Windows: Open the Command Prompt (search for
- Download and Install Java (if needed):
- If you don’t have Java, or your version is outdated/incorrect for your desired Minecraft version, you’ll need to install it.
- For Minecraft 1.17 and above (Java 17+): Visit a trusted OpenJDK distributor like Adoptium (Eclipse Temurin) or Oracle (if you prefer their distribution). Download the appropriate 64-bit installer for your operating system.
- For Minecraft 1.16.5 and below (Java 8): You can also find Java 8 downloads from Adoptium or other reliable sources.
- Crucial Tip: Always download the 64-bit version of Java if your operating system is 64-bit (which most modern computers are). Running 64-bit Minecraft with 32-bit Java can cause memory issues and crashes.
- Run the Installer: Follow the on-screen instructions. It’s usually a straightforward process.
- Verify Installation: After installation, close and reopen your Command Prompt/Terminal and run
java -versionagain to confirm the new version is detected.
Minecraft Java Edition (and Running It Once)
Forge works with Minecraft, not as a standalone application. Therefore, you must have Minecraft: Java Edition installed and set up correctly.
- Purchase and Install Minecraft: If you haven’t already, buy and install Minecraft: Java Edition from the official Minecraft website.
- Run the Target Minecraft Version At Least Once: This is a critically important step. Before installing Forge for a specific Minecraft version (e.g., 1.20.1), you must launch and play that exact vanilla Minecraft version at least once through the official Minecraft Launcher. This ensures that all necessary game files and directories for that version are created and properly configured on your system. If you skip this, Forge might not find the correct installation directory or necessary files, leading to installation failures.
System Requirements and Best Practices
While Minecraft itself isn’t the most demanding game, adding numerous mods (especially large, content-heavy ones) can significantly increase its resource consumption.
- RAM (Memory): While vanilla Minecraft can run on 4GB of RAM, serious modding often requires 8GB, 16GB, or even more. You’ll later learn how to allocate more RAM to your Forge profile.
- Storage: Mods can take up considerable disk space. Ensure you have ample free space on your drive.
- Processor (CPU) & Graphics Card (GPU): A decent modern CPU and GPU will greatly enhance your modded Minecraft experience, reducing lag and improving frame rates, particularly with visually intensive mods.
- Stable Internet Connection: For downloading Forge and mods, a reliable internet connection is a given.
- Backup Your Worlds: Before engaging in any modding, it’s always a good practice to back up your existing Minecraft worlds. While Forge itself is stable, incompatible mods can sometimes corrupt world data. You can find your world saves in the
savesfolder within your Minecraft installation directory (%appdata%.minecrafton Windows,~/Library/Application Support/minecrafton macOS,~/.minecrafton Linux).
By ensuring these prerequisites are met, you’re laying a solid foundation for a hassle-free Forge installation and a much smoother modding experience.
Step-by-Step Guide: Installing Minecraft Forge
With your system prepped and ready, it’s time to tackle the core installation process. Follow these steps carefully to get Forge up and running on your system.
Downloading the Correct Forge Version
The first crucial step is to download the Forge installer from the official source, ensuring you select the correct version that matches your Minecraft game.
- Go to the Official Forge Website: Open your web browser and navigate to
files.minecraftforge.net. This is the only official and safe place to download Minecraft Forge. Avoid unofficial sites that might bundle malware or outdated versions. - Select Your Minecraft Version: On the left sidebar of the Forge website, you’ll see a list of Minecraft versions. Click on the version that corresponds to the Minecraft game you want to mod (e.g.,
1.20.1,1.19.2,1.16.5). Remember, the Forge version MUST match your Minecraft version exactly. - Choose the Installer: Once you’ve selected the Minecraft version, you’ll see a panel with various download options.
- “Recommended” vs. “Latest”: Always aim for the “Recommended” download if available. This version has undergone more testing and is generally more stable. “Latest” is the newest build, which might include bug fixes but could also introduce new issues.
- Locate the “Installer” option under your chosen version. Click the “Installer” button.
- Wait for AdFoc.us (or similar ad service): The Forge website uses an ad-service page (often AdFoc.us or AdFly) before the actual download link. You’ll be taken to a page with an advertisement. DO NOT click anything on this ad page. Look for a “SKIP” or “SKIP AD” button, usually in the top right corner, that appears after a short countdown (typically 5-6 seconds). Click this button.
- Save the Installer: After clicking “SKIP,” your browser will prompt you to download a
.jarfile (e.g.,forge-1.20.1-47.2.6-installer.jar). Save this file to a location you can easily find, such as your Downloads folder or Desktop.
Running the Forge Installer
Once you have the .jar installer file, running it is usually straightforward.
- Locate the Installer File: Navigate to where you saved the Forge installer
.jarfile. - Run the Jar File:
- Windows: Double-click the
.jarfile. If Java is installed correctly, the Forge installer window should appear. If it doesn’t, or it opens with another program (like an archive utility), right-click the file, select “Open with,” and choose “Java(TM) Platform SE binary.” If this option isn’t available, or the file still won’t open, revisit the Java installation section. You might need a tool like Jarfix (a popular utility to fix.jarfile associations) or a complete Java reinstallation. - macOS/Linux: Double-click the
.jarfile or open Terminal, navigate to the directory where the file is saved, and typejava -jar forge-YOUR_MINECRAFT_VERSION-INSTALLER.jar(replace with your actual file name).
- Windows: Double-click the
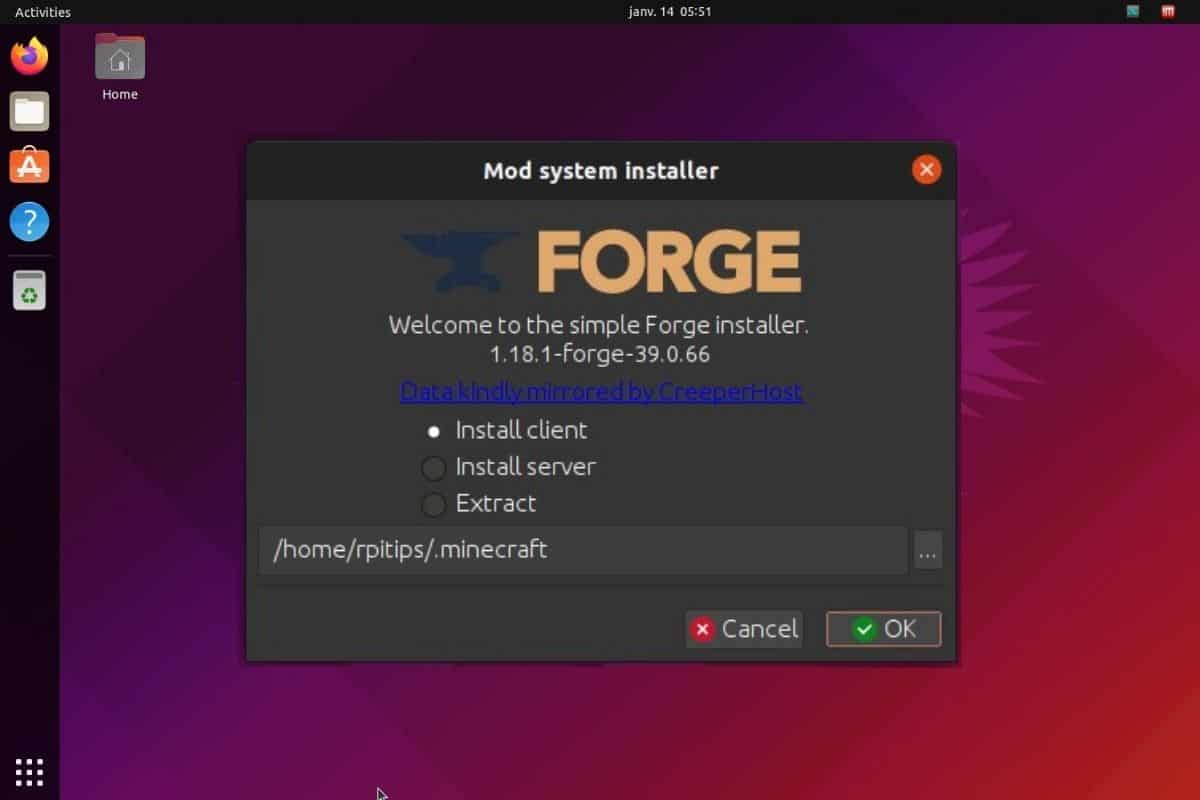
- Forge Installer Window: A small window titled “Mod system installer for Minecraft” will appear.
- Install Client: This is the default and correct option for installing Forge for single-player and joining modded servers. Ensure this radio button is selected.
- Install Server: This option is for setting up a dedicated modded Minecraft server. This is not what you want for playing the game on your own computer.
- Extract: This is for developers to extract Forge’s libraries.
- Installation Directory: The installer will usually auto-detect your default Minecraft installation directory (
%appdata%.minecrafton Windows,~/Library/Application Support/minecrafton macOS,~/.minecrafton Linux). Do not change this path unless you have a custom Minecraft setup and know exactly what you’re doing.
- Start Installation: Click the “OK” button. The installer will download necessary files and integrate Forge into your Minecraft profile. You’ll see a progress bar and text indicating what it’s doing.
- Completion Message: Once finished, you’ll receive a message stating “Successfully installed client profile Forge for version [YOUR MINECRAFT VERSION] into launcher and grabbed [number] required libraries.” Click “OK.”
Forge is now technically installed on your system!
Verifying the Installation and Launching Minecraft
The final step is to confirm that Forge has been properly integrated into your Minecraft Launcher and to launch the game with your new modding platform.
- Open the Minecraft Launcher: Close and reopen your official Minecraft Launcher.
- Select the Forge Profile:
- On the left side of the “Play” button, there’s usually a dropdown menu (or a list of profiles). Click on it.
- You should now see a new profile named “forge” or “Forge [YOUR MINECRAFT VERSION]” (e.g., “Forge 1.20.1”). Select this profile.
- Confirm Game Version: Just below the “Play” button, it should display the correct Minecraft version followed by “(forge)” (e.g., “1.20.1 (forge)”).
- Launch Minecraft: Click the large “Play” button.
- The launcher might download some additional files for the Forge profile on the first launch.
- You might see a warning about playing modded versions; click “I understand” or “Play anyway.”
- Verify Forge in Game:
- If everything went successfully, Minecraft will launch.
- On the main menu screen, you should see “Minecraft Forge” prominently displayed, usually in the bottom left corner, along with the Forge version number and “Mods” button.
- Clicking the “Mods” button will show you a list of currently loaded mods (initially just Forge itself and a few core components).
Congratulations! You have successfully installed Minecraft Forge. You are now ready to start adding your favorite mods and transforming your Minecraft experience.
Beyond Installation: Adding Mods and Troubleshooting
Installing Forge is just the first step into the expansive world of Minecraft modding. The real fun begins when you start populating your game with actual modifications. However, like any technical process, modding can sometimes present challenges.
How to Install Mods with Forge
Once Forge is installed and working, adding mods is relatively simple.
- Find Compatible Mods:
- The most reputable sources for Minecraft mods are CurseForge (
curseforge.com) and Modrinth (modrinth.com). These platforms host a vast collection of mods, often with good filtering options. - When searching for mods, always pay attention to the Minecraft version compatibility. A mod made for Minecraft 1.16.5 will not work with Minecraft 1.20.1 Forge, and vice-versa.
- Ensure the mod explicitly states it’s for Forge. (Some mods are for Fabric, which is a different mod loader.)
- The most reputable sources for Minecraft mods are CurseForge (
- Download Mod Files: Download the mod file, which will typically be a
.jarfile (e.g.,jei-1.20.1-forge-15.0.0.18.jar). Save it to a convenient location. - Locate Your
modsFolder:- Forge creates a special folder called
modswithin your Minecraft installation directory. - Windows: Press
Win + R, type%appdata%.minecraft, and press Enter. Then open themodsfolder. - macOS: In Finder, click “Go” > “Go to Folder…”, type
~/Library/Application Support/minecraft, and press Enter. Then open themodsfolder. - Linux: Navigate to
~/.minecraft/mods. - If the
modsfolder doesn’t exist, simply create a new folder namedmods(all lowercase) in your.minecraftdirectory.
- Forge creates a special folder called
- Place Mod Files: Drag and drop the downloaded mod
.jarfiles directly into themodsfolder. Do not extract the.jarfiles. - Launch Minecraft with Forge: Open your Minecraft Launcher, select your Forge profile, and click “Play.”
- Verify Mods In-Game: Once Minecraft loads, go to the main menu and click the “Mods” button. You should see your newly added mods listed there. If they appear, they are loaded!
Important Considerations for Mod Installation:
- Dependencies: Some mods require other mods to function (these are called dependencies). Read the mod’s description carefully; if it needs a dependency (like “Library X” or “API Y”), you must download and install that dependency mod into your
modsfolder as well. - Resource Packs/Shaders: These are different from mods and are installed in their respective
resourcepacksandshaderpacksfolders, not themodsfolder.
Common Installation Issues and Solutions
Even with careful following of instructions, issues can arise. Here are some common problems and their solutions:
- Forge Installer
.jarfile won’t open:- Solution: Ensure you have the correct Java version installed (64-bit Java for 64-bit OS). Try right-clicking the
.jarfile and selecting “Open with > Java(TM) Platform SE binary.” If it still fails, use a utility like Jarfix to reset.jarfile associations, or uninstall and reinstall Java.
- Solution: Ensure you have the correct Java version installed (64-bit Java for 64-bit OS). Try right-clicking the
- Forge profile not appearing in Minecraft Launcher:
- Solution: Re-run the Forge installer. Make sure you selected “Install Client” and that the installation path was correct. Also, ensure you ran the vanilla Minecraft version at least once before installing Forge.
- Minecraft crashes on startup with Forge:
- Solution 1: Incompatible Mods: This is the most common cause.
- Remove all mods from your
modsfolder and try launching Forge again. If it launches, add mods back one by one (or in small batches) to identify the problematic mod. - Double-check that all mods are for the exact Minecraft version and Forge.
- Ensure all necessary dependencies for your mods are installed.
- Remove all mods from your
- Solution 2: Insufficient RAM: Modded Minecraft often needs more memory.
- In the Minecraft Launcher, go to “Installations.”
- Hover over your Forge profile and click the three dots (
...). Select “Edit.” - Click “More Options.”
- Under “JVM Arguments,” find
-Xmx(e.g.,-Xmx2G). The number afterXmxis the maximum RAM allocated (2 gigabytes in this example). - Change it to
4G,6G, or8G(e.g.,-Xmx6G), depending on your system’s available RAM. Do not allocate more than half of your total system RAM. Save changes.
- Solution 3: Corrupted Installation: Try completely deleting your
.minecraftfolder (after backing up worlds/saves/resource packs!) and performing a fresh installation of Minecraft, Java, and then Forge. - Solution 4: Read the Crash Log: When Minecraft crashes, it usually generates a crash report (
crash-report-DATE.txt) in your.minecraft/crash-reportsfolder. Opening this file can often give clues about which mod or issue is causing the crash. Look for lines that mention specific mod IDs or error types.
- Solution 1: Incompatible Mods: This is the most common cause.
- Mod not showing in-game or not working:
- Solution: Confirm the mod file is a
.jarfile and is placed directly in themodsfolder. Verify that the mod’s version matches your Forge and Minecraft version exactly. Check for missing dependencies. Some mods might require specific configuration or keybinds to be used – check the mod’s documentation.
- Solution: Confirm the mod file is a
- Low FPS or performance issues:
- Solution: Allocate more RAM to Minecraft (as described above). Install performance-enhancing mods (like OptiFine, though ensure compatibility with your Forge version and other mods). Reduce in-game video settings (render distance, graphics quality). Update your graphics drivers.
Keeping Forge and Mods Updated
The Minecraft modding landscape is constantly evolving, with new game versions, Forge updates, and mod updates rolling out regularly.
- Updating Forge: Unlike typical software, you usually don’t “update” Forge in place. If a new stable version of Forge is released for your Minecraft version, or if you update Minecraft to a new major version, you typically need to:
- Download the new Forge installer for that specific Minecraft version.
- Run the new installer, which will create or update the Forge profile in your launcher.
- Remember that updating Forge often means your existing mods might become incompatible and also need updates.
- Updating Mods: Keep an eye on the mod pages on CurseForge or Modrinth. Mod developers frequently release updates for bug fixes, new features, and compatibility with newer Forge/Minecraft versions. To update a mod, simply download the new
.jarfile and replace the old one in yourmodsfolder.
Regularly checking for updates can improve stability, performance, and introduce new features to your modded game.

Conclusion
Installing Minecraft Forge might seem like a daunting task initially, but by following these detailed steps, you’ve successfully unlocked a world of endless possibilities for your Minecraft adventures. From understanding its fundamental role as a mod loader to meticulously preparing your system, downloading the correct version, and troubleshooting potential hiccups, you are now equipped to dive deep into the vibrant and creative realm of Minecraft modding.
Remember that Forge is more than just a piece of software; it’s a gateway to an expansive community of dedicated mod developers and players who continuously push the boundaries of what Minecraft can be. With Forge installed, you can now personalize your game with everything from simple quality-of-life enhancements to epic, game-changing overhauls.
As you venture forward, always prioritize downloading mods from official sources like CurseForge and Modrinth, meticulously check for version compatibility, and don’t hesitate to consult mod documentation or community forums if you encounter issues. The world of modded Minecraft is a journey of discovery, and with Forge as your trusted companion, you’re now ready to build, explore, and create like never before. Happy modding!
aViewFromTheCave is a participant in the Amazon Services LLC Associates Program, an affiliate advertising program designed to provide a means for sites to earn advertising fees by advertising and linking to Amazon.com. Amazon, the Amazon logo, AmazonSupply, and the AmazonSupply logo are trademarks of Amazon.com, Inc. or its affiliates. As an Amazon Associate we earn affiliate commissions from qualifying purchases.