Navigating the world of technology can sometimes feel like a complex puzzle, and for many, connecting a new peripheral like a printer to their Apple ecosystem presents a unique challenge. Whether you’re a seasoned Mac user or new to the platform, the process of installing a printer, while generally straightforward, can occasionally encounter hiccups. This guide is designed to demystify the process, offering clear, step-by-step instructions and troubleshooting tips to ensure you can get your printer up and running on your Mac without unnecessary frustration.
The evolution of technology has brought us to a point where seamless integration is the expectation. When it comes to printing, this means your Mac should effortlessly communicate with your chosen printing device, whether it’s a high-volume office workhorse or a compact photo printer. We’ll cover the most common scenarios, from wired USB connections to the ever-convenient wireless setup, and address potential roadblocks that might arise.
Setting Up Your Printer for Mac Installation
Before you even begin the software installation on your Mac, a few crucial preliminary steps will set you up for success. Rushing this stage can lead to unnecessary troubleshooting later, so take a moment to ensure everything is in order.
1. Unboxing and Initial Printer Setup
Every printer comes with its own set of unique setup instructions, typically found in a quick start guide or on the manufacturer’s website. This usually involves:
- Unpacking: Carefully remove the printer from its packaging, ensuring you remove all protective tapes, gels, and packing materials from both the exterior and interior. Don’t forget to check inside any accessible compartments or trays.
- Ink/Toner Installation: Follow the manufacturer’s guide to install ink cartridges or toner. This is a critical step, and incorrect installation can lead to non-functional printing or even damage to the printer.
- Power Connection: Connect the printer to a power source using the provided power cable.
- Initial Boot-up: Turn on the printer. Most modern printers will guide you through an initial setup process on their built-in display, which might include tasks like aligning print heads or performing initial diagnostic checks.
- Paper Loading: Load the appropriate type and size of paper into the paper tray.
2. Understanding Your Printer’s Connectivity Options
Printers connect to your Mac in a few primary ways, and knowing which option your printer supports is key to selecting the right installation method:
- USB Connection: This is the most direct and often the simplest method. You’ll need a USB cable (usually USB-A to USB-B) to connect your printer directly to a USB port on your Mac. This is a reliable option, especially if you don’t have a wireless network or prefer a wired connection.
- Wireless (Wi-Fi) Connection: Many modern printers offer Wi-Fi connectivity. This allows you to print from your Mac without any physical cables, as long as both the printer and your Mac are connected to the same Wi-Fi network. This offers the most flexibility, allowing you to print from anywhere within your home or office network.
- Ethernet Connection: Some network printers can be connected directly to your router or network switch via an Ethernet cable. This is common in office environments for shared access and can provide a very stable connection.
- AirPrint: This is Apple’s proprietary wireless printing protocol. If your printer supports AirPrint, it will often be automatically discoverable by your Mac without the need for installing specific drivers, making the setup exceptionally easy.
3. Gathering Necessary Information
Before diving into the Mac’s settings, have the following readily available:
- Printer Model Number: This is crucial for finding the correct software and drivers. It’s usually located on the front, back, or top of the printer.
- Wi-Fi Network Name (SSID) and Password: If you’re setting up a wireless printer, you’ll need your network’s name and password.
- Printer’s IP Address (if applicable): For network printers (Ethernet or Wi-Fi), you might need to know their IP address if you opt for a manual setup. This can often be found in the printer’s network settings menu.
- Installation Media or Download Link: Some older printers might come with a CD/DVD for driver installation. More commonly, you’ll need to download the latest drivers and software from the manufacturer’s official website.
Installing Your Printer on Your Mac: Step-by-Step
Once your printer is physically set up and you’ve gathered the necessary information, it’s time to integrate it with your Mac. macOS has a robust system for managing printers, making the process generally intuitive.
1. Automatic Detection and Installation (The Easiest Way)
For many modern printers, especially those that support AirPrint or have standard USB interfaces, macOS can automatically detect and set up your printer.
- For USB Printers:
- Ensure your printer is powered on and connected to your Mac via a USB cable.
- Open System Settings (or System Preferences on older macOS versions) by clicking the Apple menu in the top-left corner of your screen and selecting the appropriate option.
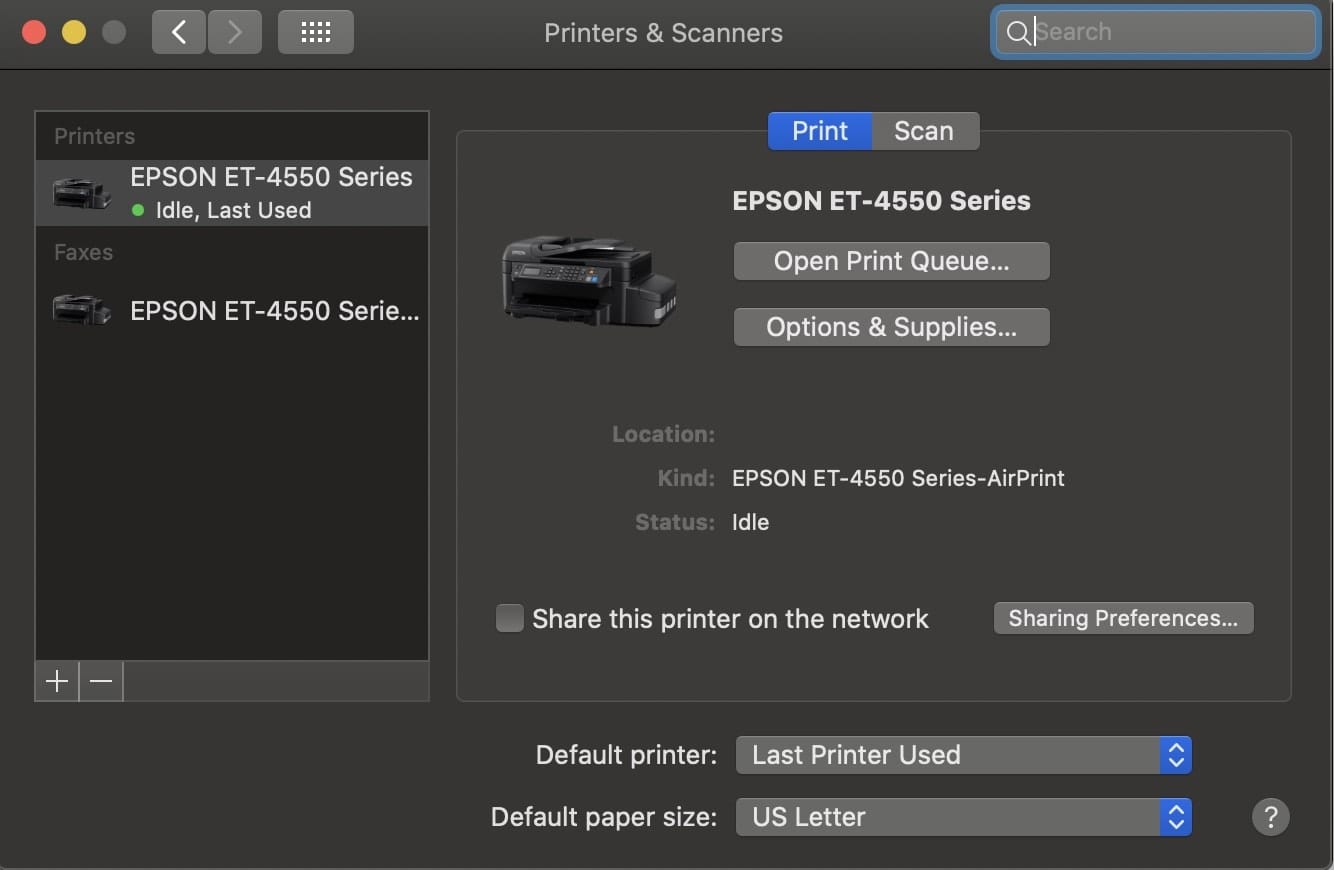
- Scroll down to Printers & Scanners in the sidebar.
- Click the Add Printer, Scanner, or Fax… button (or the “+” button).
- Your Mac will scan for connected printers. If your USB printer is detected, it should appear in the list.
- Select your printer from the list. macOS will usually automatically select the correct driver from its built-in library or prompt you to download one if needed.
- Click Add.
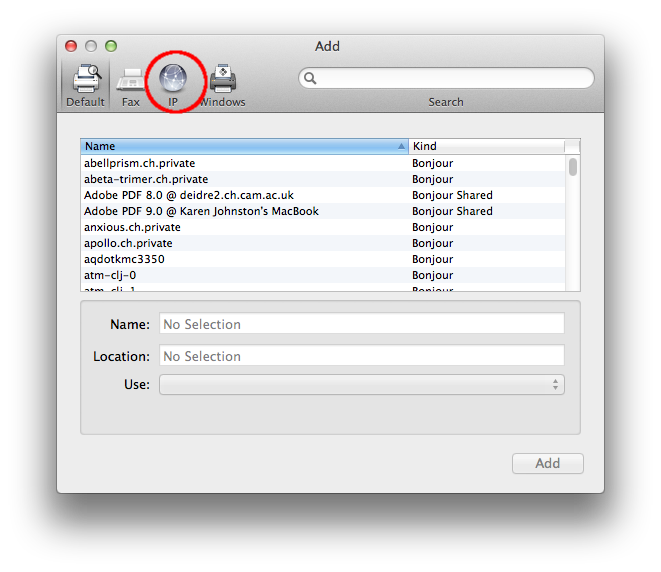
- For Wireless (Wi-Fi/Ethernet) Printers (AirPrint or Auto-Discovery):
- Ensure your printer is powered on and connected to the same Wi-Fi network as your Mac, or that it’s connected to your network via Ethernet.
- Open System Settings (or System Preferences) > Printers & Scanners.
- Click Add Printer, Scanner, or Fax… (or the “+” button).
- Your Mac will scan for printers on your network.
- If your printer is detected, it will appear in the list. If it supports AirPrint, it will likely say “AirPrint” next to its name.
- Select your printer.
- Click Add. macOS will typically configure it automatically.
2. Manual Driver Installation
If your printer isn’t automatically detected, or if you want the full functionality offered by the manufacturer’s software (e.g., advanced scanning features, ink level monitoring), you’ll need to install the drivers manually.
-
Downloading Drivers:
- Visit the official support website of your printer manufacturer (e.g., HP, Canon, Epson, Brother, etc.).
- Navigate to the “Support” or “Downloads” section.
- Enter your printer’s model number to find the correct drivers and software.
- Select macOS as your operating system and choose the latest compatible version.
- Download the recommended driver package or utility software.
-
Installing Drivers:
- Once the download is complete, open the downloaded file (usually a
.dmgor.pkgfile). - Follow the on-screen prompts to install the software. This process is similar to installing any other application on your Mac. You might be prompted to agree to license agreements, choose an installation location, and enter your administrator password.
- During the installation, you might be asked to connect your printer via USB or select it from a network list. Follow the installer’s instructions carefully.
- Once the download is complete, open the downloaded file (usually a
-
Adding the Printer after Driver Installation:
- After the drivers are installed, return to System Settings (or System Preferences) > Printers & Scanners.
- Click Add Printer, Scanner, or Fax… (or the “+” button).
- Your printer should now appear in the list, often with specific software options available.
- Select your printer.
- Ensure the “Use” or “Driver” dropdown menu is set to the correct driver (it should usually be the one you just installed, or “AirPrint” if applicable).
- Click Add.
3. Adding a Network Printer Manually (If Auto-Detection Fails)
In some cases, especially with older network printers or complex network configurations, your Mac might not automatically find the printer. You can try adding it manually using its IP address.
- Find Your Printer’s IP Address: You can usually find this on the printer’s control panel under network settings, or by printing a network configuration page from the printer itself. If it’s connected via Ethernet, you might also be able to find it by logging into your router’s administration page.
- Open System Settings (or System Preferences) > Printers & Scanners.
- Click Add Printer, Scanner, or Fax… (or the “+” button).
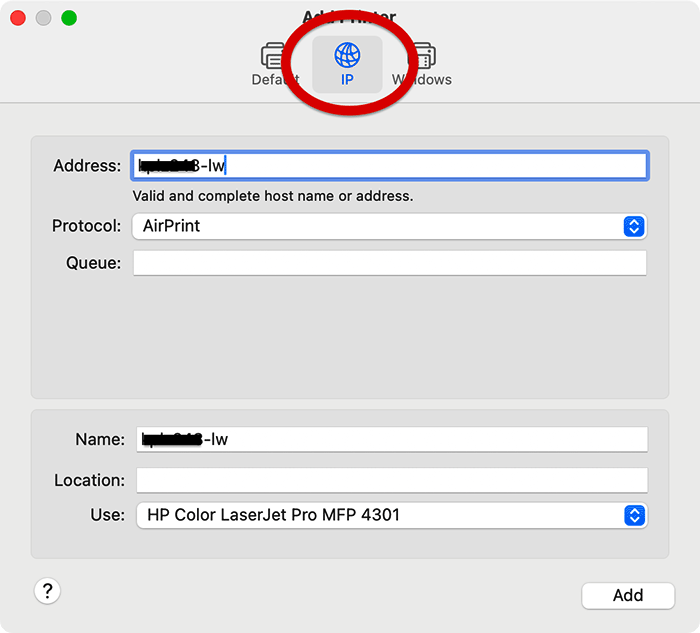
- In the toolbar at the top of the Add Printer window, click the IP tab (it might look like a globe or an IP address symbol).
- In the Address field, enter the IP address of your printer.
- macOS will attempt to identify the printer and suggest a protocol (usually IPP, LPD, or Bonjour). Select the most appropriate one, often IPP is recommended.
- In the Use dropdown menu, select Select Software…. Search for your printer model. If it’s not found, you may need to install the drivers manually first (as described above) or try a generic PostScript or PCL driver if your printer supports them.
- Click Add.
Troubleshooting Common Printer Installation Issues
Even with the best intentions, you might encounter problems. Here are some common issues and their solutions:
1. Printer Not Showing Up in the List
- Check Connections: For USB, ensure the cable is securely plugged into both the printer and your Mac. Try a different USB port or cable. For wireless, verify both the printer and Mac are on the same Wi-Fi network. Restart your router.
- Restart Everything: Power off your printer, then restart your Mac. Once your Mac has fully booted, power your printer back on and try adding it again.
- Firewall Issues: Sometimes, a firewall on your Mac or your network can block the detection of network printers. Temporarily disable your Mac’s firewall to test (System Settings > Network > Firewall). If this resolves the issue, you’ll need to configure your firewall to allow printer communication.
- Check Printer Status: Ensure the printer is powered on, has ink/toner, and no error messages are displayed on its screen.
2. “Software Not Found” or Incorrect Driver Selected
- Manual Driver Download: As detailed in the previous section, download the latest drivers directly from the manufacturer’s website for your specific printer model and macOS version.
- Reset Printing System: If macOS is persistently trying to use the wrong driver, you can reset the printing system. Go to System Settings > Printers & Scanners, right-click (or Control-click) in the blank space of the printer list, and select “Reset printing system…”. Warning: This will remove all printers from your Mac, so you’ll need to re-add them afterward.
3. Printing Errors or Incomplete Jobs
- Printer Queue: Open the printer queue (click on your printer in the Printers & Scanners list and then click “Print Queue”). Cancel any stuck or error jobs and try printing again.
- Printer Firmware Update: Check the manufacturer’s website for any available firmware updates for your printer.
- Clear Print Spooler: On macOS, the print spooler is managed automatically. Restarting your Mac usually clears it. If issues persist, a system reset (as mentioned above) can help.
- Test Print: Try printing a simple document like a plain text file or a web page to rule out issues with specific applications or file types.
4. Wireless Printing Problems
- Network Congestion: Too many devices on your Wi-Fi network can slow down or disrupt printing.
- Signal Strength: Ensure your printer is within a reasonable range of your Wi-Fi router for a strong signal.
- Router Settings: Some advanced router settings (like MAC filtering or specific security protocols) might interfere with printer discovery. Consult your router’s manual.
By following these steps and troubleshooting tips, you should be able to successfully install your printer on your Mac and enjoy seamless printing for all your document needs. Remember, the key is patience, accurate information, and knowing where to find the right resources, typically the manufacturer’s support website.
aViewFromTheCave is a participant in the Amazon Services LLC Associates Program, an affiliate advertising program designed to provide a means for sites to earn advertising fees by advertising and linking to Amazon.com. Amazon, the Amazon logo, AmazonSupply, and the AmazonSupply logo are trademarks of Amazon.com, Inc. or its affiliates. As an Amazon Associate we earn affiliate commissions from qualifying purchases.