The Microsoft Surface Pro line has long been lauded for its versatility, seamlessly blending the portability of a tablet with the power and functionality of a laptop. This hybrid nature makes it an ideal device for a wide range of users, from students and professionals to creatives and tech enthusiasts. However, like any operating system, Windows can sometimes encounter issues or users may simply desire a fresh start. Installing Windows 11 from a USB drive is a powerful method for performing clean installations, troubleshooting significant problems, or upgrading a device that might not have initially shipped with the latest operating system. This comprehensive guide will walk you through the entire process, ensuring you can successfully install Windows 11 on your Surface Pro from a bootable USB drive.
Prerequisites: Gathering What You Need
Before embarking on the installation journey, it’s crucial to ensure you have all the necessary components and information. This preparatory phase will prevent interruptions and potential roadblocks, making the entire process smoother and more efficient.
Essential Hardware and Software
The most critical elements for this installation are the Surface Pro itself and a USB drive.
- Your Surface Pro: Ensure your Surface Pro is sufficiently charged, or ideally, plugged into a power source throughout the installation process. Interruptions during installation can lead to data corruption or an incomplete operating system.
- A USB Flash Drive: You’ll need a USB flash drive with at least 8GB of storage space. While 8GB is the minimum, a 16GB or larger drive is recommended to ensure ample space for the Windows 11 installation files and any potential future updates or drivers. Ensure this USB drive doesn’t contain any data you wish to keep, as it will be formatted during the creation of the bootable media.
- Another Working Computer: You’ll need access to another computer with a stable internet connection to download the Windows 11 Media Creation Tool and create the bootable USB drive. This can be a desktop, another laptop, or even a virtual machine.
- Internet Connection: A reliable internet connection is essential for downloading the Windows 11 ISO file or using the Media Creation Tool. The download size can be several gigabytes, so a stable connection is paramount.
Securing Your Data: Backup is Key
Before you begin any major operating system installation or reinstallation, backing up your data is non-negotiable. A clean installation will erase everything on the drive where Windows is installed. Failing to back up your important files could result in permanent data loss.
- External Hard Drive or Cloud Storage: The most common and recommended method is to back up your files to an external hard drive. Connect an external drive to your Surface Pro and copy all your documents, photos, videos, music, and any other critical data. Alternatively, you can utilize cloud storage services like OneDrive, Google Drive, Dropbox, or others to sync your important files.
- Application Data and Settings: While documents and media are straightforward to back up, remember to also consider application data and settings. Some applications offer their own backup solutions. For system settings, Windows has built-in backup and restore features, but for a clean install, you’ll likely need to reconfigure most settings manually. Consider using tools or services that can back up specific application data or profiles if these are critical to your workflow.
- Product Keys and Licenses: If you have installed paid software on your Surface Pro, make a note of their product keys or licensing information. You will need to reactivate these applications after the Windows 11 installation.
Understanding Windows 11 System Requirements
While the Surface Pro line generally adheres to modern hardware standards, it’s always wise to double-check if your specific model meets the minimum system requirements for Windows 11. This ensures a smooth installation and optimal performance.
- Processor: 1 gigahertz (GHz) or faster with 2 or more cores on a compatible 64-bit processor or System on a Chip (SoC).
- RAM: 4 gigabytes (GB) or more.
- Storage: 64 GB or larger storage device.
- System Firmware: UEFI, Secure Boot capable.
- TPM: Trusted Platform Module (TPM) version 2.0.
- Graphics Card: Compatible with DirectX 12 or later with WDDM 2.0 driver.
- Display: High definition (720p) display that is greater than 9” diagonally, 8 bits per color channel.
Microsoft provides a tool called the “PC Health Check” app that can help you determine if your device is compatible. You can download this from the official Microsoft website.
Creating the Bootable USB Drive
This is the core technical step where you prepare the USB drive to initiate the Windows 11 installation. Microsoft offers a user-friendly tool for this purpose.
Using the Windows 11 Media Creation Tool
The Media Creation Tool from Microsoft is the simplest and most direct way to create a bootable Windows 11 USB drive.
- Download the Media Creation Tool: On your working computer, navigate to the official Microsoft Windows 11 download page. Look for the “Create Windows 11 Installation Media” section and click “Download Now.”
- Run the Tool: Once downloaded, run the Media Creation Tool executable. You will be prompted to accept the license terms.
- Select Language, Edition, and Architecture: The tool will typically default to the recommended options for your PC. However, for creating installation media for another PC, uncheck “Use the recommended options for this PC.” You can then select the desired Language, Edition (Windows 11), and Architecture (64-bit).
- Choose Media Type: Select “USB flash drive.”
- Select Your USB Drive: The tool will list available USB drives. Choose the correct USB drive from the dropdown menu. Crucially, ensure you select the correct drive to avoid accidentally formatting the wrong one.
- Download and Create: The tool will now download the Windows 11 installation files and create the bootable USB drive. This process can take a significant amount of time depending on your internet speed.
- Completion: Once the process is complete, you will see a confirmation message. Your USB drive is now ready to be used for installation.
Alternative: Downloading the ISO and Using Rufus
For users who prefer more control or encounter issues with the Media Creation Tool, downloading the Windows 11 ISO file and using a third-party tool like Rufus is a viable alternative.
- Download the Windows 11 ISO: Go to the official Microsoft Windows 11 download page. Under the “Download Windows 11 Disk Image (ISO)” section, select “Windows 11 (multi-edition ISO)” and click “Download.”
- Download Rufus: Rufus is a free, open-source utility that can format and create bootable USB drives. Download the latest version from the official Rufus website.
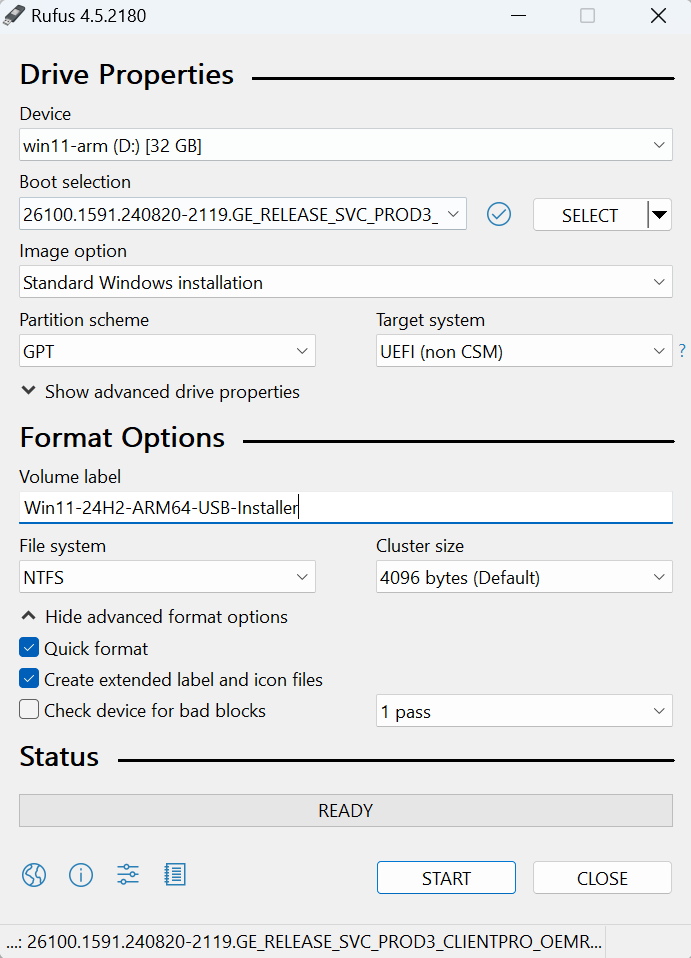
- Run Rufus: Insert your USB drive into the working computer and launch Rufus.
- Configure Rufus Settings:
- Device: Select your USB flash drive from the dropdown menu.
- Boot selection: Click “SELECT” and navigate to the Windows 11 ISO file you downloaded.
- Image option: Choose “Standard Windows installation.”
- Partition scheme: For modern UEFI systems like the Surface Pro, select GPT.
- Target system: This will automatically change to UEFI (non CSM) when GPT is selected.
- Volume label: You can give your USB drive a descriptive name (e.g., “Win11_Install”).
- File system: Leave this as NTFS (or FAT32 if preferred for compatibility, though NTFS is generally fine for this purpose).
- Cluster size: Leave this as the default.
- Start the Process: Click “START.” Rufus will warn you that all data on the USB drive will be destroyed. Confirm this by clicking “OK.”
- Wait for Completion: Rufus will format the USB drive and copy the Windows 11 files to it, making it bootable. This process may take several minutes.
Installing Windows 11 on Your Surface Pro
With your bootable USB drive in hand, you’re ready to install Windows 11 on your Surface Pro. This involves booting your device from the USB drive and following the on-screen prompts.
Booting Your Surface Pro from USB
Surface Pro devices have a specific procedure for booting from external media.
- Insert the Bootable USB Drive: Ensure your prepared Windows 11 USB drive is inserted into a USB port on your Surface Pro. If your Surface Pro model only has USB-C ports, you may need a USB-C to USB-A adapter or hub.
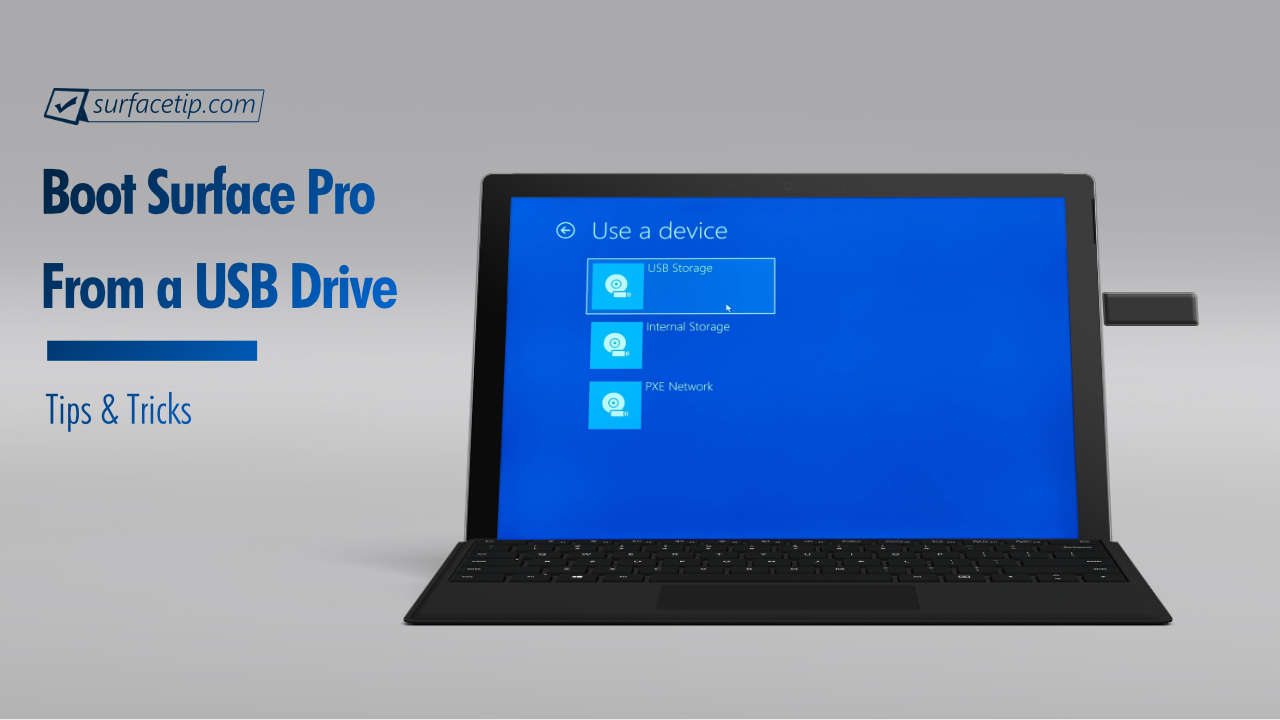
- Access Boot Options:
- Method 1 (From within Windows): If your Surface Pro is still running, you can access advanced startup options. Go to Settings > System > Recovery. Under “Advanced startup,” click “Restart now.” Your Surface Pro will reboot into the Windows Recovery Environment.
- Method 2 (During Startup): Shut down your Surface Pro completely. Press and hold the Volume Down button, then press and release the Power button. Continue holding the Volume Down button until you see the Surface logo appear. You should then be presented with boot options.
- Select the USB Drive: In the boot menu, you will see a list of bootable devices. Use the arrow keys to navigate to your USB drive (it might be listed by its manufacturer name or as a generic USB device). Select it and press Enter.
The Windows 11 Installation Process
Once your Surface Pro boots from the USB drive, you will be guided through the Windows 11 installation wizard.
- Initial Setup Screens:
- Language, Time, and Keyboard: Select your preferred language, time and currency format, and keyboard layout. Click “Next.”
- Install Now: Click the “Install now” button.
- Product Key: If you have a Windows 11 product key, enter it now. If you are reinstalling Windows 11 on a device that was previously activated, you can click “I don’t have a product key.” Windows will automatically activate later once it connects to the internet and recognizes your hardware.
- Select Operating System Version: If your ISO contained multiple editions, choose the version of Windows 11 you wish to install (e.g., Windows 11 Home, Windows 11 Pro).
- Accept License Terms: Read and accept the Microsoft license terms.
- Choose Installation Type:
- Upgrade: This option attempts to keep your files, settings, and applications. It’s generally not recommended for a truly “clean” installation or for resolving system issues.
- Custom: Install Windows only (advanced): This is the option you want for a clean installation.
- Disk Partitioning: This is a critical step where you select the drive to install Windows on.
- Identify Your Drive: You’ll see a list of drives and partitions. Carefully identify the partition where your current Windows installation resides. It’s often labeled as “Primary.”
- Delete Existing Partitions (for a clean install): To ensure a completely clean installation, it’s best to delete all partitions associated with your previous Windows installation on the primary drive. Select each relevant partition and click “Delete.” Be absolutely sure you are deleting the correct partitions to avoid data loss on other drives.
- Create New Partition (Optional but Recommended): After deleting, you will have “Unallocated Space.” Select this unallocated space and click “New” to create a new partition for Windows. Windows will automatically allocate the necessary space.
- Select Partition for Installation: Select the newly created partition (or the largest unallocated space if you didn’t create a new partition) and click “Next.”
- Installation Progress: Windows will now begin installing. This process involves copying files, installing features, and installing updates. Your Surface Pro will restart several times during this phase. Do not remove the USB drive until prompted or until you have completed the initial setup.
- Initial Setup and Configuration: After the main installation, your Surface Pro will boot into the Out-of-Box Experience (OOBE) for Windows 11.
- Region and Keyboard Layout: Confirm your region and keyboard layout.
- Network Connection: Connect to your Wi-Fi network. This is essential for activation and updates.
- Account Setup: You’ll be prompted to sign in with your Microsoft account. If you prefer a local account, there’s usually an option for “Sign-in options” and then “Offline account” or “Limited experience.”
- Privacy Settings: Configure your privacy settings.
- Personalization: You might be asked about setting up your device for specific uses.
- OneDrive Setup: Choose how you want to use OneDrive.
- Final Touches: Windows will apply your settings.
Post-Installation: Drivers and Updates
Once Windows 11 is successfully installed, your Surface Pro might not be running at its full potential. Installing the correct drivers and updates is crucial for optimal performance and functionality.
Installing Essential Drivers
Surface Pro devices are highly integrated, and specific drivers are often required for optimal performance of hardware components like the touchscreen, cameras, Wi-Fi, Bluetooth, and the Surface Pen.
- Windows Update: The first and most important step is to run Windows Update. Connect your Surface Pro to the internet, go to Settings > Windows Update, and click “Check for updates.” Windows Update will often find and install many of the necessary drivers automatically.
- Microsoft Surface Drivers and Firmware: Even after running Windows Update, it’s highly recommended to download the latest drivers and firmware directly from Microsoft.
- Identify Your Surface Model: You can usually find this information on the back of your Surface Pro or by going to Settings > System > About.
- Download from Microsoft: Visit the official Microsoft Surface support website. Search for your specific Surface Pro model. You should find a section for “Drivers and firmware” or a similar link. Download the latest driver pack.
- Run the Installer: Extract the downloaded driver pack (it’s usually a .zip file) and run the setup executable. This will install all the necessary drivers and firmware updates.
- Manual Driver Installation (If Needed): In rare cases, a specific device might not be recognized. You can go to Device Manager (search for it in the Start menu), right-click on the device with a yellow exclamation mark, and select “Update driver.” You can then choose to search automatically or browse your computer if you have downloaded specific driver files.
Keeping Windows 11 Up-to-Date
Regular updates are vital for security, stability, and new features.
- Windows Update: Continue to run Windows Update regularly. It’s recommended to check for updates at least once a week.
- Microsoft Store Apps: Open the Microsoft Store app and check for updates to your installed applications. Many Microsoft apps and even some third-party apps are updated through the Store.

Reinstalling Your Applications and Restoring Data
With your system fresh and drivers installed, it’s time to get back to your workflow.
- Reinstall Applications: Go through your list of essential applications and reinstall them. If you kept notes of product keys, now is the time to use them for activation.
- Restore Data: Connect your external hard drive or access your cloud storage and copy your backed-up files back to your Surface Pro. Organize them in your preferred locations.
By following these steps, you will have successfully performed a clean installation of Windows 11 on your Surface Pro from a bootable USB drive, ensuring a fresh, stable, and optimized computing experience. This process empowers you to troubleshoot issues, regain performance, or simply start anew with the latest operating system from Microsoft.
aViewFromTheCave is a participant in the Amazon Services LLC Associates Program, an affiliate advertising program designed to provide a means for sites to earn advertising fees by advertising and linking to Amazon.com. Amazon, the Amazon logo, AmazonSupply, and the AmazonSupply logo are trademarks of Amazon.com, Inc. or its affiliates. As an Amazon Associate we earn affiliate commissions from qualifying purchases.