In today’s hyper-connected world, a SIM card is the key that unlocks your mobile device’s ability to communicate. Whether you’re setting up a brand new smartphone, switching to a different carrier, or preparing a device for international travel, understanding how to install a SIM card is a fundamental skill. This guide will walk you through the process, demystifying each step and ensuring you’re connected in no time. From identifying your SIM card type to troubleshooting common issues, we’ve got you covered.
The technology behind SIM cards has evolved significantly, offering greater functionality and miniaturization. What was once a credit-card-sized piece of plastic has shrunk to a fingernail-sized chip, yet its importance remains paramount. This tiny component holds your subscriber identity, allowing your device to connect to your mobile network for calls, texts, and data. Without it, your smartphone is essentially a very expensive calculator.
Understanding Your SIM Card and Device
Before you can successfully install a SIM card, it’s crucial to understand the different types of SIM cards and where your device expects to find it. This foundational knowledge will prevent frustration and ensure a smooth installation process.
Types of SIM Cards: From Full-Size to eSIM
The journey of the SIM card has been one of remarkable miniaturization. Historically, SIM cards were quite large, but consumer demand for sleeker, more compact devices necessitated a change. Today, you’ll primarily encounter three main types, each designed for different device generations and form factors.
- Standard SIM (2FF): This was the original SIM card size, roughly the size of a credit card’s chip. While largely obsolete in modern smartphones, you might still find them in older devices or specific niche applications.
- Micro SIM (3FF): Slightly smaller than the standard SIM, the Micro SIM became popular with the advent of smartphones. Many devices from the early to mid-2010s utilized this size.
- Nano SIM (4FF): This is the dominant SIM card size in use today. It’s incredibly small, measuring just 12.3 mm by 8.8 mm. The vast majority of modern smartphones and tablets are designed to accept a Nano SIM.
- eSIM: The future of SIM technology is the embedded SIM, or eSIM. Unlike physical SIM cards that you insert, an eSIM is built directly into your device’s hardware. Instead of a physical card, you download a carrier profile onto the eSIM, activating your cellular service digitally. While eSIM offers convenience and space-saving benefits, it’s not yet universally adopted by all carriers or devices, and the physical installation process remains relevant for many users.
Locating the SIM Card Tray or Slot
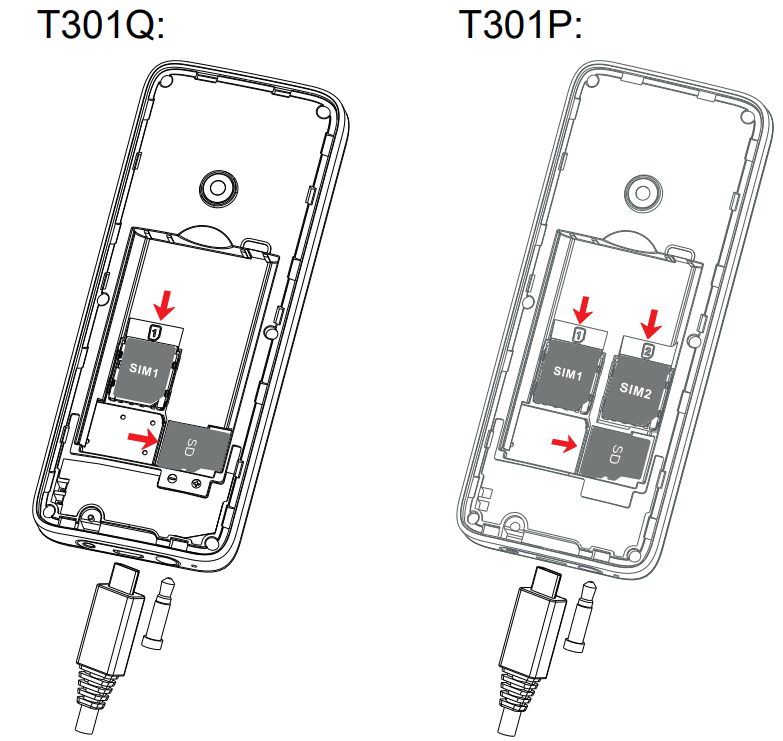
The physical location of the SIM card tray varies significantly depending on the make and model of your device. Manufacturers design their devices differently, but there are common places to look.
- On the Side of the Device: This is the most common location for SIM card trays on smartphones and tablets. You’ll typically find a small, rectangular or oval-shaped tray that either slides out or can be ejected with a small tool. It’s often located near the power and volume buttons.
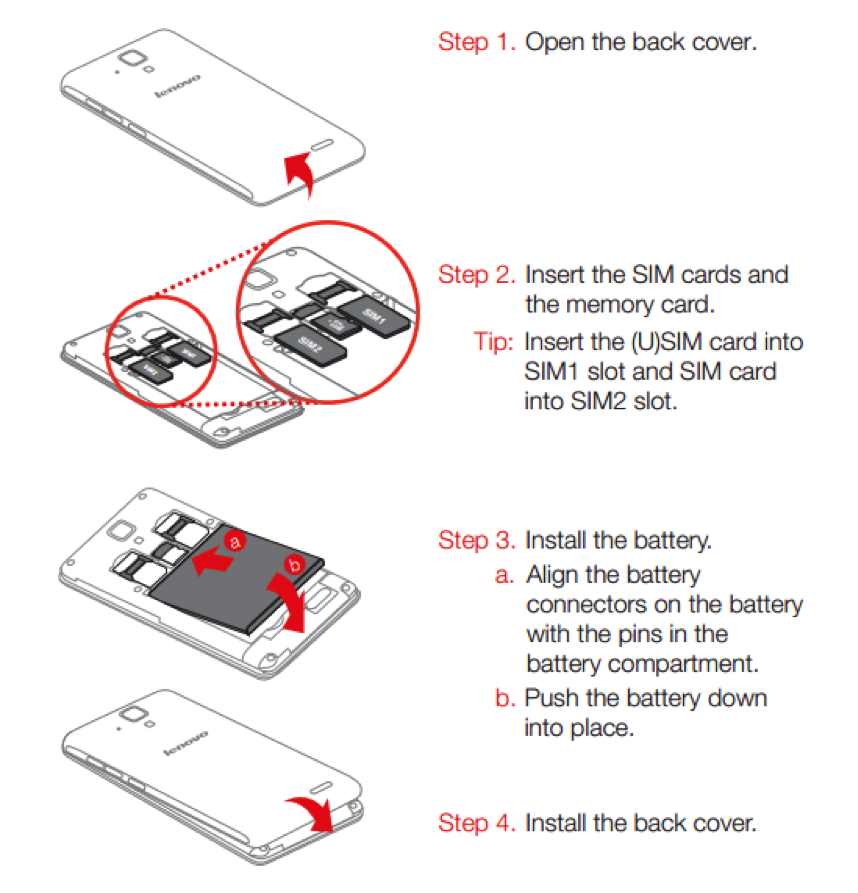
- Underneath a Removable Back Cover: Older smartphones and some feature phones have a removable back cover. In these cases, the SIM card slot is usually located beneath the battery. You’ll need to gently pry open the back cover, remove the battery, and then locate the SIM slot.
- Within the Device (for eSIM): As mentioned earlier, devices with eSIM capabilities do not have a physical tray. The activation process is entirely digital through your device’s settings menu.
Pro Tip: Consult your device’s user manual or search online for your specific model’s SIM card location if you’re unsure. A quick Google search for “[Your Phone Model] SIM card location” will often yield diagrams and instructions.
The Step-by-Step SIM Card Installation Process
Once you’ve identified your SIM card type and its location on your device, you’re ready to proceed with the installation. This process is generally straightforward, but it’s important to follow the steps carefully.
Gathering Your Tools and SIM Card
Before you begin, ensure you have everything you need readily available.
- Your New SIM Card: This will either be a physical card provided by your mobile carrier or you’ll be activating an eSIM through your carrier’s app or website. If it’s a physical SIM, it will likely come in a larger card from which you can pop out the correct size (Nano, Micro, or Standard).
- SIM Ejector Tool: Most smartphones come with a small, metal SIM ejector tool in the box. If you’ve lost it, a straightened paperclip or a small, thin needle can often serve as a substitute. Be gentle when using a makeshift tool to avoid damaging the tray or the device.
- Your Mobile Device: Make sure your device is powered off before you start. This is a critical safety step to prevent any potential electrical damage to the device or the SIM card.

Inserting the SIM Card
This is the core of the installation process. Patience and a steady hand are key.
- Power Off Your Device: As emphasized, turn off your smartphone or tablet completely. This is non-negotiable for a safe installation.
- Locate the SIM Card Tray: Refer to the previous section if you haven’t already found it.
- Eject the SIM Tray:
- For Devices with a Tray: Insert the SIM ejector tool (or your paperclip substitute) into the small hole next to the SIM card tray. Apply gentle, steady pressure. The tray should pop out slightly.
- For Devices with Removable Backs: Carefully pry open the back cover. Remove the battery. Locate the SIM slot, which often has a small metal clip that you’ll need to push or slide to release the card.
- Position the SIM Card:
- Physical SIM: Carefully remove the correct size SIM card from its larger holder. Notice the notched corner on the SIM card. Align this notch with the corresponding notch on the SIM card tray or slot. The SIM card should sit flush within the tray or slot, with the gold contacts facing down or towards the device’s internals, depending on the tray design. If it doesn’t fit easily, do not force it. Double-check the orientation.
- eSIM: This process is entirely different. You will navigate to your device’s settings (usually under “Cellular,” “Mobile Data,” or “Network & Internet”) and select the option to “Add eSIM” or “Scan QR Code.” You’ll then follow your carrier’s instructions, which often involve scanning a QR code provided by your carrier or entering activation details manually.
- Reinsert the SIM Tray (or Close the Back Cover):
- For Devices with a Tray: Gently slide the SIM tray back into its slot until it’s flush with the side of the device. Ensure it clicks into place securely.
- For Devices with Removable Backs: Reinsert the battery and then carefully snap the back cover back into place.
- Power On Your Device: Once the SIM card is securely in place, turn on your device.
Activating Your SIM Card
After installing a physical SIM card, your device needs to recognize and activate it with your mobile network. This is usually an automatic process, but sometimes requires manual intervention.
- Automatic Activation: Most modern devices will automatically detect the new SIM card and connect to your carrier’s network. You’ll see your carrier’s name appear in the status bar, along with signal strength indicators.
- Manual Activation: In some cases, you might need to manually activate the SIM card. This often involves:
- Restarting Your Device: If the carrier name doesn’t appear, try restarting your device.
- Contacting Your Carrier: If activation still doesn’t occur, you may need to contact your mobile carrier’s customer support. They can help you troubleshoot the issue, confirm your service is active on their end, and guide you through any specific activation steps required for their network.
- Carrier App: Many carriers offer their own apps that can assist with activation and account management.
Troubleshooting Common SIM Card Installation Issues
Even with clear instructions, you might encounter a few hiccups. Here are some common problems and how to resolve them.
“No SIM Card” or “Invalid SIM” Error Messages
This is a frustrating but often solvable problem.
- Reseat the SIM Card: The most common cause is a SIM card that isn’t seated correctly. Power off your device, remove the SIM tray, take out the SIM card, and reinsert it, paying close attention to the alignment of the notched corner and ensuring it’s flat. Then, reinsert the tray and power on your device.
- Check for Damage: Inspect the SIM card for any visible damage, such as bent pins or scratches. Also, examine the SIM card tray for any bent pins or debris.
- Try a Different SIM Slot (if applicable): Some devices, particularly dual-SIM phones, have multiple SIM slots. Try inserting the SIM card into the other slot to see if that resolves the issue.
- Test the SIM in Another Phone: If possible, try your SIM card in another compatible unlocked phone. If it works in another phone, the problem likely lies with your device. If it doesn’t work in another phone, the SIM card itself might be faulty or not activated correctly by your carrier.
- Contact Your Carrier: If none of the above steps work, it’s time to contact your mobile carrier. They can verify that your SIM card is active on their network and diagnose any network-side issues.
Poor Signal or Connectivity Issues
After installing a SIM card, you might experience weak signal or intermittent connectivity.
- Ensure the SIM is Fully Inserted: Again, a partially inserted SIM can cause connectivity problems.
- Check Network Settings: Go into your device’s network settings and ensure that the correct network mode (e.g., 4G/LTE, 5G) is selected and that your device is searching for available networks. You might need to manually select your carrier from the list of available networks.
- Location Matters: Your physical location can significantly impact signal strength. Move to an area with better reception, such as near a window or outdoors.
- Airplane Mode Glitch: Sometimes, simply toggling Airplane Mode on and then off can refresh your device’s connection to the network.
- Software Update: Ensure your device’s operating system is up to date. Software bugs can sometimes interfere with network connectivity.
- Carrier Outage: It’s possible your carrier is experiencing a network outage in your area. Check your carrier’s website or social media for outage notifications.
Dual-SIM Functionality Issues
If you’re setting up a dual-SIM device, ensure both SIMs are configured correctly.
- Check Each SIM Individually: Test each SIM card in a single-SIM configuration first to ensure both cards are working correctly on their own.
- Configure SIM Preferences: In your device’s dual-SIM settings, you can often choose which SIM is used for calls, texts, and data. Make sure these are set according to your preference.
- Carrier Compatibility: Ensure both your SIMs are from carriers that support dual-SIM functionality on your device.
By following these steps and understanding the troubleshooting tips, you can confidently install your SIM card and ensure your mobile device is ready to connect you to the world. Whether it’s for personal communication, business productivity, or accessing the latest tech trends, a properly installed SIM card is your gateway.
aViewFromTheCave is a participant in the Amazon Services LLC Associates Program, an affiliate advertising program designed to provide a means for sites to earn advertising fees by advertising and linking to Amazon.com. Amazon, the Amazon logo, AmazonSupply, and the AmazonSupply logo are trademarks of Amazon.com, Inc. or its affiliates. As an Amazon Associate we earn affiliate commissions from qualifying purchases.