The successful assembly of a custom PC is a rite of passage for many technology enthusiasts. However, once the last screw is tightened and the cable management is tucked away, you are left with a powerful but “brainless” machine. The hardware is ready, but it lacks the software necessary to interface with the user. Installing an operating system (OS) is the critical final bridge between raw silicon and a functional workstation or gaming rig.
Whether you are opting for the ubiquitous Windows 11, a specialized Linux distribution, or even an experimental build, the fundamental principles of installation remain consistent. This guide provides a deep dive into the technical nuances of OS deployment, ensuring your new hardware operates at its peak potential from the very first boot.

Phase 1: Preparation and Creating Installation Media
Before you even power on your new PC, you must prepare the “key” that will unlock its potential. In modern computing, this is almost exclusively a USB flash drive. Gone are the days of optical discs; today’s high-speed USB 3.0 and 3.1 drives provide the fastest and most reliable installation method.
Choosing Your OS and Securing a License
The first decision is selecting the right environment for your needs. Windows remains the gold standard for gaming and professional creative suites due to its massive driver support and software compatibility. Linux, available in flavors like Ubuntu, Fedora, or Pop!_OS, offers a playground for developers and those seeking a lightweight, open-source experience.
If you choose Windows, ensure you have a valid digital license or product key. While you can technically install Windows without a key, you will face “Activate Windows” watermarks and restricted customization options. For Linux, the “cost” is simply the time spent researching which “distro” fits your hardware best.
Creating a Bootable USB Drive
To turn a standard thumb drive into a bootable installer, you need at least 8GB of space. For Windows users, the official “Media Creation Tool” from Microsoft is the most streamlined option. It automatically downloads the latest ISO file and prepares the drive with the necessary boot sectors.
However, for power users or those installing Linux, Rufus is the industry-standard tool. Rufus allows for granular control, such as choosing between GPT (GUID Partition Table) for modern UEFI systems or MBR (Master Boot Record) for older legacy systems. Given that a new PC likely uses a modern motherboard, GPT is the preferred choice to ensure compatibility with Secure Boot and large-capacity drives.
Configuring the BIOS/UEFI Environment
When you first strike the power button, your first destination is the BIOS (Basic Input/Output System) or, more accurately on modern boards, the UEFI (Unified Extensible Firmware Interface). By tapping Delete, F2, or F12 during startup, you enter the motherboard’s firmware.
Here, you must ensure the system is ready for the OS. Two settings are paramount:
- Boot Priority: You must set your USB drive as the primary boot device so the computer looks at the flash drive before trying to boot from the empty internal SSD.
- TPM and Secure Boot: For Windows 11, ensure that TPM 2.0 is enabled and Secure Boot is active. Without these, the installer will likely throw a compatibility error.
Phase 2: Navigating the Installation Process
Once the PC recognizes the USB drive, you will be greeted by the installation environment. This is where the actual data transfer begins, moving the compressed OS files from the USB to your primary storage drive (NVMe or SATA SSD).
Partitioning and Formatting Your Drive
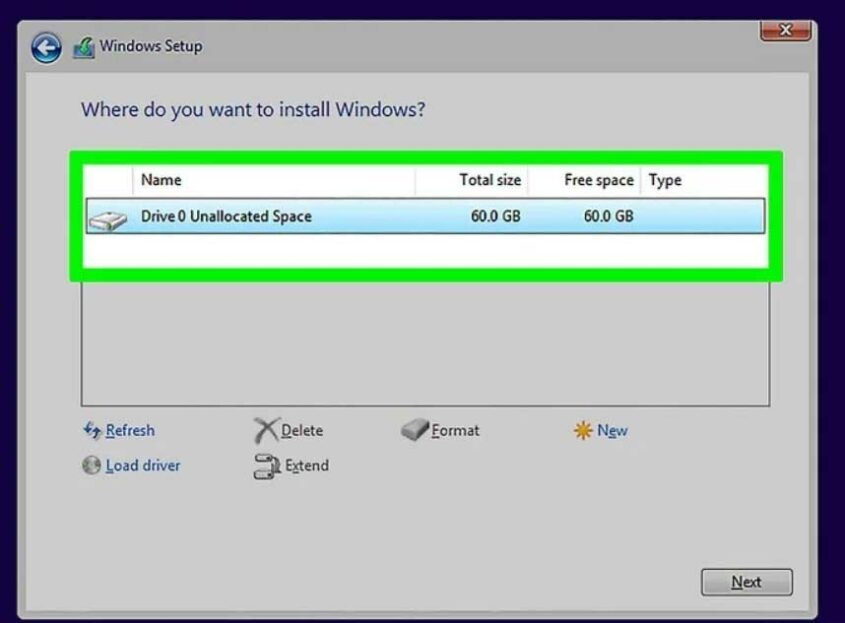
One of the most intimidating screens for new builders is the “Where do you want to install Windows?” prompt. If your SSD is brand new, it will show as “Unallocated Space.”
For a clean, professional setup, simply select the unallocated space and click “Next.” The installer will automatically create the necessary partitions:
- EFI System Partition: For booting the OS.
- MSR (Microsoft Reserved): For partition management.
- Primary Partition: Where your files and OS reside.
- Recovery Partition: To help repair the OS if things go wrong.
If you are using a massive drive (e.g., a 4TB NVMe) and wish to separate your OS from your games or data, this is the stage where you can manually click “New” and allocate specific sizes to create multiple logical drives.

The “OOBE” (Out of Box Experience)
Once the files are copied, the PC will restart. Remove the USB drive at this point to prevent the system from looping back into the installer. You will then enter the “Out of Box Experience.”
In this stage, you will select your region, keyboard layout, and network settings. A notable trend in modern tech is the push for online accounts. Windows 11 strongly prefers a Microsoft Account login. For those who value privacy or prefer a local-only account, there are “workarounds” (such as the OOBEBYPASSNRO command in the terminal) that allow you to set up a local user profile without an internet connection.
Handling Storage Driver Issues (VMD/RAID)
Occasionally, a new PC (particularly those using Intel 11th Gen or newer CPUs) might not “see” the SSD during installation. This is often due to Intel’s Volume Management Device (VMD) technology. To fix this, you must download the Intel Rapid Storage Technology (IRST) driver on another computer, place it on your installation USB, and click “Load Driver” during the partition selection screen. This is a common hurdle that distinguishes a prepared technician from a novice.
Phase 3: Post-Installation Essentials and Optimization
The desktop has loaded, and the wallpaper is visible, but the job is only 70% complete. A raw OS installation lacks the specialized “languages” (drivers) needed to talk to your specific hardware components efficiently.
Systematic Driver Deployment
While Windows Update is surprisingly adept at finding basic drivers, it rarely provides the most optimized versions for high-performance hardware.
- Chipset Drivers: Visit your motherboard manufacturer’s website (ASUS, MSI, Gigabyte, etc.) to download the latest chipset drivers. These manage communication between the CPU, RAM, and PCIe slots.
- Graphics Drivers: For NVIDIA or AMD GPUs, download the dedicated software (GeForce Experience or Adrenalin). This is vital for unlocking the full frame rate and features like DLSS or Ray Tracing.
- Audio and LAN: Generic drivers might result in muffled sound or slower internet speeds. Installing the specific Realtek or Intel drivers for your board ensures peak fidelity and stability.
System Updates and Security Hardening
Before installing your favorite apps, run Windows Update until no more updates are found. This often includes critical security patches and microcode updates for your processor.
In the realm of security, modern OS environments come with built-in protection (like Windows Defender). For most users, this is sufficient when paired with “common sense” browsing. However, this is also the time to disable “Telemetry” settings—those toggles that send usage data back to the developers—to ensure your system remains your own and isn’t bogged down by background reporting processes.
Debloating and Final Customization
New installations often come with “bloatware”—pre-installed apps like Candy Crush or trials of third-party antivirus software that consume system resources. Use the “Apps & Features” menu to prune these unnecessary programs. For a more advanced tech approach, tools like “Ninite” allow you to batch-install all your essential software (Chrome, VLC, Steam, Discord) in one go, without clicking through dozens of individual installers.
Troubleshooting Common Installation Hurdles
Even with the best preparation, technology can be temperamental. Understanding how to troubleshoot installation failures is what defines a proficient tech user.
Resolving Boot Loop Issues
If your computer keeps booting back into the “Install Now” screen even after you’ve finished the process, the BIOS is likely still prioritizing the USB drive. Ensure you have removed the USB or changed the “Boot Option #1” in the BIOS back to your internal SSD (often labeled as “Windows Boot Manager”).
Handling the “GPT vs MBR” Error
If the installer tells you it cannot install to a drive because it has an “MBR partition table,” it means your drive was formatted for an older system. You can fix this during installation by pressing Shift + F10 to open the Command Prompt. Using the diskpart tool, you can select the disk and type clean followed by convert gpt. This wipes the drive and readies it for a modern UEFI installation.
Dealing with “No Internet” During Setup
Some modern motherboards use Wi-Fi 6E or 10Gb Ethernet chips that the OS doesn’t recognize out of the box. If you are stuck on a “Let’s connect you to a network” screen with no “Skip” button, you are essentially locked out. This is where the aforementioned OOBEBYPASSNRO command is a lifesaver, allowing you to finish the setup, reach the desktop, and then install the network drivers from a USB drive.
Conclusion: The Soul of the Machine
Installing an operating system is more than just a technical necessity; it is the process of fine-tuning your hardware to reflect your specific needs. By meticulously creating bootable media, managing partitions, and curating your driver ecosystem, you ensure that your PC isn’t just fast, but stable and secure.
In the world of technology, the hardware provides the potential energy, but the operating system and its subsequent configuration provide the kinetic results. With the OS successfully installed and optimized, your new PC is no longer just a collection of parts—it is a high-performance tool ready for whatever digital challenges you throw at it.
aViewFromTheCave is a participant in the Amazon Services LLC Associates Program, an affiliate advertising program designed to provide a means for sites to earn advertising fees by advertising and linking to Amazon.com. Amazon, the Amazon logo, AmazonSupply, and the AmazonSupply logo are trademarks of Amazon.com, Inc. or its affiliates. As an Amazon Associate we earn affiliate commissions from qualifying purchases.