In the ever-evolving digital landscape, fonts are more than just text; they are crucial design elements that can dramatically shape the perception of your brand, enhance the readability of your content, and even improve user experience. Whether you’re a graphic designer looking to expand your toolkit, a content creator aiming for a more distinctive visual identity, or a business owner wanting to align your communication with your brand strategy, knowing how to install new fonts is an essential skill. This comprehensive guide will walk you through the process, ensuring you can seamlessly integrate new typographic styles into your digital workflow, regardless of your operating system.
Understanding Font Formats and Sources
Before diving into the installation process, it’s important to understand the common font formats you’ll encounter and where to find high-quality fonts. This knowledge will not only streamline the installation but also ensure you’re using legally and technically sound resources.
Common Font File Types
The vast majority of fonts you’ll download and install will come in one of a few common file formats. Each has its own advantages, but for most users, the primary distinction lies in compatibility with different operating systems and applications.
-
TrueType Fonts (.ttf): TrueType is a widely supported font format developed by Apple and later adopted by Microsoft. TTF fonts are known for their scalability, meaning they can be resized without losing quality, making them suitable for both screen display and print. They are generally compatible with most operating systems and applications.
-
OpenType Fonts (.otf): OpenType is a more advanced font format that builds upon TrueType technology. Developed collaboratively by Adobe and Microsoft, OpenType fonts offer expanded capabilities, including support for a wider range of characters, ligatures, stylistic alternates, and advanced typographic features. Like TTF, OTF fonts are scalable and offer excellent cross-platform compatibility. Many professional designers prefer OpenType due to its richer feature set.
-
Web Open Font Format (.woff and .woff2): These formats are specifically designed for web use. They are compressed and optimized for faster loading times on websites. While you might encounter these when downloading fonts for web design projects, they are less commonly installed directly onto your operating system for general use in desktop applications.
Reputable Sources for Fonts
The internet is overflowing with fonts, but not all sources are created equal. To ensure you’re getting high-quality, legally licensed fonts, it’s best to stick to reputable platforms.
-
Google Fonts: A fantastic resource for free, open-source fonts that are excellent for both web and desktop use. They offer a vast library with a wide variety of styles.
-
Adobe Fonts (formerly Typekit): If you’re an Adobe Creative Cloud subscriber, you have access to a massive library of high-quality, licensed fonts that can be synced directly to your computer.
-
Font Squirrel: A curated collection of free fonts that are licensed for commercial use. They also provide helpful web font kits.
-
DaFont / Urban Fonts: These sites offer a mix of free and premium fonts. While they have a wide selection, always pay close attention to the licensing terms, as many free fonts are for personal use only.
-
MyFonts / Fontspring / Linotype: These are major marketplaces for premium, professional fonts. If you’re looking for unique or specialized typefaces for branding or commercial projects, these are excellent places to explore.
Crucially, always check the license agreement of any font you download. Fonts downloaded from free sites often come with restrictions on commercial use, redistribution, or embedding. For professional or business purposes, investing in licensed fonts from reputable foundries or subscribing to services like Adobe Fonts is highly recommended.
Installing Fonts on Windows
Windows offers a straightforward method for installing new fonts, allowing you to quickly add new typographic options to your system.
Method 1: Using the Font Settings Menu
This is the recommended and most user-friendly method for installing fonts on Windows.
-
Locate Your Font Files: First, make sure you have downloaded and extracted your font files to a known location on your computer. These files will typically have a
.ttfor.otfextension. -
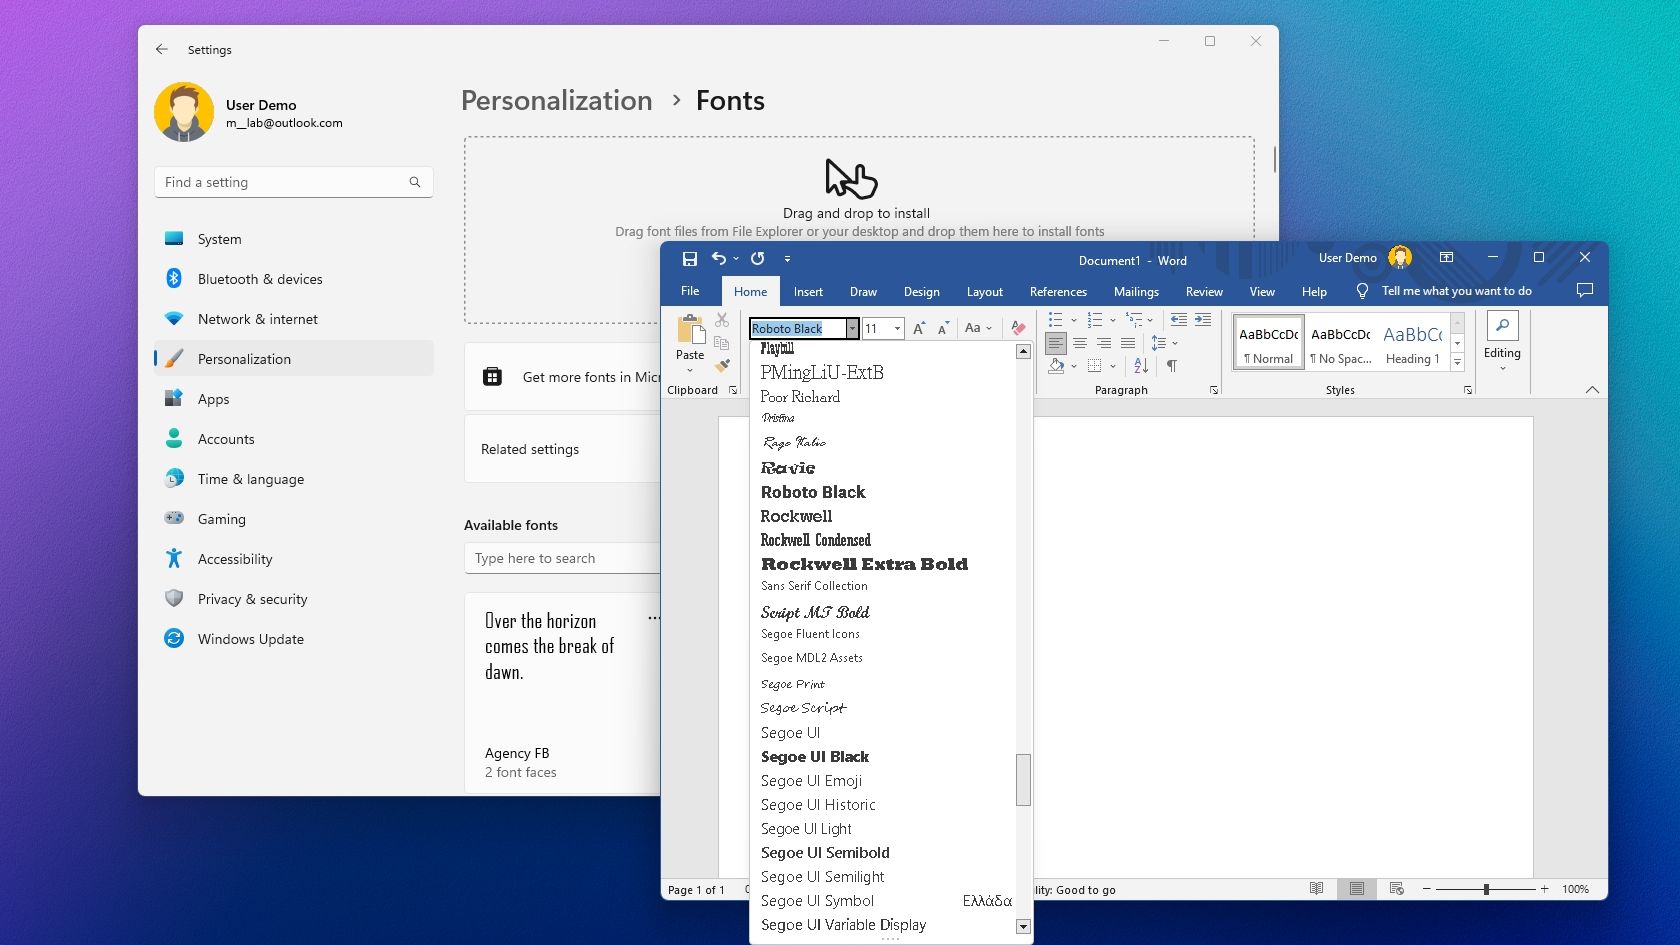
Open Windows Settings: Click on the Start menu and select the Settings cogwheel icon.
-
Navigate to Personalization: In the Settings window, click on Personalization.
-
Select Fonts: From the left-hand menu within Personalization, choose Fonts.
-
Drag and Drop or Browse: You will see a section with a drag-and-drop area. You can either:
- Drag and Drop: Open your file explorer, locate the folder containing your font files, and drag the
.ttfor.otffiles directly into the designated drag-and-drop area in the Fonts settings. - Browse: Click on the “Add fonts” button (or similar wording depending on your Windows version) and navigate to the folder where your font files are saved. Select the font files you wish to install and click “Open” or “Install.”
- Drag and Drop: Open your file explorer, locate the folder containing your font files, and drag the
-
Verification: Once you drag and drop or select the files, Windows will automatically install them. You will see the newly installed fonts appear in the list below the drag-and-drop area, often with a preview.
Method 2: Right-Click Installation
This is an even quicker method for installing individual font files.
-
Locate Font Files: Find the
.ttfor.otffont file(s) in your file explorer. -
Right-Click: Right-click on the font file you want to install.
-
Select “Install”: From the context menu that appears, select Install. If prompted by User Account Control (UAC), click Yes.
- “Install for all users”: You might also see an option like “Install for all users.” Choosing this will install the font system-wide, making it available to all user accounts on that computer. If you only see “Install,” it usually installs for the current user.
-
Verification: The font will install silently in the background. You can then check the Fonts settings (as described in Method 1) to confirm its installation.
Considerations for Windows Installation
- Administrator Privileges: In some cases, especially when installing for all users or when Windows security settings are strict, you might need administrator privileges to install fonts.
- Application Restart: After installing a new font, you may need to restart any applications (like Microsoft Word, Adobe Photoshop, etc.) that were open during the installation for the new font to appear in their font lists.
- Font Management Software: For users who work with a large number of fonts, dedicated font management software (e.g., FontBase, NexusFont) can be incredibly useful for organizing, activating, and deactivating fonts without permanent installation, which can help prevent system slowdowns.
Installing Fonts on macOS
macOS provides a robust and intuitive font management system called Font Book, making the installation of new fonts a seamless experience.
Using Font Book
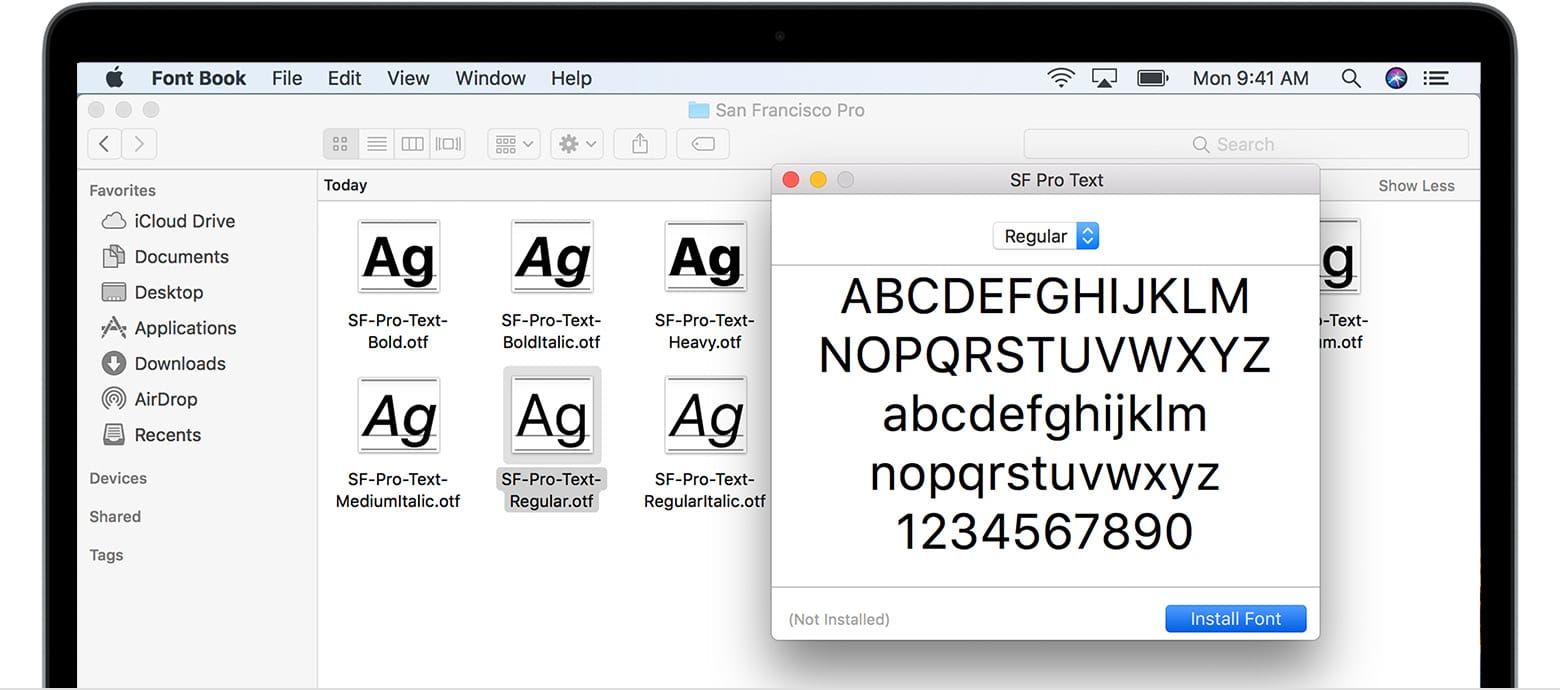
Font Book is the native application on macOS for managing your fonts.
-
Locate Your Font Files: Ensure you have your font files (typically
.ttfor.otf) downloaded and unzipped in a accessible location on your Mac. -
Open Font Book: There are several ways to open Font Book:
- Spotlight Search: Press Command + Spacebar to open Spotlight search, type “Font Book,” and press Enter.
- Applications Folder: Navigate to your Applications folder and double-click on Font Book.
-
Add Fonts to Font Book: Once Font Book is open, you can add your fonts using one of these methods:
- Drag and Drop: Open your Finder, locate the folder with your font files, and drag the
.ttfor.otffiles directly into the Font Book window. You can drag them into the “All Fonts” collection or a specific collection you’ve created. - File Menu: In Font Book, go to File > Add Fonts… (or press Command + O). Navigate to your font files, select them, and click “Open.”
- Double-Click (for individual fonts): You can also simply double-click on a font file in Finder. This will open a preview window for that font. In this preview window, click the “Install Font” button.
- Drag and Drop: Open your Finder, locate the folder with your font files, and drag the
-
Automatic Validation and Installation: Font Book will automatically validate the font files for any errors or duplicates. If a font is valid, it will be added to your library. You will see the font appear in the list within Font Book.
Installing Fonts via Automatic Activation (for Adobe CC Users)
If you are an Adobe Creative Cloud subscriber and use Adobe Fonts, the process is even more integrated.
- Access Adobe Fonts: Open the Adobe Creative Cloud desktop app.
- Browse and Activate: Navigate to the “Fonts” tab and browse the extensive library. When you find a font you like, click the “Activate” button next to it.
- Automatic Syncing: The font will automatically be downloaded and installed on your system, becoming available in all your Adobe applications and most other applications on your Mac.
Considerations for macOS Installation
- Font Validation: Font Book’s built-in validation is excellent for catching corrupted font files. If a font fails validation, it’s best to try downloading it again from the source or finding an alternative.
- User vs. Computer Installation: When adding fonts through Font Book (unless you specifically choose to install them for all users), they are typically installed for the current user. This means they will only be available when you are logged into your user account.
- Application Restart: As with Windows, you may need to quit and re-open applications for new fonts to appear in their font menus.
- Disabling Fonts: Font Book also allows you to disable fonts you aren’t currently using, which can help improve application performance, especially if you have a very large font library.
Using Your New Fonts Effectively
Once your fonts are successfully installed, the real fun begins: integrating them into your projects. The choice of font can significantly impact how your message is received.
Enhancing Brand Identity
For businesses and personal brands, typography is a cornerstone of corporate identity and personal branding. Consistent and well-chosen fonts communicate professionalism, evoke specific emotions, and make your brand instantly recognizable.
- Logos: The font used in your logo is critical. It needs to be unique, legible, and reflective of your brand’s personality.
- Marketing Materials: Ensure your marketing collateral – brochures, social media graphics, advertisements – all use fonts that align with your brand guidelines. This reinforces your visual identity across all touchpoints.
- Website Design: Typography plays a huge role in web design. Legible fonts improve user experience, while unique fonts can make your website stand out. Pay attention to font pairings for headings and body text.
Improving Readability and User Experience
Beyond aesthetics, fonts have a practical impact on how easily people can read and consume your content.
- Body Text: For long-form content (articles, books, reports), prioritize readability. Fonts with clear letterforms, adequate spacing (kerning and leading), and good x-height are ideal. Sans-serif fonts are often preferred for screen reading, while serif fonts can work well for print.
- Headings and Titles: These can be more expressive. Use them to grab attention and guide the reader through your content.
- Accessibility: Consider users with visual impairments. Avoid overly decorative or condensed fonts for body text. Ensure sufficient contrast between text and background.

Leveraging Advanced Typographic Features
If you’ve installed OpenType fonts, you have access to a wealth of advanced features that can elevate your design.
- Ligatures: These are characters that combine two or more letters into a single glyph (e.g., “fi,” “fl”). They can improve the visual flow of text.
- Stylistic Alternates: Many fonts offer variations of certain letters, allowing you to customize the look of your text further.
- Swashes and Ornaments: These decorative elements can add flair to headlines or specific words.
- Numerators/Denominators and Fractions: Essential for technical or financial documents.
Most professional design software (Adobe Creative Suite, Affinity Designer, etc.) and even some word processors (like Microsoft Word with certain fonts) will provide an interface to access these OpenType features. Look for a “Glyphs” panel or an “OpenType” section within your text formatting options.
By understanding how to install new fonts and thoughtfully selecting and using them, you unlock a powerful tool for communication, branding, and design. Whether you’re aiming to boost your online income through compelling content, solidify your corporate identity, or simply make your personal projects look more professional, a well-curated font library is an invaluable asset.
aViewFromTheCave is a participant in the Amazon Services LLC Associates Program, an affiliate advertising program designed to provide a means for sites to earn advertising fees by advertising and linking to Amazon.com. Amazon, the Amazon logo, AmazonSupply, and the AmazonSupply logo are trademarks of Amazon.com, Inc. or its affiliates. As an Amazon Associate we earn affiliate commissions from qualifying purchases.