The world of PC gaming is constantly evolving, and one of the most exciting avenues for players to personalize and expand their gaming experiences is through mods. Mods, short for modifications, are user-created alterations to a game that can introduce new features, change existing ones, or even completely transform gameplay. For many popular titles, particularly those with large and active communities, mods are an integral part of the gaming landscape. Among the most established and widely used platforms for modding Minecraft, a game renowned for its modding potential, is Forge.

Forge is a powerful modding API (Application Programming Interface) that allows developers to create and distribute mods for Minecraft. It provides a stable framework that enables mods to interact with the game without causing conflicts, making the modding process more streamlined and accessible for a vast number of players. This guide will walk you through the entire process of installing mods using Forge, ensuring you can unlock a universe of new content and gameplay possibilities for your Minecraft adventures.
Understanding the Fundamentals: What is Forge and Why Use It?
Before diving into the installation process, it’s crucial to understand what Forge is and why it’s the preferred choice for many Minecraft modders.
The Role of Forge in Minecraft Modding
Minecraft, in its vanilla (unmodded) state, offers a fantastic experience. However, the true magic for many lies in the ability to customize and enhance it. This is where mods come in. Mods can range from simple texture packs that alter the visual appearance of the game to complex overhauls that introduce entirely new dimensions, creatures, crafting recipes, and gameplay mechanics.
Forge acts as a bridge between these custom modifications and the core Minecraft game. It modifies the game’s code in a way that allows mods to be loaded and run alongside the original game. Without a mod loader like Forge, installing and running multiple mods simultaneously would be a chaotic and often impossible task. Forge simplifies this by providing a standardized way for mods to be recognized and integrated.
Benefits of Using Forge
There are several compelling reasons why players opt for Forge when it comes to modding Minecraft:
- Compatibility: Forge is designed to ensure a higher degree of compatibility between different mods. While conflicts can still arise, Forge significantly reduces the likelihood of them compared to manual mod installations without a loader.
- Ease of Installation: Forge simplifies the installation of mods. Once Forge is installed, most mods can be added simply by placing their files into a designated folder.
- Extensive Mod Support: A vast number of Minecraft mods are developed specifically for Forge. This means you’ll have access to a wider selection of high-quality modifications.
- Stability: Forge updates are regularly released to maintain compatibility with new Minecraft versions and to improve overall stability. This ensures a smoother modding experience.
- Community Support: Forge has a massive and active community. If you encounter issues, you’re likely to find solutions through forums, wikis, and online tutorials.
Preparing for Installation: Prerequisites and Essential Downloads
Before you can embark on your modding journey with Forge, there are a few essential steps and downloads you need to take care of. This preparation ensures a smooth and error-free installation.
Ensuring Minecraft and Java are Up-to-Date
The first and most critical prerequisite is having a legitimate and updated copy of Minecraft. Forge is designed to work with specific versions of Minecraft, and using an outdated or pirated version can lead to significant compatibility issues and prevent Forge from installing correctly.
- Minecraft Version: Identify the specific Minecraft version that the mods you intend to use are compatible with. Mods are often version-specific, so installing Forge for the wrong Minecraft version will render your mods useless. You can usually find this information on the mod’s download page.
- Java Installation: Minecraft runs on Java. Forge also requires a specific version of Java to be installed on your system. While newer versions of Minecraft often bundle a suitable Java runtime, it’s good practice to ensure you have the correct Java Development Kit (JDK) or Java Runtime Environment (JRE) installed. For most modern Minecraft versions (1.17 and later), Java 17 is recommended. For older versions, Java 8 is typically sufficient. You can download the latest Java versions from the official Oracle Java website or consider OpenJDK distributions for a free and open-source alternative. Ensure your Java installation is added to your system’s PATH environment variable, which is usually handled automatically during installation.
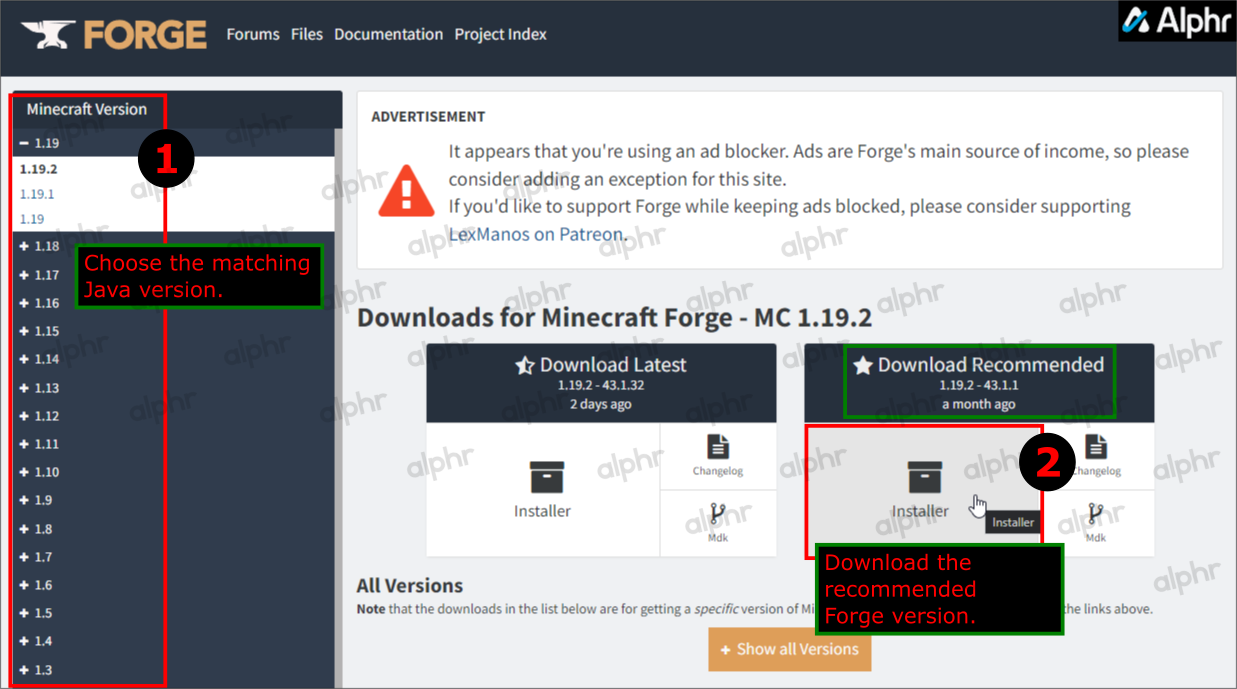
Downloading the Correct Forge Installer
Once you have your Minecraft and Java set up, the next step is to download the Forge installer itself.
- Official Forge Website: Always download Forge from the official Minecraft Forge website (files.minecraftforge.net). This is crucial for security and to ensure you’re getting a legitimate and functional installer. Downloading from unofficial sources can expose your computer to malware.
- Selecting the Correct Version: On the Forge website, you will see a list of Minecraft versions. Navigate to the specific Minecraft version for which you want to install mods. Forge typically offers two main branches: “Recommended” and “Latest.”
- Recommended: This is the most stable version of Forge for that Minecraft version and is generally recommended for most users, especially if you’re new to modding.
- Latest: This version includes the most recent features and bug fixes but might be less stable than the recommended version.
- Installer Types: Forge installers usually come in two types:
- Installer: This is the standard executable file that you will run to install Forge for your Minecraft client.
- Universal: This JAR file can be used for both client and server installations. For most users installing mods on their own PC, the “Installer” is what you’ll need.
Download the installer file (usually a .jar file) and save it to a location on your computer where you can easily access it, such as your Desktop or Downloads folder.
Installing Forge: Step-by-Step Client Installation
With all the prerequisites in place, you’re ready to install Forge for your Minecraft client. This process is straightforward and involves running the downloaded installer.
Running the Forge Installer
- Locate the Installer: Navigate to the folder where you saved the Forge installer
.jarfile. - Run the Installer:
- Windows: Double-click the Forge installer
.jarfile. If it doesn’t open, right-click the file, select “Open With,” and choose “Java(TM) Platform SE binary” or your Java executable. You might need to associate.jarfiles with Java if this option doesn’t appear directly. - macOS/Linux: Open a terminal or command prompt, navigate to the directory where you saved the installer, and run the command:
java -jar forge-installer-version.jar(replaceforge-installer-version.jarwith the actual name of your downloaded file).
- Windows: Double-click the Forge installer
- Forge Installer Window: A Forge installer window will appear. Ensure that “Install client” is selected.
- Installation Directory: The installer should automatically detect your Minecraft installation directory. If it doesn’t, or if you have Minecraft installed in a non-standard location, click the “…” button to browse and select the correct directory. This is usually located in
%appdata%.minecrafton Windows. - Installation Profile: The installer will create a new Forge profile for your Minecraft launcher. You can leave the default profile name or change it if you wish.
- Click “OK”: Click the “OK” button to begin the installation process. Forge will download and install the necessary files. You’ll see a progress bar indicating the installation status.
- Success Message: Once the installation is complete, you will see a success message. Click “OK” to close the installer.
Verifying the Forge Installation
To ensure Forge has been installed correctly, you need to launch Minecraft using the new Forge profile.
- Open Minecraft Launcher: Launch the official Minecraft Launcher.
- Select Forge Profile: In the bottom-left corner of the launcher, you should see a dropdown menu for “Installations” or “Play.” Click on this dropdown and select the Forge profile that was created during the installation. It will likely be named something like “forge-version.”
- Launch Minecraft: Click the “Play” button. Minecraft will launch with Forge loaded.
- Check for Forge Menu: Once the game has fully loaded, look for changes in the main menu. You should see “Forge” mentioned in the bottom-left corner, often with a version number. You might also notice a new “Mods” button. If you see these indicators, Forge has been installed successfully.
Installing Mods: Adding New Content to Your Game
With Forge installed and verified, you can now start adding mods to your Minecraft world. This involves downloading mods and placing them in the correct folder.
Downloading and Locating Mods
Similar to downloading Forge, it’s essential to download mods from reputable sources to avoid malware and ensure compatibility.
- Reputable Modding Websites: The most popular and reliable sources for Minecraft mods include:
- CurseForge: This is the largest and most comprehensive platform for Minecraft mods, offering a vast library of mods, resource packs, and modpacks.
- Planet Minecraft: Another popular community site with a wide array of user-created content.
- Compatibility is Key: When downloading a mod, always pay close attention to:
- Minecraft Version: Ensure the mod is compatible with the Minecraft version for which you installed Forge.
- Forge Version: Some mods might also specify a minimum Forge version.
- Dependencies: Some mods require other mods (libraries or APIs) to function. These are called dependencies. The mod’s download page will usually list any required dependencies. Download and install these first.
- Download Format: Most mods will be downloaded as
.jarfiles. Some might come as.zipfiles that contain the.jarfile.
Placing Mods in the Mods Folder
Once you have downloaded your desired mods (as .jar files), you need to place them in the correct folder within your Minecraft directory.
- Locate the Mods Folder:
- Windows: Press
Win + R, type%appdata%.minecraft, and press Enter. Inside the.minecraftfolder, you should find a folder namedmods. If this folder doesn’t exist, create it. - macOS: Open Finder, go to the “Go” menu, select “Go to Folder,” and type
~/Library/Application Support/minecraft. Look for themodsfolder. If it doesn’t exist, create it. - Linux: Navigate to
~/.minecraft/. Look for themodsfolder. If it doesn’t exist, create it.
- Windows: Press
- Copy Mod Files: Drag and drop the downloaded mod
.jarfiles into themodsfolder.
Important Notes:
- Do Not Extract: For most mods, you should not extract the
.jarfile. Simply place the.jarfile directly into themodsfolder. - Modpacks: If you are installing a modpack (a collection of mods pre-configured to work together), the process might be different. Many modpack launchers (like MultiMC or Technic Launcher) handle modpack installations automatically.
Launching Minecraft with Mods and Troubleshooting Common Issues
After placing your mods in the designated folder, the final step is to launch Minecraft and enjoy your newly enhanced gaming experience. However, sometimes things don’t go as smoothly as planned.
Launching Minecraft with Mods
- Open Minecraft Launcher: Launch the Minecraft Launcher.
- Select Forge Profile: Ensure your Forge profile is selected in the dropdown menu.
- Launch Minecraft: Click “Play.”
- Check for Mods: Once Minecraft loads, navigate to the “Mods” button on the main menu. Clicking this should display a list of all the mods that Forge has detected and loaded. If your mods appear in this list, they are installed correctly.

Troubleshooting Common Issues
Encountering issues when modding is common, but most problems are solvable with a bit of patience and understanding.
- Game Crashes on Launch:
- Incorrect Minecraft/Forge Version: Double-check that your Forge version is compatible with your Minecraft version and that your mods are compatible with both.
- Corrupted Mod File: Try re-downloading the mod file.
- Missing Dependencies: Ensure you have installed all required dependency mods.
- Conflicting Mods: If you’ve installed multiple mods, try removing them one by one to identify the conflict.
- Java Issues: Verify that your Java installation is correct and up-to-date.
- Mods Not Appearing in the “Mods” Menu:
- Incorrect Folder: Ensure the
.jarfiles are placed directly in themodsfolder, not in subfolders. - Wrong Minecraft Version: The mod might be for a different Minecraft version.
- Corrupted File: Re-download the mod.
- Incorrect Folder: Ensure the
- In-Game Glitches or Errors:
- Mod Conflicts: This is the most common cause. Try disabling mods individually or in groups to pinpoint the conflicting mod.
- Outdated Forge Version: Ensure you are using a recommended or stable Forge version for your Minecraft version.
- Performance Issues (Lag):
- Too Many Mods: Some mods can be resource-intensive. Consider removing mods that might be causing performance drops.
- OptiFine/Performance Mods: While OptiFine is a powerful optimization mod, it can sometimes conflict with other mods. If you’re using it, ensure it’s compatible with your Forge version and other mods. It’s often best to install OptiFine after Forge and place its JAR in the
modsfolder. - Allocating More RAM: For heavily modded instances, you might need to allocate more RAM to Minecraft. This can be done through the Minecraft Launcher’s profile settings.
Seeking Further Help:
If you’re still stuck, don’t hesitate to seek help from the community. The Minecraft Forge forums and the Discord servers for specific mods or modpacks are excellent places to ask questions and find solutions. Providing detailed information about your Minecraft version, Forge version, the mods you’re using, and any error messages you receive will greatly help others assist you.
By following these steps, you’ll be well-equipped to install mods using Forge and embark on an infinitely more customizable and engaging Minecraft adventure. Happy modding!
aViewFromTheCave is a participant in the Amazon Services LLC Associates Program, an affiliate advertising program designed to provide a means for sites to earn advertising fees by advertising and linking to Amazon.com. Amazon, the Amazon logo, AmazonSupply, and the AmazonSupply logo are trademarks of Amazon.com, Inc. or its affiliates. As an Amazon Associate we earn affiliate commissions from qualifying purchases.