Maven is an indispensable tool for any Java developer, simplifying the build process, dependency management, and project structure. Whether you’re embarking on a new project or looking to streamline your existing development workflow, mastering Maven installation on your Windows machine is a crucial first step. This comprehensive guide will walk you through the entire process, from understanding what Maven is to verifying a successful installation. We’ll cover the prerequisites, download options, environment variable configuration, and some initial troubleshooting tips, ensuring you’re equipped to leverage Maven’s power for enhanced productivity and robust project management.
Understanding Maven and Its Benefits
Before diving into the installation, it’s beneficial to understand what Maven is and why it’s so widely adopted in the software development community. At its core, Maven is a build automation tool that primarily focuses on Java projects. However, its capabilities extend beyond just compiling code.
What is Maven?
Maven operates on the concept of a Project Object Model (POM), which is an XML file that describes the project’s structure, dependencies, build process, and other metadata. This standardized approach brings consistency and predictability to how projects are built and managed. Instead of manually writing scripts for every build step, Maven automates these tasks based on conventions and the configuration defined in the POM.
Key Benefits of Using Maven
The widespread adoption of Maven is attributed to the significant advantages it offers:
- Dependency Management: This is arguably Maven’s most powerful feature. It automatically downloads and manages all the libraries (JAR files) your project needs from various repositories. You simply declare the dependencies in your POM, and Maven handles the rest, ensuring you have the correct versions and avoiding conflicts. This drastically reduces the manual effort and potential errors associated with managing external libraries.
- Standardized Project Structure: Maven enforces a convention-over-configuration approach to project layout. This means that if you follow the standard directory structure (e.g.,
src/main/javafor source code,src/test/javafor test code), Maven knows where to find your files and how to process them without explicit configuration. This uniformity makes it easier for developers to jump into new projects and understand their structure quickly. - Simplified Build Lifecycle: Maven defines a standard build lifecycle with distinct phases like
compile,test,package,install, anddeploy. You can execute these phases using simple commands, and Maven orchestrates the execution of goals (specific tasks) associated with each phase. This streamlined process ensures a consistent build outcome every time. - Extensibility with Plugins: Maven’s functionality can be extended through a vast ecosystem of plugins. These plugins perform various tasks, from code analysis and static checks to generating documentation and deploying applications. You can easily add or configure plugins in your POM to tailor the build process to your specific needs.
- Improved Collaboration: By standardizing project structure and build processes, Maven facilitates collaboration among developers. Everyone on the team works with the same build tool and follows similar conventions, reducing misunderstandings and integration issues.
Prerequisites for Maven Installation on Windows
Before you begin the installation process, ensure your Windows system meets the following requirements. These prerequisites are essential for Maven to function correctly and for a smooth installation experience.
Java Development Kit (JDK) Installation
Maven is built on Java and requires a Java Runtime Environment (JRE) or, more commonly, a Java Development Kit (JDK) to run. You must have a JDK installed on your system before installing Maven.
Checking for Existing JDK Installation:
- Open the Command Prompt or PowerShell.
- Type the following command and press Enter:
bash

java -version
If Java is installed, you will see output indicating the Java version. - Next, check for the JDK specifically:
bash

javac -version
This command checks for the Java compiler, which is part of the JDK. If you see a version number, the JDK is likely installed.
Installing the JDK (if necessary):
If you don’t have a JDK installed or your version is outdated, you’ll need to download and install one.
- Download: Visit the official Oracle JDK download page (for older versions) or the Adoptium Temurin JDK download page (recommended for newer, open-source versions). Choose a JDK version that is compatible with the Maven version you intend to install. Generally, a recent LTS (Long-Term Support) version of Java is a good choice.
- Run the Installer: Download the Windows installer (usually an
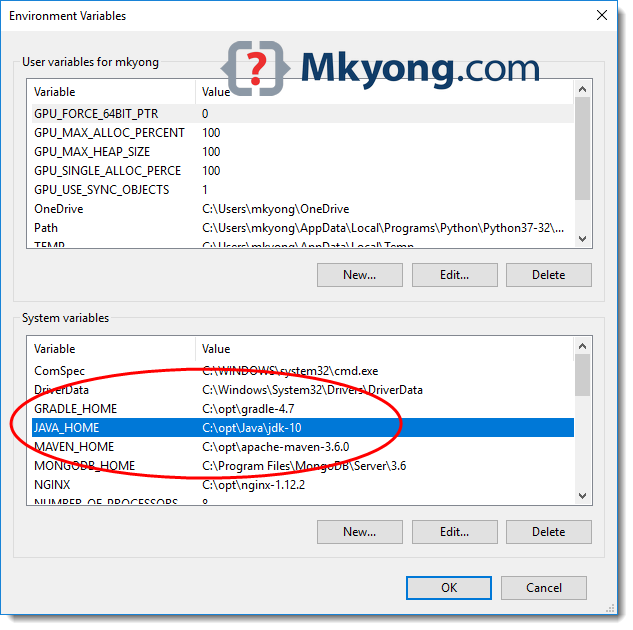
.exefile) and run it. Follow the on-screen instructions. - Set JAVA_HOME Environment Variable: This is crucial. The
JAVA_HOMEenvironment variable points to the root directory of your JDK installation. Maven and many other Java-based tools rely on this variable.- Search for “environment variables” in the Windows search bar and select “Edit the system environment variables.”
- In the System Properties window, click the “Environment Variables…” button.
- Under “System variables,” click “New…”.
- For “Variable name,” enter
JAVA_HOME. - For “Variable value,” enter the path to your JDK installation directory (e.g.,
C:Program FilesJavajdk-17.0.6). Do not include thebindirectory. - Click “OK” on all open windows to save the changes.
- Update PATH: Ensure the JDK’s
bindirectory is included in your system’sPATHvariable so you can runjavaandjavacfrom any command prompt.- In the “Environment Variables” window, find the
Pathvariable under “System variables” and select it. - Click “Edit…”.
- Click “New” and add the path to your JDK’s
bindirectory (e.g.,C:Program FilesJavajdk-17.0.6bin). - Click “OK” on all windows.
- In the “Environment Variables” window, find the
- Verify Installation: Close and reopen your Command Prompt or PowerShell, and run
java -versionandjavac -versionagain to confirm the changes.
Internet Connection
A stable internet connection is necessary to download Maven and its dependencies. Maven downloads required JAR files from remote repositories (like Maven Central) when you first build a project that uses them.
Administrative Privileges
While not always strictly required for user-level installations, having administrative privileges on your Windows machine can simplify the process, especially if you plan to install Maven system-wide or encounter any permission issues during file copying or environment variable updates.
Downloading and Installing Maven
Now that you have your prerequisites in order, let’s proceed with downloading and installing Maven on your Windows system.
Downloading the Maven Binary Archive
Maven is distributed as a binary archive. You’ll need to download the appropriate version for Windows.
- Visit the Official Maven Download Page: Go to the Apache Maven download page: https://maven.apache.org/download.cgi.
- Select a Binary Distribution: Look for the “Binary zip archive” links. It’s generally recommended to download the latest stable release. You’ll typically see options like
apache-maven-X.Y.Z-bin.zip(where X.Y.Z is the version number). - Download the Zip File: Click on the link to download the
.zipfile to your computer. Save it to a location where you can easily access it, like your Downloads folder.
Extracting the Maven Files
Once the download is complete, you need to extract the contents of the zip file to a permanent location on your system.
-
Locate the Downloaded Zip File: Navigate to the folder where you saved the
apache-maven-X.Y.Z-bin.zipfile. -
Extract the Archive: Right-click on the
.zipfile and select “Extract All…” (or use your preferred extraction tool like 7-Zip or WinRAR). -
Choose an Installation Directory: When prompted to select a destination, choose a directory where you want to install Maven. It’s best to choose a location that won’t be moved or deleted easily. Common choices include:
C:Program Files(for system-wide installation, requires admin rights)C:ApacheC:tools- Or a custom folder within your user profile if you prefer a user-specific installation.
For this guide, let’s assume you’re extracting it toC:Program FilesApachemaven. Make sure to create theApacheandmavenfolders if they don’t exist. The extracted folder will typically be namedapache-maven-X.Y.Z.
Important: The path to the Maven installation directory should not contain spaces or special characters if possible, as this can sometimes lead to issues with certain tools.
-
Verify Extraction: After extraction, you should have a folder structure similar to this:
C:Program FilesApachemavenapache-maven-X.Y.Z

    bin

    boot

    conf

    lib

    LICENSE

    NOTICE

    README.txt
The crucial part is thebindirectory, which contains the executable scripts for running Maven commands.
Configuring Environment Variables
Configuring environment variables is the most critical step for making Maven accessible from any command prompt. You need to set two variables: MAVEN_HOME and update your system’s PATH.
- Open System Properties: Search for “environment variables” in the Windows search bar and select “Edit the system environment variables.”
- Click Environment Variables: In the System Properties window, click the “Environment Variables…” button.
Setting the MAVEN_HOME Variable
This variable points to the root directory of your Maven installation.
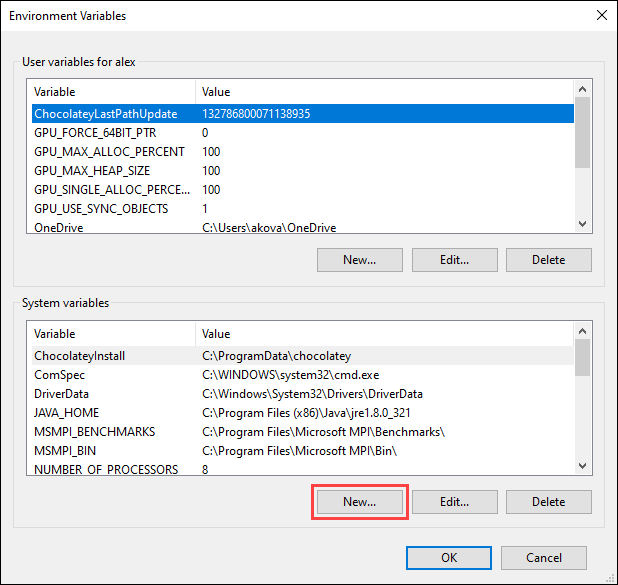
- Create New System Variable: Under “System variables,” click the “New…” button.
- Enter Variable Name and Value:
- Variable name:
MAVEN_HOME - Variable value: The path to the root directory of your extracted Maven installation (e.g.,
C:Program FilesApachemavenapache-maven-X.Y.Z). Ensure this path points to the folder containing thebin,conf,libsubdirectories, not inside them.
- Variable name:
- Confirm: Click “OK” to save the
MAVEN_HOMEvariable.
Updating the PATH Variable
This step tells Windows where to find the Maven executable commands (like mvn.cmd).
- Edit Path Variable: In the “System variables” section, find the variable named
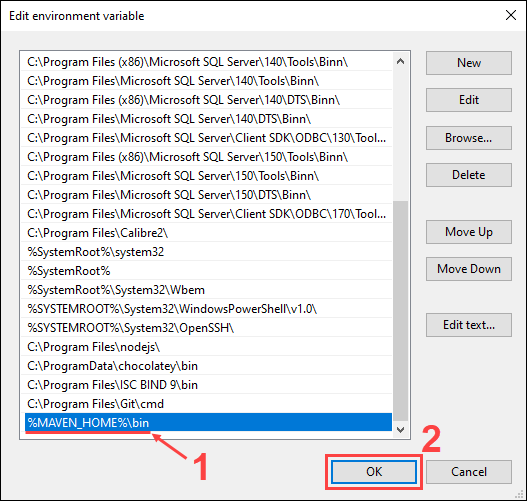
Pathand select it. Then, click the “Edit…” button. - Add Maven Bin Directory: In the “Edit environment variable” window:
- Click “New”.
- Enter the path to Maven’s
bindirectory. You can do this by typing it directly or, more conveniently, by using the%MAVEN_HOME%variable:%MAVEN_HOME%bin. This makes your PATH configuration dynamic and easier to update if you change your Maven installation location later. - Click “OK” to save the changes to the
Pathvariable.
- Confirm All Changes: Click “OK” on the “Environment Variables” window and then “OK” on the “System Properties” window to apply all your changes.
Verifying the Maven Installation
After setting up the environment variables, it’s essential to verify that Maven is correctly installed and accessible from your command line.
-
Open a New Command Prompt or PowerShell: Crucially, you must open a new command prompt window after modifying environment variables. Existing windows will not recognize the changes.
-
Run the Maven Version Command: Type the following command and press Enter:
mvn -versionIf your installation was successful, you should see output similar to this (version numbers will vary):
Apache Maven 3.9.4 (XXXXXXXXXXXXXX)
Maven home: C:Program FilesApachemavenapache-maven-3.9.4
Java home: C:Program FilesJavajdk-17.0.6
Default locale: en_US, platform encoding: Cp1252
OS name: "windows 10", version: "10.0", arch: "amd64", family: "windows"
This output confirms that Maven is recognized, shows your Maven installation directory, and importantly, your Java home directory.
-
Test Maven’s Help Command: You can also try:
bash

mvn --help
This should display a list of available Maven commands and options, further confirming a successful setup.
Troubleshooting Common Installation Issues
While the installation process is generally straightforward, you might encounter a few hiccups. Here are solutions to some common problems:
‘mvn’ is not recognized as an internal or external command
This is the most frequent error and almost always points to an issue with your environment variables.
- Double-Check
MAVEN_HOME: Ensure theMAVEN_HOMEvariable points to the correct root directory of your Maven installation (the one containingbin,conf,lib). - Verify
PATHVariable: Make sure you have added%MAVEN_HOME%bin(or the full path to thebindirectory) to your system’sPATHvariable. The order in thePATHvariable doesn’t usually matter for Maven, but ensure it’s present. - Restart Command Prompt: Always close and reopen your command prompt after making environment variable changes.
- Restart Your Computer: In rare cases, a full system restart might be necessary for all environment variable changes to take effect system-wide.
Incorrect Java Version Detected or Java Not Found
If the mvn -version command shows an incorrect Java version or indicates that Java is not found, even though you believe it’s installed:
- Verify
JAVA_HOME: EnsureJAVA_HOMEis correctly set to your JDK’s root directory (not thebinfolder). - Check
PATHfor Java: Confirm that%JAVA_HOME%binis also included in your system’sPATHvariable. - Conflicting Java Installations: If you have multiple Java versions installed, ensure that the
JAVA_HOMEpoints to the desired version and that this version’sbindirectory is correctly prioritized in thePATH. Maven typically uses theJAVA_HOMEvariable first.
Firewall or Proxy Issues
If Maven fails to download dependencies from remote repositories:
- Internet Connection: Ensure your internet connection is stable.
- Firewall: Your corporate or personal firewall might be blocking Maven’s access to the internet. You may need to configure your firewall to allow Maven.
- Proxy Server: If you are behind a proxy server, you need to configure Maven to use it. This is typically done by adding proxy settings to your Maven
settings.xmlfile (located inMAVEN_HOMEconf). You can find detailed instructions on configuring proxies in the official Maven documentation.
Corrupted Download or Extraction
If you suspect the downloaded zip file is corrupted or the extraction was incomplete:
- Redownload: Download the Maven zip archive again from the official website.
- Re-extract: Delete the previously extracted Maven folder and extract the archive to a new location.
By systematically checking these points, you should be able to resolve most installation-related problems.
Next Steps: Using Maven in Your Projects
With Maven successfully installed on your Windows machine, you’re ready to leverage its capabilities. Here are a few immediate next steps:
- Create a New Maven Project: Use the command
mvn archetype:generateto create a new project using a Maven archetype (a project template). - Add Dependencies: Edit your
pom.xmlfile to add necessary libraries for your project. - Build Your Project: Use commands like
mvn clean installto compile, test, and package your project. - Explore Maven Plugins: Discover and integrate plugins to automate more tasks in your build lifecycle.
Mastering Maven is an ongoing process, but a correct installation is the foundation for efficient and scalable Java development. Happy coding!
aViewFromTheCave is a participant in the Amazon Services LLC Associates Program, an affiliate advertising program designed to provide a means for sites to earn advertising fees by advertising and linking to Amazon.com. Amazon, the Amazon logo, AmazonSupply, and the AmazonSupply logo are trademarks of Amazon.com, Inc. or its affiliates. As an Amazon Associate we earn affiliate commissions from qualifying purchases.