The allure of a fresh operating system, with its updated features, enhanced security, and improved performance, is undeniable. For users of the venerable MacBook Pro 2014, this desire might lead to a question: can this capable machine still embrace the latest from Apple, specifically macOS Monterey? The answer, as is often the case with technology, is nuanced. While Apple’s official support for macOS Monterey does not extend to the 2014 MacBook Pro, the vibrant and resourceful community of Mac enthusiasts has found ways to overcome these limitations. This guide will delve into the process, outlining the possibilities, the challenges, and the steps involved in breathing new life into your 2014 MacBook Pro with macOS Monterey.

This journey isn’t just about installing a new operating system; it’s a testament to the ingenuity within the tech community. It highlights how even hardware that has aged by modern standards can be coaxed into running cutting-edge software, provided there’s enough dedication and technical know-how. Beyond the purely technical, this endeavor also touches upon the concept of brand loyalty and how users continue to invest time and effort into ecosystems they believe in, even when official support wanes. Furthermore, for those who rely on their MacBook Pro for productivity and income, extending its lifespan can have a significant impact on their money management, saving them the expense of an immediate upgrade.
Understanding the Compatibility Landscape
Before we dive into the “how,” it’s crucial to understand the “why” behind the official limitations. Apple designs its operating system updates with specific hardware capabilities in mind. Newer macOS versions often leverage advanced hardware features, new drivers, and optimized performance that might not be present or fully supported in older machines. For the MacBook Pro 2014, officially, the highest macOS version it can natively run is macOS Big Sur.
However, the tech world is rarely confined by official dictates. The community has developed what are known as “patchers” – unofficial tools that modify macOS installers to allow them to run on unsupported hardware. These patchers work by injecting necessary drivers and code that trick the operating system into believing it’s running on compatible hardware. This process is not without its risks and demands a certain level of technical comfort.
Official vs. Unofficial Support
Official Support: Apple’s official support policy dictates which Mac models can run which macOS versions. This is generally based on hardware compatibility, driver availability, and Apple’s planned product lifecycle. For the MacBook Pro 2014, this officially caps out at macOS Big Sur. This means you can download and install Big Sur directly from the App Store without any special procedures.
Unofficial Support (Patching): For macOS Monterey and subsequent versions, users of unsupported Macs like the 2014 MacBook Pro turn to community-developed patchers. These tools are not endorsed by Apple and are created and maintained by dedicated developers who reverse-engineer the installation process. They enable users to install newer macOS versions on older hardware, unlocking features and security updates that would otherwise be inaccessible.
Why Bother with Unofficial Installations?
The motivation for pursuing an unofficial installation is multifaceted. Primarily, it’s about technology trends. Users want to experience the latest features, a modernized user interface, and the newest advancements in Apple’s software. Monterey, for instance, brought significant improvements in areas like FaceTime, Safari, and privacy controls, which can enhance productivity and user experience.
Secondly, it speaks to personal branding and the desire to maintain a cohesive digital experience. If your workflow, applications, or devices are heavily integrated with the latest macOS features, running an older, unsupported OS can create friction. Extending the life of your current hardware allows you to maintain that seamless integration.
Finally, and perhaps most pragmatically, it’s a matter of money. Upgrading to a new MacBook Pro can be a significant financial investment. For many, their 2014 MacBook Pro is still a perfectly capable machine for everyday tasks, web browsing, light to moderate productivity, and even some creative work. By successfully installing macOS Monterey, users can postpone the need for a costly hardware upgrade, thereby saving money and optimizing their financial resources. This is especially relevant for individuals running side hustles or small businesses where every dollar counts.
Preparing Your MacBook Pro for the Monterey Journey
Embarking on an unofficial macOS installation requires careful preparation. Unlike a standard macOS update, this process involves modifying the installer and potentially your system’s boot process. Skipping these steps can lead to installation failures, data loss, or an unstable system.
Essential Pre-Installation Steps
-
Backup Your Data: This is non-negotiable. Before you begin any unofficial installation, create a full backup of your MacBook Pro. Use Time Machine or a third-party backup solution to ensure you have a complete snapshot of your current system and all your important files. This backup will be your lifeline if anything goes wrong and you need to revert to your previous macOS version.
-
Check Specific Model Compatibility: Not all MacBook Pro 2014 models are created equal in the eyes of patchers. While the general year is stated, specific internal components can sometimes influence compatibility. Research which specific patcher is recommended for your particular MacBook Pro 2014 model. Websites dedicated to unofficial macOS installations often have detailed compatibility lists.
-
Gather Necessary Tools and Software:
- macOS Monterey Installer: You’ll need to download the macOS Monterey installer application. This can usually be obtained from Apple’s servers or through community-provided links.
- Patcher Tool: Identify the most reputable and up-to-date patcher for your hardware. Popular options include the OpenCore Legacy Patcher.
- USB Drive: A USB drive (16GB or larger is usually recommended) will be needed to create a bootable installer.
- Internet Connection: A stable internet connection is essential for downloading the macOS installer and potentially the patcher software.
-
Understand Your Current macOS Version: Knowing your current macOS version (e.g., Catalina, Mojave) can sometimes be helpful, as patcher instructions might vary slightly depending on the starting point.
Creating a Bootable USB Installer
This is a critical step in the patching process. A bootable USB drive will contain the modified macOS Monterey installer that can be booted on your unsupported hardware.
- Format the USB Drive: Open Disk Utility and format your USB drive as “Mac OS Extended (Journaled)” with a “GUID Partition Map.”
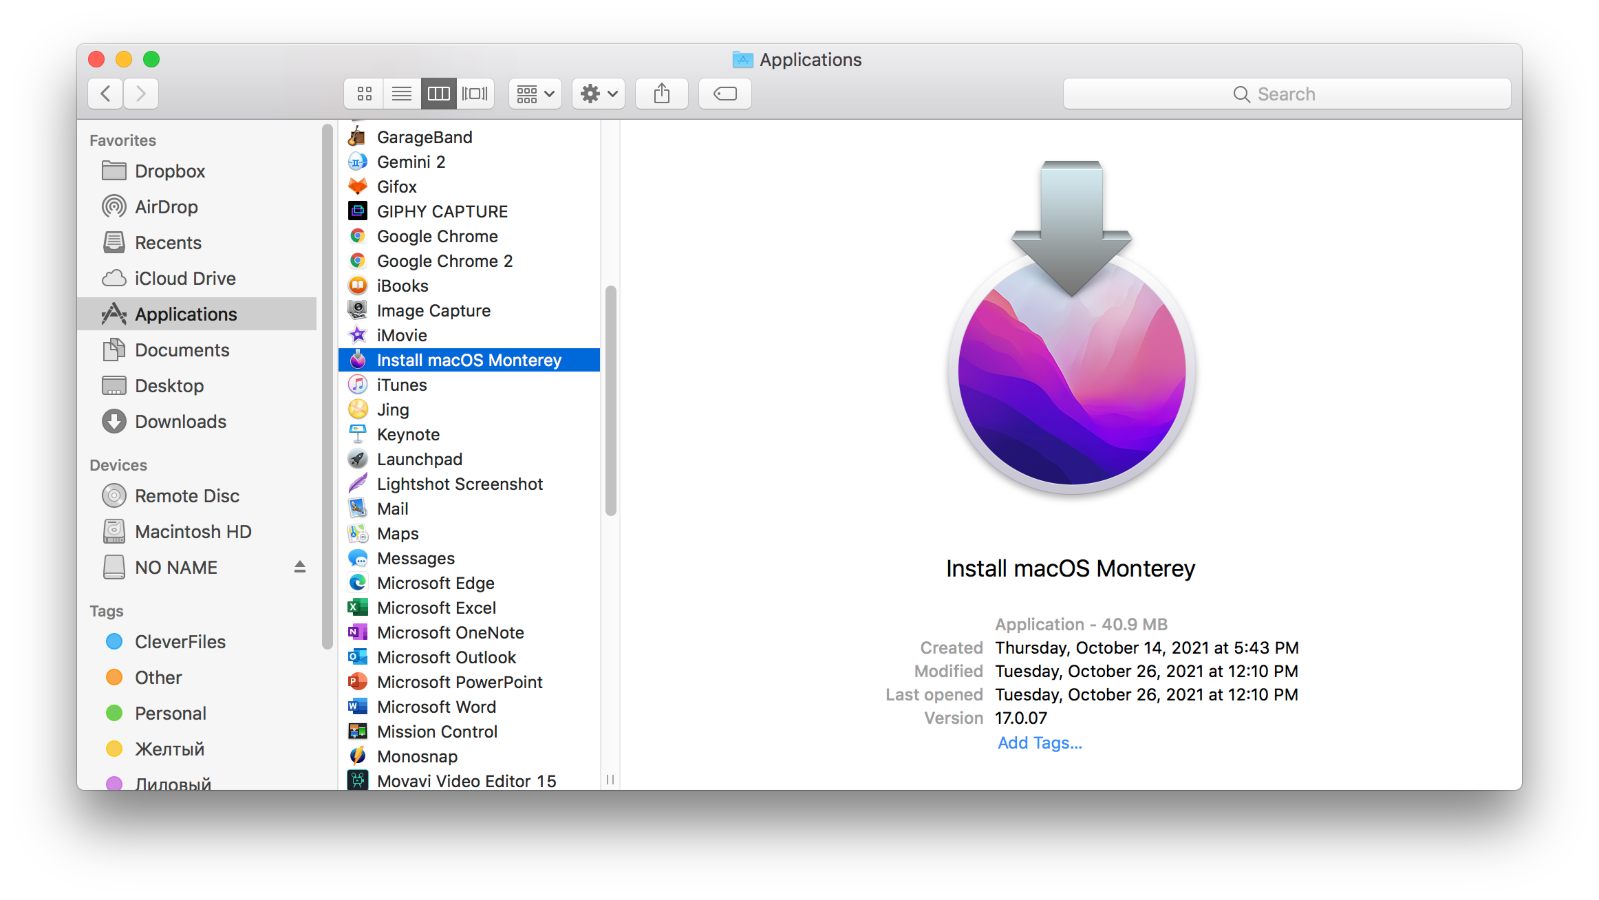
- Download the macOS Monterey Installer: Obtain the full macOS Monterey installer application.
- Use Terminal or the Patcher Tool: Most patcher tools provide a built-in function to create the bootable USB installer, simplifying the process significantly. Follow the specific instructions provided by your chosen patcher. This usually involves selecting the downloaded macOS installer and the formatted USB drive. The patcher will then inject the necessary files to make it compatible with your hardware.
The Installation Process: Guided Steps for Monterey
The installation of macOS Monterey on an unsupported Mac using a patcher involves several distinct phases. Each phase requires careful attention to detail.
Installing OpenCore and Booting the Installer
The OpenCore Legacy Patcher is a widely used tool for this purpose. Its goal is to create a bootable EFI environment that allows macOS to load on non-native hardware.
- Run the Patcher: Launch the OpenCore Legacy Patcher application on your Mac.
- Build and Install OpenCore: The patcher will guide you through building the OpenCore EFI files and then installing them onto your prepared bootable USB drive. This creates the bootloader that will enable your Mac to start the Monterey installer.
- Boot from USB: Restart your MacBook Pro and hold down the Option (Alt) key immediately after you hear the startup chime. This will bring up the Startup Manager. Select your USB drive (which will likely be labeled something like “EFI Boot” or similar) as the boot device.
- Launch the macOS Installer: The OpenCore boot menu will appear. Select the option to boot the macOS Monterey installer from your USB drive.
Installing macOS Monterey
Once the installer boots, the process becomes more similar to a standard macOS installation, with a few crucial differences.
- Disk Utility: Before installing, you’ll likely need to use Disk Utility (accessible from the macOS Utilities window that appears after booting the installer) to format your internal drive. Ensure you format it as APFS with a GUID Partition Map. Remember, this will erase all data on your internal drive, which is why a backup is paramount.
- Proceed with Installation: Select “Install macOS Monterey” from the utilities window and follow the on-screen prompts. Choose your internal drive as the destination.
- Post-Installation: After the initial installation completes, your Mac will restart. You’ll need to boot from the USB drive again and select the “Install macOS Monterey” option from the OpenCore menu, but this time, choose your internal drive as the target. This finalizes the installation and installs the necessary EFI files onto your internal drive’s EFI partition.
Post-Installation Configuration and Drivers
The installation is not truly complete until all necessary drivers and patches are applied to your internal drive.
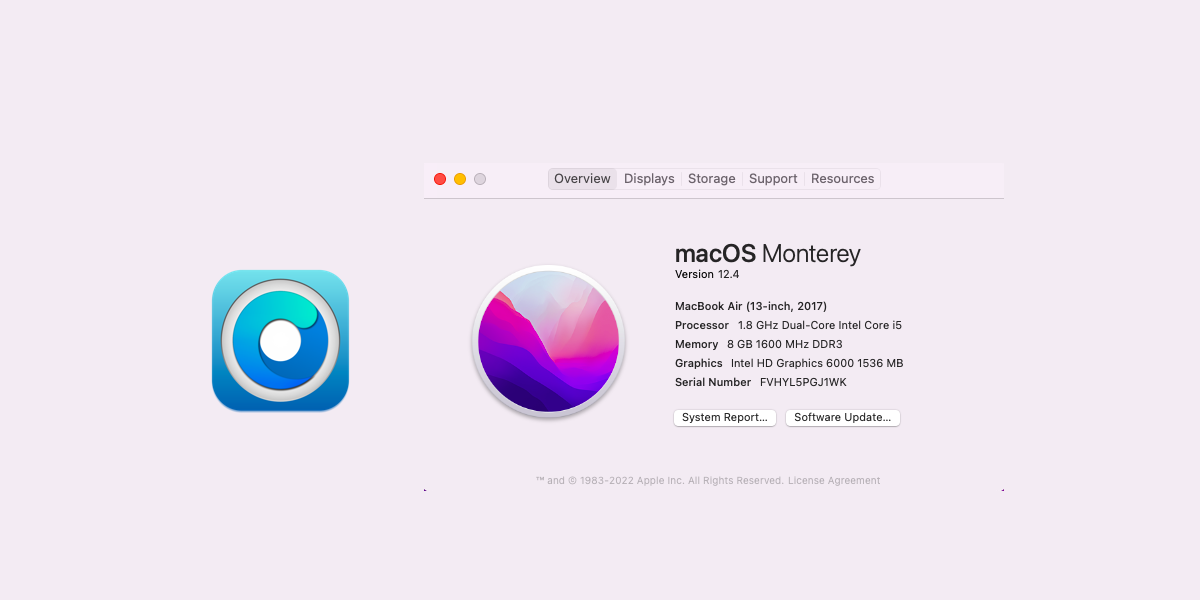
- Run the Patcher Again: After booting into macOS Monterey from your internal drive, you will need to run the OpenCore Legacy Patcher application again.
- “Post-Install Root Patch”: Within the patcher application, there will be an option to apply “Post-Install Root Patches” or “Update macOS.” This step is vital for injecting all the necessary drivers for graphics, Wi-Fi, Bluetooth, audio, and other hardware components that are not natively supported by Monterey on your 2014 MacBook Pro. Follow the prompts carefully. This process may require additional reboots.
- Testing and Troubleshooting: Once all patches are applied, test all your hardware components. Check if Wi-Fi, Bluetooth, audio, webcam, keyboard, and trackpad are functioning correctly. If any component is not working, consult the documentation and community forums for your specific patcher for troubleshooting steps or potential workarounds.
Maintaining and Troubleshooting Your Monterey MacBook Pro
Running an unofficial macOS installation is an ongoing commitment. While it can be incredibly rewarding, it also means you’ll need to be more proactive in maintaining your system and addressing any issues that may arise.
Staying Updated and Managing Issues
- Software Updates: Be cautious with Apple’s automatic software updates. Major macOS updates might overwrite the patches you’ve installed, rendering your system unstable or unbootable. It’s generally recommended to disable automatic updates and manually research whether a particular update is safe to install after confirming community consensus and potential patcher compatibility. Minor security updates might be safer, but always proceed with caution.
- Patcher Updates: Keep your chosen patcher tool updated. Developers are constantly working to improve compatibility and fix bugs for newer macOS versions and evolving hardware.
- Community Support: The communities that develop and support these patchers are invaluable resources. If you encounter an issue, search their forums and Discord servers. Chances are, someone else has faced a similar problem and found a solution.
- Troubleshooting Common Problems:
- Wi-Fi/Bluetooth Issues: Often resolved by re-running the post-install root patches.
- Graphics Glitches: Can sometimes be fixed by specific graphics patches available through the patcher.
- Performance Degradation: While Monterey brings improvements, older hardware might struggle with certain features. Consider disabling visual effects or running lighter applications.
- Boot Failures: If your Mac fails to boot, booting from the USB installer and running the patcher again to re-apply OpenCore or post-install patches is usually the first step.
Weighing the Benefits Against the Risks
The decision to install macOS Monterey on your MacBook Pro 2014 is a personal one, balancing the desire for modern features against the inherent risks of unsupported installations.
-
Benefits:
- Access to the latest macOS features and UI enhancements.
- Improved security through newer security patches.
- Extended hardware lifespan, saving money on new purchases.
- A sense of accomplishment and technical learning.
- Maintaining workflow continuity with newer software.
-
Risks:
- Potential for system instability and crashes.
- Hardware components (like Wi-Fi or audio) may not function correctly.
- Voiding any remaining Apple warranty (though unlikely on a 2014 model).
- Complexity of the installation and maintenance process.
- Apple is unlikely to provide direct support for issues encountered.
For users who are technically inclined, have a strong backup strategy, and are willing to invest time in learning and troubleshooting, installing macOS Monterey on a MacBook Pro 2014 can be a highly rewarding way to extend the life of their beloved machine and enjoy the benefits of a modern operating system. It’s a powerful example of how the tech community empowers users to push the boundaries of what’s officially supported, demonstrating a commitment to longevity and resourcefulness that resonates across the brand and money aspects of owning and using technology.
aViewFromTheCave is a participant in the Amazon Services LLC Associates Program, an affiliate advertising program designed to provide a means for sites to earn advertising fees by advertising and linking to Amazon.com. Amazon, the Amazon logo, AmazonSupply, and the AmazonSupply logo are trademarks of Amazon.com, Inc. or its affiliates. As an Amazon Associate we earn affiliate commissions from qualifying purchases.