
Minecraft, a game that has captivated millions with its infinite creative possibilities, owes a significant part of its enduring appeal to the vibrant modding community. Among the plethora of tools available to enhance the building experience, Litematica stands out as a revolutionary mod designed to streamline and simplify complex construction projects. Whether you’re a seasoned architect aiming to replicate real-world structures, a meticulous planner designing grand castles, or a newcomer looking to refine your building techniques, Litematica can be an invaluable asset. This guide will walk you through the process of installing Litematica, ensuring you can harness its power for your next Minecraft masterpiece.
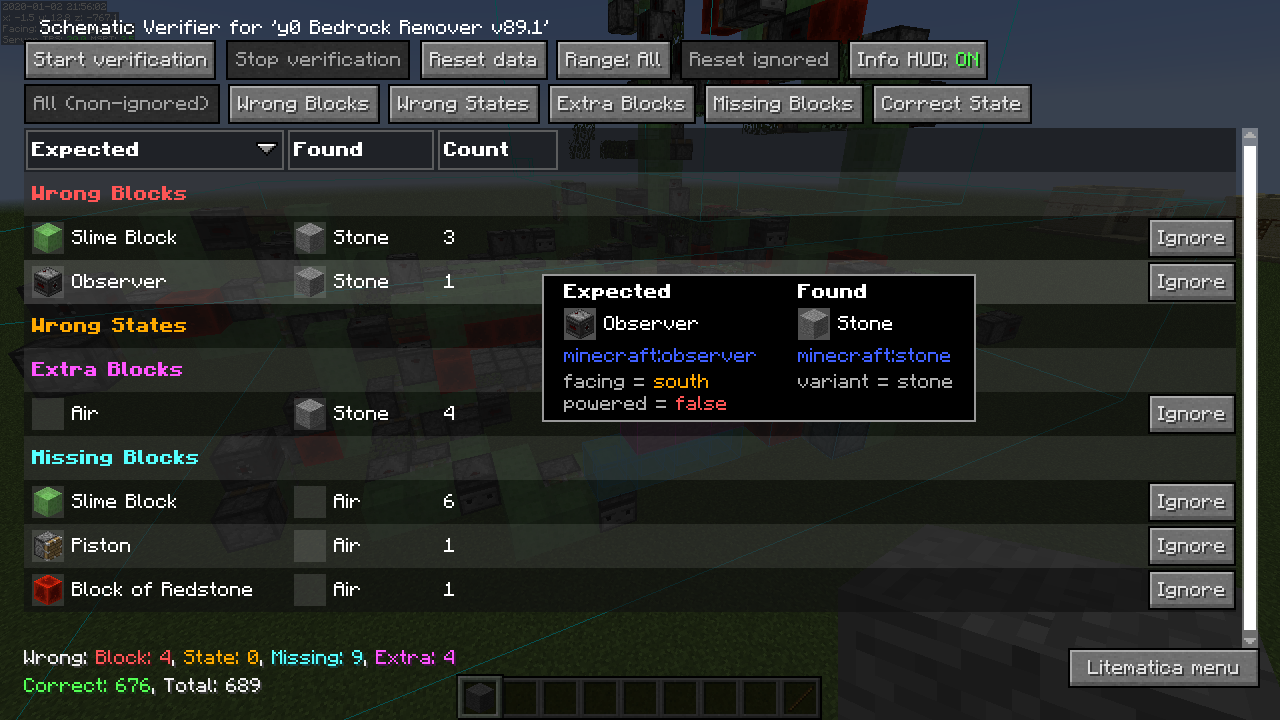
Litematica isn’t just another mod; it’s a sophisticated blueprint and schematic tool that allows players to create, import, and overlay detailed building plans directly within their Minecraft world. This means you can meticulously plan out a structure in advance, then have Litematica guide you block by block as you build, greatly reducing errors and saving immense amounts of time. It supports both vanilla Minecraft and Forge modded environments, making it accessible to a wide range of players. Understanding how to install and utilize this powerful tool is the first step towards unlocking a new level of building efficiency and creativity in Minecraft.
Understanding Litematica’s Functionality and Prerequisites
Before diving into the installation process, it’s crucial to grasp what Litematica does and what you’ll need to have in place. At its core, Litematica allows you to save a selection of blocks as a “schematic” file. This schematic can then be loaded back into Minecraft, enabling you to see a ghost-like overlay of the structure you want to build, alongside detailed information about the materials required and the blocks to be placed. This feature is particularly useful for large-scale projects, intricate designs, or when collaborating with others, as it ensures consistency and accuracy.
The primary use cases for Litematica include:
- Replicating Structures: Import existing schematics to build famous landmarks, real-world buildings, or complex contraptions.
- Planning Future Builds: Create your own schematics to map out future projects, allowing for precise planning and resource management.
- Assisted Building: The overlay feature guides you block by block, making it easier to build complex shapes and patterns without constant reference to external plans.
- Material Calculation: Litematica can automatically tell you how many of each block type you’ll need to complete a schematic.
- Version Compatibility: Litematica is designed to work with specific versions of Minecraft and Forge. It’s essential to ensure compatibility to avoid issues.
Essential Prerequisites for Installation
To successfully install Litematica, you’ll need a few key components already set up on your system. These are standard requirements for most Minecraft mods and ensure a smooth installation experience.
Minecraft Installation
Firstly, you must have a working installation of Minecraft Java Edition. Litematica is a mod for this version of Minecraft. Ensure you have the game installed and can launch it through the official Minecraft Launcher.
Minecraft Forge or Fabric Loader
Litematica, like many other Minecraft mods, requires a mod loader. The two most popular mod loaders are Forge and Fabric. Litematica supports both, but you will need to choose one and install it before proceeding.
- Forge: Forge is a long-standing and widely adopted modding API for Minecraft. It’s known for its extensive compatibility with a vast array of mods. If you plan to use many other mods that are primarily built for Forge, this is usually the preferred choice.
- Fabric: Fabric is a newer, lighter, and more modular modding toolchain. It’s known for its speed and up-to-date support for the latest Minecraft versions. If your primary focus is on performance and using mods that are specifically developed for Fabric, this might be your preference.
The installation process for Forge or Fabric is generally straightforward. You typically download an installer from their official websites, run it, and select the “Install Client” option. This will create a new profile in your Minecraft Launcher that you can select to run your game with the chosen mod loader.
Java Development Kit (JDK)
While often not explicitly mentioned for end-users, having a compatible Java Development Kit (JDK) installed on your system is a fundamental requirement for running Minecraft and its mods. Minecraft Java Edition runs on Java. Ensure you have a recent and compatible version of the JDK installed. You can download the JDK from Oracle or use an open-source alternative like Adoptium (Temurin).
Installing Litematica: Step-by-Step Guide
With the prerequisites in place, you are ready to proceed with the installation of Litematica itself. The process is remarkably similar whether you are using Forge or Fabric as your mod loader.
Downloading Litematica
The first step is to download the Litematica mod file. It’s crucial to download it from a reputable source to avoid malware or outdated versions. The most reliable place to find Litematica is its official CurseForge page or its GitHub repository.
- Navigate to the Official Source: Search for “Litematica CurseForge” or “Litematica GitHub” online. You will typically find a dedicated page for the mod.
- Select the Correct Minecraft Version: On the mod’s page, you will see different download options. It is absolutely critical to download the version of Litematica that corresponds to your installed Minecraft version and your chosen mod loader (Forge or Fabric). For example, if you are playing Minecraft 1.19.2 with Forge, you need to download the Litematica file specifically for 1.19.2 and Forge.
- Download the Mod File: Click on the download link for the appropriate version. This will download a
.jarfile. This is the mod file you need.
Installing the Mod into Your Minecraft Directory
Once you have the .jar file, you need to place it in the correct folder within your Minecraft installation.
-
Locate Your Minecraft
.minecraftFolder:- Windows: Press
Windows Key + R, type%appdata%, and press Enter. This will open the roaming folder, and you should see a.minecraftfolder. - macOS: Open Finder, click “Go” in the menu bar, then “Go to Folder…”, and type
~/Library/Application Support/minecraft. - Linux: The
.minecraftfolder is usually located in your home directory, under.minecraft.
- Windows: Press
-
Find the
modsFolder: Inside your.minecraftfolder, you will find various subfolders. Look for a folder namedmods. If this folder doesn’t exist, you may need to create it manually. Make sure it’s spelled correctly. -
Place the Litematica
.jarFile: Drag and drop the Litematica.jarfile you downloaded into themodsfolder.
Launching Minecraft with Litematica
After placing the mod file, the final step is to launch Minecraft and verify that Litematica is installed correctly.
- Open the Minecraft Launcher: Launch your Minecraft Launcher.
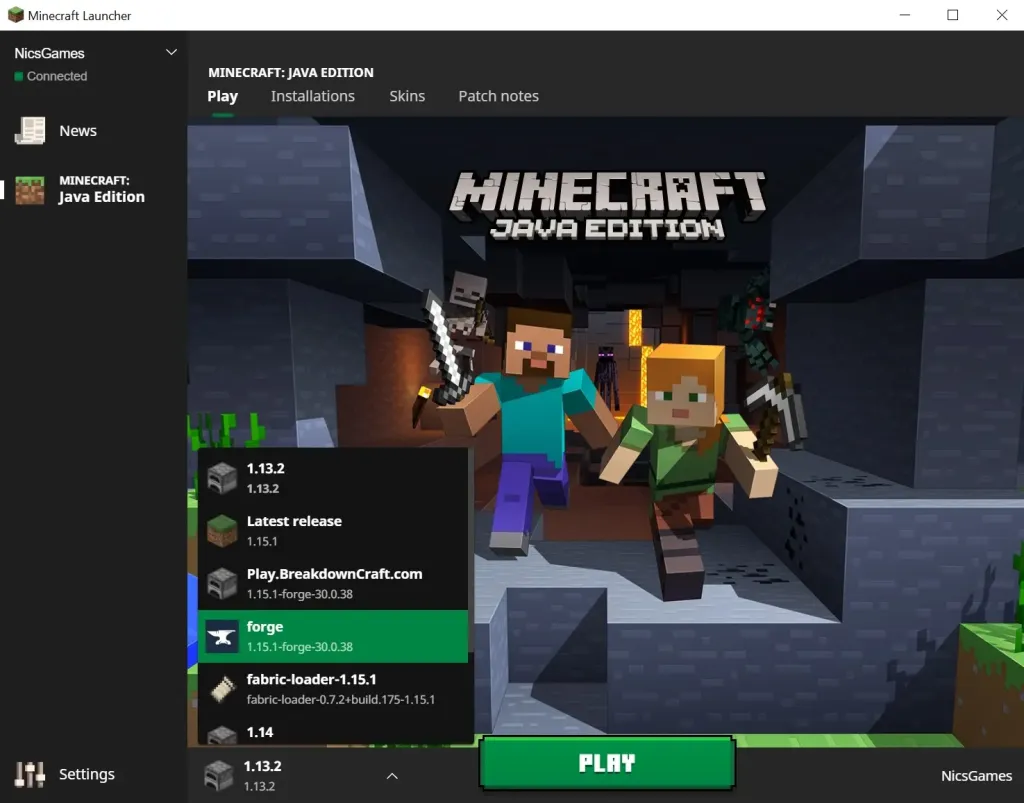
- Select Your Modded Profile: In the launcher’s “Installations” tab, or directly from the game launch screen, select the Forge or Fabric profile you created earlier.
- Launch the Game: Click the “Play” button.
Minecraft will now load with your selected mod loader and any mods placed in the mods folder. If Litematica is installed correctly, you won’t see any immediate on-screen changes until you activate it in-game.
Activating and Using Litematica in Minecraft
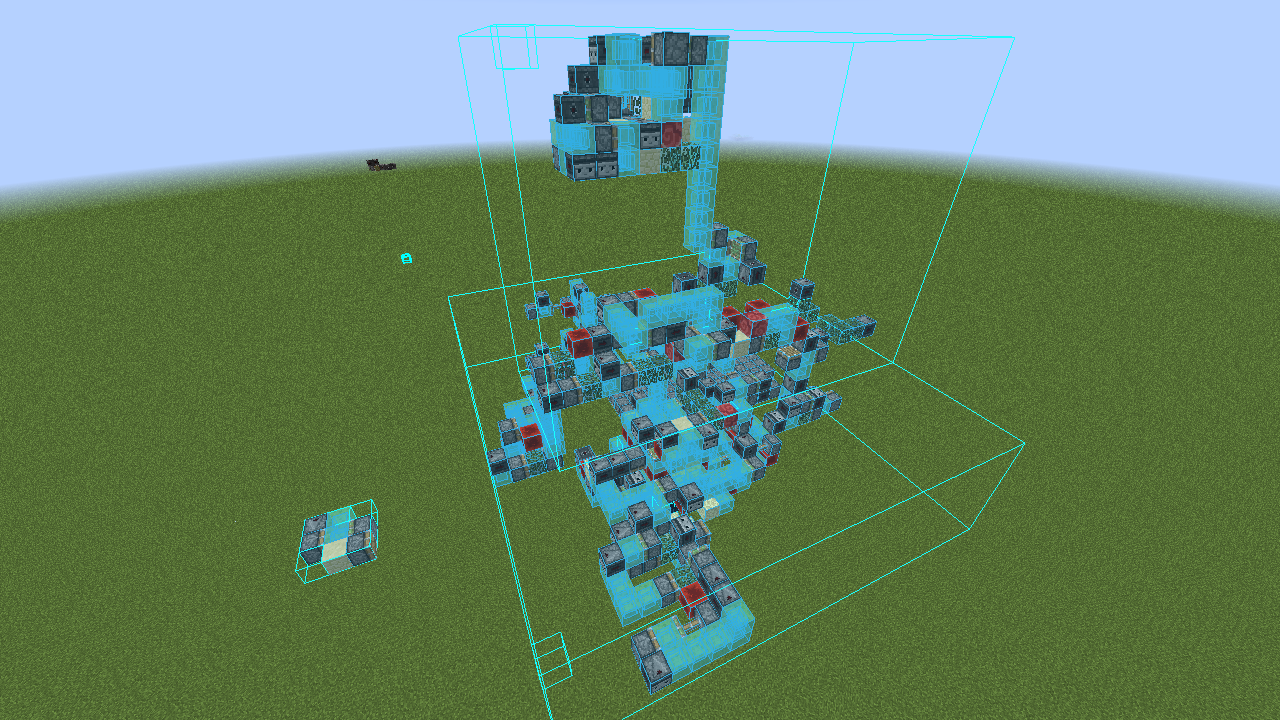
Once you’ve successfully launched Minecraft with Litematica installed, you’ll need to learn how to activate and use its features within the game. Litematica is controlled via in-game keybinds and a graphical user interface (GUI).
Accessing the Litematica Menu
The primary way to interact with Litematica is through its main menu.
- Open the Litematica Menu: By default, the keybind to open the Litematica menu is
Ctrl + M(Left Control + M). Pressing this combination will bring up the Litematica GUI, where you can manage your schematics, adjust settings, and access various tools.
Key In-Game Controls and Features
Within the Litematica menu and during gameplay, several keybindings and features are essential for effective use:
Ctrl + M: Opens the main Litematica menu.Shift + F10: Toggles the schematic overlay on/off. This is how you visualize your blueprint in the world.Shift + F7: Toggles the material list on/off. This displays the blocks required for the current schematic.Shift + F8: Toggles the build tool on/off. The build tool is crucial for placing blocks according to the schematic.Left Click(while holding the build tool): Places a block.Right Click(while holding the build tool): Removes a block (useful for correcting mistakes).Scroll Wheel(while holding the build tool): Cycles through different placement modes (e.g., placing all missing blocks, placing only a specific type).
Creating and Managing Schematics
The core functionality of Litematica revolves around creating and managing schematics.
Creating a New Schematic
- Define a Region: In-game, you’ll use a “selection tool” (which you can bind a key to, or access via the menu) to select the area you want to save as a schematic. Typically, you right-click to set the first corner and then right-click again at the opposite corner to define the bounding box of your build.
- Save the Schematic: Once the region is defined, open the Litematica menu (
Ctrl + M), navigate to the “Schematics” tab, and click the “Save Selection” button. You will be prompted to enter a name for your schematic. - Store Location: Schematics are usually saved in a
schematicsfolder within your.minecraftdirectory.
Importing and Loading Schematics
You can also import schematics created by others or previously saved by you.
- Place Schematic File: Ensure the
.litematicaschematic file is placed in theschematicsfolder within your.minecraftdirectory. - Load from Menu: Open the Litematica menu (
Ctrl + M), go to the “Schematics” tab, and click the “Load Schematic” button. Browse to find your schematic file and select it. - Activate Overlay: Once loaded, select the schematic from the list and click “Place Schematic” to begin the process of overlaying it onto your world.
Using the Build Tool
The build tool is where Litematica truly shines as an assistant. When the schematic overlay is active, and the build tool is enabled (Shift + F8), you can see precisely where each block needs to go.
- Material Requirements: The material list (
Shift + F7) will show you what blocks you need. - Guided Placement: As you approach a location where a block is needed, Litematica will highlight it. By holding down the build tool key (usually left-click), you will place the correct block. This is invaluable for complex patterns, precise alignments, and large-scale constructions, ensuring perfect replication of your planned design.
By familiarizing yourself with these controls and features, you’ll be well on your way to mastering Litematica and elevating your Minecraft building projects to unprecedented heights of precision and efficiency.
Troubleshooting Common Installation and Usage Issues
While the installation process for Litematica is generally straightforward, like any software, you might occasionally encounter issues. Understanding common problems and their solutions can save you time and frustration.
Common Installation Problems
-
Litematica Not Appearing in the Game:
- Cause: Incorrect Minecraft version, incorrect mod loader version, mod file in the wrong folder, or a corrupted mod file.
- Solution: Double-check that the Litematica version matches your Minecraft version exactly. Ensure you downloaded the correct
.jarfile for either Forge or Fabric. Verify that the.jarfile is in themodsfolder within your.minecraftdirectory. Try re-downloading the Litematica mod file from its official source.
-
Minecraft Crashing on Startup:
- Cause: Mod conflicts with other installed mods, incompatible mod loader version, or issues with the Java installation.
- Solution: If you have other mods installed, try launching Minecraft with only Litematica. If it works, you’ve identified a mod conflict. You’ll need to find compatible versions of the conflicting mods or remove one of them. Ensure your Forge/Fabric loader is up-to-date and compatible with your Minecraft version. Make sure you have a compatible JDK installed.
-
Mod Loader Profile Not Appearing in Launcher:
- Cause: Incorrect installation of Forge or Fabric.
- Solution: Re-run the Forge or Fabric installer and ensure you select “Install Client.” Check that you are launching the correct profile from the “Installations” tab in the Minecraft Launcher.
Common Usage Problems
-
Schematic Overlay Not Displaying:
- Cause: Schematic not loaded correctly, overlay is toggled off, or a configuration issue.
- Solution: Ensure you have loaded a schematic through the Litematica menu (
Ctrl + M). PressShift + F10to ensure the overlay is toggled on. Check Litematica’s configuration settings within the menu for any display-related options.
-
Build Tool Not Placing Blocks Correctly:
- Cause: Incorrect build tool mode, insufficient materials, or issues with block placement permissions.
- Solution: Cycle through the build tool placement modes using your scroll wheel. Ensure you have the necessary blocks in your inventory. If playing on a server, ensure you have permission to build in that area.
-
“Invalid Schematic” Error:
- Cause: Corrupted schematic file or a schematic created with a significantly different version of Litematica or Minecraft.
- Solution: Re-download or re-export the schematic file. Try using a schematic that is known to be compatible with your current Minecraft and Litematica versions.
Seeking Further Assistance
If you encounter persistent issues, the best resources for help are:
- Litematica’s Official GitHub/CurseForge Page: Look for an “Issues” or “Support” section. This is where developers and community members often discuss and resolve problems.
- Minecraft Modding Communities: Websites like Reddit (e.g., r/feedthebeast for Forge, r/fabricmc for Fabric) and dedicated Minecraft forums are excellent places to ask for help. Provide detailed information about your Minecraft version, mod loader, Litematica version, and the specific error you are experiencing.
By following these troubleshooting steps, you can resolve most common issues and enjoy the full benefits of Litematica for your Minecraft building endeavors.
In conclusion, Litematica is an indispensable tool for any serious Minecraft builder. By carefully following the installation steps and understanding its core functionalities, you can significantly enhance your building efficiency, precision, and creative potential. Whether you’re recreating monumental structures or devising intricate contraptions, Litematica provides the guidance and control necessary to bring your visions to life block by block. Happy building!
aViewFromTheCave is a participant in the Amazon Services LLC Associates Program, an affiliate advertising program designed to provide a means for sites to earn advertising fees by advertising and linking to Amazon.com. Amazon, the Amazon logo, AmazonSupply, and the AmazonSupply logo are trademarks of Amazon.com, Inc. or its affiliates. As an Amazon Associate we earn affiliate commissions from qualifying purchases.