
The transition from traditional incandescent lighting to Light Emitting Diode (LED) technology represents one of the most significant shifts in hardware efficiency and consumer electronics over the last two decades. However, in the contemporary “Smart Home” era, installing LED lights is no longer just a matter of manual labor and basic circuitry; it is an integration of hardware engineering, software configuration, and Internet of Things (IoT) networking.
Whether you are implementing bias lighting for a high-end workstation, architectural accents for a server room, or automated environmental lighting, the process requires a technical understanding of power distribution, signal protocols, and ecosystem compatibility. This guide explores the professional-grade methodology for selecting, installing, and optimizing modern LED systems.

1. Hardware Architecture: Selecting the Right Tech Stack
Before a single strip is adhered to a surface, a technician or enthusiast must understand the underlying technology of the LED hardware. Not all LEDs are created equal, and the “Tech” niche demands a focus on the components that drive performance and longevity.
Understanding LED Strip Variants: RGB vs. RGBIC
The most critical technical choice lies in the controller-to-LED communication. Standard RGB (Red, Green, Blue) strips allow for a single color to be displayed across the entire strip at once because all LEDs share the same control signal. In contrast, RGBIC (Independent Control) technology utilizes an integrated circuit (IC) for every individual segment. This allows for complex animations, “chasing” effects, and granular control that is essential for high-tech aesthetic setups.
Power Requirements and Voltage Drop
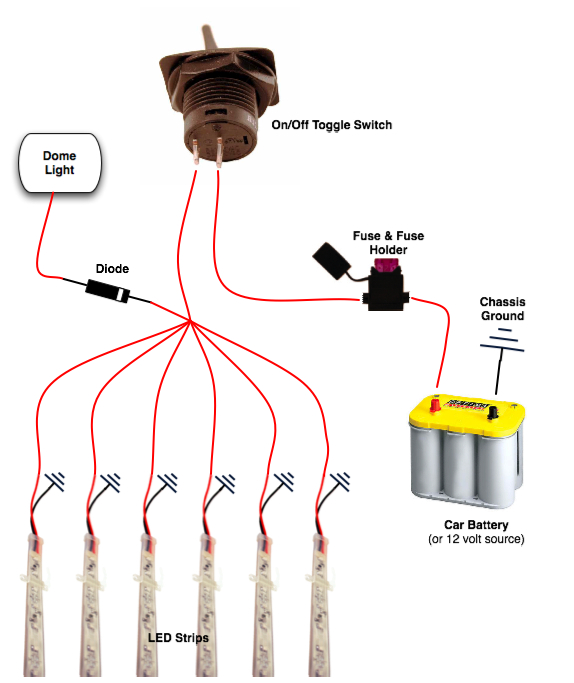
From a technical perspective, power management is where most DIY installations fail. LED strips typically operate on 5V, 12V, or 24V DC.
- 5V Systems: Often USB-powered, ideal for short runs like monitor backlighting.
- 12V/24V Systems: Required for longer runs to combat “voltage drop”—a phenomenon where the resistance of the copper traces causes the LEDs at the end of the strip to appear dimmer or a different color than those at the start. For professional installations exceeding five meters, injecting power at both ends of the strip is a technical necessity to maintain signal and brightness integrity.
Connectivity Protocols: Wi-Fi, Zigbee, and Matter
Choosing how your lights communicate with your network is a core architectural decision.
- Wi-Fi: Convenient but can congest a 2.4GHz network if dozens of strips are installed.
- Zigbee/Z-Wave: Requires a hub (like a Homey or Aeotec) but offers a mesh network that doesn’t tax your router.
- Matter: The latest industry standard in smart home tech. If you are building a future-proof system, selecting Matter-compatible LED controllers ensures interoperability between Apple HomeKit, Google Home, and Amazon Alexa without proprietary bridges.
2. Technical Installation and Physical Configuration
The physical installation of LED technology is a bridge between electrical engineering and interior design. Precision in this stage ensures that the hardware operates within its thermal limits and provides a seamless digital experience.
Mapping the Circuitry and Signal Path
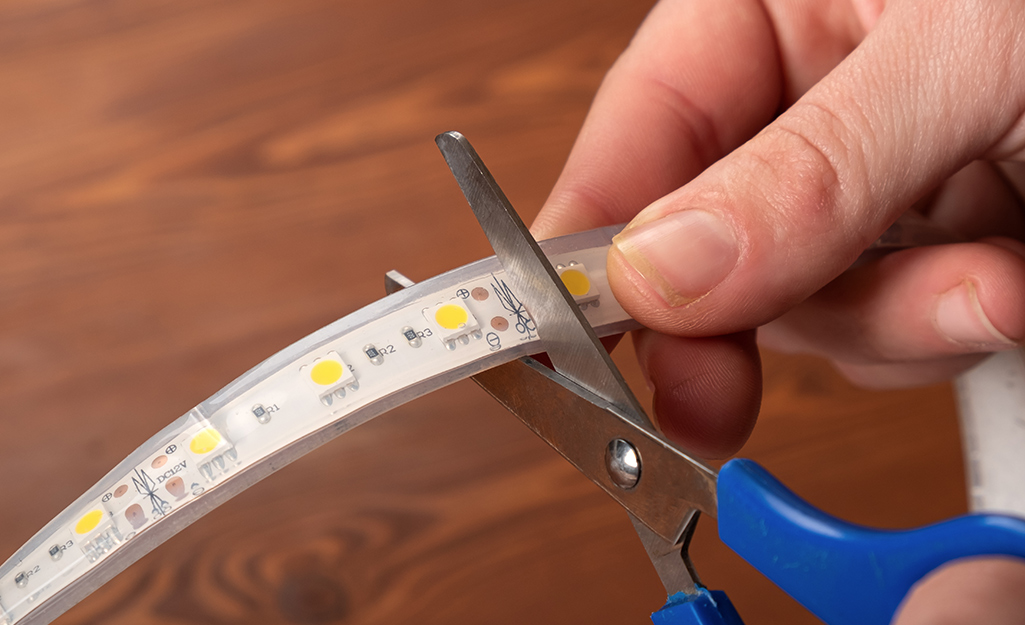
Every installation should begin with a digital or physical map of the signal path. For smart LED strips, the “controller” is the brain. It must be positioned within optimal range of your wireless access point while remaining accessible for hard resets. When cutting LED strips, it is imperative to cut only at the designated copper pads. Damaging the internal traces can lead to “dead zones” or short circuits that can fry the onboard ICs.
Thermal Management and Aluminum Channels
One of the most overlooked aspects of LED tech is heat dissipation. While LEDs are more efficient than bulbs, high-density strips (like COB – Chip on Board LEDs) generate significant heat. Installing these strips inside aluminum channels serves two technical purposes:
- Heat Sinking: The metal acts as a passive radiator, extending the lifespan of the LEDs and the adhesive.
- Diffusion: It houses a frosted lens that diffuses the individual “hot spots” of light into a continuous, professional-grade beam, which is essential for tech-focused environments where glare on screens must be minimized.
Solderless Connectors vs. Soldering
For a robust technical setup, soldering remains the gold standard for connectivity. It ensures the lowest resistance and the most secure physical bond. However, for those prioritizing rapid deployment, high-quality “clip-on” solderless connectors have evolved. When using these, ensure they are rated for the specific amperage of your strip to avoid melting the plastic housing under high load.
3. Software Integration, Automation, and Ecosystem Pairing
The “Smart” in Smart LEDs comes from the software layer. Once the hardware is physically installed, the focus shifts to firmware, API integration, and automated routines.
Firmware Updates and Initial Calibration
Upon powering up the system, the first step is often a firmware update via the manufacturer’s app (such as Govee Home, Philips Hue, or WLED). This ensures the controller has the latest security patches and color-rendering algorithms. Calibration is equally vital; this involves setting the “color temperature” to match other displays in your room, ensuring that your 6500K “Daylight” setting on your monitor matches the 6500K output of your LEDs.
Developing Custom Scenes and API Integration
Advanced users often bypass basic app presets in favor of custom scripts. Using platforms like Home Assistant or specialized software like WLED (an open-source web server for ESP8266/ESP32 boards), you can create complex lighting “scenes.”
- Webhooks: You can set your LEDs to flash red if your server’s CPU temperature exceeds a certain threshold.
- Screen Mirroring: Using software like “Prismatik” or “Hue Sync,” the LEDs can analyze the video output of your GPU in real-time to extend the colors of your screen onto the wall, reducing eye strain and increasing immersion.
Voice Assistant Synchronization and Hub Management
Integrating the lights into a centralized hub allows for macro-automations. For instance, a “Focus Mode” routine could simultaneously dim the overhead lights, turn the LED strips to a low-blue-light warm amber, and launch a specific productivity app on your desktop. This level of synchronization is what separates a simple “light strip” from a sophisticated smart home component.
4. Troubleshooting and IoT Security Protocols
As with any network-connected hardware, LED installations come with technical challenges and security risks that must be managed.
Resolving Connectivity and Signal Interference
If your LEDs are flickering or unresponsive, the issue is often digital rather than electrical.
- 2.4GHz Overcrowding: Many smart LEDs use the 2.4GHz band. If your router is overwhelmed, consider changing the Wi-Fi channel or moving the LED controller away from other high-interference devices like microwaves.
- Controller Rebooting: If the strip turns off during high-brightness white light, the power supply (PSU) likely isn’t providing enough Amps, causing the controller to brown out and reboot. Calculating the total wattage (Length of strip x Watts per meter) is the technical solution here.
Securing Your IoT Network
Smart LEDs are often the “weakest link” in digital security. Many budget controllers have hardcoded credentials or unencrypted communication paths. To secure your installation:
- VLAN Isolation: If your router supports it, place all smart lighting and IoT devices on a separate Virtual Local Area Network (VLAN). This prevents a compromised light strip from providing a gateway to your primary computer or NAS (Network Attached Storage).
- Disable Cloud Polling: Where possible, use local control protocols (like Zigbee or local API) to ensure that your lights continue to function even if the manufacturer’s servers go offline, and to keep your data within your own four walls.
Conclusion: The Future of Ambient Technology
Installing LED lights in a tech-centric world is an exercise in blending physics with software. By moving beyond the “plug-and-play” mindset and embracing technical concepts like voltage injection, aluminum thermal management, and Matter-compliant ecosystems, you transform a simple light source into a responsive, integrated piece of technology.
As we move toward “Ambient Intelligence,” where our environments react to our presence and digital needs, the humble LED strip remains the primary visual interface for the modern smart home. Proper installation today ensures a scalable, secure, and visually stunning digital environment for years to come.
aViewFromTheCave is a participant in the Amazon Services LLC Associates Program, an affiliate advertising program designed to provide a means for sites to earn advertising fees by advertising and linking to Amazon.com. Amazon, the Amazon logo, AmazonSupply, and the AmazonSupply logo are trademarks of Amazon.com, Inc. or its affiliates. As an Amazon Associate we earn affiliate commissions from qualifying purchases.