
In today’s digital landscape, understanding how to manage and utilize ISO files is a fundamental skill for anyone engaging with software, operating systems, or even specific applications. An ISO file, often referred to as an ISO image, is a single archive file that contains the complete contents of an optical disc, such as a CD or DVD. This format is incredibly useful for distributing software, operating systems, and backups, as it preserves the exact structure and data of the original disc.
While the concept might sound technical, installing and using an ISO file is a straightforward process, accessible to users of all skill levels. This guide will walk you through everything you need to know, from what an ISO file is to the various methods you can employ to install or utilize its contents. We’ll cover the most common scenarios, whether you’re looking to install a new operating system, run a specific application, or even create bootable media.
Our journey will be structured to provide a clear and logical understanding, ensuring you can confidently navigate the process. We’ll begin by demystifying the ISO file itself, then delve into the practical steps for installation and usage across different operating systems.
Understanding the ISO File: More Than Just a Digital Disc
Before we dive into the “how,” let’s clarify the “what.” An ISO file is essentially a perfect replica of an optical disc’s file system and data. Think of it as a digital snapshot. When you “burn” an ISO file to a CD or DVD, you’re creating an exact duplicate of the original disc. This makes them incredibly versatile for a multitude of purposes.
Why Use ISO Files?
The widespread adoption of ISO files stems from several key advantages:
- Distribution Efficiency: Software developers and operating system creators often distribute their products as ISO files. This allows for a single, self-contained package that can be easily downloaded and then used to install the software on multiple machines.
- Backup and Archiving: You can create ISO images of your existing CDs and DVDs to serve as backups. This protects your valuable data and software from physical damage or loss. If your physical disc gets scratched or lost, you still have a usable copy.
- Virtualization: ISO files are crucial for virtual machine software. When setting up a virtual operating system, you typically point the virtual machine software to an ISO file of the operating system installer. This allows the virtual machine to “boot” from the ISO as if it were a physical disc.
- Bootable Media Creation: ISO files are the foundation for creating bootable USB drives or DVDs. These are essential for installing operating systems on new computers, troubleshooting existing systems, or running specialized diagnostic tools.
Common Uses for ISO Files
You’ll frequently encounter ISO files when:
- Installing Operating Systems: This is perhaps the most common use. Whether it’s a fresh installation of Windows, macOS, or a Linux distribution, you’ll often download an ISO file.
- Installing Software: Many larger software suites or games are distributed as ISO files.
- Running Older Software or Games: Some older applications or games were designed to run from a CD/DVD. An ISO allows you to emulate this experience on modern computers without a physical drive.
- Creating System Restore Points or Backups: Advanced users might create ISO images of their system partitions for robust backup solutions.
Installing and Utilizing ISO Files on Windows
Windows has evolved significantly in its handling of ISO files. Modern versions of Windows offer built-in functionality that makes working with ISOs simpler than ever.
Mounting an ISO File in Windows
“Mounting” an ISO file essentially makes it appear as a virtual drive on your computer. This means your system will recognize it as if you had inserted a physical CD or DVD.
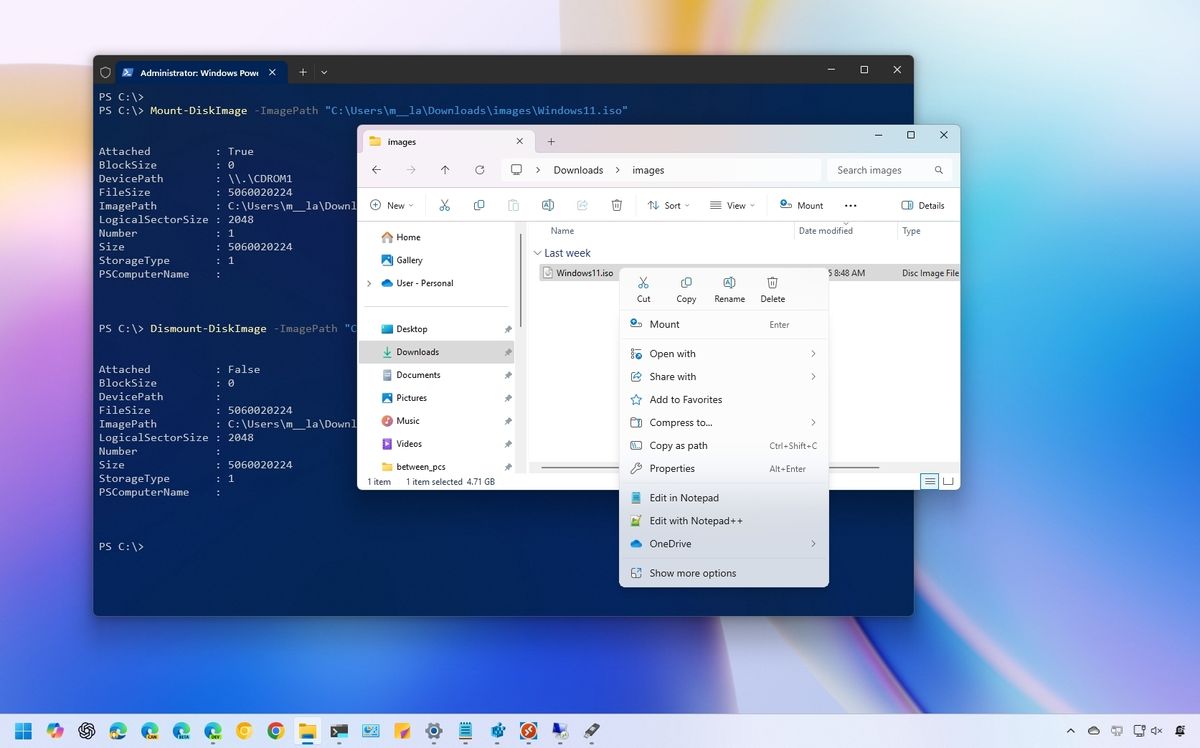
Steps to Mount an ISO in Windows 10 and 11:
- Locate the ISO file: Find the ISO file you want to install or use.
- Double-click the ISO file: In most cases, simply double-clicking the ISO file will automatically mount it.
- Alternatively, right-click and select “Mount”: If double-clicking doesn’t work, right-click on the ISO file. In the context menu, you should see an option like “Mount” or “Open with” and then select “Windows Explorer.”
- Access the virtual drive: Once mounted, a new drive letter will appear in File Explorer, usually under “This PC.” This virtual drive contains all the files from the ISO. You can now open it and run setup programs or access its contents.
Using the Mounted ISO:
- For Installation: Navigate to the virtual drive, find the setup executable (often named
setup.exeorinstall.exe), and double-click it to begin the installation process, just as you would with a physical disc. - For Accessing Files: You can browse the contents of the ISO as you would any other folder. This is useful for extracting specific files or examining the disc’s structure.
Unmounting an ISO File:
When you’re finished with the ISO, it’s good practice to unmount it to free up the virtual drive letter.
- Open File Explorer.
- Navigate to “This PC.”
- Right-click on the virtual drive that corresponds to your mounted ISO.
- Select “Eject.”
Using Third-Party Software for ISO Management (Older Windows Versions or Advanced Features)
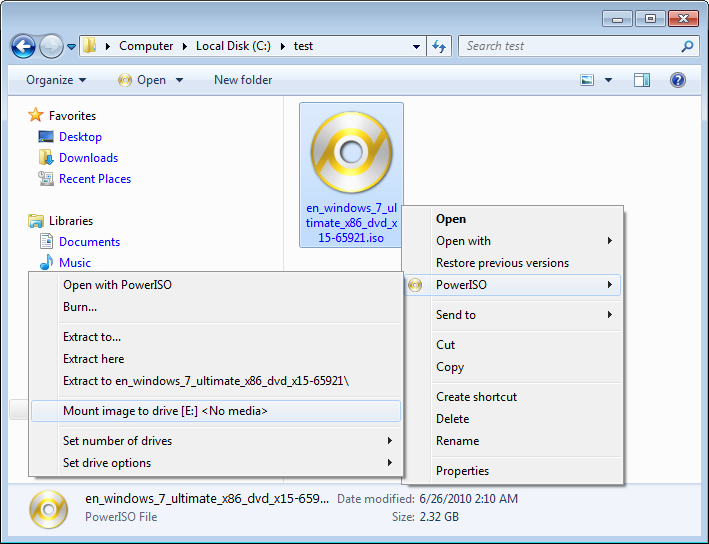
While Windows 10 and 11 have excellent built-in support, older versions of Windows (like Windows 7) might require third-party tools. Furthermore, some users prefer specialized software for more advanced ISO manipulation.
Popular Third-Party Tools:
- Daemon Tools Lite: A long-standing and popular choice, Daemon Tools Lite allows you to mount ISO images, create virtual drives, and even create ISO images from discs. It offers a free version with essential features.
- Virtual CloneDrive: Another free and reliable option, Virtual CloneDrive can mount up to eight different virtual drives simultaneously and supports a wide range of image file formats, including ISO.
- WinRAR/7-Zip: These archiving tools can also extract the contents of ISO files. While they don’t “mount” them as virtual drives, you can open the ISO file with either program and extract its contents to a folder. This is a quick way to access individual files within an ISO.
How to Use Third-Party Tools (General Steps):
- Download and install your chosen third-party software.
- Launch the application.
- Use the software’s interface to “mount” the ISO file. This typically involves browsing to your ISO file and selecting it.
- The software will create a virtual drive, which you can then access through File Explorer.
Installing and Utilizing ISO Files on macOS

macOS, being a Unix-based operating system, also has robust built-in capabilities for handling disk images, including ISO files.
Mounting an ISO File on macOS
macOS uses the .dmg format for disk images, but it can also natively mount and work with .iso files.
Steps to Mount an ISO on macOS:
- Locate the ISO file in Finder.
- Double-click the ISO file.
- The ISO file will be mounted, and its contents will appear as a mounted volume on your Desktop and in the Finder sidebar, similar to how a physical disc would.
Using the Mounted ISO:
- For Installation: Open the mounted volume. Look for a
.pkginstaller file or a.appapplication. Double-click it to start the installation process. For operating system installers (like Linux distributions), you might need to use it to create bootable media. - For Accessing Files: Browse the contents of the mounted volume to access any files within the ISO image.
Unmounting an ISO File on macOS:
- Click the Eject icon next to the mounted ISO volume in the Finder sidebar.
- Alternatively, drag the mounted volume icon from your Desktop to the Trash can (which will transform into an Eject icon).
Using Third-Party Software for ISO Management on macOS
While macOS’s built-in functionality is excellent, some users might explore third-party tools for specific needs.
- Disk Utility: This built-in macOS application can be used for more advanced disk management tasks. While primarily for
.dmgfiles, it can sometimes be used to convert or burn ISOs to physical media or other formats. - Command Line Tools: For users comfortable with the Terminal, commands like
hdiutilcan be used for mounting, unmounting, and converting disk images, including ISOs.
Creating Bootable Media from ISO Files
One of the most common and powerful uses of ISO files is to create bootable media, typically a USB drive or a DVD. This is essential for installing operating systems or running live environments.
Creating Bootable USB Drives
USB drives have largely replaced DVDs for bootable media due to their speed, reusability, and prevalence.
On Windows:
-
Rufus: This is a highly recommended, free, and open-source utility that makes creating bootable USB drives from ISO files incredibly easy.
- Download Rufus from its official website.
- Plug in your USB drive (ensure it has sufficient storage space and that you’ve backed up any important data on it, as the process will erase its contents).
- Launch Rufus.
- Under “Device,” select your USB drive.
- Under “Boot selection,” click “SELECT” and choose your ISO file.
- Rufus will usually detect the correct Partition scheme and Target system.
- Click “START.” Rufus will warn you that all data on the USB drive will be destroyed. Confirm to proceed.
- Wait for the process to complete.
-
Media Creation Tool (for Windows ISOs): If you’re installing or reinstalling Windows, Microsoft provides its own Media Creation Tool, which can download the latest Windows ISO and directly create a bootable USB drive or DVD.
On macOS:
-
DiskMaker X: A user-friendly, free application designed to create bootable macOS installers from macOS installer application files. While not directly for generic ISOs, it’s the go-to for macOS installations.
-
Etcher (BalenaEtcher): A cross-platform, free, and open-source tool that is excellent for flashing OS images (including ISOs) to SD cards and USB drives.
- Download and install Etcher.
- Launch Etcher.
- Click “Flash from file” and select your ISO.
- Click “Select target” and choose your USB drive.
- Click “Flash!” Etcher will handle the rest, including validation.
-
Command Line (Terminal): For advanced users, the
ddcommand in Terminal can be used to write ISO images to USB drives, but it requires extreme caution to avoid overwriting the wrong disk.
Creating Bootable DVDs
While less common now, creating bootable DVDs is still an option if your computer has a DVD burner and no USB ports, or if the software specifically requires a DVD.
On Windows:
- Mount the ISO file as described earlier.
- Open File Explorer and navigate to the mounted virtual drive.
- Copy all the files and folders from the virtual drive.
- Open a burning application (like Windows’ built-in Disc Image Burner, Nero, or ImgBurn).
- Select the option to burn an image or copy files to a disc.
- If using Disc Image Burner: Right-click the ISO file and select “Burn disc image.”
- If copying files: Paste the copied files onto the blank DVD. The burning application will guide you through the process of finalizing the disc.
On macOS:
- Open the “Burn Disc Image” application (usually found by right-clicking the ISO file and selecting “Burn Disc Image [ISO File Name] to Disc”).
- Insert a blank DVD into your Mac’s optical drive.
- Follow the on-screen prompts to burn the ISO image to the DVD.
Conclusion: Mastering ISO Files for Seamless Digital Operations
Understanding how to install and utilize ISO files is a valuable skill that empowers you to manage software, install operating systems, and create essential bootable media with confidence. Whether you’re a seasoned tech enthusiast or just starting your digital journey, the methods outlined in this guide provide a clear roadmap.
From the simple act of mounting an ISO in modern Windows and macOS to the more advanced process of creating bootable USB drives with tools like Rufus and Etcher, you now possess the knowledge to tackle any ISO-related task. Remember that the key lies in understanding the file’s nature as a digital disc image and then leveraging the appropriate tools and operating system features to interact with it effectively. By mastering these techniques, you’ll streamline your software installations, enhance your system management capabilities, and be better prepared for a wide range of technical scenarios.
aViewFromTheCave is a participant in the Amazon Services LLC Associates Program, an affiliate advertising program designed to provide a means for sites to earn advertising fees by advertising and linking to Amazon.com. Amazon, the Amazon logo, AmazonSupply, and the AmazonSupply logo are trademarks of Amazon.com, Inc. or its affiliates. As an Amazon Associate we earn affiliate commissions from qualifying purchases.