In the ever-evolving landscape of technology, understanding fundamental digital processes is key to unlocking the full potential of your devices. One such foundational skill, especially relevant for system administrators, tech enthusiasts, and even casual users looking to upgrade or repair their systems, is learning how to install an ISO file. Often perceived as a complex task, installing an ISO is a straightforward process once you grasp the underlying concepts and the various methods available. This guide aims to demystify ISO files and provide a detailed, step-by-step walkthrough for their installation across different operating systems and scenarios, ensuring you’re well-equipped to handle software deployments, system reinstalls, and much more.
Understanding ISO Files and Their Importance
Before diving into the “how-to,” it’s crucial to understand “what” an ISO file is and “why” it holds such importance in the digital realm. This foundational knowledge will not only make the installation process clearer but also help you appreciate the versatility and utility of these specialized file formats.
What Exactly is an ISO File?
At its core, an ISO file, also known as an ISO image, is a single file that contains an exact, sector-by-sector copy of an entire CD, DVD, or Blu-ray disc. Think of it as a digital snapshot or a perfect archive of an optical disc. The “ISO” in its name comes from the ISO 9660 file system, which is commonly used for optical media. This means that when you open an ISO file, you’re essentially looking at all the data, including the file system structure, that was present on the original disc.
ISO files are incredibly convenient because they consolidate hundreds or even thousands of individual files into a single, manageable package. This makes them ideal for distributing large software suites, entire operating systems, complex game installations, and bootable utilities. Instead of downloading numerous files and folders, you simply download one ISO file that contains everything you need, perfectly organized as if it were a physical disc.
Why Would You Need to Install an ISO?
The applications of ISO files are diverse and touch upon several critical aspects of technology use and management. Understanding these scenarios will highlight why knowing how to work with ISOs is such a valuable skill.
Firstly, and perhaps most commonly, ISO files are the standard for operating system installation. Whether you’re setting up a new computer, reinstalling Windows, macOS, or a Linux distribution, or even experimenting with virtual machines, you’ll almost certainly use an ISO image. These bootable ISOs contain all the necessary files to start a computer and install the OS onto its hard drive.
Secondly, ISOs are frequently used for software deployment and distribution, especially for large applications or suites that might have historically come on multiple discs. Gaming communities also rely heavily on ISOs for distributing older titles or specific versions that might not be available digitally in other formats. For instance, if you’re trying to install a legacy game on a modern system, an ISO might be your best bet.
Thirdly, system recovery and maintenance tools are often distributed as ISO images. These bootable utility discs can help you troubleshoot issues, repair corrupted operating systems, recover lost data, or even securely wipe a hard drive. Having a recovery ISO on hand can be a lifesaver in emergency situations.
Finally, for virtualization environments like VMware, VirtualBox, or Hyper-V, ISO files are indispensable. Instead of needing a physical disc drive for each virtual machine, you can simply “mount” an ISO image directly to a virtual DVD drive, allowing the virtual machine to boot and install an operating system as if a physical disc were inserted. This significantly streamlines the process of creating and managing virtualized systems.
Preparing for ISO Installation
Before you begin the actual process of installing or using an ISO file, a few preparatory steps are essential. These steps ensure a smooth installation, prevent potential data loss, and equip you with the right tools for the job. Neglecting these preparations can lead to frustration or, in worst-case scenarios, system instability.
Essential Tools and Software
Depending on how you intend to use your ISO file – whether mounting it as a virtual drive, creating a bootable USB, or burning it to a physical disc – you’ll need specific tools. Fortunately, many operating systems come with built-in functionalities, while reliable third-party tools are readily available for more advanced needs.
-
For Mounting ISOs (Virtual Drive):
- Windows 8/10/11: Has a native “Mount” feature.
- macOS: Has a native “Disk Image Mounter” (double-click the ISO).
- Linux: Often has native support (e.g.,
mount -o loopcommand or graphical utility). - Third-party (older OS versions or advanced features): Daemon Tools Lite, Virtual CloneDrive.
-
For Creating Bootable USB Drives:
- Rufus (Windows): A highly popular, free, and open-source utility specifically designed for creating bootable USB drives from ISOs. It’s fast, reliable, and offers various options for different boot modes (UEFI, Legacy BIOS).
- Etcher (Windows, macOS, Linux): Also known as BalenaEtcher, this is another excellent, user-friendly tool for creating bootable USB drives. Its simple interface makes it accessible for beginners, and it’s cross-platform.
- UNetbootin (Windows, macOS, Linux): A slightly older but still functional tool, good for various Linux distributions.
- Disk Utility (macOS): Can be used, though it requires a bit more command-line interaction for some ISOs.
ddcommand (Linux/macOS): A powerful command-line utility for advanced users. Offers precise control but carries a higher risk of data loss if used incorrectly.
-
For Burning ISOs to CD/DVD:
- Windows 7/8/10/11: Native “Burn disc image” feature (right-click ISO).
- macOS: Native support via Disk Utility.
- Linux: K3b (KDE), Brasero (GNOME), or command-line tools like
wodim. - Third-party: ImgBurn (Windows, very popular and feature-rich).
Ensure you download these tools from their official websites to avoid malware and ensure compatibility.
Pre-Installation Checklist
A little preparation goes a long way in preventing headaches during and after the ISO installation process. Take a moment to go through this checklist before proceeding.
- Backup Important Data: If you’re performing an operating system installation, especially a clean install, it will erase everything on the target drive. Always back up your personal files, documents, photos, and any other crucial data to an external hard drive, cloud storage, or another safe location before you begin. This is paramount and cannot be stressed enough.
- Verify System Requirements: Check the minimum system requirements for the operating system or software you intend to install from the ISO. Ensure your computer meets or exceeds these specifications (processor speed, RAM, storage space).
- Ensure Stable Power Source: If you’re installing an OS on a laptop, ensure it’s plugged into a power outlet. For desktops, a reliable power supply is equally important. An unexpected power loss during installation can lead to a corrupted system and a lengthy recovery process.
- Internet Connection (Optional but Recommended): While many OS installations can proceed offline, having an internet connection available (especially during post-installation) can speed up driver downloads, system updates, and initial software installations.
- Product Keys/Licenses: If the software or operating system requires a product key or license, make sure you have it readily accessible. You’ll usually be prompted for it during the installation process.
- Sufficient Storage Space: Ensure the target drive or USB drive has enough free space for the ISO content. For bootable USBs, a minimum of 8GB is often recommended, though 16GB provides more flexibility.
Common Methods for Installing/Using ISO Files
With your preparations complete, you’re ready to explore the various methods for working with ISO files. Each method serves a different purpose, from simply accessing the contents of an ISO to performing a full operating system installation.
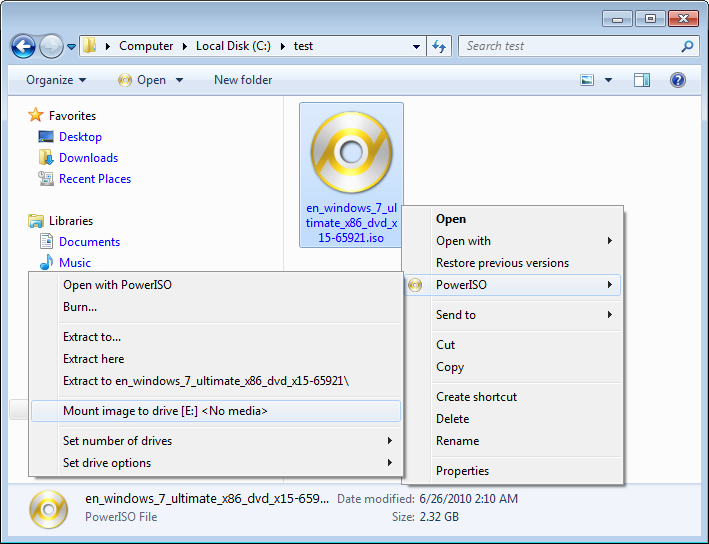
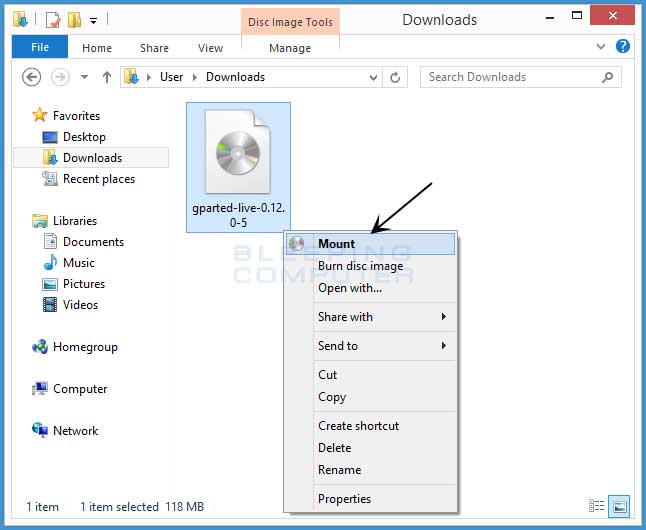
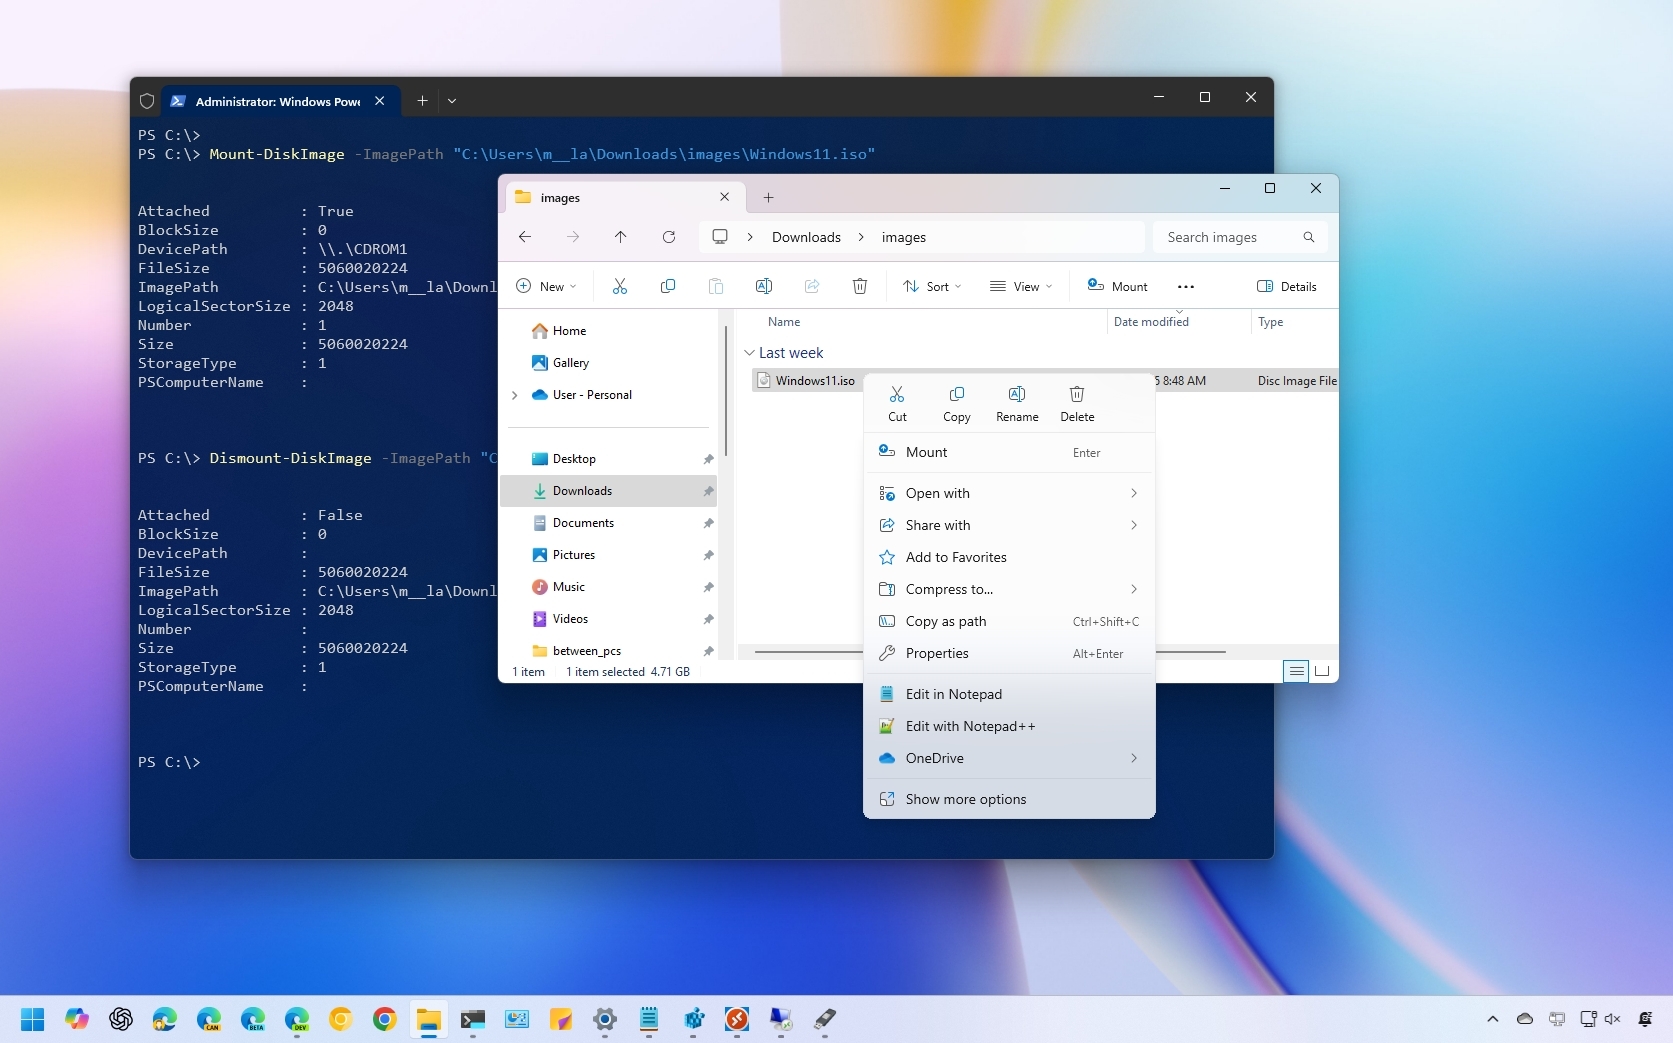
Method 1: Mounting an ISO as a Virtual Drive
This method is ideal when you need to access the contents of an ISO file without burning it to a physical disc or creating a bootable USB. Mounting an ISO creates a virtual disc drive on your computer, making the ISO file appear and behave exactly like a physical CD/DVD inserted into a drive. This is perfect for installing software, accessing documentation, or running applications directly from the image.
On Windows (Windows 8, 10, 11):
- Locate the ISO: Navigate to the folder where your ISO file is stored.
- Right-Click: Right-click on the ISO file.
- Select “Mount”: From the context menu, choose “Mount.”
- Access Virtual Drive: A new virtual drive will appear in “This PC” (or “My Computer”) under “Devices and drives.” It will typically be assigned the next available drive letter. You can now open this drive and browse its contents as if it were a physical disc.
- Unmount (Eject): To unmount the ISO, right-click on the virtual drive in “This PC” and select “Eject.”
For older Windows versions (Windows 7/Vista/XP) that lack native mounting capabilities, you’ll need a third-party tool like Daemon Tools Lite or Virtual CloneDrive.
On macOS:
- Locate the ISO: Find your ISO file in Finder.
- Double-Click: Simply double-click the ISO file.
- Access Virtual Drive: macOS will automatically mount the ISO image, and a new drive icon will appear on your desktop and in Finder’s sidebar, usually labeled with the name of the ISO. You can then open this drive to access its contents.
- Unmount (Eject): Drag the drive icon to the Trash, or right-click the icon in Finder’s sidebar and select “Eject [ISO Name].”
On Linux:
Linux distributions generally offer robust command-line and often graphical tools for mounting ISOs.
- Create a Mount Point: Open a terminal and create a directory where you want to mount the ISO.
sudo mkdir /mnt/iso - Mount the ISO: Use the
mountcommand with theloopoption.
sudo mount -o loop /path/to/your/image.iso /mnt/iso
(Replace/path/to/your/image.isowith the actual path to your ISO file). - Access Contents: You can now access the ISO’s contents in the
/mnt/isodirectory. - Unmount: When finished, unmount the ISO using:
sudo umount /mnt/iso
Many desktop environments (like GNOME or KDE) also allow you to right-click an ISO and choose a “Mount” or “Open with Disk Image Mounter” option for a graphical approach.
Method 2: Creating a Bootable USB Drive
This is the most common and recommended method for installing operating systems or running bootable utilities. Modern computers often lack optical drives, making bootable USBs the de facto standard.
Using Rufus (Windows):
Rufus is highly regarded for its efficiency and customization options.
- Download Rufus: Go to the official Rufus website and download the latest executable.
- Plug in USB Drive: Insert a USB flash drive (at least 8GB, preferably 16GB for larger OSes) into your computer. Ensure it contains no important data, as it will be completely erased.
- Launch Rufus: Run the downloaded Rufus
.exefile. It’s a portable application, so no installation is required. - Select Device: In Rufus, ensure your USB drive is selected under “Device.” (Double-check to avoid accidentally wiping the wrong drive).
- Select Boot Selection: Click the “SELECT” button next to “Boot selection” and browse to your ISO file.
- Partition Scheme and Target System: Rufus will usually auto-detect the correct “Partition scheme” (GPT or MBR) and “Target system” (UEFI or BIOS) based on your ISO. If you know your system’s boot mode, you can adjust these. For modern systems, GPT and UEFI are common.
- File System and Cluster Size: Leave these at their default settings unless you have specific reasons to change them.
- Start the Process: Click “START.” Rufus will warn you that all data on the USB drive will be destroyed. Confirm by clicking “OK.”
- Wait for Completion: Rufus will now write the ISO image to the USB drive, making it bootable. This can take several minutes depending on the ISO size and USB speed.
- Close Rufus: Once “READY” appears, you can close Rufus and safely eject your USB drive.
Using Etcher (Windows, macOS, Linux):
Etcher is known for its simplicity and cross-platform compatibility.
- Download Etcher: Get Etcher from the official BalenaEtcher website and install it (or run the portable version on Windows).
- Plug in USB Drive: Insert your USB flash drive (at least 8GB). Again, all data will be erased.
- Launch Etcher: Open the Etcher application.
- Select Image: Click “Flash from file” and select your ISO file.
- Select Target: Click “Select target” and choose your USB drive from the list. Be very careful here to select the correct drive!
- Flash!: Click the “Flash!” button.
- Authentication: Etcher might ask for administrator privileges (Windows/macOS) or your password (Linux) to proceed.
- Wait for Completion: Etcher will write the image and then validate it. This process can take a while.
- Eject: Once finished, Etcher will automatically unmount and prepare the USB for safe removal.
Booting from the USB Drive:
After creating your bootable USB, you’ll need to configure your computer to boot from it.
- Restart Computer: Restart your computer.
- Access Boot Menu/BIOS/UEFI: As the computer starts up, repeatedly press the designated key to enter the “Boot Menu” or “BIOS/UEFI Setup.” Common keys include
F2,F10,F12,Del, orEsc. The specific key varies by manufacturer (Dell, HP, Lenovo, ASUS, Acer, etc.). - Select USB Drive: In the Boot Menu, select your USB drive from the list of bootable devices. If you’re in BIOS/UEFI Setup, navigate to the “Boot” tab, change the boot order to prioritize USB, save changes, and exit.
- Start Installation: Your computer should now boot from the USB, and you’ll see the operating system installer or utility load. Follow the on-screen instructions to proceed with the installation.
Method 3: Burning an ISO to a CD/DVD
While less common now due to the prevalence of USB drives, burning an ISO to a physical disc is still a viable option, especially for older systems or when physical media is preferred for archival purposes.
On Windows (Windows 7, 8, 10, 11):
- Insert Blank Disc: Insert a blank writable CD-R/RW or DVD-R/RW into your computer’s optical drive.
- Locate ISO: Find your ISO file in File Explorer.
- Right-Click: Right-click on the ISO file.
- Select “Burn disc image”: Choose this option from the context menu.
- Windows Disc Image Burner: The “Windows Disc Image Burner” dialog will open.
- Select Burner: Ensure your optical drive is selected under “Disc burner.”
- Verify Disc After Burning (Optional but Recommended): Check the “Verify disc after burning” box to ensure the data was written correctly.
- Burn: Click “Burn” to start the process.
- Wait for Completion: The process can take some time, depending on the ISO size and disc speed.
- Eject: Once complete, the disc will automatically eject.
On macOS:
- Insert Blank Disc: Put a blank writable CD/DVD into your optical drive.
- Locate ISO: Find your ISO file in Finder.
- Right-Click (or Control-Click): Control-click on the ISO file.
- Select “Burn Disc Image “[ISO Name]” to Disc…”: Choose this option.
- Burn Disc Dialog: A dialog box will appear.
- Select Burner and Speed: Select your optical drive and choose a burning speed (lower speeds are sometimes more reliable).
- Verify Burned Data (Optional): Check the “Verify burned data” box.
- Burn: Click “Burn” to start.
- Wait and Eject: Wait for the process to complete, then eject the disc.
On Linux:
- Graphical Tools (e.g., Brasero, K3b):
- Open your preferred burning software.
- Select the option to “Burn Image” or “Burn CD/DVD from ISO.”
- Browse and select your ISO file.
- Choose your burner drive and adjust any settings (like burning speed, verification).
- Click “Burn.”
- Command Line (
wodimorgrowisofs): For advanced users.
sudo wodim dev=/dev/sr0 -v -data your_image.iso(Replace/dev/sr0with your optical drive device).
Post-Installation and Best Practices
Once your ISO is installed, whether it’s an operating system or software, there are a few final steps and considerations to ensure everything runs smoothly and securely.
Verifying Your Installation
After a successful operating system installation, take some time to verify that everything is working as expected:
- Check Device Drivers: Ensure all your hardware components (graphics card, network adapter, sound card, etc.) have the correct drivers installed. Most modern OSes will install generic drivers, but manufacturer-specific drivers often offer better performance and features.
- Run Updates: Immediately connect to the internet and run all available system updates. This patches security vulnerabilities and provides the latest software improvements.
- Install Essential Software: Begin installing your essential applications, such as a web browser, office suite, antivirus software, and any productivity tools you rely on.
- Restore Data: If you backed up your data, now is the time to restore it to your new installation.
Troubleshooting Common Issues
While the process is generally straightforward, you might encounter some common hurdles:
- Bootable USB Not Detected:
- Ensure the USB drive is properly formatted and the ISO was written correctly. Try recreating it with a different tool (e.g., Rufus if Etcher failed, or vice versa).
- Check your BIOS/UEFI settings for “Secure Boot” (disable it temporarily if it’s preventing the USB from booting) or “Legacy Boot” options.
- Try a different USB port (especially a USB 2.0 port if you’re having issues with USB 3.0 ports on older systems).
- Installation Errors:
- Re-download the ISO file. It might have been corrupted during download. Verify its checksum if available.
- Check your target drive for errors (e.g., using Diskpart in Windows setup or GParted in Linux live environments).
- Ensure your system meets the minimum requirements.
- Slow Installation:
- Use a faster USB drive (USB 3.0 or higher).
- Ensure your computer’s hardware isn’t overheating.
Security Considerations When Using ISOs
Security should always be a top priority when dealing with software, and ISOs are no exception:
- Source Validation: Always download ISO files from official and trusted sources (e.g., Microsoft’s official website, Ubuntu’s official website, a reputable software vendor). Avoid downloading ISOs from unknown third-party sites, as they could be tampered with to include malware or unwanted software.
- Checksum Verification: Many official ISO downloads provide a checksum (like MD5, SHA1, or SHA256). After downloading an ISO, use a checksum utility to verify that the calculated checksum of your downloaded file matches the one provided by the source. This ensures the file hasn’t been corrupted during download and hasn’t been maliciously altered.
- Antivirus Scan: While less effective for bootable ISOs, you can still perform an antivirus scan on the downloaded ISO file before writing it to a USB or disc, especially if you have any doubts about its source.
Conclusion: Harnessing the Power of ISOs
Mastering the art of installing and working with ISO files is a valuable skill in the digital age. From seamlessly deploying operating systems and software to creating essential recovery tools, ISO images serve as the backbone for many critical tech operations. By understanding what an ISO is, preparing adequately, and following the detailed steps for mounting, creating bootable USBs, or burning to discs, you gain a significant level of control over your computing environment.
Whether you’re a seasoned IT professional managing multiple systems, a tech-savvy individual upgrading your home PC, or simply someone looking to explore new operating systems in a virtual machine, the methods outlined in this guide provide you with the knowledge and confidence to handle ISO files effectively. Always prioritize official sources and security best practices, and you’ll find that installing an ISO is not just a task, but a gateway to a more efficient and powerful computing experience.
aViewFromTheCave is a participant in the Amazon Services LLC Associates Program, an affiliate advertising program designed to provide a means for sites to earn advertising fees by advertising and linking to Amazon.com. Amazon, the Amazon logo, AmazonSupply, and the AmazonSupply logo are trademarks of Amazon.com, Inc. or its affiliates. As an Amazon Associate we earn affiliate commissions from qualifying purchases.