The visual appeal of your Mac can be significantly enhanced by the fonts you choose. Whether you’re a designer crafting a stunning presentation, a writer personalizing your documents, or a tech enthusiast customizing your digital workspace, having the right fonts at your disposal is crucial. While macOS comes equipped with a robust library of system fonts, the true power lies in your ability to expand this collection. This guide will walk you through the straightforward process of installing new fonts on your Mac, transforming your creative and professional output. We’ll cover everything from finding and downloading fonts to managing them efficiently, ensuring a seamless integration into your workflow.
Understanding Font Management on macOS
Before we dive into the installation process, it’s helpful to understand how macOS handles fonts. The operating system utilizes a dedicated application called Font Book, which serves as your central hub for all font-related activities. Font Book allows you to preview, organize, activate, deactivate, and, of course, install fonts. Familiarizing yourself with this tool is the first step to becoming a font-savvy Mac user.
The Role of Font Book
Font Book is more than just an installer; it’s a powerful font manager. When you install a font, it’s not simply copied to a hidden folder. Instead, Font Book registers the font, making it accessible to all applications on your Mac that utilize system fonts. This includes popular software like Microsoft Word, Pages, Photoshop, and even your web browser.
When you open Font Book, you’ll see a list of all the fonts currently installed on your system. You can browse them, see them in action, and even create collections to group fonts for specific projects. This organizational capability is particularly useful if you work with a large number of fonts.
Locating and Downloading Fonts for Your Mac
The vast universe of fonts is accessible through numerous online sources. Understanding where to find high-quality, legally usable fonts is paramount. Whether you’re looking for free options or premium designer fonts, there are excellent resources available.
Free Font Resources
For those on a budget or seeking a quick font solution, several websites offer a wide array of free fonts. It’s crucial to pay attention to the licensing agreements associated with these fonts, as some may be for personal use only, while others allow for commercial use.
- Google Fonts: A fantastic resource offering a vast library of open-source fonts that can be downloaded and used for free, both personally and commercially. Their website is well-organized, allowing you to preview fonts with your own text.
- DaFont: A popular site with a massive collection of free fonts, often categorized by style. While many are free for personal use, always check the individual license.
- Font Squirrel: Another excellent source for free, commercially licensed fonts. They curate high-quality fonts and often provide web font kits for designers.
Premium Font Marketplaces
If you’re a professional designer or require unique, high-quality fonts for branding and commercial projects, investing in premium fonts is often worthwhile. These fonts typically come with more robust licensing and offer superior design and technical quality.
- Adobe Fonts: Included with most Adobe Creative Cloud subscriptions, Adobe Fonts provides access to a curated library of high-quality typefaces that can be easily activated and used across your Adobe applications and other desktop software.
- MyFonts: One of the largest marketplaces for commercial fonts, offering a vast selection from independent foundries and established designers.
- Fontspring: Similar to MyFonts, Fontspring offers a wide range of premium fonts with flexible licensing options.
When downloading fonts, you’ll typically encounter them in one of two file formats: TrueType (.ttf) or OpenType (.otf). Both are widely supported by macOS and are excellent choices. OpenType fonts are generally considered more advanced, offering greater character support and advanced typographic features.
Installing Fonts on Your Mac: Step-by-Step
Once you’ve found and downloaded your desired fonts, the installation process on macOS is remarkably simple. There are a couple of primary methods, each catering to different user preferences.
Method 1: Double-Click Installation
This is the most common and intuitive method for installing fonts.
- Locate the Font File: Navigate to the folder where you downloaded your font file(s). This is usually your “Downloads” folder.
- Open the Font File: Double-click on the font file. If it’s a compressed file (like a .zip), you’ll need to extract it first by double-clicking the .zip file.
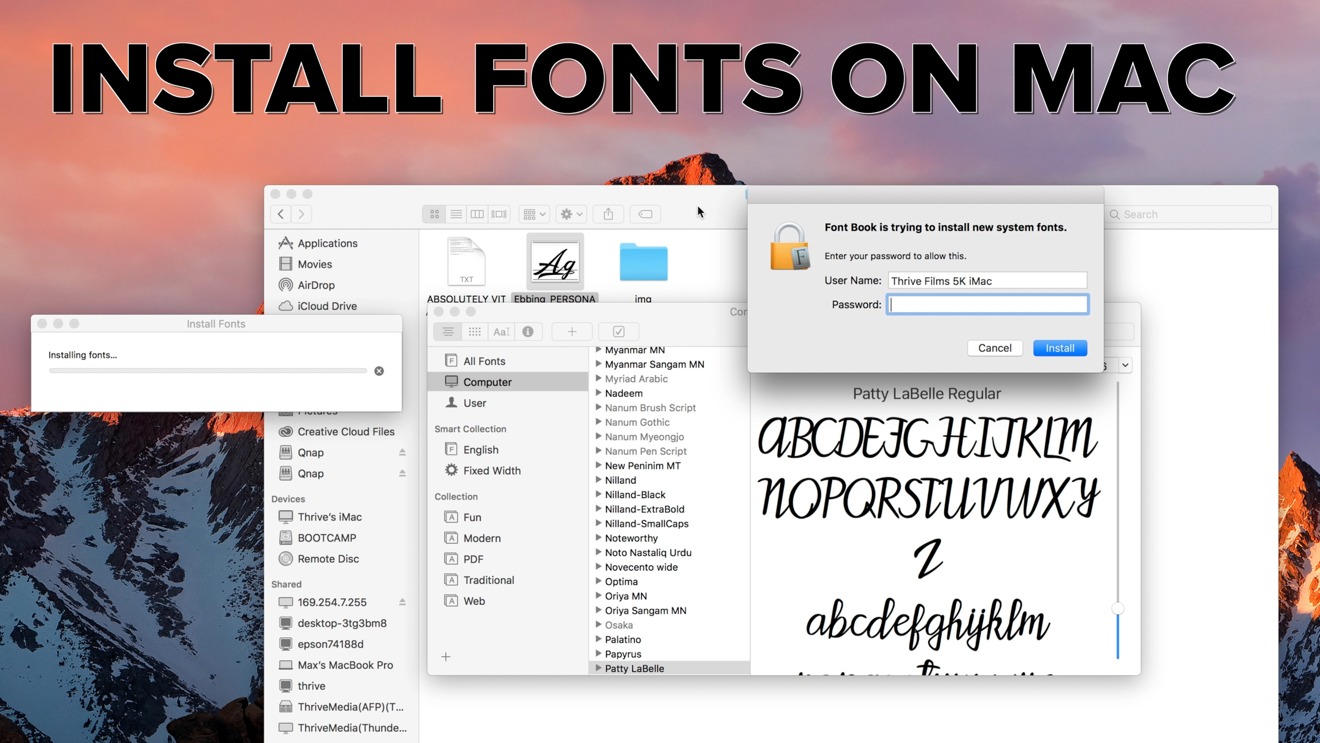
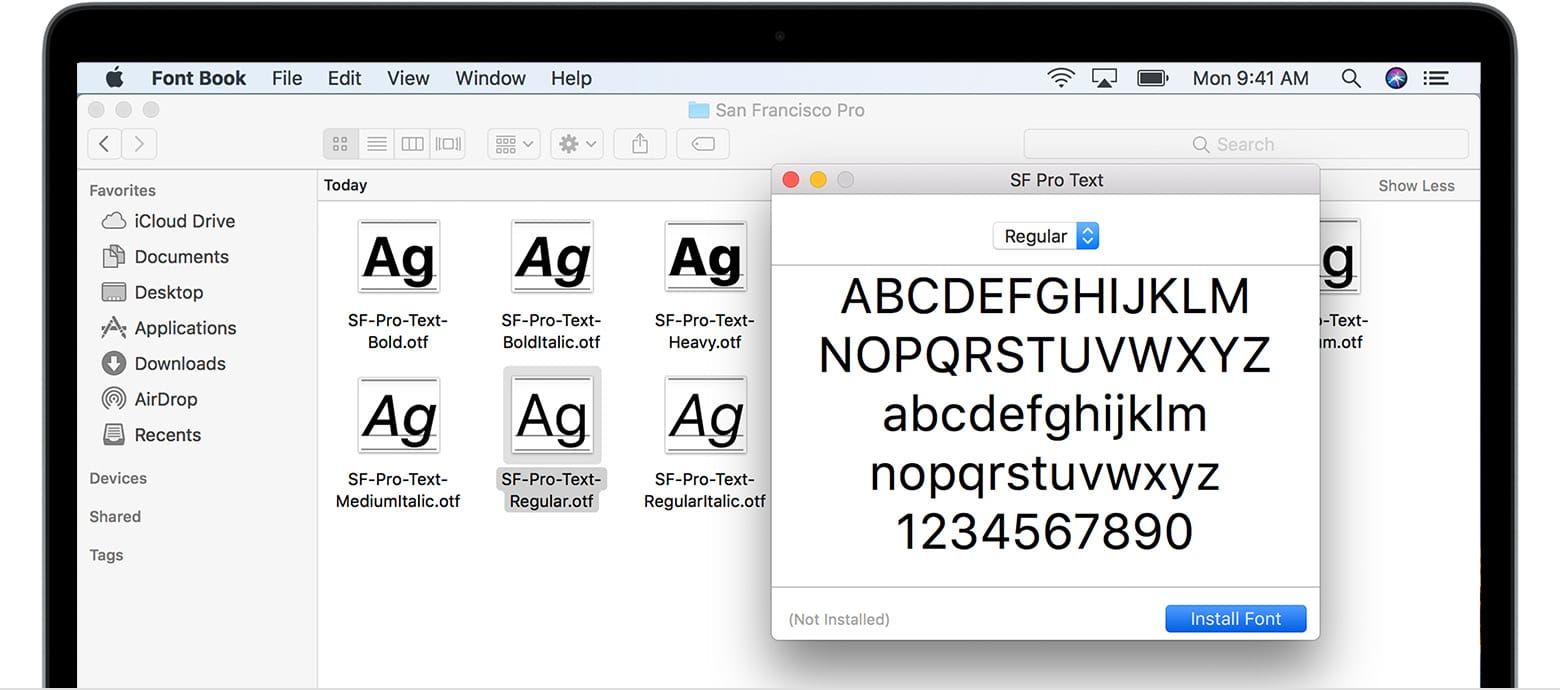
- Font Book Preview: Upon double-clicking, macOS will automatically open Font Book and display a preview of the font.
- Install the Font: In the Font Book window, you’ll see a button labeled “Install Font” (or a similar phrasing like “Install”). Click this button.
Font Book will then validate the font and install it into your system’s font library. You’ll see it appear in the list of available fonts within Font Book.
Method 2: Drag and Drop into Font Book
If you have multiple fonts to install or prefer a more direct approach, you can drag and drop them into Font Book.
- Open Font Book: Launch the Font Book application. You can find it in your “Applications” folder or by searching using Spotlight (Command + Spacebar and typing “Font Book”).
- Locate Your Font Files: Open a Finder window and navigate to where your downloaded font files are stored.
- Drag and Drop: Select the font file(s) you wish to install and drag them directly into the Font Book window. You can drop them onto the list of fonts, or onto a specific collection if you have organized them.
Font Book will then process and install the dropped font files.
Installing Fonts for a Single User vs. All Users
When you install a font using either of the methods above, by default, it’s usually installed for the current user only. This means that only your user account on the Mac will have access to the new font.
If you want the font to be available to all user accounts on your Mac (for example, if you have multiple users or if you’re setting up a shared computer), you can specify this during the installation process.
- Font Book Preferences: Open Font Book, then go to Font Book > Preferences (or Settings). Under the “Default Install Location” or a similar option, you can choose between “User” (for the current user) and “Computer” (for all users).
- Installation Prompt: Alternatively, when you double-click a font file to open it in Font Book, before clicking “Install Font,” you might see an option or preference to choose the installation scope.
Choosing to install for “Computer” will require administrator privileges.
Managing Your Font Library with Font Book
Once your fonts are installed, Font Book becomes indispensable for managing your growing collection. Effective management ensures that your creative process remains efficient and that your system doesn’t become bogged down by unnecessary fonts.
Previewing and Validating Fonts
Before installing, or even after installation, you can use Font Book to preview any font. Select a font from the list, and its characters will be displayed. This is invaluable for checking if the font renders correctly and has the characters you need.
Font Book also performs a “validation” process when you install a font. This checks for potential issues or conflicts within the font file itself. If Font Book finds any problems, it will warn you and offer to resolve them, preventing potential system instability or application crashes.
Organizing Fonts with Collections
For users with extensive font libraries, creating collections is a game-changer. Collections are essentially custom folders within Font Book that allow you to group fonts by project, style, or any other criteria you choose.
To create a collection:
- In Font Book, go to File > New Collection.
- Give your collection a descriptive name (e.g., “Wedding Invitations,” “Tech Blog Headers,” “Serif Fonts”).
- Drag and drop fonts from your main font list into your newly created collection.
This makes it incredibly easy to access the specific fonts you need for a particular task without having to scroll through hundreds of installed fonts.
Activating and Deactivating Fonts
Not all installed fonts need to be active at all times. In fact, having too many active fonts can slow down your Mac. Font Book allows you to “deactivate” fonts. Deactivated fonts remain installed but are temporarily hidden from applications. This is a fantastic way to keep your font menu clean and improve application performance.
To deactivate a font:
- Select the font(s) in Font Book.
- Go to Edit > Deactivate [Font Name] (or the number of selected fonts).
To reactivate them, simply select the deactivated font and choose Edit > Activate [Font Name].
Troubleshooting Common Font Installation Issues
While font installation on macOS is generally smooth, occasional hiccups can occur. Here are some common issues and their solutions:
Font Fails to Install or Shows Errors
- Corrupted Font File: The downloaded font file might be corrupted. Try downloading it again from the source.
- Invalid Font Format: Ensure the font is in a compatible format (.ttf or .otf). Older formats might not be supported.
- Font Book Permissions: Though rare, permission issues could prevent installation. Try restarting your Mac and attempting the installation again.
- Duplicate Fonts: If you already have a version of the font installed, Font Book might flag it as a duplicate. You can choose to resolve this by replacing the existing font or keeping both if they are different versions.
Font Not Appearing in Applications After Installation
- Application Restart: Some applications cache their font lists. If a font doesn’t appear immediately, try quitting and reopening the application.
- System Restart: For a more comprehensive refresh, a full Mac restart can sometimes resolve font visibility issues.
- Correct Installation Location: Ensure the font was installed correctly. If you intended it for all users but installed it only for your user, it won’t appear for other accounts.
- Font Validation Issues: If Font Book reported validation errors that were not fully resolved, the font might not be usable.
System Slowdown or Application Crashes
- Too Many Active Fonts: As mentioned, deactivating less frequently used fonts can significantly improve performance.
- Damaged Font Files: A single corrupted font can sometimes cause cascading issues. Use Font Book’s validation tool to check all your fonts. You can select all fonts and then go to File > Validate Fonts.
- Conflicting Fonts: In rare cases, two fonts might have similar internal naming conventions, leading to conflicts. Font Book usually helps identify these.
By understanding the role of Font Book and following these straightforward steps, you can confidently expand your font library, personalize your Mac’s appearance, and elevate your creative projects to new heights. Experiment with different fonts, organize them effectively, and enjoy the visual richness they bring to your digital life.
aViewFromTheCave is a participant in the Amazon Services LLC Associates Program, an affiliate advertising program designed to provide a means for sites to earn advertising fees by advertising and linking to Amazon.com. Amazon, the Amazon logo, AmazonSupply, and the AmazonSupply logo are trademarks of Amazon.com, Inc. or its affiliates. As an Amazon Associate we earn affiliate commissions from qualifying purchases.